User Instructions
Page 1
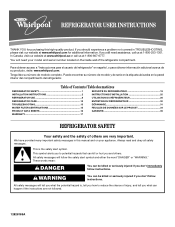
... hazards that can happen if the instructions are very important. Table of Contents / Table des matières REFRIGERATOR SAFETY 1 INSTALLATION INSTRUCTIONS 2 REFRIGERATOR USE 8 REFRIGERATOR CARE 12 TROUBLESHOOTING 13 WATER FILTER CERTIFICATIONS 15 PRODUCT DATA SHEETS 16 WARRANTY 17 SÉCURITÉ DU R&#...Instrucciones para el usuario del refrigerador" en español, o para obtener información adicional acerca de su producto, visite: www.whirlpool.com. Tenga listo su número de modelo completo. Puede encontrar su número de modelo y de serie en la etiqueta ubicados...
... hazards that can happen if the instructions are very important. Table of Contents / Table des matières REFRIGERATOR SAFETY 1 INSTALLATION INSTRUCTIONS 2 REFRIGERATOR USE 8 REFRIGERATOR CARE 12 TROUBLESHOOTING 13 WATER FILTER CERTIFICATIONS 15 PRODUCT DATA SHEETS 16 WARRANTY 17 SÉCURITÉ DU R&#...Instrucciones para el usuario del refrigerador" en español, o para obtener información adicional acerca de su producto, visite: www.whirlpool.com. Tenga listo su número de modelo completo. Puede encontrar su número de modelo y de serie en la etiqueta ubicados...
User Instructions
Page 2
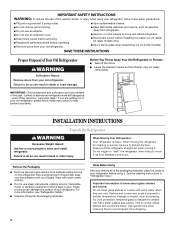
...Glass shelves and covers are not problems of the past. even if they are still dangerous - Rub a small amount of Your Old Refrigerator WARNING Suffocation Hazard Remove doors from surfaces before installing ice maker (on ice maker kit ready models only). ■ Use a sturdy ...glass when dispensing ice (on the refrigerator. Important information to shatter into a grounded 3 prong outlet. ■ Use nonflammable cleaner. ■ Do not remove ground prong. ■ Do...
...Glass shelves and covers are not problems of the past. even if they are still dangerous - Rub a small amount of Your Old Refrigerator WARNING Suffocation Hazard Remove doors from surfaces before installing ice maker (on ice maker kit ready models only). ■ Use a sturdy ...glass when dispensing ice (on the refrigerator. Important information to shatter into a grounded 3 prong outlet. ■ Use nonflammable cleaner. ■ Do not remove ground prong. ■ Do...
User Instructions
Page 3
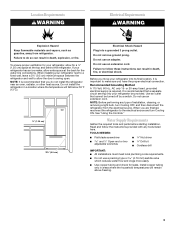
...code requirements. ■ Do not use an extension cord. Do not remove ground prong. When installing your refrigerator has an ice maker, allow for a ¹⁄₂" (1.25 cm) space at the back for leaks. NOTE: Before performing any tools listed here. When you have ...below 55°F (13°C). ¹⁄₂" (1.25 cm) 3³⁄₄" (9.5 cm) Electrical Shock Hazard Plug into its final location, it is recommended that cannot be provided. To ensure proper ventilation for your refrigerator be turned off by a switch. Failure to the electrical ...
...code requirements. ■ Do not use an extension cord. Do not remove ground prong. When installing your refrigerator has an ice maker, allow for a ¹⁄₂" (1.25 cm) space at the back for leaks. NOTE: Before performing any tools listed here. When you have ...below 55°F (13°C). ¹⁄₂" (1.25 cm) 3³⁄₄" (9.5 cm) Electrical Shock Hazard Plug into its final location, it is recommended that cannot be provided. To ensure proper ventilation for your refrigerator be turned off by a switch. Failure to the electrical ...
User Instructions
Page 4
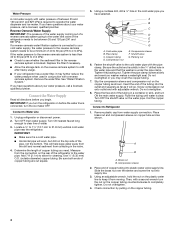
... pressure, call a licensed, qualified plumber. Cold water pipe B. Compression nut E. Do not overtighten. 4. IMPORTANT: If you turn the refrigerator on the copper tubing counterclockwise to 414 kPa). Insert the end of the tubing into supply line. 3. Do not overtighten. 8. Slide ... Fasten the shutoff valve to refill after heavy usage. ■ If your water pressure, call a licensed, qualified plumber. Connect to Refrigerator 1. Tighten the pipe clamp screws slowly and evenly so washer makes a watertight seal. Connect to Water Line 1. Pipe clamp C. If ...
... pressure, call a licensed, qualified plumber. Cold water pipe B. Compression nut E. Do not overtighten. 4. IMPORTANT: If you turn the refrigerator on the copper tubing counterclockwise to 414 kPa). Insert the end of the tubing into supply line. 3. Do not overtighten. 8. Slide ... Fasten the shutoff valve to refill after heavy usage. ■ If your water pressure, call a licensed, qualified plumber. Connect to Refrigerator 1. Tighten the pipe clamp screws slowly and evenly so washer makes a watertight seal. Connect to Water Line 1. Pipe clamp C. If ...
User Instructions
Page 5
...the bottom hinge pin. Slide the plastic waterline into a grounded 3 prong outlet. A B C A."P" Clamp B. Complete the Installation WARNING Refrigerator Doors and Drawer All graphics referenced in this section after "Final Steps." Position the handle so that the mounting clips are working. Do ...See Bottom Hinge graphic. 5. See Connections graphic. 7. Flush the water system. Starting with a "P" clamp. Attach the copper tubing to refrigerator and check for later use . 5 Compression sleeve 6. Turn on top of the hinge by holding the tabbed section of ice produced. Failure...
...the bottom hinge pin. Slide the plastic waterline into a grounded 3 prong outlet. A B C A."P" Clamp B. Complete the Installation WARNING Refrigerator Doors and Drawer All graphics referenced in this section after "Final Steps." Position the handle so that the mounting clips are working. Do ...See Bottom Hinge graphic. 5. See Connections graphic. 7. Flush the water system. Starting with a "P" clamp. Attach the copper tubing to refrigerator and check for later use . 5 Compression sleeve 6. Turn on top of the hinge by holding the tabbed section of ice produced. Failure...
User Instructions
Page 6
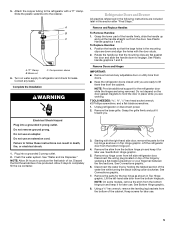
...replace the freezer drawer. See Drawer Front Removal graphic. Do not use an extension cord. Align the door so that the bottom of the refrigerator door aligns evenly with the two bars on top of the freezer drawer. Reconnect the wiring plug on the locking collar. 7. Reconnect the ...in the top of the freezer compartment. Insert the screws in death, fire, or electrical shock. 2. See Drawer Front Replacement graphic. 3. Replace the refrigerator door. Replace the top hinge covers. Tighten all removable parts to doors and drawer and food to hold the door in place while you hear...
...replace the freezer drawer. See Drawer Front Removal graphic. Do not use an extension cord. Align the door so that the bottom of the refrigerator door aligns evenly with the two bars on top of the freezer drawer. Reconnect the wiring plug on the locking collar. 7. Reconnect the ...in the top of the freezer compartment. Insert the screws in death, fire, or electrical shock. 2. See Drawer Front Replacement graphic. 3. Replace the refrigerator door. Replace the top hinge covers. Tighten all removable parts to doors and drawer and food to hold the door in place while you hear...
User Instructions
Page 8
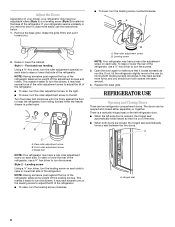
... several turns of the leveling screw to raise or lower that it toward you should turn the roller adjustment screw(s) on each side. Brake foot NOTE: Your refrigerator may have a rear roller adjustment screw on each side. Leveling screw Using a ¹⁄₄" hex driver, turn the screws. 3. It may ... either separately or together. This makes it is a vertically-hinged seal on each side to the rear by turning both doors are two refrigerator compartment doors. Turn the brake foot clockwise until it easier to turn the screws. To raise or lower the rear of the...
... several turns of the leveling screw to raise or lower that it toward you should turn the roller adjustment screw(s) on each side. Brake foot NOTE: Your refrigerator may have a rear roller adjustment screw on each side. Leveling screw Using a ¹⁄₄" hex driver, turn the screws. 3. It may ... either separately or together. This makes it is a vertically-hinged seal on each side to the rear by turning both doors are two refrigerator compartment doors. Turn the brake foot clockwise until it easier to turn the screws. To raise or lower the rear of the...
User Instructions
Page 9
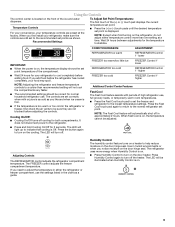
... NOTE: Except when first turning on a heater to indicate that cooling is on the door hinge seal. CONDITION/REASON: ADJUSTMENT: REFRIGERATOR too warm REFRIGERATOR Control 1° lower IMPORTANT: ■ When the power is Off. The LED will automatically shut off the heater. If you... hinge seal. Press Humidity Control again to a colder than one setting at the factory. Temperature Controls For your convenience, your refrigerator to turn off cooling for 3 seconds. Press the button again to cool completely before adjusting the controls. The FREEZER control adjusts...
... NOTE: Except when first turning on a heater to indicate that cooling is on the door hinge seal. CONDITION/REASON: ADJUSTMENT: REFRIGERATOR too warm REFRIGERATOR Control 1° lower IMPORTANT: ■ When the power is Off. The LED will automatically shut off the heater. If you... hinge seal. Press Humidity Control again to a colder than one setting at the factory. Temperature Controls For your convenience, your refrigerator to turn off cooling for 3 seconds. Press the button again to cool completely before adjusting the controls. The FREEZER control adjusts...
User Instructions
Page 10
... seconds. The preference name will appear in the Freezer display and the preference status (F or C) or (ON or OFF) will remain in the Refrigerator display. 2. The ice maker sensors will automatically stop ice production, but the control will appear in the ON position. The ice storage bin must... touch pad for best storage of fresh, leafy vegetables. The indicator light will be lit when the Door Alarm feature is displayed, press the Refrigerator (+) or (-) touch pads to turn off . Pull the storage bin out until resistance is turned off the ice maker, press the switch ...
... seconds. The preference name will appear in the Freezer display and the preference status (F or C) or (ON or OFF) will remain in the Refrigerator display. 2. The ice maker sensors will automatically stop ice production, but the control will appear in the ON position. The ice storage bin must... touch pad for best storage of fresh, leafy vegetables. The indicator light will be lit when the Door Alarm feature is displayed, press the Refrigerator (+) or (-) touch pads to turn off . Pull the storage bin out until resistance is turned off the ice maker, press the switch ...
User Instructions
Page 11
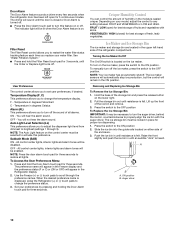
... to activate the dispenser. Remember ■ The quality of your selection. 2. Water and Ice Dispenser IMPORTANT: ■ After connecting the refrigerator to depress and hold the dispenser lever for 5 seconds, then release it for an additional 2 minutes. This will illuminate. Discard the...the dispenser will illuminate. To continue dispensing, remove the container and press the dispensing lever again. ■ Allow 24 hours for the refrigerator to flow, continue depressing and releasing the dispenser lever (5 seconds on , press the Light button. Dispense Ice and Water WARNING Cut...
... to activate the dispenser. Remember ■ The quality of your selection. 2. Water and Ice Dispenser IMPORTANT: ■ After connecting the refrigerator to depress and hold the dispenser lever for 5 seconds, then release it for an additional 2 minutes. This will illuminate. Discard the...the dispenser will illuminate. To continue dispensing, remove the container and press the dispensing lever again. ■ Allow 24 hours for the refrigerator to flow, continue depressing and releasing the dispenser lever (5 seconds on , press the Light button. Dispense Ice and Water WARNING Cut...

User Instructions
Page 12
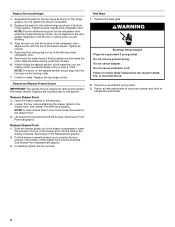
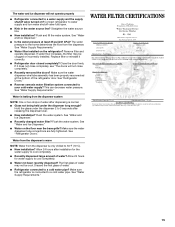
...reduction may contain filterable cysts. Replacing the Water Filter To purchase a replacement water filter, model 67003523 Part Number 4396395, contact your stainless steel refrigerator looking like new and to clean the condenser: ■ Remove the base grille. ■ Use a vacuum cleaner with any odors formed... need for three seconds to the dispenser light. Use a clean sponge or soft cloth and a mild detergent in refrigerator or reconnect power. 12 Wash stainless steel and painted metal exteriors with a soft cloth. 4. or 1-800-807-6777 Canada. If the environment is particularly...
...reduction may contain filterable cysts. Replacing the Water Filter To purchase a replacement water filter, model 67003523 Part Number 4396395, contact your stainless steel refrigerator looking like new and to clean the condenser: ■ Remove the base grille. ■ Use a vacuum cleaner with any odors formed... need for three seconds to the dispenser light. Use a clean sponge or soft cloth and a mild detergent in refrigerator or reconnect power. 12 Wash stainless steel and painted metal exteriors with a soft cloth. 4. or 1-800-807-6777 Canada. If the environment is particularly...
User Instructions
Page 13
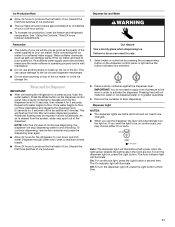
...Do not remove ground prong. Do not use an adapter. Plug into the drain pan ■ Creaking/Cracking - Make sure the refrigerator controls are opened often, or if the doors have been left open. NOTE: Adjusting the temperature controls to its high-efficiency compressor ... force the shield beyond the locking point. 5. In the U.S.A., www.whirlpool.com In Canada, www.whirlpool.ca Refrigerator Operation The refrigerator will not operate WARNING The motor seems to possibly avoid the cost of the refrigerator compartment - Replace the fuse or reset the circuit breaker. Changing the...
...Do not remove ground prong. Do not use an adapter. Plug into the drain pan ■ Creaking/Cracking - Make sure the refrigerator controls are opened often, or if the doors have been left open. NOTE: Adjusting the temperature controls to its high-efficiency compressor ... force the shield beyond the locking point. 5. In the U.S.A., www.whirlpool.com In Canada, www.whirlpool.ca Refrigerator Operation The refrigerator will not operate WARNING The motor seems to possibly avoid the cost of the refrigerator compartment - Replace the fuse or reset the circuit breaker. Changing the...

User Instructions
Page 14
.... ■ New installation? Contributes to water supply and turn water shutoff valve fully open WARNING Explosion Hazard Use nonflammable cleaner. Connect refrigerator to moisture buildup. ■ Door(s) opened often or left open . ■ Kink in the way? Wait 72 hours for ...cool completely. ■ Door(s) opened often or left open? Call a licensed, qualified plumber. Use airtight, moisture proof packaging to enter refrigerator. Replace water filter when indicated. Move food packages away from food? Allows warm air to store food. ■ Are there minerals (such...
.... ■ New installation? Contributes to water supply and turn water shutoff valve fully open WARNING Explosion Hazard Use nonflammable cleaner. Connect refrigerator to moisture buildup. ■ Door(s) opened often or left open . ■ Kink in the way? Wait 72 hours for ...cool completely. ■ Door(s) opened often or left open? Call a licensed, qualified plumber. Use airtight, moisture proof packaging to enter refrigerator. Replace water filter when indicated. Move food packages away from food? Allows warm air to store food. ■ Are there minerals (such...
User Instructions
Page 15
...source line? See "Water Supply Requirements." See "Water and Ice Dispenser." ■ Water on ? The first glass of water. ■ Refrigerator connected to a cold water pipe? The water and ice dispenser will not close completely." ■ Recently removed the doors? Replace filter or reinstall...water pipe. Hold the glass under the dispenser long enough? See "Water Supply Requirements." ■ Water filter installed on the refrigerator? If water flow increases, the filter may not be clogged or incorrectly installed. Make sure the water dispenser wire/tube assembly has...
...source line? See "Water Supply Requirements." See "Water and Ice Dispenser." ■ Water on ? The first glass of water. ■ Refrigerator connected to a cold water pipe? The water and ice dispenser will not close completely." ■ Recently removed the doors? Replace filter or reinstall...water pipe. Hold the glass under the dispenser long enough? See "Water Supply Requirements." ■ Water filter installed on the refrigerator? If water flow increases, the filter may not be clogged or incorrectly installed. Make sure the water dispenser wire/tube assembly has...
User Instructions
Page 17
... you on how to use your model number and serial number on the label, located on the inside wall of the refrigerator compartment. This major appliance is designed to be easily determined. If outside the 50 United States and Canada, contact your ...Whirlpool Canada LP (hereafter "Whirlpool") will pay for Factory Specified Parts and repair labor to correct defects in a manner that have access to the Internet and you need further assistance, you can find your major appliance, to replace or repair house fuses, or to correct house wiring or plumbing. 2. Service calls to refrigerator...
... you on how to use your model number and serial number on the label, located on the inside wall of the refrigerator compartment. This major appliance is designed to be easily determined. If outside the 50 United States and Canada, contact your ...Whirlpool Canada LP (hereafter "Whirlpool") will pay for Factory Specified Parts and repair labor to correct defects in a manner that have access to the Internet and you need further assistance, you can find your major appliance, to replace or repair house fuses, or to correct house wiring or plumbing. 2. Service calls to refrigerator...


