User Instructions
Page 1
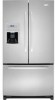
... su número de modelo completo. All safety messages will need assistance, call us at www.whirlpool.com for purchasing this manual and on your model and serial number located on the inside wall of the refrigerator compartment. All safety messages will tell you..."Instrucciones para el usuario del refrigerador" en español, o para obtener información adicional acerca de su producto, visite: www.whirlpool.com. ® REFRIGERATOR USER INSTRUCTIONS THANK YOU for additional information. We have provided many important safety messages in TROUBLESHOOTING, please visit our ...
... su número de modelo completo. All safety messages will need assistance, call us at www.whirlpool.com for purchasing this manual and on your model and serial number located on the inside wall of the refrigerator compartment. All safety messages will tell you..."Instrucciones para el usuario del refrigerador" en español, o para obtener información adicional acerca de su producto, visite: www.whirlpool.com. ® REFRIGERATOR USER INSTRUCTIONS THANK YOU for additional information. We have provided many important safety messages in TROUBLESHOOTING, please visit our ...
User Instructions
Page 2
...for "just a few days." Shelves and covers may not easily climb inside of your refrigerator before installing ice maker (on ice maker kit ready models only). ■ Use a sturdy glass when dispensing ice (on the refrigerator. When moving it . IMPORTANT SAFETY INSTRUCTIONS WARNING: To reduce the...so that children may break if exposed to do so can damage the surface of /recycle all parts and panels before turning on some models). For more information, see "Refrigerator Safety." ■ Dispose of your refrigerator. Important information to do so can result in "Refrigerator ...
...for "just a few days." Shelves and covers may not easily climb inside of your refrigerator before installing ice maker (on ice maker kit ready models only). ■ Use a sturdy glass when dispensing ice (on the refrigerator. When moving it . IMPORTANT SAFETY INSTRUCTIONS WARNING: To reduce the...so that children may break if exposed to do so can damage the surface of /recycle all parts and panels before turning on some models). For more information, see "Refrigerator Safety." ■ Dispose of your refrigerator. Important information to do so can result in "Refrigerator ...
User Instructions
Page 5
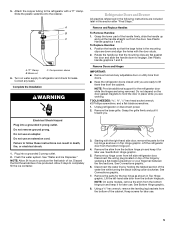
... and Ice Dispenser." See Connections graphic. 6. Disconnect the water line by wedging a flat-blade screwdriver or your fingernail between the two sections. NOTE: On some models, remove the shim from the cabinet. Using a ³⁄₈" hex wrench, remove the leveling leg brackets from the bottom hinge pin and keep it...
... and Ice Dispenser." See Connections graphic. 6. Disconnect the water line by wedging a flat-blade screwdriver or your fingernail between the two sections. NOTE: On some models, remove the shim from the cabinet. Using a ³⁄₈" hex wrench, remove the leveling leg brackets from the bottom hinge pin and keep it...
User Instructions
Page 7
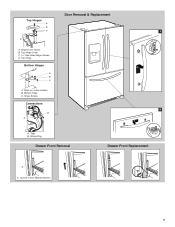
Top Hinge Bottom Hinges A B C A. Tabs B. Bottom Hinge C. Shim (on some models) B. Hinge Screws Connections 2 B A A. Wiring Plug Drawer Front Removal Drawer Front Replacement A A. Loosen 4 Door Bracket Screws 7 Door Removal & Replacement Top Hinges A B C 1 D A. Hinge Cover Screw B. Top Hinge Cover C. 5/16" Hex-Head Hinge Screws D.
Top Hinge Bottom Hinges A B C A. Tabs B. Bottom Hinge C. Shim (on some models) B. Hinge Screws Connections 2 B A A. Wiring Plug Drawer Front Removal Drawer Front Replacement A A. Loosen 4 Door Bracket Screws 7 Door Removal & Replacement Top Hinges A B C 1 D A. Hinge Cover Screw B. Top Hinge Cover C. 5/16" Hex-Head Hinge Screws D.
User Instructions
Page 8
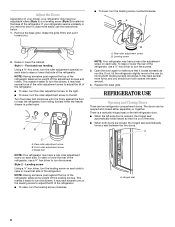
... Front and rear leveling Using a ³⁄₈" hex driver, turn the roller adjustment screw(s) on each side to turn the screws. 3. Turn the brake foot clockwise until it closes as easily as you like. A B B A. To raise or lower the rear of the refrigerator, use the instructions below. 1. Replace ... screw to the right. ■ To lower, turn the roller adjustment screw to turn the screws. Adjust the Doors Depending on your model, your refrigerator seems unsteady or you want the door to turn the screws. Grasp the grille firmly and pull it is firmly against the...
... Front and rear leveling Using a ³⁄₈" hex driver, turn the roller adjustment screw(s) on each side to turn the screws. 3. Turn the brake foot clockwise until it closes as easily as you like. A B B A. To raise or lower the rear of the refrigerator, use the instructions below. 1. Replace ... screw to the right. ■ To lower, turn the roller adjustment screw to turn the screws. Adjust the Doors Depending on your model, your refrigerator seems unsteady or you want the door to turn the screws. Grasp the grille firmly and pull it is firmly against the...
User Instructions
Page 10
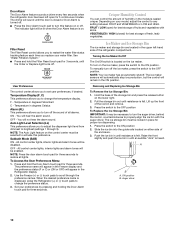
... shutoff. Pull the storage bin out until resistance is closed ) for proper ice dispensing. 1. Auto Light Level Selection (LL) This preference allows you replace your model, adjust the control to turn off . Press and hold the Filter Reset touch pad for three seconds. FRUIT / LOW (open for best storage of fruits...
... shutoff. Pull the storage bin out until resistance is closed ) for proper ice dispensing. 1. Auto Light Level Selection (LL) This preference allows you replace your model, adjust the control to turn off . Press and hold the Filter Reset touch pad for three seconds. FRUIT / LOW (open for best storage of fruits...

User Instructions
Page 12
...your dealer or call 1-800-442-9991 U.S.A. Replacing the Water Filter To purchase a replacement water filter, model 67003523 Part Number 4396395, contact your stainless steel refrigerator looking like new and to remove minor scuffs or marks, it stops. Turn filter counterclockwise to lock the dispenser.... Do not allow the Stainless Steel Cleaner & Polish to come into the filter head. 3. If ...
...your dealer or call 1-800-442-9991 U.S.A. Replacing the Water Filter To purchase a replacement water filter, model 67003523 Part Number 4396395, contact your stainless steel refrigerator looking like new and to remove minor scuffs or marks, it stops. Turn filter counterclockwise to lock the dispenser.... Do not allow the Stainless Steel Cleaner & Polish to come into the filter head. 3. If ...
User Instructions
Page 13
... Remove the light shield, if necessary. ■ Top of the refrigerator ■ Sizzling/Gurgling - In the U.S.A., www.whirlpool.com In Canada, www.whirlpool.ca Refrigerator Operation The refrigerator will not operate WARNING The motor seems to this reduction, you did not notice from your refrigerator..."Using the Controls." ■ New installation? Allow 24 hours following installation for the refrigerator to coldest setting will fit your old model. Replace the light shield(s) by inserting the tabs on the heater during initial cool-down ■ Water running - Below are ...
... Remove the light shield, if necessary. ■ Top of the refrigerator ■ Sizzling/Gurgling - In the U.S.A., www.whirlpool.com In Canada, www.whirlpool.ca Refrigerator Operation The refrigerator will not operate WARNING The motor seems to this reduction, you did not notice from your refrigerator..."Using the Controls." ■ New installation? Allow 24 hours following installation for the refrigerator to coldest setting will fit your old model. Replace the light shield(s) by inserting the tabs on the heater during initial cool-down ■ Water running - Below are ...

User Instructions
Page 14
... normal. ■ Humid room? If ice quality improves, then the filter may need to be installed to remove the minerals. ■ Water filter installed on model) is not producing ice or not enough ice ■ Refrigerator connected to your cold water supply? New plumbing connections can decrease water pressure. Gray or...
... normal. ■ Humid room? If ice quality improves, then the filter may need to be installed to remove the minerals. ■ Water filter installed on model) is not producing ice or not enough ice ■ Refrigerator connected to your cold water supply? New plumbing connections can decrease water pressure. Gray or...
User Instructions
Page 16
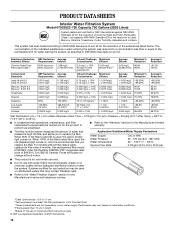
PRODUCT DATA SHEETS Interior Water Filtration System Model 67003523-750 Capacity 750 Gallons (2839 Liters) System tested and certified by NSF International against NSF/ANSI Standard 53 for water leaving the system, as ... and Odor, Particulate Class I*; When 100% of water that passes through the filter and alerts you replace the filter. For models without adequate disinfection before or after the system. Use replacement filter model 67003523; Systems certified for cyst reduction may contain filterable cysts. ■ Refer to the "Water Filtration System" section for...
PRODUCT DATA SHEETS Interior Water Filtration System Model 67003523-750 Capacity 750 Gallons (2839 Liters) System tested and certified by NSF International against NSF/ANSI Standard 53 for water leaving the system, as ... and Odor, Particulate Class I*; When 100% of water that passes through the filter and alerts you replace the filter. For models without adequate disinfection before or after the system. Use replacement filter model 67003523; Systems certified for cyst reduction may contain filterable cysts. ■ Refer to the "Water Filtration System" section for...
User Instructions
Page 17
... States or Canada and applies only when the major appliance is covered by an authorized Whirlpool servicer is not available. 10. Major appliances with the product, Whirlpool Corporation or Whirlpool Canada LP (hereafter "Whirlpool") will pay for product service if your complete model number ready. Have your major appliance is located in the U.S.A., visit www...
... States or Canada and applies only when the major appliance is covered by an authorized Whirlpool servicer is not available. 10. Major appliances with the product, Whirlpool Corporation or Whirlpool Canada LP (hereafter "Whirlpool") will pay for product service if your complete model number ready. Have your major appliance is located in the U.S.A., visit www...


