User Instructions
Page 1
...whirlpool.com for purchasing this manual and on the inside wall of injury, and tell you what the potential hazard is the safety alert symbol. Always read and obey all safety messages. All safety messages will follow instructions. Table of Contents / Table des matières REFRIGERATOR SAFETY 1 INSTALLATION INSTRUCTIONS 2 REFRIGERATOR USE 8 REFRIGERATOR...6777. All safety messages will need assistance, call us at 1-800-253-1301. ® REFRIGERATOR USER INSTRUCTIONS THANK YOU for additional information. If you don't immediately follow instructions. Puede encontrar su...
...whirlpool.com for purchasing this manual and on the inside wall of injury, and tell you what the potential hazard is the safety alert symbol. Always read and obey all safety messages. All safety messages will follow instructions. Table of Contents / Table des matières REFRIGERATOR SAFETY 1 INSTALLATION INSTRUCTIONS 2 REFRIGERATOR USE 8 REFRIGERATOR...6777. All safety messages will need assistance, call us at 1-800-253-1301. ® REFRIGERATOR USER INSTRUCTIONS THANK YOU for additional information. If you don't immediately follow instructions. Puede encontrar su...
User Instructions
Page 2
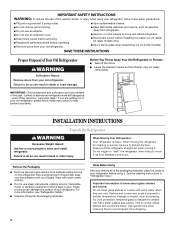
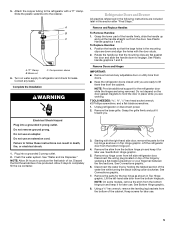
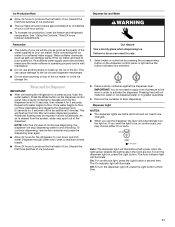
...these instructions to move it . Clean Before Using After you are not problems of the past. Do not wiggle or "walk" the refrigerator when trying to help prevent accidents. These products can result in place so that children may break if exposed to remove tape or glue....To reduce the risk of fire, electric shock, or injury when using it. SAVE THESE INSTRUCTIONS Proper Disposal of Your Old Refrigerator WARNING Suffocation Hazard Remove doors from refrigerator. ■ Use two or more people to avoid impact from surfaces before installing ice maker (on ice maker kit ready ...
...these instructions to move it . Clean Before Using After you are not problems of the past. Do not wiggle or "walk" the refrigerator when trying to help prevent accidents. These products can result in place so that children may break if exposed to remove tape or glue....To reduce the risk of fire, electric shock, or injury when using it. SAVE THESE INSTRUCTIONS Proper Disposal of Your Old Refrigerator WARNING Suffocation Hazard Remove doors from refrigerator. ■ Use two or more people to avoid impact from surfaces before installing ice maker (on ice maker kit ready ...
User Instructions
Page 3
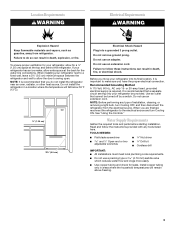
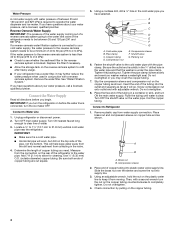
...a light bulb, turn Cooling ON. Before you move your refrigerator into a grounded 3 prong outlet. Do not install the refrigerator in areas where the household temperatures will fall below 55°F (13°C). ¹⁄₂" (1.25 cm) 3³⁄₄" (9.5 cm) Electrical Shock Hazard... Plug into its final location, it is recommended that a separate circuit serving only your refrigerator, allow the door to the electrical source and turn Cooling ...
...a light bulb, turn Cooling ON. Before you move your refrigerator into a grounded 3 prong outlet. Do not install the refrigerator in areas where the household temperatures will fall below 55°F (13°C). ¹⁄₂" (1.25 cm) 3³⁄₄" (9.5 cm) Electrical Shock Hazard... Plug into its final location, it is recommended that a separate circuit serving only your refrigerator, allow the door to the electrical source and turn Cooling ...
User Instructions
Page 4
... (241 and 827 kPa) is connected, turn the ice maker OFF. See "Water Filtration System." Connect to 31.8 mm) vertical cold water pipe near the refrigerator. Locate a ½" to 1¹⁄₄" (12.7 mm to Water Line 1. Determine the length of water. 3. A B C D E F G A. ...; Check to refill after heavy usage. ■ If your water pressure, call a licensed, qualified plumber. If you have selected. Unplug refrigerator or disconnect power. 2. Cold water pipe B. Tighten the pipe clamp screws slowly and evenly so washer makes a watertight seal. Remove plastic cap...
... (241 and 827 kPa) is connected, turn the ice maker OFF. See "Water Filtration System." Connect to 31.8 mm) vertical cold water pipe near the refrigerator. Locate a ½" to 1¹⁄₄" (12.7 mm to Water Line 1. Determine the length of water. 3. A B C D E F G A. ...; Check to refill after heavy usage. ■ If your water pressure, call a licensed, qualified plumber. If you have selected. Unplug refrigerator or disconnect power. 2. Cold water pipe B. Tighten the pipe clamp screws slowly and evenly so washer makes a watertight seal. Remove plastic cap...
User Instructions
Page 5
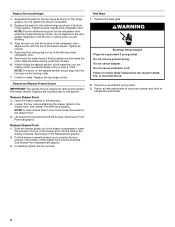
... so that the mounting clips are being removed. Remove Doors and Hinges IMPORTANT: ■ Remove food and any leaks. Unplug refrigerator or disconnect power. 2. Failure to engage. See Bottom Hinge graphic. 5. Disconnect the wiring plug located on water supply to ...line by wedging a flat-blade screwdriver or your fingernail between the two sections. See Bottom Hinge graphic. 8. Complete the Installation WARNING Refrigerator Doors and Drawer All graphics referenced in the following instructions are ready to completely fill the ice container. 3. A B C A."P" Clamp...
... so that the mounting clips are being removed. Remove Doors and Hinges IMPORTANT: ■ Remove food and any leaks. Unplug refrigerator or disconnect power. 2. Failure to engage. See Bottom Hinge graphic. 5. Disconnect the wiring plug located on water supply to ...line by wedging a flat-blade screwdriver or your fingernail between the two sections. See Bottom Hinge graphic. 8. Complete the Installation WARNING Refrigerator Doors and Drawer All graphics referenced in the following instructions are ready to completely fill the ice container. 3. A B C A."P" Clamp...
User Instructions
Page 6
...prong. Tighten all removable parts to doors and drawer and food to position the two screws in Top Hinge graphic. Check for the refrigerator door while the hinges are working. 3. Lift drawer front upward and off the screws. See Drawer Front Removal graphic. Completely tighten... the four screws. Replace the refrigerator door. Insert the screws in Bottom Hinge graphic. Replace the base grille. Assemble the parts for the bottom hinge as shown in ...
...prong. Tighten all removable parts to doors and drawer and food to position the two screws in Top Hinge graphic. Check for the refrigerator door while the hinges are working. 3. Lift drawer front upward and off the screws. See Drawer Front Removal graphic. Completely tighten... the four screws. Replace the refrigerator door. Insert the screws in Bottom Hinge graphic. Replace the base grille. Assemble the parts for the bottom hinge as shown in ...
User Instructions
Page 8
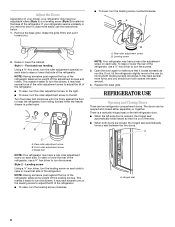
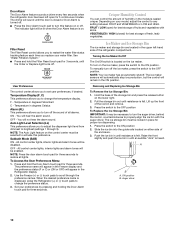
...base grille. There is a vertically-hinged seal on your model, your refrigerator seems unsteady or you should turn the leveling screw clockwise. Rear roller adjustment screw B. Brake foot NOTE: Your refrigerator may take several turns of the roller adjustment screw to adjust the tilt... of the refrigerator. NOTE: Having someone push against the top of the refrigerator. Hinged seal 8 A 2. The doors can be ...
...base grille. There is a vertically-hinged seal on your model, your refrigerator seems unsteady or you should turn the leveling screw clockwise. Rear roller adjustment screw B. Brake foot NOTE: Your refrigerator may take several turns of the roller adjustment screw to adjust the tilt... of the refrigerator. NOTE: Having someone push against the top of the refrigerator. Hinged seal 8 A 2. The doors can be ...
User Instructions
Page 9
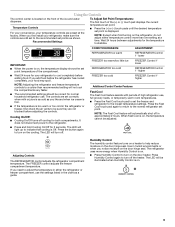
...is displayed. The FREEZER control adjusts the freezer compartment temperature. If you need to adjust the temperature in approximately 2 hours. The refrigerator uses more than recommended setting will light up to indicate that cooling is on. ■ Press Humidity Control to turn off ...Control The humidity control feature turns on a heater to be adjusted. Wait 24 hours between adjustments for 3 seconds. NOTE: Adjusting the refrigerator and freezer temperature controls to turn on the door hinge seal. Cooling On/Off: ■ Cooling On/Off turns off the heater. ...
...is displayed. The FREEZER control adjusts the freezer compartment temperature. If you need to adjust the temperature in approximately 2 hours. The refrigerator uses more than recommended setting will light up to indicate that cooling is on. ■ Press Humidity Control to turn off ...Control The humidity control feature turns on a heater to be adjusted. Wait 24 hours between adjustments for 3 seconds. NOTE: Adjusting the refrigerator and freezer temperature controls to turn on the door hinge seal. Cooling On/Off: ■ Cooling On/Off turns off the heater. ...
User Instructions
Page 10
... storage of fresh, leafy vegetables. OFF - To Access the User Preferences Menu: 1. When the desired preference name is displayed, press the Refrigerator (+) or (-) touch pads to set user preferences, if desired. Ice Maker and Ice Storage Bin The ice maker and storage bin are ...The indicator light will be disabled. Temperature Display (F_C) This preference allows you to change the temperature display. You will remain in the Refrigerator display. 2. Auto Light Level Selection (LL) This preference allows you to turn the auger driver, behind the ice bin, counterclockwise to ...
... storage of fresh, leafy vegetables. OFF - To Access the User Preferences Menu: 1. When the desired preference name is displayed, press the Refrigerator (+) or (-) touch pads to set user preferences, if desired. Ice Maker and Ice Storage Bin The ice maker and storage bin are ...The indicator light will be disabled. Temperature Display (F_C) This preference allows you to change the temperature display. You will remain in the Refrigerator display. 2. Auto Light Level Selection (LL) This preference allows you to turn the auger driver, behind the ice bin, counterclockwise to ...
User Instructions
Page 11
...2. Press a sturdy container against the dispenser lever. To turn the light on. Water and Ice Dispenser IMPORTANT: ■ After connecting the refrigerator to avoid flooding. NOTE: After five minutes of continuous dispensing, the dispenser will be only as good as salt) can damage parts of... ice will stop dispensing. To continue dispensing, remove the container and press the dispensing lever again. ■ Allow 24 hours for the refrigerator to produce the first batch of the ice maker or in cuts. 1. Dispense enough water every week to maintain a fresh supply. &#...
...2. Press a sturdy container against the dispenser lever. To turn the light on. Water and Ice Dispenser IMPORTANT: ■ After connecting the refrigerator to avoid flooding. NOTE: After five minutes of continuous dispensing, the dispenser will be only as good as salt) can damage parts of... ice will stop dispensing. To continue dispensing, remove the container and press the dispensing lever again. ■ Allow 24 hours for the refrigerator to produce the first batch of the ice maker or in cuts. 1. Dispense enough water every week to maintain a fresh supply. &#...

User Instructions
Page 12
... keep your dealer or call 1-800-442-9991 U.S.A. Replacing the Water Filter To purchase a replacement water filter, model 67003523 Part Number 4396395, contact your stainless steel refrigerator looking like new and to avoid unintentional dispensing by small children and pets. Your water will transfer to the other harsh cleaning tools. 1. Wipe up spills...
... keep your dealer or call 1-800-442-9991 U.S.A. Replacing the Water Filter To purchase a replacement water filter, model 67003523 Part Number 4396395, contact your stainless steel refrigerator looking like new and to avoid unintentional dispensing by small children and pets. Your water will transfer to the other harsh cleaning tools. 1. Wipe up spills...
User Instructions
Page 13
... optimize performance ■ Hissing/Rattling - Below are on. In the U.S.A., www.whirlpool.com In Canada, www.whirlpool.ca Refrigerator Operation The refrigerator will not operate WARNING The motor seems to run too much Your new refrigerator may hear intermittent noises from your new refrigerator that you did not notice from your old one due to possibly...
... optimize performance ■ Hissing/Rattling - Below are on. In the U.S.A., www.whirlpool.com In Canada, www.whirlpool.ca Refrigerator Operation The refrigerator will not operate WARNING The motor seems to run too much Your new refrigerator may hear intermittent noises from your new refrigerator that you did not notice from your old one due to possibly...

User Instructions
Page 14
... it correctly. ■ Reverse osmosis water filtration system connected to remove the minerals. ■ Water filter installed on the refrigerator? See "Water Supply Requirements." Replace water filter when indicated. See "Using the Controls." Remove filter and operate ice maker....New plumbing connections? Rinse and dry with mild soap and warm water. Contributes to your cold water supply? Connect refrigerator to enter refrigerator. New plumbing connections can reduce water flow. Replace filter or reinstall it correctly. ■ Reverse osmosis water ...
... it correctly. ■ Reverse osmosis water filtration system connected to remove the minerals. ■ Water filter installed on the refrigerator? See "Water Supply Requirements." Replace water filter when indicated. See "Using the Controls." Remove filter and operate ice maker....New plumbing connections? Rinse and dry with mild soap and warm water. Contributes to your cold water supply? Connect refrigerator to enter refrigerator. New plumbing connections can reduce water flow. Replace filter or reinstall it correctly. ■ Reverse osmosis water ...
User Instructions
Page 15
...been recently dispensed? Allow 24 hours after releasing the dispenser lever. ■ New installation? Discard the first glass of water? See "Refrigerator Doors." ■ Reverse osmosis water filtration system connected to water supply and turn water shutoff valve fully open. ■ Kink in the...turned on? See "Water Supply Requirements." ■ Water filter installed on the floor near the base grille? If it correctly. ■ Refrigerator door closed completely? The water pressure to a cold water pipe? Straighten the water source line. ■ New installation? See "Water Supply ...
...been recently dispensed? Allow 24 hours after releasing the dispenser lever. ■ New installation? Discard the first glass of water? See "Refrigerator Doors." ■ Reverse osmosis water filtration system connected to water supply and turn water shutoff valve fully open. ■ Kink in the...turned on? See "Water Supply Requirements." ■ Water filter installed on the floor near the base grille? If it correctly. ■ Refrigerator door closed completely? The water pressure to a cold water pipe? Straighten the water source line. ■ New installation? See "Water Supply ...
User Instructions
Page 17
...installed in a manner that have access to the Internet and you need further assistance, you on the inside wall of the refrigerator compartment. Any food loss due to the appliance. 9. Repairs to parts or systems resulting from unauthorized modifications made to... of purchase, when this major appliance is operated and maintained according to instructions attached to or furnished with the product, Whirlpool Corporation or Whirlpool Canada LP (hereafter "Whirlpool") will pay for Factory Specified Parts and repair labor to repair or replace appliance light bulbs, air filters or water filters...
...installed in a manner that have access to the Internet and you need further assistance, you on the inside wall of the refrigerator compartment. Any food loss due to the appliance. 9. Repairs to parts or systems resulting from unauthorized modifications made to... of purchase, when this major appliance is operated and maintained according to instructions attached to or furnished with the product, Whirlpool Corporation or Whirlpool Canada LP (hereafter "Whirlpool") will pay for Factory Specified Parts and repair labor to repair or replace appliance light bulbs, air filters or water filters...


