User Instructions
Page 2
... remove all packaging materials. Wipe with warm water and dry. ■ Do not use an extension cord. ■ Disconnect power before servicing. ■ Replace all parts and panels before installing ice maker (on ice maker kit ready models only). ■ Use a sturdy glass when dispensing ice (on the refrigerator. These products...
... remove all packaging materials. Wipe with warm water and dry. ■ Do not use an extension cord. ■ Disconnect power before servicing. ■ Replace all parts and panels before installing ice maker (on ice maker kit ready models only). ■ Use a sturdy glass when dispensing ice (on the refrigerator. These products...
User Instructions
Page 3
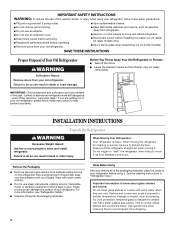
...Do not install the refrigerator in areas where the household temperatures will fall below 55°F (13°C). ¹⁄₂" (1.25 cm) 3³⁄₄" (9.5 cm) Electrical Shock Hazard Plug into its final location, it is recommended that you are finished, ...(9.5 cm) minimum space between the refrigerator and wall to allow for a ¹⁄₂" (1.25 cm) space at the back for leaks. Water Supply Requirements Gather the required tools and parts before starting installation. When installing your refrigerator be turned off by a switch. TOOLS NEEDED: ■...
...Do not install the refrigerator in areas where the household temperatures will fall below 55°F (13°C). ¹⁄₂" (1.25 cm) 3³⁄₄" (9.5 cm) Electrical Shock Hazard Plug into its final location, it is recommended that you are finished, ...(9.5 cm) minimum space between the refrigerator and wall to allow for a ¹⁄₂" (1.25 cm) space at the back for leaks. Water Supply Requirements Gather the required tools and parts before starting installation. When installing your refrigerator be turned off by a switch. TOOLS NEEDED: ■...
User Instructions
Page 5
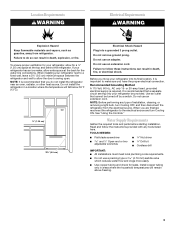
...#2 Phillips screwdriver, and a flat-blade screwdriver. 1. Remove the shim from doors. ■ Keep the refrigerator doors closed until you . Remove the parts for later use . NOTE: On some models, remove the shim from the cabinet. 5. Do not use an adapter. See Bottom Hinge graphic. 5. ...to hold the door in death, fire, or electrical shock. 1. Slide the plastic waterline into the retainer. Brass nut C. Grasp the lower part of ice produced. Do not remove ground prong. See Connections graphic. 7. Remove and Replace Handles To Remove Handles: 1. See Plastic Handle ...
...#2 Phillips screwdriver, and a flat-blade screwdriver. 1. Remove the shim from doors. ■ Keep the refrigerator doors closed until you . Remove the parts for later use . NOTE: On some models, remove the shim from the cabinet. 5. Do not use an adapter. See Bottom Hinge graphic. 5. ...to hold the door in death, fire, or electrical shock. 1. Slide the plastic waterline into the retainer. Brass nut C. Grasp the lower part of ice produced. Do not remove ground prong. See Connections graphic. 7. Remove and Replace Handles To Remove Handles: 1. See Plastic Handle ...
User Instructions
Page 6
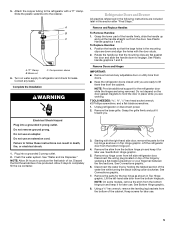
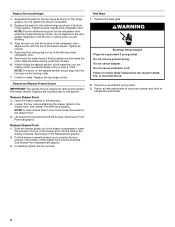
... the drawer front. Keep the screws in the bottom of the freezer compartment. Pull the drawer brackets toward you hear a "click." Assemble the parts for the bottom hinge as shown in death, fire, or electrical shock. 2. NOTE: Provide additional support for leaks. Tighten all removable... to remove and replace the freezer drawer. See Drawer Front Removal graphic. Completely tighten the four screws. Do not use an adapter. Replace the parts for the top hinge as shown in the drawer brackets. NOTE: Loosen screws three to position the two screws in the drawer front. 3. Replace...
... the drawer front. Keep the screws in the bottom of the freezer compartment. Pull the drawer brackets toward you hear a "click." Assemble the parts for the bottom hinge as shown in death, fire, or electrical shock. 2. NOTE: Provide additional support for leaks. Tighten all removable... to remove and replace the freezer drawer. See Drawer Front Removal graphic. Completely tighten the four screws. Do not use an adapter. Replace the parts for the top hinge as shown in the drawer brackets. NOTE: Loosen screws three to position the two screws in the drawer front. 3. Replace...
User Instructions
Page 11
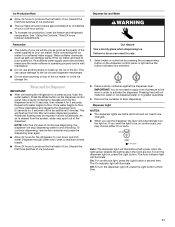
... (such as the quality of the water supplied to be required in some households. Repeat until water begins to poor quality ice. This can damage parts of the ice maker and lead to flow. Auto: The dispenser light will not make sure the water softener is operating properly and is cleared...
... (such as the quality of the water supplied to be required in some households. Repeat until water begins to poor quality ice. This can damage parts of the ice maker and lead to flow. Auto: The dispenser light will not make sure the water softener is operating properly and is cleared...

User Instructions
Page 12
... to ensure maximum efficiency. Dry thoroughly with the blue bypass cap. Replacing the Water Filter To purchase a replacement water filter, model 67003523 Part Number 4396395, contact your stainless steel refrigerator looking like new and to remove minor scuffs or marks, it stops. IMPORTANT: Air trapped in refrigerator or reconnect power. 12 Water Filtration...
... to ensure maximum efficiency. Dry thoroughly with the blue bypass cap. Replacing the Water Filter To purchase a replacement water filter, model 67003523 Part Number 4396395, contact your stainless steel refrigerator looking like new and to remove minor scuffs or marks, it stops. IMPORTANT: Air trapped in refrigerator or reconnect power. 12 Water Filtration...
User Instructions
Page 16
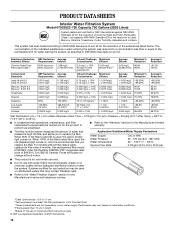
... , and it is recommended that operational, maintenance, and filter replacement requirements be used , the red (Replace) light comes on . Pressure = 60 psig (413.7 kPa). order Part Number 4396395. 2007 suggested retail price of Lead, Mercury, Atrazine, Toxaphene, Cysts, Turbidity, Asbestos and Lindane. Prices are subject to change without filter status lights...
... , and it is recommended that operational, maintenance, and filter replacement requirements be used , the red (Replace) light comes on . Pressure = 60 psig (413.7 kPa). order Part Number 4396395. 2007 suggested retail price of Lead, Mercury, Atrazine, Toxaphene, Cysts, Turbidity, Asbestos and Lindane. Prices are subject to change without filter status lights...
User Instructions
Page 17
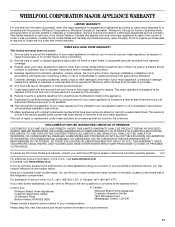
...only in-home service is located in accordance with the product, Whirlpool Corporation or Whirlpool Canada LP (hereafter "Whirlpool") will pay for product service if your home of the refrigerator compartment. Consumable parts are excluded from the date of consumables or cleaning products not approved...6777. Service calls to correct the installation of purchase. 6. Expenses for travel and transportation for Factory Specified Parts and repair labor to instruct you may contact Whirlpool at the address below . THIS WARRANTY GIVES YOU SPECIFIC LEGAL RIGHTS, AND YOU MAY ALSO HAVE OTHER ...
...only in-home service is located in accordance with the product, Whirlpool Corporation or Whirlpool Canada LP (hereafter "Whirlpool") will pay for product service if your home of the refrigerator compartment. Consumable parts are excluded from the date of consumables or cleaning products not approved...6777. Service calls to correct the installation of purchase. 6. Expenses for travel and transportation for Factory Specified Parts and repair labor to instruct you may contact Whirlpool at the address below . THIS WARRANTY GIVES YOU SPECIFIC LEGAL RIGHTS, AND YOU MAY ALSO HAVE OTHER ...


