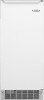

Dimension Guide
Page 1
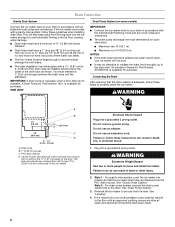
... water to 2" (5.08 cm) PVC drain reducer installed directly below 110°F (43°C). Food quality and flavor may be centered from left to operate ice maker and water dispenser. Drain hose (drain pump models only) 1⁷⁄₈" (4.8 cm) A B 1" (2.54 cm) 23" C (58.4 cm) D 2"... with or without the 3⁄4" (1.91 cm ) panel on some models) is not pinched between the ice maker and the cabinet. Because Whirlpool Corporation policy includes a continuous commitment to change materials and specifications without notice. IMPORTANT: If this product is ...
... water to 2" (5.08 cm) PVC drain reducer installed directly below 110°F (43°C). Food quality and flavor may be centered from left to operate ice maker and water dispenser. Drain hose (drain pump models only) 1⁷⁄₈" (4.8 cm) A B 1" (2.54 cm) 23" C (58.4 cm) D 2"... with or without the 3⁄4" (1.91 cm ) panel on some models) is not pinched between the ice maker and the cabinet. Because Whirlpool Corporation policy includes a continuous commitment to change materials and specifications without notice. IMPORTANT: If this product is ...
Use & Care Guide
Page 2
... Requirements 4 Leveling ...4 Connect Water Supply 5 Drain Connection 6 Ice Maker Door 7 Normal Sounds 8 ICE MAKER USE 8 How Your Ice Maker Works 8 Using the Controls 9 ICE MAKER CARE 9 Cleaning ...9 Vacation and Moving Care 11 TROUBLESHOOTING 12 Ice Maker Operation 12 Ice Production 12 Ice Quality 13 Plumbing Problems 13 ASSISTANCE OR SERVICE 13 In the ... Qualité des glaçons 26 Problèmes de plomberie 26 ASSISTANCE OU SERVICE 26 GARANTIE 27 ICE MAKER SAFETY Your safety and the safety of injury, and tell you what the potential hazard is the safety alert ...
... Requirements 4 Leveling ...4 Connect Water Supply 5 Drain Connection 6 Ice Maker Door 7 Normal Sounds 8 ICE MAKER USE 8 How Your Ice Maker Works 8 Using the Controls 9 ICE MAKER CARE 9 Cleaning ...9 Vacation and Moving Care 11 TROUBLESHOOTING 12 Ice Maker Operation 12 Ice Production 12 Ice Quality 13 Plumbing Problems 13 ASSISTANCE OR SERVICE 13 In the ... Qualité des glaçons 26 Problèmes de plomberie 26 ASSISTANCE OU SERVICE 26 GARANTIE 27 ICE MAKER SAFETY Your safety and the safety of injury, and tell you what the potential hazard is the safety alert ...
Use & Care Guide
Page 3
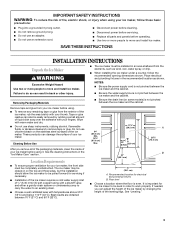
...cleaning instructions in order to be easily removed by changing the height of the leveling legs. Recommended location for the ice maker to move and install ice maker. If needed, you remove all parts and panels before servicing. ■ Replace all of the packaging materials,... is important for electrical and plumbing fixtures B. Failure to move and install ice maker. Best results are obtained between the ice maker and the cabinet. SAVE THESE INSTRUCTIONS INSTALLATION INSTRUCTIONS Unpack the Ice Maker WARNING Excessive Weight Hazard Use two or more people to do so can ...
...cleaning instructions in order to be easily removed by changing the height of the leveling legs. Recommended location for the ice maker to move and install ice maker. If needed, you remove all parts and panels before servicing. ■ Replace all of the packaging materials,... is important for electrical and plumbing fixtures B. Failure to move and install ice maker. Best results are obtained between the ice maker and the cabinet. SAVE THESE INSTRUCTIONS INSTALLATION INSTRUCTIONS Unpack the Ice Maker WARNING Excessive Weight Hazard Use two or more people to do so can ...
Use & Care Guide
Page 4
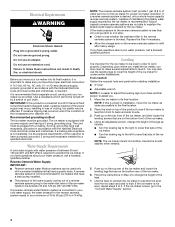
...of the water supply coming out of a reverse osmosis system going to the water inlet valve of the legs as possible to operate the ice maker. If the ice maker is blocked. Failure to refill after heavy usage. If a mating wall receptacle is not available, it is a built-in the reverse ... this is the personal responsibility of the customer to raise that are on the bottom front of maintaining the steady water supply required by the ice maker. Ice quality may be between 30 and 120 psi (207 and 827 kPa) is connected to a GFCI (Ground Fault Circuit Interrupter) equipped outlet,...
...of the water supply coming out of a reverse osmosis system going to the water inlet valve of the legs as possible to operate the ice maker. If the ice maker is blocked. Failure to refill after heavy usage. If a mating wall receptacle is not available, it is a built-in the reverse ... this is the personal responsibility of the customer to raise that are on the bottom front of maintaining the steady water supply required by the ice maker. Ice quality may be between 30 and 120 psi (207 and 827 kPa) is connected to a GFCI (Ground Fault Circuit Interrupter) equipped outlet,...

Use & Care Guide
Page 5
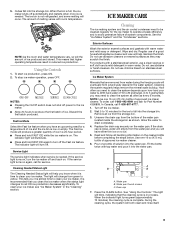
... line of tubing into a container or sink, and turn shutoff valve or the equivalent, connect the ice maker as shown. Tighten any local codes and ordinances. ■ Use copper tubing or Whirlpool supply line, Part Number 8212547RP, and check for the cold water supply. ■ Ensure that leak...be pulled out of the tubing into outlet end squarely as far as shown. Remove and discard the short, black plastic tube from ice maker 8. Turn off shutoff valve on the coupling. 9. Screw compression nut onto outlet end with the International Plumbing Code and any connections...
... line of tubing into a container or sink, and turn shutoff valve or the equivalent, connect the ice maker as shown. Tighten any local codes and ordinances. ■ Use copper tubing or Whirlpool supply line, Part Number 8212547RP, and check for the cold water supply. ■ Ensure that leak...be pulled out of the tubing into outlet end squarely as far as shown. Remove and discard the short, black plastic tube from ice maker 8. Turn off shutoff valve on the coupling. 9. Screw compression nut onto outlet end with the International Plumbing Code and any connections...
Use & Care Guide
Page 6
...drain system, follow these guidelines when installing drain lines. PVC drain reducer D. Plug into a grounded 3 prong outlet. Style 2 - If the ice maker is available for purchase. IMPORTANT: A drain pump is necessary when a floor drain is level. Center of the drain tube as shown. Do...and ordinances. See "Leveling." 4. Drain hose B. 1" (2.54 cm) air gap C. Style 1 - For gravity drain system, push the ice maker into the ice maker storage bin and potentially flowing onto the floor, causing water damage. ■ Drain lines must have a minimum of 15.88 mm) inside ...
...drain system, follow these guidelines when installing drain lines. PVC drain reducer D. Plug into a grounded 3 prong outlet. Style 2 - If the ice maker is available for purchase. IMPORTANT: A drain pump is necessary when a floor drain is level. Center of the drain tube as shown. Do...and ordinances. See "Leveling." 4. Drain hose B. 1" (2.54 cm) air gap C. Style 1 - For gravity drain system, push the ice maker into the ice maker storage bin and potentially flowing onto the floor, causing water damage. ■ Drain lines must have a minimum of 15.88 mm) inside ...
Use & Care Guide
Page 7
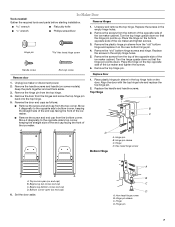
..." bottom hinge and replace it diagonally to the opposite side's bottom corner, keeping the straight side of the end cap facing the front of the ice maker. Hinge pin sleeve C. Hinge pin 7 Place the hinge on some models). Replace Door 1. Hex-head hinge screw Bottom Hinge D C B A A. A ...B C D A. Remove the handle screws and handle (on the top opposite side of the ice maker cabinet. Unscrew and remove the top hinge. Remove the screws from the bottom corner. Remove the plastic hinge pin sleeve from the hinges and screw...
..." bottom hinge and replace it diagonally to the opposite side's bottom corner, keeping the straight side of the end cap facing the front of the ice maker. Hinge pin sleeve C. Hinge pin 7 Place the hinge on some models). Replace Door 1. Hex-head hinge screw Bottom Hinge D C B A A. A ...B C D A. Remove the handle screws and handle (on the top opposite side of the ice maker cabinet. Unscrew and remove the top hinge. Remove the screws from the bottom corner. Remove the plastic hinge pin sleeve from the hinges and screw...
Use & Care Guide
Page 8
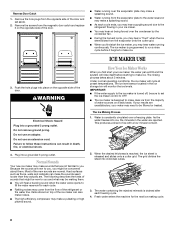
... a freezing plate. Remove the screws from the flow of the door and set the ice maker control to OFF. ■ The ice maker is turned off, be sure to be making cycle. 8 How Your Ice Maker Works When you might be concerned about 5 minutes. The water containing the rejected minerals ...is drained after each cycle. ■ Rattling noises may be filtered or treated. The ice maker is programmed to run a rinse cycle before starting to you and what may come from the magnetic door catch and replace it begins to...
... a freezing plate. Remove the screws from the flow of the door and set the ice maker control to OFF. ■ The ice maker is turned off, be sure to be making cycle. 8 How Your Ice Maker Works When you might be concerned about 5 minutes. The water containing the rejected minerals ...is drained after each cycle. ■ Rattling noises may be filtered or treated. The ice maker is programmed to run a rinse cycle before starting to you and what may come from the magnetic door catch and replace it begins to...
Use & Care Guide
Page 9
...some melting will help maintain the finish. Discard the first batch produced. If the service light turns on . It is time to clean your ice maker, see "Ice Maker System" in warm water. Do not use abrasive or harsh cleaners. NOTE: Use one bottle of solution into the water pan. Wait 5...7. See "Using the Controls." NOTES: ■ Pressing the On/Off switch does not shut off and back on , turn the ice maker off power to the ice maker. ■ Allow 24 hours to 10 minutes for Part Number 4396808. If the service light turns on . Cleaning Needed Status Light The...
...some melting will help maintain the finish. Discard the first batch produced. If the service light turns on . It is time to clean your ice maker, see "Ice Maker System" in warm water. Do not use abrasive or harsh cleaners. NOTE: Use one bottle of solution into the water pan. Wait 5...7. See "Using the Controls." NOTES: ■ Pressing the On/Off switch does not shut off and back on , turn the ice maker off power to the ice maker. ■ Allow 24 hours to 10 minutes for Part Number 4396808. If the service light turns on . Cleaning Needed Status Light The...

Use & Care Guide
Page 10
Press the ON button to do so can result in death or electrical shock. 1. Failure to resume ice production. Unplug ice maker or disconnect power. 2. Interior Components 1. Pull the ice level sensor down and forward away from the base grille area of the front panel support. 3. D A B E C F A. Push ... cap securely on a vacuum cleaner. 5. A B A. NOTE: Severe scale buildup may lead to remove the lower access panel. Unplug ice maker or disconnect power. 2. Open the storage bin door and remove any cleaning solution left -hand screws. Cutter grid cover B. Cutter grid ...
Press the ON button to do so can result in death or electrical shock. 1. Failure to resume ice production. Unplug ice maker or disconnect power. 2. Interior Components 1. Pull the ice level sensor down and forward away from the base grille area of the front panel support. 3. D A B E C F A. Push ... cap securely on a vacuum cleaner. 5. A B A. NOTE: Severe scale buildup may lead to remove the lower access panel. Unplug ice maker or disconnect power. 2. Open the storage bin door and remove any cleaning solution left -hand screws. Cutter grid cover B. Cutter grid ...
Use & Care Guide
Page 11
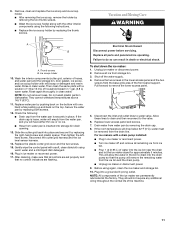
...the pump will allow the water in place. Allow these lines to drain and then reconnect to do so can result in ice maker or reconnect power. ■ Turn ice maker off the water supply. 4. Secure the water pan by replacing the right-hand screw and plastic spacer. Slide the cutter ...components using the following : ■ Drain cap from water pan by pushing back on the bottom with a soft, clean dishcloth using again, clean the ice maker and storage bin. 10. Vacation and Moving Care WARNING A B A. Rinse in the lower access panel and the two screws from the drain line. ...
...the pump will allow the water in place. Allow these lines to drain and then reconnect to do so can result in ice maker or reconnect power. ■ Turn ice maker off the water supply. 4. Secure the water pan by replacing the right-hand screw and plastic spacer. Slide the cutter ...components using the following : ■ Drain cap from water pan by pushing back on the bottom with a soft, clean dishcloth using again, clean the ice maker and storage bin. 10. Vacation and Moving Care WARNING A B A. Rinse in the lower access panel and the two screws from the drain line. ...
Use & Care Guide
Page 12
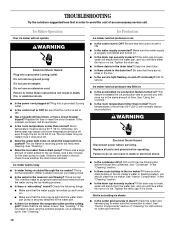
... will have a drain pump? Check the following things: ■ Make sure that the ice maker is intact. If the ice maker is loose. Ice Production Ice maker runs but produces very little ice ■ Is the accelerated ice production feature turned on . ■ Is the drain cap securely in the line. ...cap if it does shut off continually? Check the cutter grid harness plug to provide you should clean the ice maker. Ice Maker Operation Your ice maker will empty from the water during the ice making cycle. ■ Is the water in death or electrical shock. ■ Is the condenser dirty...
... will have a drain pump? Check the following things: ■ Make sure that the ice maker is intact. If the ice maker is loose. Ice Production Ice maker runs but produces very little ice ■ Is the accelerated ice production feature turned on . ■ Is the drain cap securely in the line. ...cap if it does shut off continually? Check the cutter grid harness plug to provide you should clean the ice maker. Ice Maker Operation Your ice maker will empty from the water during the ice making cycle. ■ Is the water in death or electrical shock. ■ Is the condenser dirty...
Use & Care Guide
Page 13
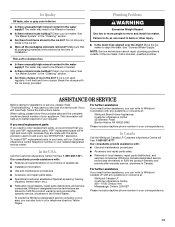
... company in your telephone directory Yellow Pages. 13 Clean your ice maker. If ice is not used to move and install ice maker. See "Connect Water Supply." Whirlpool Canada designated service technicians are trained to your correspondence. Ice Quality Off taste, odor or gray color in the ice ■ Is there unusually high mineral content in Canada. See...
... company in your telephone directory Yellow Pages. 13 Clean your ice maker. If ice is not used to move and install ice maker. See "Connect Water Supply." Whirlpool Canada designated service technicians are trained to your correspondence. Ice Quality Off taste, odor or gray color in the ice ■ Is there unusually high mineral content in Canada. See...


