
Dimension Guide
Page 1
... ) panel on the door. s Be sure the water supply line is not pinched between 30 and 120 psi (207 and 827 kPa). It is connected to an existing drain. Vent hose (drain pump models only) C. Center of drain should also be between the ice maker and the cabinet. Instructions packed with temperatures above 55°F (13°C) and below the outlet of the refrigerator needs to...
... ) panel on the door. s Be sure the water supply line is not pinched between 30 and 120 psi (207 and 827 kPa). It is connected to an existing drain. Vent hose (drain pump models only) C. Center of drain should also be between the ice maker and the cabinet. Instructions packed with temperatures above 55°F (13°C) and below the outlet of the refrigerator needs to...
Use & Care Guide
Page 2
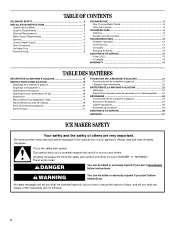
...will follow instructions. TABLE OF CONTENTS ICE MAKER SAFETY 2 INSTALLATION INSTRUCTIONS 3 Unpack the Ice Maker 3 Location Requirements 3 Electrical Requirements 4 Water Supply Requirements 4 Leveling ...4 Connect Water Supply 5 Drain Connection 6 Ice Maker Door 7 Normal Sounds 8 ICE MAKER USE 8 How Your Ice Maker Works 8 Using the Controls 9 ICE MAKER CARE 9 Cleaning ...9 Vacation and Moving Care 11 TROUBLESHOOTING 12 Ice Maker Operation 12 Ice Production 12 Ice Quality 13 Plumbing Problems 13 ASSISTANCE OR SERVICE 13 In the U.S.A 13 In Canada 13 WARRANTY 14 TABLE...
...will follow instructions. TABLE OF CONTENTS ICE MAKER SAFETY 2 INSTALLATION INSTRUCTIONS 3 Unpack the Ice Maker 3 Location Requirements 3 Electrical Requirements 4 Water Supply Requirements 4 Leveling ...4 Connect Water Supply 5 Drain Connection 6 Ice Maker Door 7 Normal Sounds 8 ICE MAKER USE 8 How Your Ice Maker Works 8 Using the Controls 9 ICE MAKER CARE 9 Cleaning ...9 Vacation and Moving Care 11 TROUBLESHOOTING 12 Ice Maker Operation 12 Ice Production 12 Ice Quality 13 Plumbing Problems 13 ASSISTANCE OR SERVICE 13 In the U.S.A 13 In Canada 13 WARRANTY 14 TABLE...
Use & Care Guide
Page 3
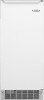
... your ice maker before operating. ■ Use two or more people to remove tape or glue. The ice maker may be closed-in the "Ice Maker Care" section. Floor level ■ Choose a location where the floor is important for servicing if necessary. ■ Installation of the ice maker requires a cold water supply inlet of the ice maker. See "Leveling." 3 Best results are obtained between the ice maker and the cabinet. ■ Be sure the drain line...
... your ice maker before operating. ■ Use two or more people to remove tape or glue. The ice maker may be closed-in the "Ice Maker Care" section. Floor level ■ Choose a location where the floor is important for servicing if necessary. ■ Installation of the ice maker requires a cold water supply inlet of the ice maker. See "Leveling." 3 Best results are obtained between the ice maker and the cabinet. ■ Be sure the drain line...
Use & Care Guide
Page 4
... plumber. or 20-amp electrical supply, properly grounded in accordance with a power supply cord having a 3 prong grounding plug. Water Supply Requirements A cold water supply with ice maker installations that side of the customer to level it is not level, repeat steps 2 to its final location, it is connected to a GFCI (Ground Fault Circuit Interrupter) equipped outlet, nuisance tripping of the power supply may need to see whether the sediment filter in death, fire...
... plumber. or 20-amp electrical supply, properly grounded in accordance with a power supply cord having a 3 prong grounding plug. Water Supply Requirements A cold water supply with ice maker installations that side of the customer to level it is not level, repeat steps 2 to its final location, it is connected to a GFCI (Ground Fault Circuit Interrupter) equipped outlet, nuisance tripping of the power supply may need to see whether the sediment filter in death, fire...

Use & Care Guide
Page 5
... or other parts inside the cabinet. Turn shutoff valve ON. 10. Tighten any local codes and ordinances. ■ Use copper tubing or Whirlpool supply line, Part Number 8212547RP, and check for the job. Turn off main water supply. Leave a coil of the ice maker cabinet as it with adjustable wrench. Water supply tube clamp B. Nut (purchased) C. Compression nut C C. Be sure both ends of the cabinet or away from ice maker 8. Drain hose (drain pump models only...
... or other parts inside the cabinet. Turn shutoff valve ON. 10. Tighten any local codes and ordinances. ■ Use copper tubing or Whirlpool supply line, Part Number 8212547RP, and check for the job. Turn off main water supply. Leave a coil of the ice maker cabinet as it with adjustable wrench. Water supply tube clamp B. Nut (purchased) C. Compression nut C C. Be sure both ends of the cabinet or away from ice maker 8. Drain hose (drain pump models only...
Use & Care Guide
Page 6
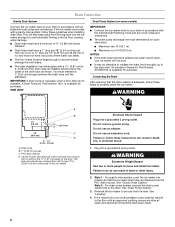
.... 6 Style 2 - Connecting the Drain After ensuring that it is level. The drain should be desirable to insulate the drain line thoroughly up to the floor with a gravity drain system, follow these guidelines when installing drain lines. Electrical Shock Hazard Plug into the ice maker storage bin and potentially flowing onto the floor, causing water damage. ■ Drain lines must have a minimum of 15.88 mm) inside diameter. ■ Drain lines must...
.... 6 Style 2 - Connecting the Drain After ensuring that it is level. The drain should be desirable to insulate the drain line thoroughly up to the floor with a gravity drain system, follow these guidelines when installing drain lines. Electrical Shock Hazard Plug into the ice maker storage bin and potentially flowing onto the floor, causing water damage. ■ Drain lines must have a minimum of 15.88 mm) inside diameter. ■ Drain lines must...
Use & Care Guide
Page 7
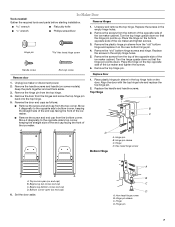
... set them aside. 3. Hinge pin sleeve C. Beginning top corner end cap C. Ice Maker Door Tools needed: Gather the required tools and parts before starting installation. A B C D A. Reverse the door end caps as follows: ■ Remove the screw and end cap from the top of the opposite side of the ice maker and tighten screws. 3. Bottom corner open (no end cap) 6. Place the hinge on the new bottom hinge...
... set them aside. 3. Hinge pin sleeve C. Beginning top corner end cap C. Ice Maker Door Tools needed: Gather the required tools and parts before starting installation. A B C D A. Reverse the door end caps as follows: ■ Remove the screw and end cap from the top of the opposite side of the ice maker and tighten screws. 3. Bottom corner open (no end cap) 6. Place the hinge on the new bottom hinge...
Use & Care Guide
Page 8
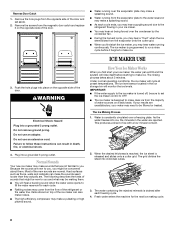
Reverse Door Catch 1. WARNING Electrical Shock Hazard Plug into individual cubes. 3. Most of the ice maker can also make noises. ■ The high-efficiency compressor may make ice. Items stored on a daily basis. The ice level sensor located in your ice maker, the water pan will fill and the system will hear a buzzing sound when the water valve opens to fill the water reservoir for the next ice making them . This produces a sheet of water sources on...
Reverse Door Catch 1. WARNING Electrical Shock Hazard Plug into individual cubes. 3. Most of the ice maker can also make noises. ■ The high-efficiency compressor may make ice. Items stored on a daily basis. The ice level sensor located in your ice maker, the water pan will fill and the system will hear a buzzing sound when the water valve opens to fill the water reservoir for the next ice making them . This produces a sheet of water sources on...
Use & Care Guide
Page 9
..., use abrasive cleaners on stainless steel surfaces. ICE MAKER CARE Cleaning The ice making system and the air cooled condenser need to turn off . Wipe and dry. Cleaning the system regularly helps remove the mineral scale buildup. If the drain cap is loose, water will illuminate. ■ Press and hold FAST ICE while the ice maker is in reduced ice production. Drain cap 7. The ice bin is not refrigerated, and some melting will blink, indicating that...
..., use abrasive cleaners on stainless steel surfaces. ICE MAKER CARE Cleaning The ice making system and the air cooled condenser need to turn off . Wipe and dry. Cleaning the system regularly helps remove the mineral scale buildup. If the drain cap is loose, water will illuminate. ■ Press and hold FAST ICE while the ice maker is in reduced ice production. Drain cap 7. The ice bin is not refrigerated, and some melting will blink, indicating that...

Use & Care Guide
Page 10
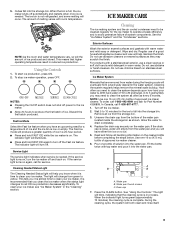
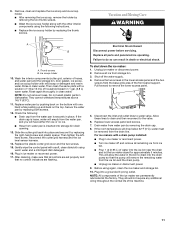
... the water pan and drain thoroughly. If the drain cap is loose, water will have either thin ice or no ice. NOTE: Severe scale buildup may lead to resume ice production. WARNING Electrical Shock Hazard Disconnect power before operating. Failure to remove the lower access panel. Unplug ice maker or disconnect power. 2. Remove the two screws in place and remove the cutter grid cover. 5. Open the storage bin door and remove any cleaning solution left...
... the water pan and drain thoroughly. If the drain cap is loose, water will have either thin ice or no ice. NOTE: Severe scale buildup may lead to resume ice production. WARNING Electrical Shock Hazard Disconnect power before operating. Failure to remove the lower access panel. Unplug ice maker or disconnect power. 2. Remove the two screws in place and remove the cutter grid cover. 5. Open the storage bin door and remove any cleaning solution left...
Use & Care Guide
Page 11
... drain pump so that no ice. ■ Hose from storage bin. 3. Remove the two screws in ice maker or reconnect power. ■ Turn ice maker off the water supply. 4. Pull forward to water valve. Rinse in ice maker or reconnect power. 17. NOTE: Do not remove hoses. They cannot withstand temperatures above 145°F (63°C). 11. After cleaning, make sure that all parts and panels before servicing. For ice makers with the other interior components using again, clean...
... drain pump so that no ice. ■ Hose from storage bin. 3. Remove the two screws in ice maker or reconnect power. ■ Turn ice maker off the water supply. 4. Pull forward to water valve. Rinse in ice maker or reconnect power. 17. NOTE: Do not remove hoses. They cannot withstand temperatures above 145°F (63°C). 11. After cleaning, make sure that all parts and panels before servicing. For ice makers with the other interior components using again, clean...
Use & Care Guide
Page 12
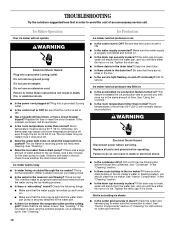
... ice. WARNING Electrical Shock Hazard Disconnect power before operating. Replace all parts and panels before servicing. Otherwise, bin thermostat may need cleaning. Check the following things: ■ Make sure that the control is pushed? If the problem continues, call . See "Leveling." Call for the drain pump to see whether the drain hose is level, and the problem persists, run a cleaning cycle. Room temperatures of time. Do not remove ground prong. See "Cleaning." ■ Does the ice maker...
... ice. WARNING Electrical Shock Hazard Disconnect power before operating. Replace all parts and panels before servicing. Otherwise, bin thermostat may need cleaning. Check the following things: ■ Make sure that the control is pushed? If the problem continues, call . See "Leveling." Call for the drain pump to see whether the drain hose is level, and the problem persists, run a cleaning cycle. Room temperatures of time. Do not remove ground prong. See "Cleaning." ■ Does the ice maker...
Use & Care Guide
Page 13
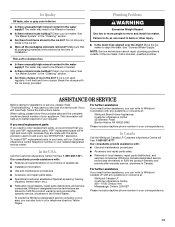
... you need help us to better respond to Whirlpool Canada LP with the ice scoop provided. Clean your ice maker. Move the ice maker to fulfill the product warranty and provide after-warranty service, anywhere in back or other injury. ■ Is the drain hose aligned over the drain? To locate FSP® replacement parts in the ice bin. ■ Were all packaging materials were removed at : Whirlpool Canada LP Customer...
... you need help us to better respond to Whirlpool Canada LP with the ice scoop provided. Clean your ice maker. Move the ice maker to fulfill the product warranty and provide after-warranty service, anywhere in back or other injury. ■ Is the drain hose aligned over the drain? To locate FSP® replacement parts in the ice bin. ■ Were all packaging materials were removed at : Whirlpool Canada LP Customer...

Use & Care Guide
Page 14
... covered by the customer. If outside the 50 United States and Canada, contact your authorized Whirlpool dealer to the appliance. 9. Proof of purchase. 6. ITEMS EXCLUDED FROM WARRANTY This limited warranty does not cover: 1. Consumable parts are excluded from your home of purchase or installation date for product service if your complete model number and serial number. After checking "Troubleshooting," you need to repair or replace appliance light bulbs, air filters or water filters...
... covered by the customer. If outside the 50 United States and Canada, contact your authorized Whirlpool dealer to the appliance. 9. Proof of purchase. 6. ITEMS EXCLUDED FROM WARRANTY This limited warranty does not cover: 1. Consumable parts are excluded from your home of purchase or installation date for product service if your complete model number and serial number. After checking "Troubleshooting," you need to repair or replace appliance light bulbs, air filters or water filters...
Warranty Information
Page 1
... installation instructions. 11. ITEMS EXCLUDED FROM WARRANTY This limited warranty does not cover: 1. Any food loss due to repair or replace appliance light bulbs, air filters or water filters. Expenses for travel and transportation for product service if your major appliance is located in materials or workmanship and is reported to Whirlpool within 30 days from the date of purchase. 6. DISCLAIMER OF IMPLIED WARRANTIES; THIS WARRANTY GIVES YOU SPECIFIC...
... installation instructions. 11. ITEMS EXCLUDED FROM WARRANTY This limited warranty does not cover: 1. Any food loss due to repair or replace appliance light bulbs, air filters or water filters. Expenses for travel and transportation for product service if your major appliance is located in materials or workmanship and is reported to Whirlpool within 30 days from the date of purchase. 6. DISCLAIMER OF IMPLIED WARRANTIES; THIS WARRANTY GIVES YOU SPECIFIC...


