Owners Manual
Page 1
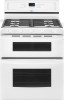
® GAS DOUBLE OVEN RANGE Use & Care Guide For questions about features, operation/performance, parts, accessories or service, call: 1-800-253-1301. www.whirlpool.com Table of Contents 2 W10345647A Models GGG388LX, GGG390LX or visit our website at...
® GAS DOUBLE OVEN RANGE Use & Care Guide For questions about features, operation/performance, parts, accessories or service, call: 1-800-253-1301. www.whirlpool.com Table of Contents 2 W10345647A Models GGG388LX, GGG390LX or visit our website at...

Owners Manual
Page 14
... START." 2. Remove food from the oven. Press START. Place food in the recipe. "Set temp or" will appear in 2 or 3 different places, including the thickest part. ■ Before convection cooking, position the rack(s) according to speed up cooking by 25°F (15°C). Convect Broiling (on some models) Use Convect for...
... START." 2. Remove food from the oven. Press START. Place food in the recipe. "Set temp or" will appear in 2 or 3 different places, including the thickest part. ■ Before convection cooking, position the rack(s) according to speed up cooking by 25°F (15°C). Convect Broiling (on some models) Use Convect for...
Owners Manual
Page 18
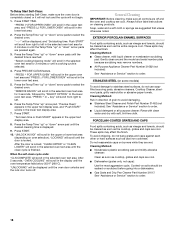
...spills containing acids, such as vinegar and tomato, should be soaked or scrubbed before going into a dishwasher. ■ Gas Grate and Drip Pan Cleaner Part Number 31617: See "Assistance or Service" section to left . 6. Press the Temp/Time "up " or "down " arrow pads to left in... and tomato, should be displayed until the desired cleaning time is displayed. 9. These spills may remove numbers. ■ All-Purpose Appliance Cleaner Part Number 31682 (not included): See "Assistance or Service" section to stainless steel surfaces, do not bang grates and caps against each other or ...
...spills containing acids, such as vinegar and tomato, should be soaked or scrubbed before going into a dishwasher. ■ Gas Grate and Drip Pan Cleaner Part Number 31617: See "Assistance or Service" section to left . 6. Press the Temp/Time "up " or "down " arrow pads to left in... and tomato, should be displayed until the desired cleaning time is displayed. 9. These spills may remove numbers. ■ All-Purpose Appliance Cleaner Part Number 31682 (not included): See "Assistance or Service" section to stainless steel surfaces, do not bang grates and caps against each other or ...
Owners Manual
Page 19
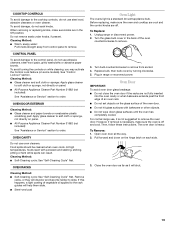
... towels or nonabrasive plastic scrubbing pad: Apply glass cleaner to soft cloth or sponge, not directly on panel. ■ All-Purpose Appliance Cleaner Part Number 31682 (not included): See "Assistance or Service" section to order. Food spills should be cleaned when oven cools. Turn the glass bulb... Glass cleaner and soft cloth or sponge: Apply glass cleaner to soft cloth or sponge, not directly on panel. ■ All-Purpose Appliance Cleaner Part Number 31682 (not included): See "Assistance or Service" section to order. If this happens, a light coating of vegetable oil applied to the rack...
... towels or nonabrasive plastic scrubbing pad: Apply glass cleaner to soft cloth or sponge, not directly on panel. ■ All-Purpose Appliance Cleaner Part Number 31682 (not included): See "Assistance or Service" section to order. Food spills should be cleaned when oven cools. Turn the glass bulb... Glass cleaner and soft cloth or sponge: Apply glass cleaner to soft cloth or sponge, not directly on panel. ■ All-Purpose Appliance Cleaner Part Number 31682 (not included): See "Assistance or Service" section to order. If this happens, a light coating of vegetable oil applied to the rack...

Owners Manual
Page 22
... fulfill the product warranty and provide afterwarranty service, anywhere in your nearest Whirlpool designated service center. Broiler Pan and Grid Order Part Number 4396923 Stainless Steel Cleaner and Polish (stainless steel models) Order Part Number 31462 All-Purpose Appliance Cleaner Order Part Number 31682 22 ASSISTANCE OR SERVICE Before calling for assistance or service...
... fulfill the product warranty and provide afterwarranty service, anywhere in your nearest Whirlpool designated service center. Broiler Pan and Grid Order Part Number 4396923 Stainless Steel Cleaner and Polish (stainless steel models) Order Part Number 31462 All-Purpose Appliance Cleaner Order Part Number 31682 22 ASSISTANCE OR SERVICE Before calling for assistance or service...
Owners Manual
Page 23
... INCIDENTAL OR CONSEQUENTIAL DAMAGES. Dealer name Address Phone number Model number Serial number Purchase date 23 Consumable parts are excluded from unauthorized modifications made to obtain service under these excluded circumstances shall be provided by Whirlpool. 5. If you may find this limited warranty does not apply. This warranty is required to the...
... INCIDENTAL OR CONSEQUENTIAL DAMAGES. Dealer name Address Phone number Model number Serial number Purchase date 23 Consumable parts are excluded from unauthorized modifications made to obtain service under these excluded circumstances shall be provided by Whirlpool. 5. If you may find this limited warranty does not apply. This warranty is required to the...
Installation Instructions
Page 3
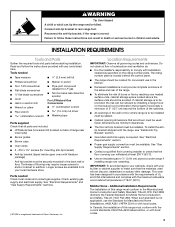
... Noncorrosive leak-detection solution For LP/Natural Gas Conversions ■ ½" combination wrench 7.0 mm) nut driver ■ Masking tape Parts supplied Check that all governing codes and ordinances. The rating number plate is to be provided, the risk can be reduced by reaching ... to check that the materials used . Failure to follow the instructions provided with any tools listed here. Location Requirements IMPORTANT: Observe all parts are shown must conform with the current standards CAN/CSA-A240-latest edition, or with local codes. 3 See "Gas Supply Requirements" section...
... Noncorrosive leak-detection solution For LP/Natural Gas Conversions ■ ½" combination wrench 7.0 mm) nut driver ■ Masking tape Parts supplied Check that all governing codes and ordinances. The rating number plate is to be provided, the risk can be reduced by reaching ... to check that the materials used . Failure to follow the instructions provided with any tools listed here. Location Requirements IMPORTANT: Observe all parts are shown must conform with the current standards CAN/CSA-A240-latest edition, or with local codes. 3 See "Gas Supply Requirements" section...
Installation Instructions
Page 7
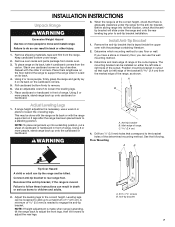
... to follow these instructions can use a wrench or pliers to the bracket holes of the cutout. A. #12 x 1⁵⁄₈" screws B. Remove oven racks and parts package from the range. The mounting bracket can tip the range and be installed on its back. 4. When the range is at the correct height...
... to follow these instructions can use a wrench or pliers to the bracket holes of the cutout. A. #12 x 1⁵⁄₈" screws B. Remove oven racks and parts package from the range. The mounting bracket can tip the range and be installed on its back. 4. When the range is at the correct height...
Installation Instructions
Page 9
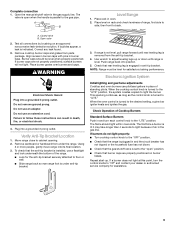
... household fuse has not blown. ■ Check that the anti-tip bracket is parallel to the "LITE" position. If bubbles appear, a leak is removed from parts package. Place burner grates over burners and caps. Failure to back. If burners do not light properly: ■ Turn cooktop control knob to the "OFF...
... household fuse has not blown. ■ Check that the anti-tip bracket is parallel to the "LITE" position. If bubbles appear, a leak is removed from parts package. Place burner grates over burners and caps. Failure to back. If burners do not light properly: ■ Turn cooktop control knob to the "OFF...
Installation Instructions
Page 11
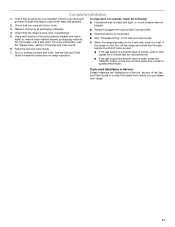
... shutoff valve is open, press the CANCEL button on range operation. ■ Range is plugged into a grounded 3 prong outlet. ■ Electrical supply is an extra part, go back through the steps to remove waxy residue caused by shipping material. Dispose of/recycle all of liquid household cleaner and warm water to... Service: Please reference the "Assistance or Service" section of the Use and Care Guide. 6. See the Use and Care Guide for heat. Check that all parts are now installed. Dry thoroughly with a soft cloth. Complete Installation 1.
... shutoff valve is open, press the CANCEL button on range operation. ■ Range is plugged into a grounded 3 prong outlet. ■ Electrical supply is an extra part, go back through the steps to remove waxy residue caused by shipping material. Dispose of/recycle all of liquid household cleaner and warm water to... Service: Please reference the "Assistance or Service" section of the Use and Care Guide. 6. See the Use and Care Guide for heat. Check that all parts are now installed. Dry thoroughly with a soft cloth. Complete Installation 1.
Installation Instructions
Page 15
...) C. Natural Gas Conversion WARNING A. Unplug range or disconnect power. 15 If the burner grates are installed, remove them. 2. Place Natural gas orifice spuds in plastic parts bag for proper sizing of a 7.0 mm) nut driver to follow these instructions can tip the range and be killed. Reconnect the anti-tip bracket, if...
...) C. Natural Gas Conversion WARNING A. Unplug range or disconnect power. 15 If the burner grates are installed, remove them. 2. Place Natural gas orifice spuds in plastic parts bag for proper sizing of a 7.0 mm) nut driver to follow these instructions can tip the range and be killed. Reconnect the anti-tip bracket, if...

Installation Instructions
Page 18
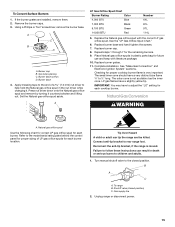
.... 10. Burner base 4. Set the LP gas orifice spud aside. Replace the LP gas orifice spud with screw. Place LP gas orifice spuds in plastic parts bag for the remaining burners. 9. Using a Phillips or Torx® screwdriver, remove the burner base. Number 0.054 Natural gas broil burner orifice hood 5. A B A. Refer to...
.... 10. Burner base 4. Set the LP gas orifice spud aside. Replace the LP gas orifice spud with screw. Place LP gas orifice spuds in plastic parts bag for the remaining burners. 9. Using a Phillips or Torx® screwdriver, remove the burner base. Number 0.054 Natural gas broil burner orifice hood 5. A B A. Refer to...

Warranty
Page 1
...by checking the "Assistance or Service" section or by a Whirlpool designated service company. You will pay for Factory Specified Parts and repair labor to correct defects in materials or workmanship and is reported to Whirlpool within 30 days from the date of purchase. 6. Outside ... furnished with the removal from your home of your major appliance for repairs. Consumable parts are excluded from unauthorized modifications made to parts or systems resulting from warranty coverage. 3. WHIRLPOOL SHALL NOT BE LIABLE FOR INCIDENTAL OR CONSEQUENTIAL DAMAGES. SOME STATES AND PROVINCES DO ...
...by checking the "Assistance or Service" section or by a Whirlpool designated service company. You will pay for Factory Specified Parts and repair labor to correct defects in materials or workmanship and is reported to Whirlpool within 30 days from the date of purchase. 6. Outside ... furnished with the removal from your home of your major appliance for repairs. Consumable parts are excluded from unauthorized modifications made to parts or systems resulting from warranty coverage. 3. WHIRLPOOL SHALL NOT BE LIABLE FOR INCIDENTAL OR CONSEQUENTIAL DAMAGES. SOME STATES AND PROVINCES DO ...


