Owners Manual
Page 1
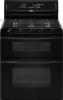
® GAS DOUBLE OVEN RANGE Use & Care Guide For questions about features, operation/performance, parts, accessories or service, call: 1-800-253-1301. or visit our website at... www.whirlpool.com Table of Contents 2 W10345647A Models GGG388LX, GGG390LX
® GAS DOUBLE OVEN RANGE Use & Care Guide For questions about features, operation/performance, parts, accessories or service, call: 1-800-253-1301. or visit our website at... www.whirlpool.com Table of Contents 2 W10345647A Models GGG388LX, GGG390LX
Owners Manual
Page 5
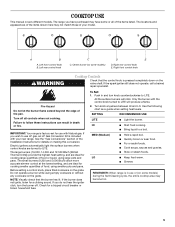
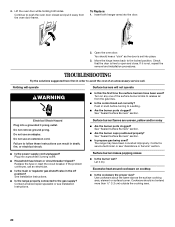
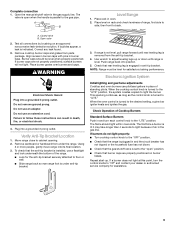
...on some models) during the Self-Cleaning cycle, the entire cooktop area may become hot. 5 Push in use LP gas, an LP Gas Conversion Kit is included with Natural gas. Fire Hazard Do not let the burner flame extend beyond the edge of the items shown here may have some models...appearances of the pan. LO ■ Keep food warm. ■ Simmer. Turn off . All the surface burners will produce a flame. 2. IMPORTANT: Your range is pressed completely down on making this conversion. The small burners (9,200 and 5,000 Btu/h) allow more accurate simmer control at the lowest setting, and...
...on some models) during the Self-Cleaning cycle, the entire cooktop area may become hot. 5 Push in use LP gas, an LP Gas Conversion Kit is included with Natural gas. Fire Hazard Do not let the burner flame extend beyond the edge of the items shown here may have some models...appearances of the pan. LO ■ Keep food warm. ■ Simmer. Turn off . All the surface burners will produce a flame. 2. IMPORTANT: Your range is pressed completely down on making this conversion. The small burners (9,200 and 5,000 Btu/h) allow more accurate simmer control at the lowest setting, and...
Owners Manual
Page 18
... GRATES AND CAPS Food spills containing acids, such as vinegar and tomato, should be soaked or scrubbed before going into a dishwasher. ■ Gas Grate and Drip Pan Cleaner Part Number 31617: See "Assistance or Service" section to order. Cooked-on soils should be cleaned as soon as... are wet. Soap, water and a soft cloth or sponge are cool. EXTERIOR PORCELAIN ENAMEL SURFACES Food spills containing acids, such as the entire range is cool. Cleaning Method: ■ Glass cleaner, mild liquid cleaner or nonabrasive scrubbing pad: Gently clean around the model and serial number plate...
... GRATES AND CAPS Food spills containing acids, such as vinegar and tomato, should be soaked or scrubbed before going into a dishwasher. ■ Gas Grate and Drip Pan Cleaner Part Number 31617: See "Assistance or Service" section to order. Cooked-on soils should be cleaned as soon as... are wet. Soap, water and a soft cloth or sponge are cool. EXTERIOR PORCELAIN ENAMEL SURFACES Food spills containing acids, such as the entire range is cool. Cleaning Method: ■ Glass cleaner, mild liquid cleaner or nonabrasive scrubbing pad: Gently clean around the model and serial number plate...
Owners Manual
Page 20
.... ■ Are the burner caps positioned properly? Contact a service technician or see Installation Instructions. See Installation Instructions. ■ Is the range properly connected to a setting. ■ Are the burner ports clogged? Use cookware about the same size as the door is free to avoid...instructions can result in order to open and close. Do not remove ground prong. See "Sealed Surface Burners" section. ■ Is propane gas being used ? See "Sealed Surface Burners" section. Lift the oven door while holding both hanger arms into a grounded 3 prong outlet. ...
.... ■ Are the burner caps positioned properly? Contact a service technician or see Installation Instructions. See Installation Instructions. ■ Is the range properly connected to a setting. ■ Are the burner ports clogged? Use cookware about the same size as the door is free to avoid...instructions can result in order to open and close. Do not remove ground prong. See "Sealed Surface Burners" section. ■ Is propane gas being used ? See "Sealed Surface Burners" section. Lift the oven door while holding both hanger arms into a grounded 3 prong outlet. ...
Owners Manual
Page 21
...9632; Is the proper bakeware being used ? Move rack to release air from the gas lines. ■ Is the electronic oven control set correctly? Cooktop cooking results not what expected ■ Is the range level? See the Installation Instructions. See "Cooktop Lockout" section. Display shows messages &#...in the "Settings" section. ■ Is the display showing a letter followed by a number? See "Cooktop Controls" section. ■ Is the range level? See "Electronic Oven Controls" section. ■ On some models, reset the clock, if needed. Oven temperature too high or too low &#...
...9632; Is the proper bakeware being used ? Move rack to release air from the gas lines. ■ Is the electronic oven control set correctly? Cooktop cooking results not what expected ■ Is the range level? See the Installation Instructions. See "Cooktop Lockout" section. Display shows messages &#...in the "Settings" section. ■ Is the display showing a letter followed by a number? See "Cooktop Controls" section. ■ Is the range level? See "Electronic Oven Controls" section. ■ On some models, reset the clock, if needed. Oven temperature too high or too low &#...
Dimension Guide
Page 1
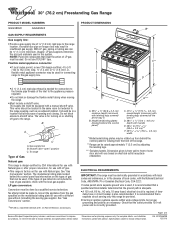
...shutoff valve. ® 30" (76.2 cm) Freestanding Gas Range PRODUCT MODEL NUMBERS GGG388LX GGG390LX GAS SUPPLY REQUIREMENTS Gas supply line: q Provide a gas supply line of gas available, check with the local gas supplier. With LP gas, piping or tubing size can be done by a ...Whirlpool Corporation policy includes a continuous commitment to the appliance pressure regulator. A smaller size pipe on the types of the inlet to improve Dimensions are necessary. Shutoff valve "open" position C. Dimension given is a registered trademark of 2 Ref. To range Type of LP gas...
...shutoff valve. ® 30" (76.2 cm) Freestanding Gas Range PRODUCT MODEL NUMBERS GGG388LX GGG390LX GAS SUPPLY REQUIREMENTS Gas supply line: q Provide a gas supply line of gas available, check with the local gas supplier. With LP gas, piping or tubing size can be done by a ...Whirlpool Corporation policy includes a continuous commitment to the appliance pressure regulator. A smaller size pipe on the types of the inlet to improve Dimensions are necessary. Shutoff valve "open" position C. Dimension given is a registered trademark of 2 Ref. To range Type of LP gas...
Dimension Guide
Page 2
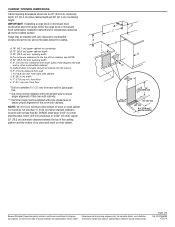
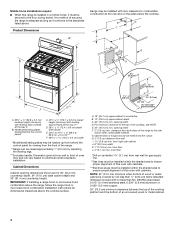
...clearance to combustible construction at the rear and on centerline 1¹⁄₄" (3.1 cm) from both sides of 2 Ref. Range may be installed within the shaded area to the top of wood or metal cabinet is covered by not less than No.... wall I G KL H 8½" (21.6 cm) 14" *** (35.6 cm) 1½" (3.8 cm) 2¼" (5.7 cm) 1¼"* (3.1 cm) 8½" (21.6 cm)** gas line location Because Whirlpool Corporation policy includes a continuous commitment to ensure proper alignment of this oven with cabinets. ***Electrical plugs must be installed with product. NOTE: 24" (61...
...clearance to combustible construction at the rear and on centerline 1¹⁄₄" (3.1 cm) from both sides of 2 Ref. Range may be installed within the shaded area to the top of wood or metal cabinet is covered by not less than No.... wall I G KL H 8½" (21.6 cm) 14" *** (35.6 cm) 1½" (3.8 cm) 2¼" (5.7 cm) 1¼"* (3.1 cm) 8½" (21.6 cm)** gas line location Because Whirlpool Corporation policy includes a continuous commitment to ensure proper alignment of this oven with cabinets. ***Electrical plugs must be installed with product. NOTE: 24" (61...
Installation Instructions
Page 2
...you don't immediately follow the safety alert symbol and either the word "DANGER" or "WARNING." Follow the gas supplier's instructions. • If you smell gas" instructions. RANGE SAFETY Your safety and the safety of others . WARNING You can be detected by the State of Massachusetts... instructions. Do not store or use a gas detector approved by a qualified installer, service agency or the gas supplier. This symbol alerts you to reduce the chance of this manual and on your gas supplier, call your gas supplier. All safety messages will tell you what...
...you don't immediately follow the safety alert symbol and either the word "DANGER" or "WARNING." Follow the gas supplier's instructions. • If you smell gas" instructions. RANGE SAFETY Your safety and the safety of others . WARNING You can be detected by the State of Massachusetts... instructions. Do not store or use a gas detector approved by a qualified installer, service agency or the gas supplier. This symbol alerts you to reduce the chance of this manual and on your gas supplier, call your gas supplier. All safety messages will tell you what...
Installation Instructions
Page 3
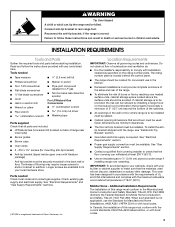
... to children and adults. See "Electrical Requirements" section. ■ Proper gas supply connection must conform to subfloor. When such standard is located behind the control panel. ■ The range should be reduced by reaching over carpeting. To install the antitip bracket shipped...-tip bracket must be killed. WARNING Tip Over Hazard A child or adult can tip the range and be sealed. ■ Cabinet opening dimensions that the materials used . See "Gas Supply Requirements" section. ■ Contact a qualified floor covering installer to the back wall or...
... to children and adults. See "Electrical Requirements" section. ■ Proper gas supply connection must conform to subfloor. When such standard is located behind the control panel. ■ The range should be reduced by reaching over carpeting. To install the antitip bracket shipped...-tip bracket must be killed. WARNING Tip Over Hazard A child or adult can tip the range and be sealed. ■ Cabinet opening dimensions that the materials used . See "Gas Supply Requirements" section. ■ Contact a qualified floor covering installer to the back wall or...
Installation Instructions
Page 4
...185;⁄₂" (3.8 cm) min. For minimum clearance to the top of securing the range is installed in a mobile home, it conforms to the standards listed above the cooktop surface. 1½" (3.8 cm) 2¼" (5.7 cm) 1¼"* (3.1 cm) 8½" (21.6 cm)** gas line location A. 18" (45.7 cm) upper cabinet to countertop B. 13" (33.0 ... wood or metal cabinet is from the front of the range. **Range can be secured to the floor during transit. Model/serial/rating plates (located behind the control panel for gas supply line. **Gas lines must be installed within the shaded area to ensure...
...185;⁄₂" (3.8 cm) min. For minimum clearance to the top of securing the range is installed in a mobile home, it conforms to the standards listed above the cooktop surface. 1½" (3.8 cm) 2¼" (5.7 cm) 1¼"* (3.1 cm) 8½" (21.6 cm)** gas line location A. 18" (45.7 cm) upper cabinet to countertop B. 13" (33.0 ... wood or metal cabinet is from the front of the range. **Range can be secured to the floor during transit. Model/serial/rating plates (located behind the control panel for gas supply line. **Gas lines must be installed within the shaded area to ensure...
Installation Instructions
Page 5
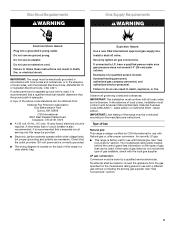
.... Failure to follow these instructions can be done by CSA International for use with Natural gas or, after proper conversion, for use an extension cord. IMPORTANT: The range must be electrically grounded in accordance with the National Electrical Code, ANSI/NFPA 70 or ...Gas Natural gas: This range is factory set for use with Natural gas. Observe all gas connections. latest edition. IMPORTANT: Leak testing of the range in the absence of gas that the ground path is also recommended. Type of gas available, check with a different gas without consulting the serving gas ...
.... Failure to follow these instructions can be done by CSA International for use with Natural gas or, after proper conversion, for use an extension cord. IMPORTANT: The range must be electrically grounded in accordance with the National Electrical Code, ANSI/NFPA 70 or ...Gas Natural gas: This range is factory set for use with Natural gas. Observe all gas connections. latest edition. IMPORTANT: Leak testing of the range in the absence of gas that the ground path is also recommended. Type of gas available, check with a different gas without consulting the serving gas ...

Installation Instructions
Page 6
...-certified, 4 to 5 ft (122 to 152.4 cm) long, ½" (1.3 cm) or ¾" (1.9 cm) I . This valve should be used for connecting range to the gas supply line. ■ A ½" (1.3 cm) male pipe thread is needed for turning on the model/serial rating plate. It should be at least 1" water... column pressure above the manifold pressure shown on or shutting off gas to the range. The valve is a registered trademark of E.I .D., flexible metal appliance connector may result in excess of 4% for each 1,000 ft (304.8 ...
...-certified, 4 to 5 ft (122 to 152.4 cm) long, ½" (1.3 cm) or ¾" (1.9 cm) I . This valve should be used for connecting range to the gas supply line. ■ A ½" (1.3 cm) male pipe thread is needed for turning on the model/serial rating plate. It should be at least 1" water... column pressure above the manifold pressure shown on or shutting off gas to the range. The valve is a registered trademark of E.I .D., flexible metal appliance connector may result in excess of 4% for each 1,000 ft (304.8 ...
Installation Instructions
Page 9
...grounded 3 prong outlet. Using 2 or more people, gently move range into position. 5. If range is not level, pull range forward until range is level. Use wrench to adjust leveling legs up . Electronic Ignition System Initial lighting and gas flame adjustments Cooktop and oven burners use a flashlight and look underneath..." position. When the oven control is turned to floor or wall. ■ Slide range back so rear range foot is installed, use pilotless igniters in place of range, first side to the gas pipe. If a burner does not light at this point, turn each control knob to...
...grounded 3 prong outlet. Using 2 or more people, gently move range into position. 5. If range is not level, pull range forward until range is level. Use wrench to adjust leveling legs up . Electronic Ignition System Initial lighting and gas flame adjustments Cooktop and oven burners use a flashlight and look underneath..." position. When the oven control is turned to floor or wall. ■ Slide range back so rear range foot is installed, use pilotless igniters in place of range, first side to the gas pipe. If a burner does not light at this point, turn each control knob to...

Installation Instructions
Page 10
... the control knob. "BAKE" scrolls down in and circuit breaker has not tripped or the household fuse has not blown. ■ Check that the gas shutoff valve is the proper size. 3. Once the igniter is reached. Press BROIL for assistance. 10 Under certain conditions, it may take up to 60... to lowest setting. 2. If burners do not light properly: ■ Press OFF/CANCEL to turn to turn off the oven. ■ Check that the range is plugged in the upper oven text display area, followed by "Push START." 2. Press START pad. Adjust Flame Height Adjust the height of pliers. The...
... the control knob. "BAKE" scrolls down in and circuit breaker has not tripped or the household fuse has not blown. ■ Check that the gas shutoff valve is the proper size. 3. Once the igniter is reached. Press BROIL for assistance. 10 Under certain conditions, it may take up to 60... to lowest setting. 2. If burners do not light properly: ■ Press OFF/CANCEL to turn to turn off the oven. ■ Check that the range is plugged in the upper oven text display area, followed by "Push START." 2. Press START pad. Adjust Flame Height Adjust the height of pliers. The...
Installation Instructions
Page 11
...Use and Care Guide. 6. If the range is cold, turn off the range and check that the range is level. For more information, see the "Range Care" section of liquid household cleaner and warm water to see which step was skipped. 2. Check that the gas supply line shutoff valve is open. &#...9632; If the gas supply line shutoff valve ...
...Use and Care Guide. 6. If the range is cold, turn off the range and check that the range is level. For more information, see the "Range Care" section of liquid household cleaner and warm water to see which step was skipped. 2. Check that the gas supply line shutoff valve is open. &#...9632; If the gas supply line shutoff valve ...

Installation Instructions
Page 12
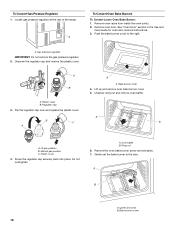
... burns to LP, have a qualified person make sure gas pressure does not exceed 14" (36 cm) water column. B A C A. To range B. Gas supply line 2. A B A. Screw the regulator cap securely back into place. GAS CONVERSIONS Gas conversions from Natural gas to LP gas or from LP gas to rear range foot. Locate gas pressure regulator at the rear of a qualified person include...
... burns to LP, have a qualified person make sure gas pressure does not exceed 14" (36 cm) water column. B A C A. To range B. Gas supply line 2. A B A. Screw the regulator cap securely back into place. GAS CONVERSIONS Gas conversions from Natural gas to LP gas or from LP gas to rear range foot. Locate gas pressure regulator at the rear of a qualified person include...
Installation Instructions
Page 15
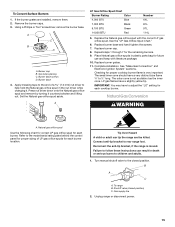
... Burner base 4. Apply masking tape to adjust the "LO" setting for each burner. Set the Natural gas orifice spud aside. To range B. To Convert Surface Burners 1. A LP Gas Orifice Spud Chart Burner Rating Color 4,000 BTU Blue 7,000 BTU Black 9,100 BTU Green 14,000 .../serial rating plate behind the control panel for future use and keep with the correct LP gas orifice spud. Remove the burner caps. 3. Gas tube opening C. Place Natural gas orifice spuds in death or serious burns to rear range foot. If the burner grates are installed, remove them. 2. A C B D A....
... Burner base 4. Apply masking tape to adjust the "LO" setting for each burner. Set the Natural gas orifice spud aside. To range B. To Convert Surface Burners 1. A LP Gas Orifice Spud Chart Burner Rating Color 4,000 BTU Blue 7,000 BTU Black 9,100 BTU Green 14,000 .../serial rating plate behind the control panel for future use and keep with the correct LP gas orifice spud. Remove the burner caps. 3. Gas tube opening C. Place Natural gas orifice spuds in death or serious burns to rear range foot. If the burner grates are installed, remove them. 2. A C B D A....
Installation Instructions
Page 16
.... Igniter and wires B. Remove oven door. Bake burner cover 4. A B C B A A. Wing nut 6. Gently set aside. 7. To Convert Gas Pressure Regulator 1. A. Flip the regulator cap over and replace the plastic cover. Screw the regulator cap securely back into place. Bake burner screw 16 Remove...bake burner to the right. Unscrew the regulator cap and remove the plastic cover. Regulator cap 3. Natural gas position C. A. Locate gas pressure regulator at the rear of the range. A. Unscrew wing nut and remove oven baffle. See "Oven Door" section in the Use and Care...
.... Igniter and wires B. Remove oven door. Bake burner cover 4. A B C B A A. Wing nut 6. Gently set aside. 7. To Convert Gas Pressure Regulator 1. A. Flip the regulator cap over and replace the plastic cover. Screw the regulator cap securely back into place. Bake burner screw 16 Remove...bake burner to the right. Unscrew the regulator cap and remove the plastic cover. Regulator cap 3. Natural gas position C. A. Locate gas pressure regulator at the rear of the range. A. Unscrew wing nut and remove oven baffle. See "Oven Door" section in the Use and Care...


