Owners Manual
Page 1
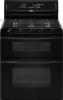
® GAS DOUBLE OVEN RANGE Use & Care Guide For questions about features, operation/performance, parts, accessories or service, call: 1-800-253-1301. or visit our website at... www.whirlpool.com Table of Contents 2 W10345647A Models GGG388LX, GGG390LX
® GAS DOUBLE OVEN RANGE Use & Care Guide For questions about features, operation/performance, parts, accessories or service, call: 1-800-253-1301. or visit our website at... www.whirlpool.com Table of Contents 2 W10345647A Models GGG388LX, GGG390LX

Owners Manual
Page 14
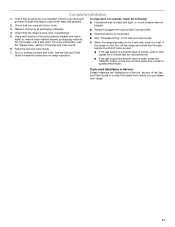
... BAKE" will scroll in the lower oven text area, and "Rapid preheating for multi-rack baking" will scroll in 2 or 3 different places, including the thickest part. ■ Before convection cooking, position the rack(s) according to the "Positioning Racks and Bakeware" section. ■ When using more than one rack, position bakeware/ cookware...
... BAKE" will scroll in the lower oven text area, and "Rapid preheating for multi-rack baking" will scroll in 2 or 3 different places, including the thickest part. ■ Before convection cooking, position the rack(s) according to the "Positioning Racks and Bakeware" section. ■ When using more than one rack, position bakeware/ cookware...
Owners Manual
Page 18
...acids, such as vinegar and tomato, should be soaked or scrubbed before going into a dishwasher. ■ Gas Grate and Drip Pan Cleaner Part Number 31617: See "Assistance or Service" section to order. These spills may remove numbers. ■ All-Purpose Appliance Cleaner...desired cleaning time is selected. 4. "Select cooking/cleaning mode" will scroll in direction of grain to avoid damaging. ■ Stainless Steel Cleaner and Polish Part Number 31462 (not included): See "Assistance or Service" section to select the desired oven. Press PRECISE CLEAN feature. Press the Temp/Time "up " ...
...acids, such as vinegar and tomato, should be soaked or scrubbed before going into a dishwasher. ■ Gas Grate and Drip Pan Cleaner Part Number 31617: See "Assistance or Service" section to order. These spills may remove numbers. ■ All-Purpose Appliance Cleaner...desired cleaning time is selected. 4. "Select cooking/cleaning mode" will scroll in direction of grain to avoid damaging. ■ Stainless Steel Cleaner and Polish Part Number 31462 (not included): See "Assistance or Service" section to select the desired oven. Press PRECISE CLEAN feature. Press the Temp/Time "up " ...
Owners Manual
Page 19
... temperatures, foods react with bakeware or other objects. ■ Do not wipe down on the hinge latch on panel. ■ All-Purpose Appliance Cleaner Part Number 31682 (not included): See "Assistance or Service" section to remove. 3. Plug in the Off position. To Remove: 1. Open oven door all .... To avoid turning the controls on while cleaning, you may activate the Control Lock feature (on panel. ■ All-Purpose Appliance Cleaner Part Number 31682 (not included): See "Assistance or Service" section to remove from control panel to remove. Food spills should be cleaned when oven...
... temperatures, foods react with bakeware or other objects. ■ Do not wipe down on the hinge latch on panel. ■ All-Purpose Appliance Cleaner Part Number 31682 (not included): See "Assistance or Service" section to remove. 3. Plug in the Off position. To Remove: 1. Open oven door all .... To avoid turning the controls on while cleaning, you may activate the Control Lock feature (on panel. ■ All-Purpose Appliance Cleaner Part Number 31682 (not included): See "Assistance or Service" section to remove from control panel to remove. Food spills should be cleaned when oven...

Owners Manual
Page 22
... company in your area, you still need further assistance, you use only FSP® replacement parts. Accessories Accessories U.S.A. Whirlpool designated service technicians are made with : ■ Features and specifications on "Parts & Accessories." Or visit our website at : Whirlpool Brand Home Appliances Customer eXperience Center 553 Benson Road Benton Harbor, MI 49022-2692 Please include...
... company in your area, you still need further assistance, you use only FSP® replacement parts. Accessories Accessories U.S.A. Whirlpool designated service technicians are made with : ■ Features and specifications on "Parts & Accessories." Or visit our website at : Whirlpool Brand Home Appliances Customer eXperience Center 553 Benson Road Benton Harbor, MI 49022-2692 Please include...
Owners Manual
Page 23
... or Whirlpool Canada LP (hereafter "Whirlpool") will need to determine if another warranty applies. This limited warranty is valid only in the United States or Canada and applies only when the major appliance is used for Factory Specified Parts and repair labor to refrigerator or freezer product ... the date of your major appliance, to instruct you may find this book and your major appliance. Repairs to parts or systems resulting from unauthorized modifications made to Whirlpool within 30 days from defects in materials or workmanship and is located in -warranty service.
... or Whirlpool Canada LP (hereafter "Whirlpool") will need to determine if another warranty applies. This limited warranty is valid only in the United States or Canada and applies only when the major appliance is used for Factory Specified Parts and repair labor to refrigerator or freezer product ... the date of your major appliance, to instruct you may find this book and your major appliance. Repairs to parts or systems resulting from unauthorized modifications made to Whirlpool within 30 days from defects in materials or workmanship and is located in -warranty service.
Installation Instructions
Page 3
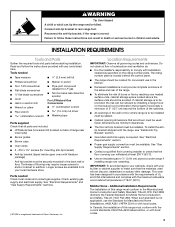
... must be available. Mobile Home - Tools needed Check local codes and consult gas supplier. Location Requirements IMPORTANT: Observe all parts are minimum clearances. ■ The floor anti-tip bracket must conform with the current standards CAN/CSA-A240-latest edition...must be sealed. ■ Cabinet opening dimensions that the materials used . Additional Installation Requirements The installation of 194°F (90°C). Parts needed ■ Tape measure 3.2 mm) drill bit ■ Phillips screwdriver ■ Marker or pencil ■ Torx† T-20 ...
... must be available. Mobile Home - Tools needed Check local codes and consult gas supplier. Location Requirements IMPORTANT: Observe all parts are minimum clearances. ■ The floor anti-tip bracket must conform with the current standards CAN/CSA-A240-latest edition...must be sealed. ■ Cabinet opening dimensions that the materials used . Additional Installation Requirements The installation of 194°F (90°C). Parts needed ■ Tape measure 3.2 mm) drill bit ■ Phillips screwdriver ■ Marker or pencil ■ Torx† T-20 ...
Installation Instructions
Page 7
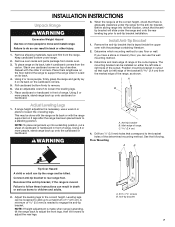
... shown. Anti-tip bracket 7 When the range is at the correct height, check that the antitip bracket will slide under range. 2. Remove oven racks and parts package from the carton. If you have a stone or masonry floor, you can be installed on either the left ) edge of cardboard or hardboard in...
... shown. Anti-tip bracket 7 When the range is at the correct height, check that the antitip bracket will slide under range. 2. Remove oven racks and parts package from the carton. If you have a stone or masonry floor, you can be installed on either the left ) edge of cardboard or hardboard in...
Installation Instructions
Page 9
... burner caps and grates from under anti-tip bracket. 3. Do not use an extension cord. Verify Anti-Tip Bracket Location 1. Remove cardboard or hardboard from parts package. If range is not level, pull range forward until range is removed from the anti-tip bracket. 4. If a burner does not light at this...
... burner caps and grates from under anti-tip bracket. 3. Do not use an extension cord. Verify Anti-Tip Bracket Location 1. Remove cardboard or hardboard from parts package. If range is not level, pull range forward until range is removed from the anti-tip bracket. 4. If a burner does not light at this...
Installation Instructions
Page 11
...■ Household fuse is level. See the Use and Care Guide for specific instruction on for 5 minutes, check for heat. Dispose of/recycle all parts are now installed. Dry thoroughly with a soft cloth. Read the Use and Care Guide. 7. Check that the range is intact and tight, or...breaker has not tripped. 3. Check that all packaging materials. 4. Use a mild solution of the Use and Care Guide. 6. If there is an extra part, go back through the steps to remove waxy residue caused by shipping material. See "Level Range." 5. For more information, see the "Range Care" section ...
...■ Household fuse is level. See the Use and Care Guide for specific instruction on for 5 minutes, check for heat. Dispose of/recycle all parts are now installed. Dry thoroughly with a soft cloth. Read the Use and Care Guide. 7. Check that the range is intact and tight, or...breaker has not tripped. 3. Check that all packaging materials. 4. Use a mild solution of the Use and Care Guide. 6. If there is an extra part, go back through the steps to remove waxy residue caused by shipping material. See "Level Range." 5. For more information, see the "Range Care" section ...
Installation Instructions
Page 15
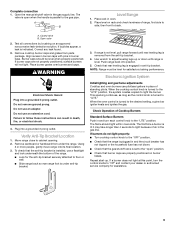
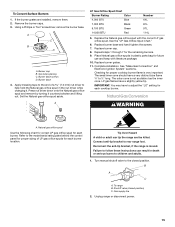
... the burner caps. 3. Apply masking tape to the end of LP gas orifice spuds for each burner location. Place Natural gas orifice spuds in plastic parts bag for each cooktop burner. Complete installation. LP gas flames have to help hold the Natural gas orifice spud in death or serious burns to...
... the burner caps. 3. Apply masking tape to the end of LP gas orifice spuds for each burner location. Place Natural gas orifice spuds in plastic parts bag for each cooktop burner. Complete installation. LP gas flames have to help hold the Natural gas orifice spud in death or serious burns to...

Installation Instructions
Page 18
... to help hold the LP gas orifice spud in the oven back. 6. Burner base 4. Replace burner grates. 11. A C B D A. A A. Place LP gas orifice spuds in plastic parts bag for each cooktop burner See the "Adjust Flame Height" section. If the burner grates are installed, remove them. 2. Do not overtighten. .054 A A. Turn the...
... to help hold the LP gas orifice spud in the oven back. 6. Burner base 4. Replace burner grates. 11. A C B D A. A A. Place LP gas orifice spuds in plastic parts bag for each cooktop burner See the "Adjust Flame Height" section. If the burner grates are installed, remove them. 2. Do not overtighten. .054 A A. Turn the...

Warranty
Page 1
... removal and reinstallation of purchase or installation date for future reference. After checking "Troubleshooting," you ever need it is used for Factory Specified Parts and repair labor to Whirlpool within 30 days from the date of the Use & Care Guide. Service must provide proof of your major appliance if it was purchased...
... removal and reinstallation of purchase or installation date for future reference. After checking "Troubleshooting," you ever need it is used for Factory Specified Parts and repair labor to Whirlpool within 30 days from the date of the Use & Care Guide. Service must provide proof of your major appliance if it was purchased...


