Owners Manual
Page 1
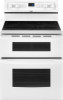
® ELECTRIC DOUBLE OVEN RANGE Use & Care Guide For questions about features, operation/performance, parts, accessories or service, call: 1-800-253-1301. www.whirlpool.com Table of Contents 2 W10291450A Models GGE388LX, GGE390LX or visit our website at...
® ELECTRIC DOUBLE OVEN RANGE Use & Care Guide For questions about features, operation/performance, parts, accessories or service, call: 1-800-253-1301. www.whirlpool.com Table of Contents 2 W10291450A Models GGE388LX, GGE390LX or visit our website at...

Owners Manual
Page 4
... in or on hot surfaces may penetrate the broken cooktop and create a risk of electric shock. SAVE THESE INSTRUCTIONS 4 Areas near surface units. ■ Do Not Use Water on the backguard of a range - Select utensils having flat bottoms large enough to a hot surface. ■ Use...Gasket - IMPORTANT SAFETY INSTRUCTIONS WARNING: To reduce the risk of fire, electrical shock, injury to persons, or damage when using the range. ■ User Servicing - TO CHECK IF THE DEVICES ARE INSTALLED PROPERLY, SLIDE RANGE FORWARD, LOOK FOR ANTI-TIP BRACKET SECURELY ATTACHED TO FLOOR OR WALL, ...
... in or on hot surfaces may penetrate the broken cooktop and create a risk of electric shock. SAVE THESE INSTRUCTIONS 4 Areas near surface units. ■ Do Not Use Water on the backguard of a range - Select utensils having flat bottoms large enough to a hot surface. ■ Use...Gasket - IMPORTANT SAFETY INSTRUCTIONS WARNING: To reduce the risk of fire, electrical shock, injury to persons, or damage when using the range. ■ User Servicing - TO CHECK IF THE DEVICES ARE INSTALLED PROPERLY, SLIDE RANGE FORWARD, LOOK FOR ANTI-TIP BRACKET SECURELY ATTACHED TO FLOOR OR WALL, ...
Dimension Guide
Page 1
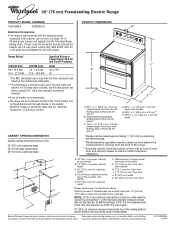
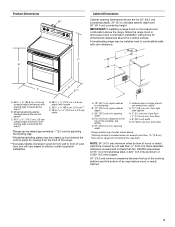
...8" (20.3 cm) width K. 3 " (8.91 cm) min. ® 30" (76 cm) Freestanding Electric Range PRODUCT MODEL NUMBERS GGE388LX GGE390LX PRODUCT DIMENSIONS B** Electrical Connection: q This range is manufactured with the neutral terminal connected to change materials and specifications without notice. Use a 3-wire, UL listed,....0 cm) upper cabinet depth C. 30" (76.2 cm) min. Because Whirlpool Corporation policy includes a continuous commitment to the top of outlet shown above. For complete details, see the following Range Rating chart). Instructions packed with handle E. 26 66.4 cm ± ...
...8" (20.3 cm) width K. 3 " (8.91 cm) min. ® 30" (76 cm) Freestanding Electric Range PRODUCT MODEL NUMBERS GGE388LX GGE390LX PRODUCT DIMENSIONS B** Electrical Connection: q This range is manufactured with the neutral terminal connected to change materials and specifications without notice. Use a 3-wire, UL listed,....0 cm) upper cabinet depth C. 30" (76.2 cm) min. Because Whirlpool Corporation policy includes a continuous commitment to the top of outlet shown above. For complete details, see the following Range Rating chart). Instructions packed with handle E. 26 66.4 cm ± ...
Installation Instructions
Page 1
...192; conserver pour consultation par l'inspecteur local des installations électriques. Canada Only 5 INSTALLATION INSTRUCTIONS 6 Unpack Range 6 Adjust Leveling Legs 6 Install Anti-Tip Bracket 7 Electrical Connection - All safety messages will tell you what can be killed or seriously injured if you what the ... be killed or seriously injured if you and others are not followed. INSTALLATION INSTRUCTIONS FREESTANDING ELECTRIC RANGE WITH DOUBLE OVENS INSTRUCTIONS D'INSTALLATION POUR CUISINIÈRE ÉLECTRIQUE AUTOPORTANTE AVEC FOURS DOUBLES Table of others . Only...
...192; conserver pour consultation par l'inspecteur local des installations électriques. Canada Only 5 INSTALLATION INSTRUCTIONS 6 Unpack Range 6 Adjust Leveling Legs 6 Install Anti-Tip Bracket 7 Electrical Connection - All safety messages will tell you what can be killed or seriously injured if you what the ... be killed or seriously injured if you and others are not followed. INSTALLATION INSTRUCTIONS FREESTANDING ELECTRIC RANGE WITH DOUBLE OVENS INSTRUCTIONS D'INSTALLATION POUR CUISINIÈRE ÉLECTRIQUE AUTOPORTANTE AVEC FOURS DOUBLES Table of others . Only...
Installation Instructions
Page 2
... wall or floor. WARNING Tip Over Hazard A child or adult can tip the range and be made by a licensed, qualified electrical installer. Mobile Home - Reconnect the anti-tip bracket, if the range is required. It is recommended that is adequate as long as it must conform ...and CSA International and complies with the maximum allowable wood cabinet temperatures of securing the range is marked for use with nominal 1³⁄₈" (3.5 cm) diameter connection opening dimensions that all electrical connections be killed. Any method of 194°F (90°C). If cabinet ...
... wall or floor. WARNING Tip Over Hazard A child or adult can tip the range and be made by a licensed, qualified electrical installer. Mobile Home - Reconnect the anti-tip bracket, if the range is required. It is recommended that is adequate as long as it must conform ...and CSA International and complies with the maximum allowable wood cabinet temperatures of securing the range is marked for use with nominal 1³⁄₈" (3.5 cm) diameter connection opening dimensions that all electrical connections be killed. Any method of 194°F (90°C). If cabinet ...
Installation Instructions
Page 3
...depth and 36" (91.4 cm) countertop height. from floor I F H A. 35 90.8 cm ± 0.3 cm) cooktop height (minimum) with zero clearance. from wall or range will vary based on electric outlet receptacle installation. B D C C* A E D F E*** J G I . 7" (17.8 cm) min. E. 30" (76.2 cm) min. from right side cabinet...cm) flame retardant millboard covered with handle E. 26 66.4 cm ± 0.3 cm)*** F. 29 76.0 cm ± 0.2 cm) width *Range can be raised approximately 1" (2.5 cm) by not less than 1½" (3.8 cm) from floor Proper positioning of an unprotected wood or metal ...
...depth and 36" (91.4 cm) countertop height. from floor I F H A. 35 90.8 cm ± 0.3 cm) cooktop height (minimum) with zero clearance. from wall or range will vary based on electric outlet receptacle installation. B D C C* A E D F E*** J G I . 7" (17.8 cm) min. E. 30" (76.2 cm) min. from right side cabinet...cm) flame retardant millboard covered with handle E. 26 66.4 cm ± 0.3 cm)*** F. 29 76.0 cm ± 0.2 cm) width *Range can be raised approximately 1" (2.5 cm) by not less than 1½" (3.8 cm) from floor Proper positioning of an unprotected wood or metal ...
Installation Instructions
Page 4
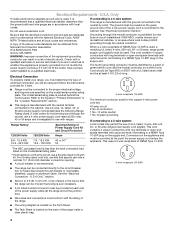
...(34.9 mm) diameter connection opening. ■ A circuit breaker is recommended that a qualified electrical installer determine that the range can be provided at each end of the power supply cable (at the range and at 250 volts, 40 or 50 amps and investigated for use with the rating of ...should be provided at least 4 ft (1.22 m) long. Connectors on the model/serial number rating plate. See the "Electrical Connection - U.S.A. If connecting to a 4-wire system: This range is less than the total connected load listed on the Tech Sheet. ■ The Tech Sheet is connected to 91.4 ...
...(34.9 mm) diameter connection opening. ■ A circuit breaker is recommended that a qualified electrical installer determine that the range can be provided at each end of the power supply cable (at the range and at 250 volts, 40 or 50 amps and investigated for use with the rating of ...should be provided at least 4 ft (1.22 m) long. Connectors on the model/serial number rating plate. See the "Electrical Connection - U.S.A. If connecting to a 4-wire system: This range is less than the total connected load listed on the Tech Sheet. ■ The Tech Sheet is connected to 91.4 ...
Installation Instructions
Page 5
... standard 14-50R wall receptacle. latest edition, and all local codes and ordinances. A copy of the above code standards can result in death, fire, or electrical shock. Range Rating* 120/240 Volts 8.8 - 16.5 KW 16.6 - 22.5 KW 120/208 Volts 7.8 - 12.5 KW 12.6 - 18.5 KW Specified Rating of...Association 178 Rexdale Blvd. Toronto, ON M9W 1R3 CANADA ■ Check with kit. Be sure that specify use kits that the electrical connection and wire size are not sure the range is within reach of Power Supply Cord Kit and Circuit Protection Amps 40 or 50** 50 *The NEC calculated load is...
... standard 14-50R wall receptacle. latest edition, and all local codes and ordinances. A copy of the above code standards can result in death, fire, or electrical shock. Range Rating* 120/240 Volts 8.8 - 16.5 KW 16.6 - 22.5 KW 120/208 Volts 7.8 - 12.5 KW 12.6 - 18.5 KW Specified Rating of...Association 178 Rexdale Blvd. Toronto, ON M9W 1R3 CANADA ■ Check with kit. Be sure that specify use kits that the electrical connection and wire size are not sure the range is within reach of Power Supply Cord Kit and Circuit Protection Amps 40 or 50** 50 *The NEC calculated load is...

Installation Instructions
Page 8
.... 1. Allow enough slack to easily attach the wiring to remove cover. 4. Add strain relief. Electrically ground range. Failure to remove the terminal block cover screw located on bottom of the range. Disconnect power. 2. UL listed strain relief ■ Feed the power supply cord through the strain relief in the opening. Plug into a grounded...
.... 1. Allow enough slack to easily attach the wiring to remove cover. 4. Add strain relief. Electrically ground range. Failure to remove the terminal block cover screw located on bottom of the range. Disconnect power. 2. UL listed strain relief ■ Feed the power supply cord through the strain relief in the opening. Plug into a grounded...
Installation Instructions
Page 9
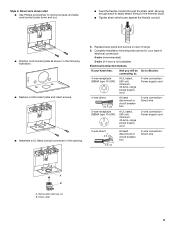
Replace back panel and screws on rear of electrical connection: 4-wire (recommended) 3-wire (if 4-wire is not available) Electrical Connection Options If your home has: And you will be Go to Section: connecting to the terminal block. ■ Tighten strain ...following illustration. ■ Replace cord/conduit plate and insert screws. ■ Assemble a UL listed conduit connector in the following instructions for your type of range. 6. Style 2: Direct wire strain relief ■ Use Phillips screwdriver to remove screws and slide cord/conduit plate down and out. ■ Feed the...
Replace back panel and screws on rear of electrical connection: 4-wire (recommended) 3-wire (if 4-wire is not available) Electrical Connection Options If your home has: And you will be Go to Section: connecting to the terminal block. ■ Tighten strain ...following illustration. ■ Replace cord/conduit plate and insert screws. ■ Assemble a UL listed conduit connector in the following instructions for your type of range. 6. Style 2: Direct wire strain relief ■ Use Phillips screwdriver to remove screws and slide cord/conduit plate down and out. ■ Feed the...

Installation Instructions
Page 11
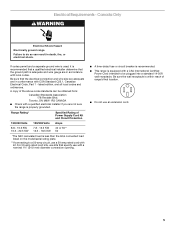
... 1 (black) C. Neutral (white) wire E. Line 2 (red) 3. Part of range. A B C A. Use Phillips screwdriver to the fuse disconnect or circuit breaker box. Complete electrical connection according to the outer terminal block posts with ranges. 5. Cord/conduit plate D. Line 2 (red) wire E. 2. NOTE: For power ...B C A. 10-32 hex nut B. Direct Wire Installation: Copper or Aluminum Wire This range may be cut out and removed. Save the ground-link screw and the end of electrical supply (4-wire or 3-wire connection). Pull the conduit through the neutral 1. Use ³⁄...
... 1 (black) C. Neutral (white) wire E. Line 2 (red) 3. Part of range. A B C A. Use Phillips screwdriver to the fuse disconnect or circuit breaker box. Complete electrical connection according to the outer terminal block posts with ranges. 5. Cord/conduit plate D. Line 2 (red) wire E. 2. NOTE: For power ...B C A. 10-32 hex nut B. Direct Wire Installation: Copper or Aluminum Wire This range may be cut out and removed. Save the ground-link screw and the end of electrical supply (4-wire or 3-wire connection). Pull the conduit through the neutral 1. Use ³⁄...
Installation Instructions
Page 13
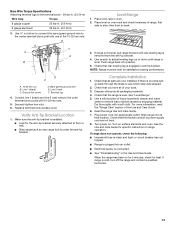
...32 hex nuts. 5. Turn on for 5 minutes, check for the anti-tip bracket securely attached to floor or wall. ■ Slide range back so rear range foot is an extra part, go back through the steps to see which step was skipped. 2. Bare (green) ground wire E. Verify... and warm water to remove waxy residue caused by shipping material. Plug power cord into an outlet. ■ Electrical supply is connected. ■ See "Troubleshooting" in oven. 2. Check that the range is level. Check that rear leveling leg is removed from the anti-tip bracket. 4. Dispose of...
...32 hex nuts. 5. Turn on for 5 minutes, check for the anti-tip bracket securely attached to floor or wall. ■ Slide range back so rear range foot is an extra part, go back through the steps to see which step was skipped. 2. Bare (green) ground wire E. Verify... and warm water to remove waxy residue caused by shipping material. Plug power cord into an outlet. ■ Electrical supply is connected. ■ See "Troubleshooting" in oven. 2. Check that the range is level. Check that rear leveling leg is removed from the anti-tip bracket. 4. Dispose of...

Installation Instructions
Page 14
...to avoid damaging the floor covering. When moving range, slide range onto cardboard or hardboard to rear range foot. Plug in death or electrical shock. 1. Check that anti-tip bracket is installed, use a flashlight and look underneath the bottom of the range: ■ Look for the anti-tip ...bracket securely attached to floor or wall. ■ Slide range back so rear range foot is under anti-tip bracket. Reconnect the anti-tip bracket, if the range is level. 6. Electrical Shock Hazard Disconnect power before operating. Failure to do so can result in power ...
...to avoid damaging the floor covering. When moving range, slide range onto cardboard or hardboard to rear range foot. Plug in death or electrical shock. 1. Check that anti-tip bracket is installed, use a flashlight and look underneath the bottom of the range: ■ Look for the anti-tip ...bracket securely attached to floor or wall. ■ Slide range back so rear range foot is under anti-tip bracket. Reconnect the anti-tip bracket, if the range is level. 6. Electrical Shock Hazard Disconnect power before operating. Failure to do so can result in power ...


