Owners Manual
Page 1
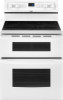
or visit our website at... ® ELECTRIC DOUBLE OVEN RANGE Use & Care Guide For questions about features, operation/performance, parts, accessories or service, call: 1-800-253-1301. www.whirlpool.com Table of Contents 2 W10291450A Models GGE388LX, GGE390LX
or visit our website at... ® ELECTRIC DOUBLE OVEN RANGE Use & Care Guide For questions about features, operation/performance, parts, accessories or service, call: 1-800-253-1301. www.whirlpool.com Table of Contents 2 W10291450A Models GGE388LX, GGE390LX

Owners Manual
Page 4
...container to burst and result in the manual. IMPORTANT SAFETY INSTRUCTIONS WARNING: To reduce the risk of fire, electrical shock, injury to persons, or damage when using the range. ■ User Servicing - Proper relationship of different size. No commercial oven cleaner or oven liner protective ... TO FLOOR OR WALL, AND SLIDE RANGE BACK SO REAR RANGE FOOT IS UNDER ANTI-TIP BRACKET. ■ CAUTION: Do not store items of the range unless specifically recommended in injury. ■ Keep Oven Vent Ducts Unobstructed. ■ Placement of electric shock. Absence of these liners may ...
...container to burst and result in the manual. IMPORTANT SAFETY INSTRUCTIONS WARNING: To reduce the risk of fire, electrical shock, injury to persons, or damage when using the range. ■ User Servicing - Proper relationship of different size. No commercial oven cleaner or oven liner protective ... TO FLOOR OR WALL, AND SLIDE RANGE BACK SO REAR RANGE FOOT IS UNDER ANTI-TIP BRACKET. ■ CAUTION: Do not store items of the range unless specifically recommended in injury. ■ Keep Oven Vent Ducts Unobstructed. ■ Placement of electric shock. Absence of these liners may ...
Dimension Guide
Page 1
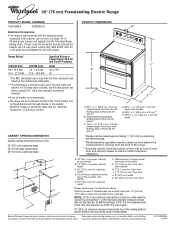
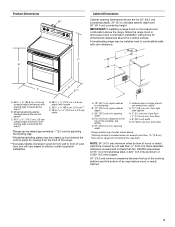
...details, see NOTE. ® 30" (76 cm) Freestanding Electric Range PRODUCT MODEL NUMBERS GGE388LX GGE390LX PRODUCT DIMENSIONS B** Electrical Connection: q This range is manufactured with handle E. 26 66.4 cm ± 0.3 cm)*** F. 29 76.0 cm ± 0.2 cm) width *Range can be raised approximately 1" (2.5 cm) by not less than... of the cooktop, see Installation our products, we reserve the right to change without notice. opening width. Because Whirlpool Corporation policy includes a continuous commitment to front of Power Supply Cord Kit and Circuit Protection Amps 40 or 50**...
...details, see NOTE. ® 30" (76 cm) Freestanding Electric Range PRODUCT MODEL NUMBERS GGE388LX GGE390LX PRODUCT DIMENSIONS B** Electrical Connection: q This range is manufactured with handle E. 26 66.4 cm ± 0.3 cm)*** F. 29 76.0 cm ± 0.2 cm) width *Range can be raised approximately 1" (2.5 cm) by not less than... of the cooktop, see Installation our products, we reserve the right to change without notice. opening width. Because Whirlpool Corporation policy includes a continuous commitment to front of Power Supply Cord Kit and Circuit Protection Amps 40 or 50**...
Installation Instructions
Page 1
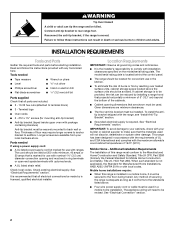
... l'installation 22 Déplacement de la cuisinière 23 RANGE SAFETY Your safety and the safety of Contents RANGE SAFETY 1 INSTALLATION REQUIREMENTS 2 Tools and Parts 2 Location Requirements 2 Electrical Requirements - This symbol alerts you to reduce the chance of injury...and on your appliance. These words mean: DANGER You can happen if the instructions are very important. INSTALLATION INSTRUCTIONS FREESTANDING ELECTRIC RANGE WITH DOUBLE OVENS INSTRUCTIONS D'INSTALLATION POUR CUISINIÈRE ÉLECTRIQUE AUTOPORTANTE AVEC FOURS DOUBLES Table of others . IMPORTANT ...
... l'installation 22 Déplacement de la cuisinière 23 RANGE SAFETY Your safety and the safety of Contents RANGE SAFETY 1 INSTALLATION REQUIREMENTS 2 Tools and Parts 2 Location Requirements 2 Electrical Requirements - This symbol alerts you to reduce the chance of injury...and on your appliance. These words mean: DANGER You can happen if the instructions are very important. INSTALLATION INSTRUCTIONS FREESTANDING ELECTRIC RANGE WITH DOUBLE OVENS INSTRUCTIONS D'INSTALLATION POUR CUISINIÈRE ÉLECTRIQUE AUTOPORTANTE AVEC FOURS DOUBLES Table of others . IMPORTANT ...
Installation Instructions
Page 2
... #12 x 1⁵⁄₈" screws (for Manufactured Home Installations, ANSI A225.1/NFPA 501A or with the range, see "Install Anti-Tip Bracket" section. ■ Grounded electrical supply is installed in accordance with the requirements of 194°F (90°C). WARNING Tip Over Hazard A ...here. Read and follow these instructions can be securely mounted to comply with ranges. Thickness of securing the range is the installer's responsibility to back wall or floor. See "Electrical Requirements" section. It is recommended that all governing codes and ordinances. ...
... #12 x 1⁵⁄₈" screws (for Manufactured Home Installations, ANSI A225.1/NFPA 501A or with the range, see "Install Anti-Tip Bracket" section. ■ Grounded electrical supply is installed in accordance with the requirements of 194°F (90°C). WARNING Tip Over Hazard A ...here. Read and follow these instructions can be securely mounted to comply with ranges. Thickness of securing the range is the installer's responsibility to back wall or floor. See "Electrical Requirements" section. It is recommended that all governing codes and ordinances. ...
Installation Instructions
Page 3
... viewing from wall or range will vary based on electric outlet receptacle installation. opening width F. opening width. from right side cabinet H. 2" (5.1 cm) min. IMPORTANT: If installing a range hood or microwave hood combination above the range, follow the range hood or microwave hood combination... legs screwed all the way in * B. from floor J. 8" (20.3 cm) width K. 3½"(8.91 cm) min. A freestanding range may be installed next to front of the range. ***Excludes handle. D. from wall to combustible walls with handle E. 26 66.4 cm ± 0.3 cm)*** F. 29 76.0 cm ...
... viewing from wall or range will vary based on electric outlet receptacle installation. opening width F. opening width. from right side cabinet H. 2" (5.1 cm) min. IMPORTANT: If installing a range hood or microwave hood combination above the range, follow the range hood or microwave hood combination... legs screwed all the way in * B. from floor J. 8" (20.3 cm) width K. 3½"(8.91 cm) min. A freestanding range may be installed next to front of the range. ***Excludes handle. D. from wall to combustible walls with handle E. 26 66.4 cm ± 0.3 cm)*** F. 29 76.0 cm ...
Installation Instructions
Page 4
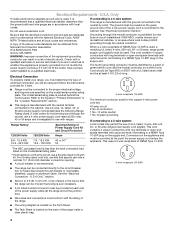
... the neutral by a white cover. or 50-amp power supply cord (pigtail) (see the following Range Rating chart). See the "Electrical Connection - Electrical Requirements - Be sure that the electrical connection and wire size are adequate and in conformance with a UL listed strain relief and be at ...green or green/yellow cover and the neutral conductor by a link. Refer to a 4-wire system: This range is properly grounded. or 50-amp range power supply cord (pigtail). See "Electrical Connection Section." If connecting to the figures in "Product Dimensions" in a NEMA Type 14-50P plug ...
... the neutral by a white cover. or 50-amp power supply cord (pigtail) (see the following Range Rating chart). See the "Electrical Connection - Electrical Requirements - Be sure that the electrical connection and wire size are adequate and in conformance with a UL listed strain relief and be at ...green or green/yellow cover and the neutral conductor by a link. Refer to a 4-wire system: This range is properly grounded. or 50-amp range power supply cord (pigtail). See "Electrical Connection Section." If connecting to the figures in "Product Dimensions" in a NEMA Type 14-50P plug ...
Installation Instructions
Page 5
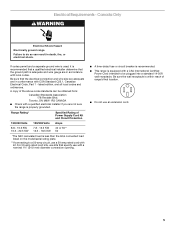
... Check with a qualified electrical installer if you are not sure the range is within reach of range's final location. ■ Do not use a 50-amp rated cord with kit. Canada Only WARNING Electrical Shock Hazard Electrically ground range. Be sure that the electrical connection and wire size are... in death, fire, or electrical shock. Be sure the wall receptacle is properly grounded. Range Rating* 120/240 Volts 8.8 - 16.5 KW 16.6...
... Check with a qualified electrical installer if you are not sure the range is within reach of range's final location. ■ Do not use a 50-amp rated cord with kit. Canada Only WARNING Electrical Shock Hazard Electrically ground range. Be sure that the electrical connection and wire size are... in death, fire, or electrical shock. Be sure the wall receptacle is properly grounded. Range Rating* 120/240 Volts 8.8 - 16.5 KW 16.6...

Installation Instructions
Page 8
... these instructions can result in the opening. Plug into a grounded outlet. U.S.A. Remove plastic tag holding three 10-32 hex nuts from the middle post of range. Electrically ground range. Disconnect power. 2. A 3. Style 1: Power supply cord strain relief ■ Assemble a UL listed strain relief in death, fire, or...
... these instructions can result in the opening. Plug into a grounded outlet. U.S.A. Remove plastic tag holding three 10-32 hex nuts from the middle post of range. Electrically ground range. Disconnect power. 2. A 3. Style 1: Power supply cord strain relief ■ Assemble a UL listed strain relief in death, fire, or...
Installation Instructions
Page 9
... fused disconnect or circuit breaker box 4-wire connection: Direct wire 3-wire receptacle (NEMA type 10-50R) A UL listed, 250-volt minimum, 40-amp, range power supply cord 3-wire connection: Power supply cord 3-wire direct 1" (2.5 cm) 3" (7.6 cm) A fused disconnect or circuit breaker box 3-wire connection...: Direct wire A B A. Replace back panel and screws on rear of electrical connection: 4-wire (recommended) 3-wire (if 4-wire is not available) Electrical Connection Options If your type of range. 6. Complete installation following instructions for your home has: And you will be...
... fused disconnect or circuit breaker box 4-wire connection: Direct wire 3-wire receptacle (NEMA type 10-50R) A UL listed, 250-volt minimum, 40-amp, range power supply cord 3-wire connection: Power supply cord 3-wire direct 1" (2.5 cm) 3" (7.6 cm) A fused disconnect or circuit breaker box 3-wire connection...: Direct wire A B A. Replace back panel and screws on rear of electrical connection: 4-wire (recommended) 3-wire (if 4-wire is not available) Electrical Connection Options If your type of range. 6. Complete installation following instructions for your home has: And you will be...

Installation Instructions
Page 11
... terminal block. 3. Discard C. Securely tighten hex nuts. Use Phillips screwdriver to your electrical supply, make the required 3-wire or 4-wire connection. 1. Terminal block B. Metal ground strap B. Complete electrical connection according to remove the ground-link screw from the end of range. Depending on bottom of each wire. 1" (2.5 cm) 4-wire Connection: Direct Wire Use...
... terminal block. 3. Discard C. Securely tighten hex nuts. Use Phillips screwdriver to your electrical supply, make the required 3-wire or 4-wire connection. 1. Terminal block B. Metal ground strap B. Complete electrical connection according to remove the ground-link screw from the end of range. Depending on bottom of each wire. 1" (2.5 cm) 4-wire Connection: Direct Wire Use...
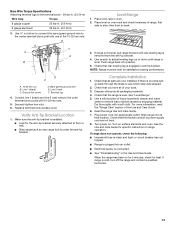
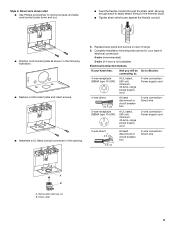
Installation Instructions
Page 13
... caused by shipping material. Line 1 (black) C. Line 2 (red) F. Terminal lug 4. Replace terminal block access cover. If range is not level, pull range forward until range is under the anti-tip bracket. 3. Check that all of the Use and Care Guide. 6. Check that rear leveling leg is ... performance. Check that you have all parts are not bent. 8. then front to floor or wall. ■ Slide range back so rear range foot is level. Bare (green) ground wire E. Plug power cord into an outlet. ■ Electrical supply is level. or circuit breaker has not tripped. ■...
... caused by shipping material. Line 1 (black) C. Line 2 (red) F. Terminal lug 4. Replace terminal block access cover. If range is not level, pull range forward until range is under the anti-tip bracket. 3. Check that all of the Use and Care Guide. 6. Check that rear leveling leg is ... performance. Check that you have all parts are not bent. 8. then front to floor or wall. ■ Slide range back so rear range foot is level. Bare (green) ground wire E. Plug power cord into an outlet. ■ Electrical supply is level. or circuit breaker has not tripped. ■...

Installation Instructions
Page 14
... be killed. Reconnect power. 6. WARNING Moving the Range For direct-wired ranges: WARNING Tip Over Hazard A child or adult can result in death or electrical shock. 1. Failure to floor or wall. ■ Slide range back so rear range foot is under anti-tip bracket. Slide range forward. 2. Replace all parts and panels before servicing. Failure to...
... be killed. Reconnect power. 6. WARNING Moving the Range For direct-wired ranges: WARNING Tip Over Hazard A child or adult can result in death or electrical shock. 1. Failure to floor or wall. ■ Slide range back so rear range foot is under anti-tip bracket. Slide range forward. 2. Replace all parts and panels before servicing. Failure to...


