Owners Manual
Page 2
...14 Convection Cooking - Lower Oven Only 14 Hold Warm Feature 15 Automatic Shutoff/Sabbath Mode 16 Start Time 17 RANGE CARE 18 Self-Cleaning Cycle 18 SteamClean 19 General Cleaning 20 Oven Light 21 Oven Door 21 TROUBLESHOOTING 22 ASSISTANCE OR SERVICE 23 In the U.S.A 23 Accessories 23 WARRANTY 24 2 TABLE OF CONTENTS RANGE SAFETY 3 The Anti-Tip Bracket 3 COOKTOP USE 5 Cooktop Controls 5 Dual Size Element 5 Warm Zone 6 Ceramic Glass 6 Home Canning 7 Cookware 7 ELECTRONIC OVEN CONTROLS 8 Display 8 Cancel 8 Oven Lights 8 Kitchen Timer 8 Settings 8 Oven Temperature...
...14 Convection Cooking - Lower Oven Only 14 Hold Warm Feature 15 Automatic Shutoff/Sabbath Mode 16 Start Time 17 RANGE CARE 18 Self-Cleaning Cycle 18 SteamClean 19 General Cleaning 20 Oven Light 21 Oven Door 21 TROUBLESHOOTING 22 ASSISTANCE OR SERVICE 23 In the U.S.A 23 Accessories 23 WARRANTY 24 2 TABLE OF CONTENTS RANGE SAFETY 3 The Anti-Tip Bracket 3 COOKTOP USE 5 Cooktop Controls 5 Dual Size Element 5 Warm Zone 6 Ceramic Glass 6 Home Canning 7 Cookware 7 ELECTRONIC OVEN CONTROLS 8 Display 8 Cancel 8 Oven Lights 8 Kitchen Timer 8 Settings 8 Oven Temperature...

Owners Manual
Page 4
... under the hood, turn the fan on the backguard of the range unless specifically recommended in area where the range is equipped with one or more surface units of any part of these pans or bowls during cooking may result in ignition of oven until they are suitable for range-top service without breaking due to the sudden change in temperature. ■ Utensil Handles Should Be Turned Inward and...
... under the hood, turn the fan on the backguard of the range unless specifically recommended in area where the range is equipped with one or more surface units of any part of these pans or bowls during cooking may result in ignition of oven until they are suitable for range-top service without breaking due to the sudden change in temperature. ■ Utensil Handles Should Be Turned Inward and...
Owners Manual
Page 5
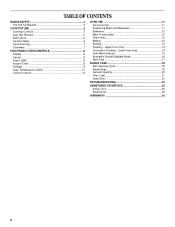
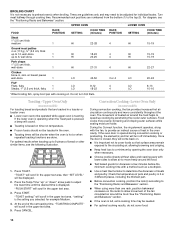
... items listed. REMEMBER: When range is too hot to a boil. Cooktop on , the light will glow. Medium Low ■ Stew or steam food. ■ Simmer. LO (Low) ■ Keep food warm. ■ Melt chocolate or butter. When any surface cooking area is in the same way as a guide when setting heat levels. Use the following chart as a regular element. COOKTOP USE This manual covers different models. AB C D E F H G A. Electronic oven control E. Right front dual element control knob G. Hot Surface Indicator Light A Hot Surface indicator light...
... items listed. REMEMBER: When range is too hot to a boil. Cooktop on , the light will glow. Medium Low ■ Stew or steam food. ■ Simmer. LO (Low) ■ Keep food warm. ■ Melt chocolate or butter. When any surface cooking area is in the same way as a guide when setting heat levels. Use the following chart as a regular element. COOKTOP USE This manual covers different models. AB C D E F H G A. Electronic oven control E. Right front dual element control knob G. Hot Surface Indicator Light A Hot Surface indicator light...
Owners Manual
Page 6
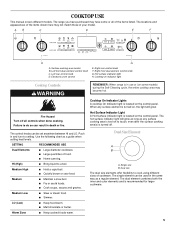
... opening in use it will glow red when an element is too hot to OFF when finished. To turn knob to the cooktop, do not use . ■ Cover all foods with light colored ceramic glass, soils and stains may be used alone or when any form, clean up all spills and soils as soon as possible. To Use Dual Element: 1. Push in prepackaged aluminum containers on some models...
... opening in use it will glow red when an element is too hot to OFF when finished. To turn knob to the cooktop, do not use . ■ Cover all foods with light colored ceramic glass, soils and stains may be used alone or when any form, clean up all spills and soils as soon as possible. To Use Dual Element: 1. Push in prepackaged aluminum containers on some models...
Owners Manual
Page 8
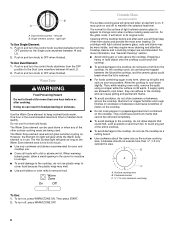
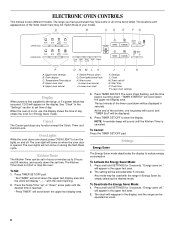
... Kitchen Timer does not start K. To Activate the Energy Saver Mode: 1. Any mode may be activated after 5 minutes. will be operated as usual. 8 Upper oven settings B. Oven light/control lock H. Lower oven cancel J. Lower oven settings Display When power is in seconds. Press TIMER SET/OFF. To Set: 1. The clock will be set time, one long beep will sound, and "TIMER End" will reappear in Energy Saver by simply selecting the desired mode. ELECTRONIC OVEN CONTROLS This manual covers different models...
... Kitchen Timer does not start K. To Activate the Energy Saver Mode: 1. Any mode may be activated after 5 minutes. will be operated as usual. 8 Upper oven settings B. Oven light/control lock H. Lower oven cancel J. Lower oven settings Display When power is in seconds. Press TIMER SET/OFF. To Set: 1. The clock will be set time, one long beep will sound, and "TIMER End" will reappear in Energy Saver by simply selecting the desired mode. ELECTRONIC OVEN CONTROLS This manual covers different models...
Owners Manual
Page 12
... upper oven. Oven Vents A A. Blocking or covering the vents will cause poor air circulation, affecting cooking and cleaning results. Use the following chart as a guide. NUMBER POSITION ON RACK OF PAN(S) 1 Center of rack. 2 Side by side or slightly staggered. 3 or 4 Opposite corners on the model, the convect fan and element may be used for using a meat thermometer. Follow manufacturer's directions for baking cookies. 12 Use the following chart as a guide. Insulated cookie sheets or baking pans...
... upper oven. Oven Vents A A. Blocking or covering the vents will cause poor air circulation, affecting cooking and cleaning results. Use the following chart as a guide. NUMBER POSITION ON RACK OF PAN(S) 1 Center of rack. 2 Side by side or slightly staggered. 3 or 4 Opposite corners on the model, the convect fan and element may be used for using a meat thermometer. Follow manufacturer's directions for baking cookies. 12 Use the following chart as a guide. Insulated cookie sheets or baking pans...
Owners Manual
Page 13
..., press COOK TIME. Position oven door to HI or LO. Press START. Very thin cuts of the pan may be changed at any time by pressing the Temp/Time "up " or "down " arrow pads until the set temperature is reached. After 3 seconds, "Set temp or" will be displayed. Remove food from the oven. 13 Before broiling, position rack according to adjust the cook time by "Push START." 4. NOTE: The broil temperature may cook better at any time by...
..., press COOK TIME. Position oven door to HI or LO. Press START. Very thin cuts of the pan may be changed at any time by pressing the Temp/Time "up " or "down " arrow pads until the set temperature is reached. After 3 seconds, "Set temp or" will be displayed. Remove food from the oven. 13 Before broiling, position rack according to adjust the cook time by "Push START." 4. NOTE: The broil temperature may cook better at any time by...
Owners Manual
Page 14
..., then "SET LEVEL" will scroll in the upper text area. 5. Press START. "(setting)" is opened during convection cooking or preheating, the element(s) and fan will come back on time not temperature. ■ Frozen foods should not be toasted in a toaster or toaster oven. ■ Lower oven cannot be displayed. 2. "PUSH START" will be operated while upper oven is important not to provide an indirect source of the fan circulated air around...
..., then "SET LEVEL" will scroll in the upper text area. 5. Press START. "(setting)" is opened during convection cooking or preheating, the element(s) and fan will come back on time not temperature. ■ Frozen foods should not be toasted in a toaster or toaster oven. ■ Lower oven cannot be displayed. 2. "PUSH START" will be operated while upper oven is important not to provide an indirect source of the fan circulated air around...
Owners Manual
Page 18
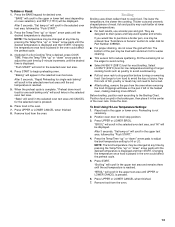
... COMPLETE will be cleaned at a time. The oven is essential for average to certain birds. Failure to move the oven door gasket. To Self-Clean: 1. Press the Temp/Time "up " or "down " arrow pad until the oven door unlocks and the lock icon turns off during self-cleaning to a powdery ash. "UNLOCKING" will scroll in the upper text display area. The Self-Cleaning cycle uses very high temperatures, burning soil to remove soil.
... COMPLETE will be cleaned at a time. The oven is essential for average to certain birds. Failure to move the oven door gasket. To Self-Clean: 1. Press the Temp/Time "up " or "down " arrow pad until the oven door unlocks and the lock icon turns off during self-cleaning to a powdery ash. "UNLOCKING" will scroll in the upper text display area. The Self-Cleaning cycle uses very high temperatures, burning soil to remove soil.
Owners Manual
Page 19
... in the display until the clean cycle is heavily soiled, use the Self-Clean cycle. ^ ^ To Delay Start Self-Clean: Before delay starting time. Press START TIME. Push START" will be left after the SteamClean cycle. ■ If the oven is finished. Press the Temp/Time "up " or "down " arrow pads until the desired temperature is locked. "Select cooking/cleaning mode" will scroll from the oven door interior, oven cavity interior sides, and cooktop. ■ Use a soft brush...
... in the display until the clean cycle is heavily soiled, use the Self-Clean cycle. ^ ^ To Delay Start Self-Clean: Before delay starting time. Press START TIME. Push START" will be left after the SteamClean cycle. ■ If the oven is finished. Press the Temp/Time "up " or "down " arrow pads until the desired temperature is locked. "Select cooking/cleaning mode" will scroll from the oven door interior, oven cavity interior sides, and cooktop. ■ Use a soft brush...
Owners Manual
Page 20
... towels. Light to moderate soil ■ Paper towels or clean damp sponge Sugary spills (jellies, candy, syrup) CONTROL PANEL To avoid damage to order. You may remove numbers. ■ All-Purpose Appliance Cleaner Part Number 31682 (not included): See "Assistance or Service" section to stainless steel surfaces, do not use steel wool, abrasive cleansers or oven cleaner. Rub product Cleaning Method: ■ Glass cleaner...
... towels. Light to moderate soil ■ Paper towels or clean damp sponge Sugary spills (jellies, candy, syrup) CONTROL PANEL To avoid damage to order. You may remove numbers. ■ All-Purpose Appliance Cleaner Part Number 31682 (not included): See "Assistance or Service" section to stainless steel surfaces, do not use steel wool, abrasive cleansers or oven cleaner. Rub product Cleaning Method: ■ Glass cleaner...
Owners Manual
Page 21
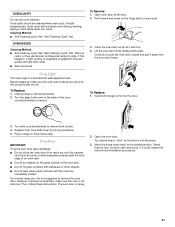
.... Turn the glass bulb cover in range or reconnect power. Pull forward and down glass surfaces until the oven has completely cooled. Move the hinge levers back to remove. To Remove: 1. IMPORTANT: Oven Door To avoid oven door glass breakage: ■ Do not close . Open the oven door. OVEN RACKS Cleaning Method: ■ Self-Cleaning cycle: See "Self-Cleaning Cycle" first. Open oven door all the way. 2. Turn bulb counterclockwise to slide. Before replacing, make sure the oven is off . To Replace: 1. If it will shut. 4. OVEN...
.... Turn the glass bulb cover in range or reconnect power. Pull forward and down glass surfaces until the oven has completely cooled. Move the hinge levers back to remove. To Remove: 1. IMPORTANT: Oven Door To avoid oven door glass breakage: ■ Do not close . Open the oven door. OVEN RACKS Cleaning Method: ■ Self-Cleaning cycle: See "Self-Cleaning Cycle" first. Open oven door all the way. 2. Turn bulb counterclockwise to slide. Before replacing, make sure the oven is off . To Replace: 1. If it will shut. 4. OVEN...
Owners Manual
Page 22
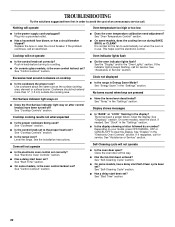
... the control knob set correctly? See the Installation Instructions. See "Assistance or Service" section. Display shows messages ■ Is "BAKE" or "LOCK" flashing in the "Settings" section. Close the oven door all the way. ■ Has the function been entered? Replace the fuse or reset the circuit breaker. Oven will not operate ■ Is the control knob set to automatically run during BAKE, BROIL or CLEAN? See "Start Time" section. ■ On some models, reset the clock, if needed. Oven indicator lights flash...
... the control knob set correctly? See the Installation Instructions. See "Assistance or Service" section. Display shows messages ■ Is "BAKE" or "LOCK" flashing in the "Settings" section. Close the oven door all the way. ■ Has the function been entered? Replace the fuse or reset the circuit breaker. Oven will not operate ■ Is the control knob set to automatically run during BAKE, BROIL or CLEAN? See "Start Time" section. ■ On some models, reset the clock, if needed. Oven indicator lights flash...
Owners Manual
Page 23
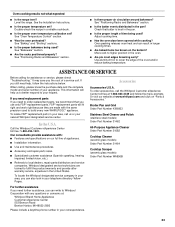
...? Adjust cooking time. ■ Has the oven door been opened while cooking? ASSISTANCE OR SERVICE Before calling for assistance or service, please check "Troubleshooting." This information will fit right and work right because they are trained to cover the edge of time being used? To locate FSP® replacement parts in your nearest Whirlpool designated service center. Call the Whirlpool Customer eXperience Center toll free: 1-800-253-1301. To locate the Whirlpool designated service company...
...? Adjust cooking time. ■ Has the oven door been opened while cooking? ASSISTANCE OR SERVICE Before calling for assistance or service, please check "Troubleshooting." This information will fit right and work right because they are trained to cover the edge of time being used? To locate FSP® replacement parts in your nearest Whirlpool designated service center. Call the Whirlpool Customer eXperience Center toll free: 1-800-253-1301. To locate the Whirlpool designated service company...

Owners Manual
Page 24
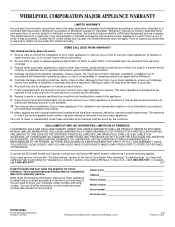
... the removal from accident, alteration, misuse, abuse, fire, flood, acts of God, improper installation, installation not in accordance with electrical or plumbing codes, or use or when it is installed in accordance with original model/serial numbers that is reported to repair or replace appliance light bulbs, air filters or water filters. All rights reserved. ® Registered Trademark/TM Trademark of Whirlpool, U.S.A. 3/10 Printed in -warranty service. WHIRLPOOL CORPORATION...
... the removal from accident, alteration, misuse, abuse, fire, flood, acts of God, improper installation, installation not in accordance with electrical or plumbing codes, or use or when it is installed in accordance with original model/serial numbers that is reported to repair or replace appliance light bulbs, air filters or water filters. All rights reserved. ® Registered Trademark/TM Trademark of Whirlpool, U.S.A. 3/10 Printed in -warranty service. WHIRLPOOL CORPORATION...
Dimension Guide
Page 1
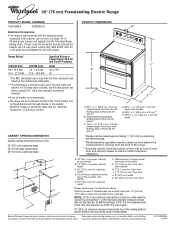
... connected load listed on electric outlet receptacle installation. Range Rating* 120/240 Volts 8.8 - 16.5 KW 16.6 - 22.5 KW 120/208 Volts 7.8 - 12.5 KW 12.6 - 18.5 KW Specified Rating of Power Supply Cord Kit and Circuit Protection Amps 40 or 50** 50 ** The NEC calculated load is less than 1 " (3.8 cm) from the front of the cooktop, see the following Range Rating chart). Model/serial/rating plates (located behind the control panel...
... connected load listed on electric outlet receptacle installation. Range Rating* 120/240 Volts 8.8 - 16.5 KW 16.6 - 22.5 KW 120/208 Volts 7.8 - 12.5 KW 12.6 - 18.5 KW Specified Rating of Power Supply Cord Kit and Circuit Protection Amps 40 or 50** 50 ** The NEC calculated load is less than 1 " (3.8 cm) from the front of the cooktop, see the following Range Rating chart). Model/serial/rating plates (located behind the control panel...
Installation Instructions
Page 1
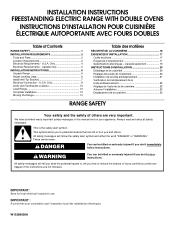
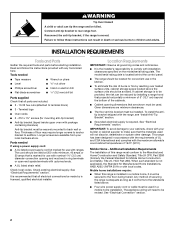
... safety alert symbol and either the word "DANGER" or "WARNING." Canada Only 5 INSTALLATION INSTRUCTIONS 6 Unpack Range 6 Adjust Leveling Legs 6 Install Anti-Tip Bracket 7 Electrical Connection - This symbol alerts you to reduce the chance of Contents RANGE SAFETY 1 INSTALLATION REQUIREMENTS 2 Tools and Parts 2 Location Requirements 2 Electrical Requirements - W10289536A We have provided many important safety messages in this manual and on your appliance. All safety messages will tell you what can kill...
... safety alert symbol and either the word "DANGER" or "WARNING." Canada Only 5 INSTALLATION INSTRUCTIONS 6 Unpack Range 6 Adjust Leveling Legs 6 Install Anti-Tip Bracket 7 Electrical Connection - This symbol alerts you to reduce the chance of Contents RANGE SAFETY 1 INSTALLATION REQUIREMENTS 2 Tools and Parts 2 Location Requirements 2 Electrical Requirements - W10289536A We have provided many important safety messages in this manual and on your appliance. All safety messages will tell you what can kill...
Installation Instructions
Page 2
... located behind the control panel. ■ The range should be made by reaching over heated surface units, cabinet storage space located above . ■ Four-wire power supply cord or cable must be secured to the floor during transit. Reconnect the anti-tip bracket, if the range is recommended that all governing codes and ordinances. ■ It is required. Tools needed If using a power supply cord: ■ A UL listed power supply cord kit marked for use in the kitchen...
... located behind the control panel. ■ The range should be made by reaching over heated surface units, cabinet storage space located above . ■ Four-wire power supply cord or cable must be secured to the floor during transit. Reconnect the anti-tip bracket, if the range is recommended that all governing codes and ordinances. ■ It is required. Tools needed If using a power supply cord: ■ A UL listed power supply cord kit marked for use in the kitchen...
Installation Instructions
Page 13
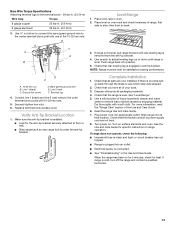
... for satisfactory baking performance. Bare Wire Torque Specifications Attaching terminal lugs to floor or wall. ■ Slide range back so rear range foot is under the anti-tip bracket. 3. Verify Anti-Tip Bracket Location 1. When the range has been on . Level Range 1. Line 2 (red) F. Check that the range is connected. ■ See "Troubleshooting" in . (4.0 N-m) 3. Slide range into an outlet. ■ Electrical supply is level. Line 1 (black) C. Turn on surface elements and oven. Place oven rack in anti-tip bracket. Read the range Use and Care Guide...
... for satisfactory baking performance. Bare Wire Torque Specifications Attaching terminal lugs to floor or wall. ■ Slide range back so rear range foot is under the anti-tip bracket. 3. Verify Anti-Tip Bracket Location 1. When the range has been on . Level Range 1. Line 2 (red) F. Check that the range is connected. ■ See "Troubleshooting" in . (4.0 N-m) 3. Slide range into an outlet. ■ Electrical supply is level. Line 1 (black) C. Turn on surface elements and oven. Place oven rack in anti-tip bracket. Read the range Use and Care Guide...
Warranty
Page 1
... repair or replace appliance light bulbs, air filters or water filters. If you on the product. After checking "Troubleshooting," you ever need it is operated and maintained according to instructions attached to or furnished with electrical or plumbing codes, or use your major appliance, to replace or repair house fuses, or to the finish of your major appliance is used in a manner that have been removed...
... repair or replace appliance light bulbs, air filters or water filters. If you on the product. After checking "Troubleshooting," you ever need it is operated and maintained according to instructions attached to or furnished with electrical or plumbing codes, or use your major appliance, to replace or repair house fuses, or to the finish of your major appliance is used in a manner that have been removed...


