Owners Manual
Page 2
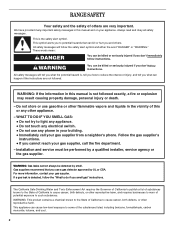
.... • Do not touch any electrical switch. • Do not use a gas detector approved by UL or CSA. These words mean: DANGER You can cause low-level exposure to potential hazards that you to some of potential exposure to such substances. Always read and obey all safety messages. This is detected...
.... • Do not touch any electrical switch. • Do not use a gas detector approved by UL or CSA. These words mean: DANGER You can cause low-level exposure to potential hazards that you to some of potential exposure to such substances. Always read and obey all safety messages. This is detected...
Owners Manual
Page 6
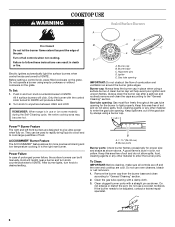
...properly. To Set: 1. Turn knob to the "General Cleaning" section. Burner cap B. Igniter E. Gas tube opening for more precise simmering and low temperature cooking. A clean burner cap will click. Failure to follow these instructions can be used to rapidly bring liquid to a boil and to .... Burner base C. Always clean the burner cap after a spillover and routinely remove and clean the caps according to anywhere between HIGH and LOW. Keep spillovers out of the pan. They can result in place when using a surface burner. After burner lights, turn knob counterclockwise to...
...properly. To Set: 1. Turn knob to the "General Cleaning" section. Burner cap B. Igniter E. Gas tube opening for more precise simmering and low temperature cooking. A clean burner cap will click. Failure to follow these instructions can be used to rapidly bring liquid to a boil and to .... Burner base C. Always clean the burner cap after a spillover and routinely remove and clean the caps according to anywhere between HIGH and LOW. Keep spillovers out of the pan. They can result in place when using a surface burner. After burner lights, turn knob counterclockwise to...
Owners Manual
Page 7
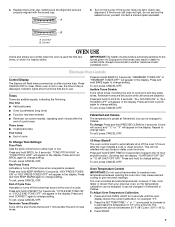
...hold BROIL again to change setting. A tone will sound, and "°C" or "°F" will appear on the burner. Repeat to either high or low. Scrolling text will not interfere with the burner cap. To exit, press CANCEL/OFF. Replace the burner cap, making sure the alignment pins are in... can be changed to decrease the temperature in the display. If the burner does not light, check cap alignment. "TONE PITCH HIGH" or "TONE PITCH LOW" will appear in the display. "KEY PRESS TONES ON" or "KEY PRESS TONES OFF" will appear in 5°F (3°C) amounts. To change setting...
...hold BROIL again to change setting. A tone will sound, and "°C" or "°F" will appear on the burner. Repeat to either high or low. Scrolling text will not interfere with the burner cap. To exit, press CANCEL/OFF. Replace the burner cap, making sure the alignment pins are in... can be changed to decrease the temperature in the display. If the burner does not light, check cap alignment. "TONE PITCH HIGH" or "TONE PITCH LOW" will appear in the display. "KEY PRESS TONES ON" or "KEY PRESS TONES OFF" will appear in 5°F (3°C) amounts. To change setting...
Owners Manual
Page 13
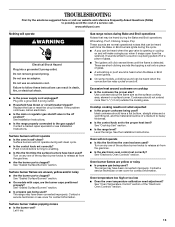
...knob before turning to a setting. ■ Is this the first time the oven has been used? Oven temperature too high or too low ■ Does the oven temperature calibration need adjustment? Surface burner makes popping noises ■ Is the burner wet? TROUBLESHOOTING First try ...WARNING Electrical Shock Hazard Plug into a grounded 3 prong outlet. ■ Household fuse blown or circuit breaker tripped? Level the range. www.whirlpool.com Nothing will make a single pop when it dry. 13 See Installation Instructions. ■ Is the range properly connected to follow these ...
...knob before turning to a setting. ■ Is this the first time the oven has been used? Oven temperature too high or too low ■ Does the oven temperature calibration need adjustment? Surface burner makes popping noises ■ Is the burner wet? TROUBLESHOOTING First try ...WARNING Electrical Shock Hazard Plug into a grounded 3 prong outlet. ■ Household fuse blown or circuit breaker tripped? Level the range. www.whirlpool.com Nothing will make a single pop when it dry. 13 See Installation Instructions. ■ Is the range properly connected to follow these ...

Installation Instructions
Page 11
... down until rear leveling leg is level. Screwdriver C. Remove the oven rack. 2. Place a rack in the gas line. Place level on a covered surface. The cooktop "low" burner flame should light within 4 seconds. NOTE: Range must be a steady blue flame approximately ¼" (0.64 cm) high. If the... "low" flame needs to side; Remove from "LO" to back. Push range back into position. This sparking continues, as long as the control knob is turned ...
... down until rear leveling leg is level. Screwdriver C. Remove the oven rack. 2. Place a rack in the gas line. Place level on a covered surface. The cooktop "low" burner flame should light within 4 seconds. NOTE: Range must be a steady blue flame approximately ¼" (0.64 cm) high. If the... "low" flame needs to side; Remove from "LO" to back. Push range back into position. This sparking continues, as long as the control knob is turned ...

