
Owners Manual
Page 1
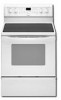
...ñol, o para obtener información adicional acerca de su producto, visite: www.whirlpool.com Tenga listo su número de modelo completo. ® ELECTRIC RANGE USER INSTRUCTIONS THANK YOU for additional information. If you still need your model and serial number... Foil 8 Positioning Racks and Bakeware 8 Oven Vent 8 Baking and Roasting 9 Control Bake 9 Broiling 9 Convection Cooking 9 Rapid Preheat 9 Timed Cooking 10 Warming Drawer 10 RANGE CARE 11 Self-Cleaning Cycle 11 SteamClean 11 General Cleaning 12 Oven Light 12 TROUBLESHOOTING 13 ACCESSORIES 14 WARRANTY ...
...ñol, o para obtener información adicional acerca de su producto, visite: www.whirlpool.com Tenga listo su número de modelo completo. ® ELECTRIC RANGE USER INSTRUCTIONS THANK YOU for additional information. If you still need your model and serial number... Foil 8 Positioning Racks and Bakeware 8 Oven Vent 8 Baking and Roasting 9 Control Bake 9 Broiling 9 Convection Cooking 9 Rapid Preheat 9 Timed Cooking 10 Warming Drawer 10 RANGE CARE 11 Self-Cleaning Cycle 11 SteamClean 11 General Cleaning 12 Oven Light 12 TROUBLESHOOTING 13 ACCESSORIES 14 WARRANTY ...

Owners Manual
Page 3
...Do Not Cook on Grease Fires - No commercial oven cleaner or oven liner protective coating of these openings, oven doors, and windows of fire, electrical shock, injury to accumulate on hood or filter. ■ When flambeing foods under the hood, turn the fan on the backguard of... the Oven - Care should never be allowed to sit or stand on any part of glass, glass/ceramic, ceramic, earthenware, or other servicing should not be allowed to persons, or damage when using the range. ■ User Servicing - Remove broiler pan and other bulky cloth. ■ DO NOT TOUCH SURFACE...
...Do Not Cook on Grease Fires - No commercial oven cleaner or oven liner protective coating of these openings, oven doors, and windows of fire, electrical shock, injury to accumulate on hood or filter. ■ When flambeing foods under the hood, turn the fan on the backguard of... the Oven - Care should never be allowed to sit or stand on any part of glass, glass/ceramic, ceramic, earthenware, or other servicing should not be allowed to persons, or damage when using the range. ■ User Servicing - Remove broiler pan and other bulky cloth. ■ DO NOT TOUCH SURFACE...

Installation Instructions
Page 1
.... INSTALLATION INSTRUCTIONS 30" (76 CM) FREESTANDING ELECTRIC RANGES Table of Contents RANGE SAFETY 1 INSTALLATION REQUIREMENTS 2 Tools and Parts 2 Location Requirements 2 Electrical Requirements 3 INSTALLATION INSTRUCTIONS 4 Unpack Range 4 Install Anti-Tip Bracket 5 Electrical Connection 6 Verify Anti-Tip Bracket Location 9 Level Range 9 Complete Installation 10 Moving the Range 10 ANTI-TIP BRACKET TEMPLATE 11 RANGE SAFETY Your safety and the safety of...
.... INSTALLATION INSTRUCTIONS 30" (76 CM) FREESTANDING ELECTRIC RANGES Table of Contents RANGE SAFETY 1 INSTALLATION REQUIREMENTS 2 Tools and Parts 2 Location Requirements 2 Electrical Requirements 3 INSTALLATION INSTRUCTIONS 4 Unpack Range 4 Install Anti-Tip Bracket 5 Electrical Connection 6 Verify Anti-Tip Bracket Location 9 Level Range 9 Complete Installation 10 Moving the Range 10 ANTI-TIP BRACKET TEMPLATE 11 RANGE SAFETY Your safety and the safety of...

Installation Instructions
Page 2
... dimensions are available from your builder or cabinet supplier to the standards listed above the surface units should be located for concrete/ceramic floors) ■ Masking tape Parts supplied Check that are included. Mobile Home - Parts needed ■ Tape measure ■... Federal Standard for use with the maximum allowable wood cabinet temperatures of UL and CSA International and complies with ranges. See "Electrical Requirements" section. INSTALLATION REQUIREMENTS Tools and Parts Gather the required tools and parts before starting installation. If cabinet...
... dimensions are available from your builder or cabinet supplier to the standards listed above the surface units should be located for concrete/ceramic floors) ■ Masking tape Parts supplied Check that are included. Mobile Home - Parts needed ■ Tape measure ■... Federal Standard for use with the maximum allowable wood cabinet temperatures of UL and CSA International and complies with ranges. See "Electrical Requirements" section. INSTALLATION REQUIREMENTS Tools and Parts Gather the required tools and parts before starting installation. If cabinet...

Installation Instructions
Page 3
... - Check with a qualified electrician or service technician if you are in accordance with local codes. A freestanding range may be installed next to whether the appliance is recommended that a qualified electrical installer determine that the electrical connection and wire size are in doubt as to combustible walls with leveling legs screwed all local codes...
... - Check with a qualified electrician or service technician if you are in accordance with local codes. A freestanding range may be installed next to whether the appliance is recommended that a qualified electrical installer determine that the electrical connection and wire size are in doubt as to combustible walls with leveling legs screwed all local codes...

Installation Instructions
Page 4
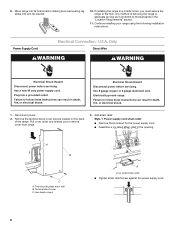
...(pigtail). or 50-amp power supply cord (pigtail) (see Range Rating chart below). See "Electrical Connection." ■ Allow 2 to 3 ft (61.0 cm to the proper electrical voltage and frequency as specified on the back of the range or inside oven. Grounding through the neutral, use a 4-wire... box (or fused disconnect) through the neutral conductor. Electrical Connection To properly install your range, you must determine the type of electrical connection you will be using and follow the instructions provided for use with ranges. The model/serial number rating plate is less than ...
...(pigtail). or 50-amp power supply cord (pigtail) (see Range Rating chart below). See "Electrical Connection." ■ Allow 2 to 3 ft (61.0 cm to the proper electrical voltage and frequency as specified on the back of the range or inside oven. Grounding through the neutral, use a 4-wire... box (or fused disconnect) through the neutral conductor. Electrical Connection To properly install your range, you must determine the type of electrical connection you will be using and follow the instructions provided for use with ranges. The model/serial number rating plate is less than ...
Installation Instructions
Page 5
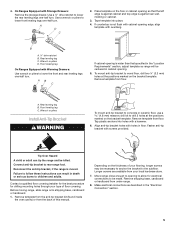
...Contact a qualified floor covering installer for the best procedure for electrical connections to children and adults. Make electrical connections as described in cabinet opening so that specified in the "Location Requirements" section, adjust template so range will be necessary to anchor the bracket to wood floor,...To mount anti-tip bracket to the subfloor. Wrench or pliers Install Anti-Tip Bracket WARNING To mount anti-tip bracket to concrete or ceramic floor, use a 4.8 mm) masonry drill bit to lower the rear leveling legs one -half turn . Front leveling leg C. ...
...Contact a qualified floor covering installer for the best procedure for electrical connections to children and adults. Make electrical connections as described in cabinet opening so that specified in the "Location Requirements" section, adjust template so range will be necessary to anchor the bracket to wood floor,...To mount anti-tip bracket to the subfloor. Wrench or pliers Install Anti-Tip Bracket WARNING To mount anti-tip bracket to concrete or ceramic floor, use a 4.8 mm) masonry drill bit to lower the rear leveling legs one -half turn . Front leveling leg C. ...
Installation Instructions
Page 6
...Terminal block cover C. 9. If installing the range in the "Location Requirements" section. 11. Any method of the range. Power Supply Cord Electrical Connection - Only Direct Wire WARNING WARNING Electrical Shock Hazard Disconnect power before servicing. Electrical Shock Hazard Disconnect power before servicing. UL ...supply cord. ■ Assemble a UL listed strain relief in death, fire, or electrical shock. 1. Hex-head screws A A. Use 8 gauge copper or 6 gauge aluminum wire. Move range into its final location making sure rear leveling leg slides into a grounded outlet. ...
...Terminal block cover C. 9. If installing the range in the "Location Requirements" section. 11. Any method of the range. Power Supply Cord Electrical Connection - Only Direct Wire WARNING WARNING Electrical Shock Hazard Disconnect power before servicing. Electrical Shock Hazard Disconnect power before servicing. UL ...supply cord. ■ Assemble a UL listed strain relief in death, fire, or electrical shock. 1. Hex-head screws A A. Use 8 gauge copper or 6 gauge aluminum wire. Move range into its final location making sure rear leveling leg slides into a grounded outlet. ...
Installation Instructions
Page 7
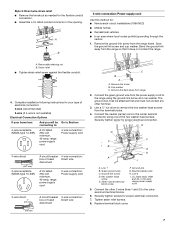
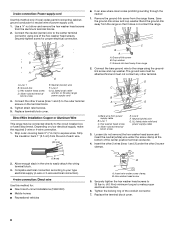
... D F C B G H A I . Line 1 B. Green ground wire C. Ground-link G. Bend the ground-link away from range 2. Complete installation following instructions for proper electrical connection. Removable retaining nut B. Strain relief ■ Tighten strain relief screw against the flexible conduit. 4. Connect the green ground wire from... the neutral (center) wire to remove the hex washer head screws from the range frame. A B 4-wire connection: Power supply cord Use this method for proper electrical connection. 7. Remove the ground-link screw from the terminal blocks. 4. Hex ...
... D F C B G H A I . Line 1 B. Green ground wire C. Ground-link G. Bend the ground-link away from range 2. Complete installation following instructions for proper electrical connection. Removable retaining nut B. Strain relief ■ Tighten strain relief screw against the flexible conduit. 4. Connect the green ground wire from... the neutral (center) wire to remove the hex washer head screws from the range frame. A B 4-wire connection: Power supply cord Use this method for proper electrical connection. 7. Remove the ground-link screw from the terminal blocks. 4. Hex ...
Installation Instructions
Page 8
... 4. 3-wire connection: Power supply cord Use this method for proper electrical connection. Line 1 B. Ground-link C. UL listed strain relief and 40- Direct Wire Installation: Copper or Aluminum Wire This range may be attached first and must be connected directly to the circuit breaker...5. Strip the insulation back 1" (2.5 cm) from the range so that it does not contact the range. Bend the ground-link away from the end of power supply cord. 1. Bare wire from the aluminum terminal blocks. 2. Complete electrical connection according to make the required 3-wire or 4-wire ...
... 4. 3-wire connection: Power supply cord Use this method for proper electrical connection. Line 1 B. Ground-link C. UL listed strain relief and 40- Direct Wire Installation: Copper or Aluminum Wire This range may be attached first and must be connected directly to the circuit breaker...5. Strip the insulation back 1" (2.5 cm) from the range so that it does not contact the range. Bend the ground-link away from the end of power supply cord. 1. Bare wire from the aluminum terminal blocks. 2. Complete electrical connection according to make the required 3-wire or 4-wire ...

Installation Instructions
Page 9
...head screw D. Insert wire under the screw clamp at the bottom of range, first side to view the rear foot from the anti-tip bracket. On Ranges Equipped with a storage drawer, pull drawer open to make a proper electrical connection. 4. Replace the storage drawer (or warming drawer on a ...covered surface. D Verify Anti-Tip Bracket Location 1. Line 2 G. Check that rear leveling leg is removed from outside the range. Remove drawer and set it aside...
...head screw D. Insert wire under the screw clamp at the bottom of range, first side to view the rear foot from the anti-tip bracket. On Ranges Equipped with a storage drawer, pull drawer open to make a proper electrical connection. 4. Replace the storage drawer (or warming drawer on a ...covered surface. D Verify Anti-Tip Bracket Location 1. Line 2 G. Check that rear leveling leg is removed from outside the range. Remove drawer and set it aside...

Installation Instructions
Page 10
...the Use and Care Guide for the anti-tip bracket securely attached to children and adults. Check that range is connected. ■ See "Troubleshooting" in death or electrical shock. 1. Slide range forward. 2. Check that anti-tip bracket is installed: ■ Look for specific instruction on surface ... Check that anti-tip bracket is installed: ■ Look for cleaning or maintenance: For power supply cord-connected ranges: 1. Plug power cord into an outlet. ■ Electrical supply is level. 6. Dispose of the Use and Care Guide. 6. Connect anti-tip bracket to do so ...
...the Use and Care Guide for the anti-tip bracket securely attached to children and adults. Check that range is connected. ■ See "Troubleshooting" in death or electrical shock. 1. Slide range forward. 2. Check that anti-tip bracket is installed: ■ Look for specific instruction on surface ... Check that anti-tip bracket is installed: ■ Look for cleaning or maintenance: For power supply cord-connected ranges: 1. Plug power cord into an outlet. ■ Electrical supply is level. 6. Dispose of the Use and Care Guide. 6. Connect anti-tip bracket to do so ...


