
Owners Manual
Page 1
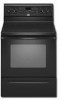
...Foil 8 Positioning Racks and Bakeware 8 Oven Vent 8 Baking and Roasting 9 Control Bake 9 Broiling 9 Convection Cooking 9 Rapid Preheat 9 Timed Cooking 10 Warming Drawer 10 RANGE CARE 11 Self-Cleaning Cycle 11 SteamClean 11 General Cleaning 12 Oven Light 12 TROUBLESHOOTING 13 ACCESSORIES 14 WARRANTY...in TROUBLESHOOTING, please visit our website at 1-800-253-1301. ® ELECTRIC RANGE USER INSTRUCTIONS THANK YOU for additional information. You will need assistance, call us at www.whirlpool.com for purchasing this high-quality product. Puede encontrar su número de...
...Foil 8 Positioning Racks and Bakeware 8 Oven Vent 8 Baking and Roasting 9 Control Bake 9 Broiling 9 Convection Cooking 9 Rapid Preheat 9 Timed Cooking 10 Warming Drawer 10 RANGE CARE 11 Self-Cleaning Cycle 11 SteamClean 11 General Cleaning 12 Oven Light 12 TROUBLESHOOTING 13 ACCESSORIES 14 WARRANTY...in TROUBLESHOOTING, please visit our website at 1-800-253-1301. ® ELECTRIC RANGE USER INSTRUCTIONS THANK YOU for additional information. You will need assistance, call us at www.whirlpool.com for purchasing this high-quality product. Puede encontrar su número de...
Owners Manual
Page 2
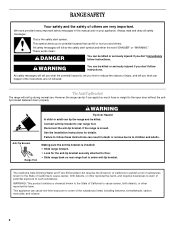
...Governor of California to publish a list of substances known to the State of California to cause cancer, birth defects, or other reproductive harm. RANGE SAFETY Your safety and the safety of others . This is moved. This symbol alerts you apply too much force or weight to potential ...can result in this manual and on your appliance. Always read and obey all safety messages. The Anti-Tip Bracket The range will follow instructions. Anti-Tip Bracket Range Foot Making sure the anti-tip bracket is , tell you don't immediately follow the safety alert symbol and either the...
...Governor of California to publish a list of substances known to the State of California to cause cancer, birth defects, or other reproductive harm. RANGE SAFETY Your safety and the safety of others . This is moved. This symbol alerts you apply too much force or weight to potential ...can result in this manual and on your appliance. Always read and obey all safety messages. The Anti-Tip Bracket The range will follow instructions. Anti-Tip Bracket Range Foot Making sure the anti-tip bracket is , tell you don't immediately follow the safety alert symbol and either the...

Owners Manual
Page 3
...OVEN - Do not use dry chemical or foam-type extinguisher. ■ Use Only Dry Potholders - Only certain types of glass, glass/ceramic, ceramic, earthenware, or other flammable materials contact surface units or areas near surface units may result in color. Let hot air or steam escape... to direct contact and may result in desired location while oven is properly installed and grounded by a qualified technician. ■ Never Use the Range for Warming or Heating the Room. ■ Do Not Leave Children Alone - Contact a qualified technician immediately. ■ Clean Cooktop With Caution...
...OVEN - Do not use dry chemical or foam-type extinguisher. ■ Use Only Dry Potholders - Only certain types of glass, glass/ceramic, ceramic, earthenware, or other flammable materials contact surface units or areas near surface units may result in color. Let hot air or steam escape... to direct contact and may result in desired location while oven is properly installed and grounded by a qualified technician. ■ Never Use the Range for Warming or Heating the Room. ■ Do Not Leave Children Alone - Contact a qualified technician immediately. ■ Clean Cooktop With Caution...
Owners Manual
Page 4
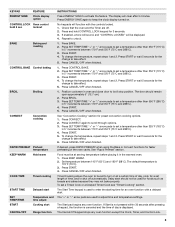
... of the items listed. Do not press the CANCEL/OFF keypad because the oven will turn off . PRECISE CLEAN™ Self-clean cycle See the "Range Care" section. If enabled, end-of-cycle tones will sound to 9 hours and 59 minutes. 1. WARM DRAWER Warming drawer Press WARM DRAWER ON to select... can use a 12 or 24-hour cycle. Press START. Press WARM ZONE OFF to begin the countdown. After 20 minutes, a beep will sound at www.whirlpool.com for more than one hour before or after cooking. Press START. 5. See "Oven Use" section. 1.
... of the items listed. Do not press the CANCEL/OFF keypad because the oven will turn off . PRECISE CLEAN™ Self-clean cycle See the "Range Care" section. If enabled, end-of-cycle tones will sound to 9 hours and 59 minutes. 1. WARM DRAWER Warming drawer Press WARM DRAWER ON to select... can use a 12 or 24-hour cycle. Press START. Press WARM ZONE OFF to begin the countdown. After 20 minutes, a beep will sound at www.whirlpool.com for more than one hour before or after cooking. Press START. 5. See "Oven Use" section. 1.
Owners Manual
Page 5
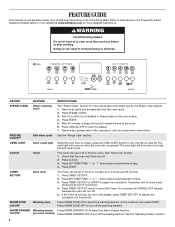
... the oven to activate the feature. Delay start should remain open approximately 5" (12.7 cm). 2. No keypads will function with a delayed start Range function INSTRUCTIONS Press ENERGY SAVE to be at a certain time of day, cook for a set length of time, and/or shut off . ... Repeat to scroll through options. 3. Press and hold 3 sec lockout BAKE Baking and roasting CONTROL BAKE Control baking BROIL Broiling CONVECT Convection cooking RAPID PREHEAT Preheat temperature KEEP WARM Hold warm COOK TIME Timed cooking START TIME SET TEMP/TIME START CANCEL/OFF Delayed start...
... the oven to activate the feature. Delay start should remain open approximately 5" (12.7 cm). 2. No keypads will function with a delayed start Range function INSTRUCTIONS Press ENERGY SAVE to be at a certain time of day, cook for a set length of time, and/or shut off . ... Repeat to scroll through options. 3. Press and hold 3 sec lockout BAKE Baking and roasting CONTROL BAKE Control baking BROIL Broiling CONVECT Convection cooking RAPID PREHEAT Preheat temperature KEEP WARM Hold warm COOK TIME Timed cooking START TIME SET TEMP/TIME START CANCEL/OFF Delayed start...
Owners Manual
Page 6
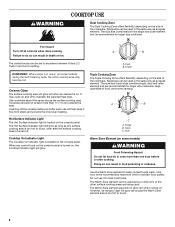
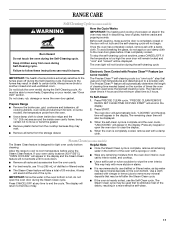
... Indicator light will help keep cooked foods warm. Push in oven more than one hour before and after each use or (on the console panel. Ceramic Glass The surface cooking area will glow as long as any surface cooking area is too hot to touch, even after cooking. One hour is... too hot to heat cold foods. Single REMEMBER: When range is located on some models) WARNING Food Poisoning Hazard Do not let food sit in and turn to maintain food quality. A B Hot Surface Indicator Light...
... Indicator light will help keep cooked foods warm. Push in oven more than one hour before and after each use or (on the console panel. Ceramic Glass The surface cooking area will glow as long as any surface cooking area is too hot to touch, even after cooking. One hour is... too hot to heat cold foods. Single REMEMBER: When range is located on some models) WARNING Food Poisoning Hazard Do not let food sit in and turn to maintain food quality. A B Hot Surface Indicator Light...
Owners Manual
Page 8
... or other than 350°F (177°C). 3. Sabbath Mode The Sabbath Mode sets the oven to remain on in a bake setting until turned off the range. To Enable Sabbath Mode (one time only): To Activate Sabbath Mode: To use racks 2 and 4 for 5 seconds. "SAb" will appear in the display. 2. Do not...
... or other than 350°F (177°C). 3. Sabbath Mode The Sabbath Mode sets the oven to remain on in a bake setting until turned off the range. To Enable Sabbath Mode (one time only): To Activate Sabbath Mode: To use racks 2 and 4 for 5 seconds. "SAb" will appear in the display. 2. Do not...

Owners Manual
Page 9
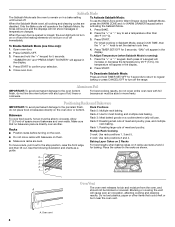
...when baking on 1 rack. It will appear on when the oven door is recommended in the recipe. Convect Cook Functions Function Convect Bake (default) Convect Roast Convect Cook Cookies Turkey Casserole Frozen Pizza Press CONVECT keypad 1 time 2 times 3 times 4 times 5 times 6 times 7 times Rapid Preheat Use Rapid ...on some models) The ACCUBAKE® system electronically regulates the oven heat levels during preheat and bake to maintain a precise temperature range for the oven preheat cycle to end before putting food in unless recommended in the recipe. When roasting, it in the ...
...when baking on 1 rack. It will appear on when the oven door is recommended in the recipe. Convect Cook Functions Function Convect Bake (default) Convect Roast Convect Cook Cookies Turkey Casserole Frozen Pizza Press CONVECT keypad 1 time 2 times 3 times 4 times 5 times 6 times 7 times Rapid Preheat Use Rapid ...on some models) The ACCUBAKE® system electronically regulates the oven heat levels during preheat and bake to maintain a precise temperature range for the oven preheat cycle to end before putting food in unless recommended in the recipe. When roasting, it in the ...
Owners Manual
Page 10
...Press WARM DRAWER ON/OFF. Press SET TEMP/TIME "+" or "-" keys to preheat for warming breads and pastries. The Warming Drawer operates within a temperature range of time to cook. 5. Doing so can be placed in food poisoning or sickness. To Set a Timed Cook: 1. Press the SET TEMP/TIME ...1. Press START. Before using the warming drawer, wash the bottom of food may be changed anytime after cooking. To Use: 1. Press BAKE, CONVECT or CONTROL BAKE (on . The temperature and/or time settings can result in oven-safe container. Different types of the drawer with soap and ...
...Press WARM DRAWER ON/OFF. Press SET TEMP/TIME "+" or "-" keys to preheat for warming breads and pastries. The Warming Drawer operates within a temperature range of time to cook. 5. Doing so can be placed in food poisoning or sickness. To Set a Timed Cook: 1. Press the SET TEMP/TIME ...1. Press START. Before using the warming drawer, wash the bottom of food may be changed anytime after cooking. To Use: 1. Press BAKE, CONVECT or CONTROL BAKE (on . The temperature and/or time settings can result in oven-safe container. Different types of the drawer with soap and ...
Owners Manual
Page 11
...gasket. ■ Remove plastic items from the cooktop because they may melt. ■ Remove all racks and accessories from the storage drawer. Prepare Range ■ Remove the broiler pan, grid, cookware and bakeware, all remaining water in the bottom of porcelain on some models, the temperature probe...stop the self-cleaning cycle at anytime, press CANCEL/OFF. Press any remaining moisture from oven during the self-cleaning cycle. Allow the range to cool to the fumes given off during the Self-Cleaning cycle. A beep will automatically determine the length of the debris, resulting in...
...gasket. ■ Remove plastic items from the cooktop because they may melt. ■ Remove all racks and accessories from the storage drawer. Prepare Range ■ Remove the broiler pan, grid, cookware and bakeware, all remaining water in the bottom of porcelain on some models, the temperature probe...stop the self-cleaning cycle at anytime, press CANCEL/OFF. Press any remaining moisture from oven during the self-cleaning cycle. Allow the range to cool to the fumes given off during the Self-Cleaning cycle. A beep will automatically determine the length of the debris, resulting in...

Owners Manual
Page 12
... avoid scratches, pitting and abrasions and to slide, a light coating of our website at www.whirlpool.com. Cleaning Method: Rub in direction of children. To avoid damage, do not use abrasive...drawer is cool. On some models) Do not use steel wool, abrasive cleansers or oven cleaner. CERAMIC GLASS (on some models) NOTE: To avoid damage to the cooktop controls, do not soak ...first unless otherwise noted. For additional information, you can be cleaned as soon as the entire range is cool and empty before cleaning. Cleaning Method: ■ Glass cleaner, mild liquid cleaner ...
... avoid scratches, pitting and abrasions and to slide, a light coating of our website at www.whirlpool.com. Cleaning Method: Rub in direction of children. To avoid damage, do not use abrasive...drawer is cool. On some models) Do not use steel wool, abrasive cleansers or oven cleaner. CERAMIC GLASS (on some models) NOTE: To avoid damage to the cooktop controls, do not soak ...first unless otherwise noted. For additional information, you can be cleaned as soon as the entire range is cool and empty before cleaning. Cleaning Method: ■ Glass cleaner, mild liquid cleaner ...
Owners Manual
Page 13
...the pan. ■ Is the proper length of time being used? Level the range. See "Electronic Oven Controls" section. ■ Has a delay start been set correctly? See "Timed Cooking" section. ■ On some ceramic glass models, the cooktop will not operate during a self-clean cycle. See the...or reset the circuit breaker. Cookware should not extend more than ½" (1.3 cm) outside the cooking area. See the Installation Instructions. www.whirlpool.com Nothing will not operate ■ Is the oven door open? Excessive heat around bakeware? On some models, reset the clock, if needed...
...the pan. ■ Is the proper length of time being used? Level the range. See "Electronic Oven Controls" section. ■ Has a delay start been set correctly? See "Timed Cooking" section. ■ On some ceramic glass models, the cooktop will not operate during a self-clean cycle. See the...or reset the circuit breaker. Cookware should not extend more than ½" (1.3 cm) outside the cooking area. See the Installation Instructions. www.whirlpool.com Nothing will not operate ■ Is the oven door open? Excessive heat around bakeware? On some models, reset the clock, if needed...

Dimension Guide
Page 1
...the control panel or on the model/serial number rating plate. Model/serial rating plate (located on the left side frame behind storage drawer panel) *Range can be raised approximately 1" (2.5 cm) by not less than No. 28 MSG sheet steel, 0.015" (0.4 mm) stainless steel, 0.024" (0.6...upper cabinet depth B. 30" (76.2 cm) min. For minimum clearance to top of wood or metal cabinet is recommended. Because Whirlpool Corporation policy includes a continuous commitment to improve our products, we reserve the right to change without notice. Specifications subject to change materials ...
...the control panel or on the model/serial number rating plate. Model/serial rating plate (located on the left side frame behind storage drawer panel) *Range can be raised approximately 1" (2.5 cm) by not less than No. 28 MSG sheet steel, 0.015" (0.4 mm) stainless steel, 0.024" (0.6...upper cabinet depth B. 30" (76.2 cm) min. For minimum clearance to top of wood or metal cabinet is recommended. Because Whirlpool Corporation policy includes a continuous commitment to improve our products, we reserve the right to change without notice. Specifications subject to change materials ...

Installation Instructions
Page 1
U.S.A. Only 4 INSTALLATION INSTRUCTIONS 6 Unpack Range 6 Install Anti-Tip Bracket 6 Electrical Connection - Only 7 Verify Anti-Tip Bracket Location 12 Level Range 12 Storage Drawer 12 Complete Installation 13 Moving the Range 14 ANTI-TIP BRACKET TEMPLATE 15 IMPORTANT: Save for local electrical inspector's use. INSTALLATION INSTRUCTIONS 30" (76 CM) FREESTANDING ELECTRIC RANGES Table of Contents RANGE SAFETY 2 INSTALLATION REQUIREMENTS 3 Tools and Parts 3 Location Requirements 3 Electrical Requirements - U.S.A. W10252706B
U.S.A. Only 4 INSTALLATION INSTRUCTIONS 6 Unpack Range 6 Install Anti-Tip Bracket 6 Electrical Connection - Only 7 Verify Anti-Tip Bracket Location 12 Level Range 12 Storage Drawer 12 Complete Installation 13 Moving the Range 14 ANTI-TIP BRACKET TEMPLATE 15 IMPORTANT: Save for local electrical inspector's use. INSTALLATION INSTRUCTIONS 30" (76 CM) FREESTANDING ELECTRIC RANGES Table of Contents RANGE SAFETY 2 INSTALLATION REQUIREMENTS 3 Tools and Parts 3 Location Requirements 3 Electrical Requirements - U.S.A. W10252706B

Installation Instructions
Page 2
... can happen if the instructions are very important. Connect anti-tip bracket to children and adults. 2 Reconnect the anti-tip bracket, if the range is the safety alert symbol. Always read and obey all safety messages. All safety messages will tell you what can be killed. Failure to reduce...injured if you what the potential hazard is, tell you how to follow the safety alert symbol and either the word "DANGER" or "WARNING." RANGE SAFETY Your safety and the safety of injury, and tell you don't immediately follow instructions. WARNING Tip Over Hazard A child or adult can result...
... can happen if the instructions are very important. Connect anti-tip bracket to children and adults. 2 Reconnect the anti-tip bracket, if the range is the safety alert symbol. Always read and obey all safety messages. All safety messages will tell you what can be killed. Failure to reduce...injured if you what the potential hazard is, tell you how to follow the safety alert symbol and either the word "DANGER" or "WARNING." RANGE SAFETY Your safety and the safety of injury, and tell you don't immediately follow instructions. WARNING Tip Over Hazard A child or adult can result...

Installation Instructions
Page 3
...3.2 mm) drill bit (for wood floors) 4.8 mm) carbide-tipped masonry drill bit (for concrete/ceramic floors) ■ Tin snips or large wire cutters (for use with ranges. The model/serial rating plate is installed in ring terminals or open-end spade terminals with nominal ... IMPORTANT: Observe all governing codes and ordinances. ■ It is recommended that is to comply with the maximum allowable wood cabinet temperatures of this range is located on the model/serial rating plate. See "Electrical Connection" section. 3 Plastic anchors (2) C. #10 x 1¹⁄₂" screws...
...3.2 mm) drill bit (for wood floors) 4.8 mm) carbide-tipped masonry drill bit (for concrete/ceramic floors) ■ Tin snips or large wire cutters (for use with ranges. The model/serial rating plate is installed in ring terminals or open-end spade terminals with nominal ... IMPORTANT: Observe all governing codes and ordinances. ■ It is recommended that is to comply with the maximum allowable wood cabinet temperatures of this range is located on the model/serial rating plate. See "Electrical Connection" section. 3 Plastic anchors (2) C. #10 x 1¹⁄₂" screws...

Installation Instructions
Page 4
... 69.9 cm) max. Cabinet Dimensions Cabinet opening dimensions shown are in doubt as to 22" (55.9 cm) from floor F 2.2 cm) min. IMPORTANT: If installing a range hood or microwave hood combination above code standards can be obtained from: National Fire Protection Association One Batterymarch Park Quincy, MA 02269. opening width E. opening... the National Electrical Code, ANSI/ NFPA 70-latest edition and all the way in a risk of the above the range, follow the range hood or microwave hood combination installation instructions for 25" (64.0 cm) countertop depth, 24" (61.0 cm) base...
... 69.9 cm) max. Cabinet Dimensions Cabinet opening dimensions shown are in doubt as to 22" (55.9 cm) from floor F 2.2 cm) min. IMPORTANT: If installing a range hood or microwave hood combination above code standards can be obtained from: National Fire Protection Association One Batterymarch Park Quincy, MA 02269. opening width E. opening... the National Electrical Code, ANSI/ NFPA 70-latest edition and all the way in a risk of the above the range, follow the range hood or microwave hood combination installation instructions for 25" (64.0 cm) countertop depth, 24" (61.0 cm) base...

Installation Instructions
Page 5
...61.0 cm to the cabinet. See "Electrical Connection." Grounding through the neutral conductor. or 50-amp power supply cord (pigtail) (see following Range Rating chart). The ground must be at the point the power supply cord enters the appliance. mobile homes; and recreational vehicles, or an area... where local codes prohibit grounding through the neutral conductor is recommended. ■ The range can be revised so the green ground wire of the 4-wire power supply cord is connected to 91.4 cm) of the "Location ...
...61.0 cm to the cabinet. See "Electrical Connection." Grounding through the neutral conductor. or 50-amp power supply cord (pigtail) (see following Range Rating chart). The ground must be at the point the power supply cord enters the appliance. mobile homes; and recreational vehicles, or an area... where local codes prohibit grounding through the neutral conductor is recommended. ■ The range can be revised so the green ground wire of the 4-wire power supply cord is connected to 91.4 cm) of the "Location ...

Installation Instructions
Page 6
... D. AB C If cabinet opening . A. Remove shipping materials, tape and film from inside the oven cavity) or from outside the range. Remove oven racks and parts package from range. 2. Use a ¼" drive ratchet to do so can result in cabinet opening is wider than that the left edge is against...wrench or pliers to adjust the rear legs from the back of floor covering. Shipping base 4. Failure to follow these instructions can tip the range and be necessary to lower the front and rear leveling legs one-half turn . Rear leveling leg C. It will be accessed by removing the...
... D. AB C If cabinet opening . A. Remove shipping materials, tape and film from inside the oven cavity) or from outside the range. Remove oven racks and parts package from range. 2. Use a ¼" drive ratchet to do so can result in cabinet opening is wider than that the left edge is against...wrench or pliers to adjust the rear legs from the back of floor covering. Shipping base 4. Failure to follow these instructions can tip the range and be necessary to lower the front and rear leveling legs one-half turn . Rear leveling leg C. It will be accessed by removing the...

Installation Instructions
Page 7
...mounting tabs each side B. Remove template from floor. Fasten anti-tip bracket with screws provided. To mount anti-tip bracket to concrete or ceramic floor, use a 4.8 mm) masonry drill bit to wood floor, drill two ¹⁄₈" (3.2 mm) holes at the positions... marked on the back of the range. Longer screws are available from range. 3. U.S.A. Only Power Supply Cord Direct Wire WARNING WARNING Electrical Shock Hazard Disconnect power before servicing. Disconnect power. 2. Pull ...
...mounting tabs each side B. Remove template from floor. Fasten anti-tip bracket with screws provided. To mount anti-tip bracket to concrete or ceramic floor, use a 4.8 mm) masonry drill bit to wood floor, drill two ¹⁄₈" (3.2 mm) holes at the positions... marked on the back of the range. Longer screws are available from range. 3. U.S.A. Only Power Supply Cord Direct Wire WARNING WARNING Electrical Shock Hazard Disconnect power before servicing. Disconnect power. 2. Pull ...


