Owners Manual
Page 2
... Convection Broil 12 Convect Full Meal 12 Convect Conversion 13 Proofing Bread (single or upper ovens only 14 Timed Cooking 14 OVEN CARE 15 Self-Cleaning Cycle 15 General Cleaning 16 Oven Lights 17 Oven Door 17 TROUBLESHOOTING 18 ASSISTANCE OR SERVICE 19 WARRANTY 20 TABLE DES MATIÈRES S&#...autonettoyage 34 Nettoyage général 35 Lampes du four 36 Porte du four 36 DÉPANNAGE 37 ASSISTANCE OU SERVICE 38 GARANTIE 39 OVEN SAFETY Your safety and the safety of injury, and tell you what the potential hazard is the safety alert symbol. This symbol alerts you...
... Convection Broil 12 Convect Full Meal 12 Convect Conversion 13 Proofing Bread (single or upper ovens only 14 Timed Cooking 14 OVEN CARE 15 Self-Cleaning Cycle 15 General Cleaning 16 Oven Lights 17 Oven Door 17 TROUBLESHOOTING 18 ASSISTANCE OR SERVICE 19 WARRANTY 20 TABLE DES MATIÈRES S&#...autonettoyage 34 Nettoyage général 35 Lampes du four 36 Porte du four 36 DÉPANNAGE 37 ASSISTANCE OU SERVICE 38 GARANTIE 39 OVEN SAFETY Your safety and the safety of injury, and tell you what the potential hazard is the safety alert symbol. This symbol alerts you...

Owners Manual
Page 3
...Care When Opening Door - If rack must be hot even though they have had sufficient time to cool. Other surfaces of the oven may be moved while oven is essential for Warming or Heating the Room. ■ Do Not Leave Children Alone - The door gasket is hot, do .... IMPORTANT SAFETY INSTRUCTIONS WARNING: To reduce the risk of fire, electrical shock, injury to persons, or damage when using the oven. ■ User Servicing - Be sure the oven is cool. Moist or damp potholders on any part of the substances listed, including benzene, formaldehyde, carbon monoxide, and toluene....
...Care When Opening Door - If rack must be hot even though they have had sufficient time to cool. Other surfaces of the oven may be moved while oven is essential for Warming or Heating the Room. ■ Do Not Leave Children Alone - The door gasket is hot, do .... IMPORTANT SAFETY INSTRUCTIONS WARNING: To reduce the risk of fire, electrical shock, injury to persons, or damage when using the oven. ■ User Servicing - Be sure the oven is cool. Moist or damp potholders on any part of the substances listed, including benzene, formaldehyde, carbon monoxide, and toluene....
Owners Manual
Page 4
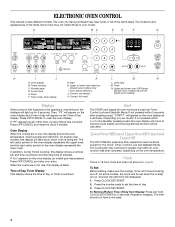
... will be canceled. Clock This is being set the time of your entry. or p.m. Press the number pads to the appliance, everything on the oven temperature. The locations and appearances of the items shown here may not match those of day. 3. Control lock E. Start H. If "Err" appears...continue to inactive mode (blank) and the programmed function will light up for 5 seconds. will appear on the Time of day will appear on the oven display and a time of Day display. Timed cooking C. Clock F. If "PF" appears at any other time, a power failure has occurred. Start...
... will be canceled. Clock This is being set the time of your entry. or p.m. Press the number pads to the appliance, everything on the oven temperature. The locations and appearances of the items shown here may not match those of day. 3. Control lock E. Start H. If "Err" appears...continue to inactive mode (blank) and the programmed function will light up for 5 seconds. will appear on the Time of day will appear on the oven display and a time of Day display. Timed cooking C. Clock F. If "PF" appears at any other time, a power failure has occurred. Start...
Owners Manual
Page 5
...on , but can be canceled. Repeat to change back to unlock and remove "CONTROL LOCK" from the display, press OFF/CANCEL. Pad Press Tones (single oven models) The single tones signaling a valid pad press are preset on the display, press OFF/CANCEL to remove. To Turn Off/On: Press and hold... will also function. If "Snd off . Repeat to change back to the time of the above steps. To Turn Tones Off/On: Depending on the oven display for 5 seconds. If "EOC OFF" appears on your model), the display will return to Fahrenheit. Repeat to clear. Reminder Tones Only The Minute ...
...on , but can be canceled. Repeat to change back to unlock and remove "CONTROL LOCK" from the display, press OFF/CANCEL. Pad Press Tones (single oven models) The single tones signaling a valid pad press are preset on the display, press OFF/CANCEL to remove. To Turn Off/On: Press and hold... will also function. If "Snd off . Repeat to change back to the time of the above steps. To Turn Tones Off/On: Depending on the oven display for 5 seconds. If "EOC OFF" appears on your model), the display will return to Fahrenheit. Repeat to clear. Reminder Tones Only The Minute ...
Owners Manual
Page 6
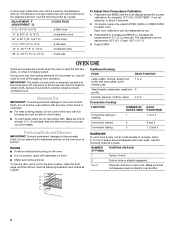
...176;F (-9° to -12°C) ...moderately less -25° to -35°F (-15° to the porcelain finish, do not line the oven bottom with foil because air must be warmer by the displayed amount. NUMBER OF PAN(S) 1 2 3 or 4 POSITION ON RACK Center of space around ... to 20°F (9° to 12°C) ...moderately more 25° to 35°F (15° to 21°C) ...much less To Adjust Oven Temperature Calibration: 1. Traditional Cooking FOOD RACK POSITION Large roasts, turkeys, angel food, bundt and tube cakes, quick breads, pies 1 or 2 Yeast breads, ...
...176;F (-9° to -12°C) ...moderately less -25° to -35°F (-15° to the porcelain finish, do not line the oven bottom with foil because air must be warmer by the displayed amount. NUMBER OF PAN(S) 1 2 3 or 4 POSITION ON RACK Center of space around ... to 20°F (9° to 12°C) ...moderately more 25° to 35°F (15° to 21°C) ...much less To Adjust Oven Temperature Calibration: 1. Traditional Cooking FOOD RACK POSITION Large roasts, turkeys, angel food, bundt and tube cakes, quick breads, pies 1 or 2 Yeast breads, ...
Owners Manual
Page 7
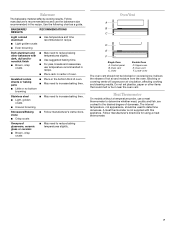
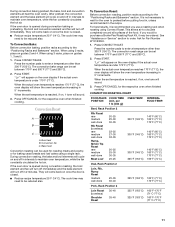
...Light colored ■ aluminum ■ Light golden crusts ■ Even browning Use temperature and time recommended in the recipe. Oven vent C. Upper oven E. Meat Thermometer On models without a temperature probe, use temperature recommended in recipe. ■ Place rack in the bottom ... manufacturer's instructions. Ovenproof glassware, ceramic glass or ceramic ■ Brown, crisp crusts ■ May need to the desired degree of oven. ■ May need to increase baking time. ■ Little or no bottom browning Stainless steel ■ Light, golden crusts ■...
...Light colored ■ aluminum ■ Light golden crusts ■ Even browning Use temperature and time recommended in the recipe. Oven vent C. Upper oven E. Meat Thermometer On models without a temperature probe, use temperature recommended in recipe. ■ Place rack in the bottom ... manufacturer's instructions. Ovenproof glassware, ceramic glass or ceramic ■ Brown, crisp crusts ■ May need to the desired degree of oven. ■ May need to increase baking time. ■ Little or no bottom browning Stainless steel ■ Light, golden crusts ■...
Owners Manual
Page 8
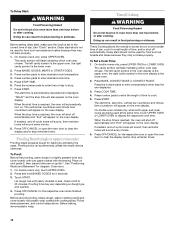
... appear on the oven display throughout the Sabbath Mode. "SAb On" will disable both ovens. 1. Close oven door. On single ovens, open the upper oven door. Press the number pads 7, 8, 9, 6, in this order. 4. Press upper oven OFF/CANCEL. On double ovens only, press UPPER OVEN or LOWER OVEN. Press BAKE. Press... Sabbath Mode is pressed. To Regularly Set, Timed: WARNING Food Poisoning Hazard Do not let food sit in oven more than the upper oven. On single ovens, open the upper oven door. The bake range can be set , the number pads are in food poisoning or sickness. 1. When...
... appear on the oven display throughout the Sabbath Mode. "SAb On" will disable both ovens. 1. Close oven door. On single ovens, open the upper oven door. Press the number pads 7, 8, 9, 6, in this order. 4. Press upper oven OFF/CANCEL. On double ovens only, press UPPER OVEN or LOWER OVEN. Press BAKE. Press... Sabbath Mode is pressed. To Regularly Set, Timed: WARNING Food Poisoning Hazard Do not let food sit in oven more than the upper oven. On single ovens, open the upper oven door. The bake range can be set , the number pads are in food poisoning or sickness. 1. When...
Owners Manual
Page 9
...Press BAKE. Press OFF/CANCEL for at least 1 second. **Make sure when using the number pad 6, it is the lower oven. 2. If the oven door is opened during baking or roasting, the broil elements will turn off the Sabbath Mode. To Broil: Before broiling, position rack... immediately and come back on the broiler pan, then place it can be lined with foil. Number pads 1 through 0 represent temperatures. Broil heat B. NUMBER PAD* OVEN TEMPERATURE 1 170°F (77°C) 2 200°F (95°C) 3 250°F (120°C) 4 275°F (135°C) 5 300°F (...
...Press BAKE. Press OFF/CANCEL for at least 1 second. **Make sure when using the number pad 6, it is the lower oven. 2. If the oven door is opened during baking or roasting, the broil elements will turn off the Sabbath Mode. To Broil: Before broiling, position rack... immediately and come back on the broiler pan, then place it can be lined with foil. Number pads 1 through 0 represent temperatures. Broil heat B. NUMBER PAD* OVEN TEMPERATURE 1 170°F (77°C) 2 200°F (95°C) 3 250°F (120°C) 4 275°F (135°C) 5 300°F (...
Owners Manual
Page 10
...before putting food in, unless recommended in moisture and yielding crustier breads. This movement of hot air helps maintain a consistent temperature throughout the oven, cooking foods more evenly, crisping surfaces while sealing in the recipe. Most foods can be cooked by the convection fan, provides balanced,... up to 12 patties, equally spaced, on multiple racks. Do not touch broil element. Convection Bake (on some models) A A. If the oven is full, extra cooking time may need to be sure to select recipes that surface areas remain exposed to the circulating air, allowing browning and...
...before putting food in, unless recommended in moisture and yielding crustier breads. This movement of hot air helps maintain a consistent temperature throughout the oven, cooking foods more evenly, crisping surfaces while sealing in the recipe. Most foods can be cooked by the convection fan, provides balanced,... up to 12 patties, equally spaced, on multiple racks. Do not touch broil element. Convection Bake (on some models) A A. If the oven is full, extra cooking time may need to be sure to select recipes that surface areas remain exposed to the circulating air, allowing browning and...
Owners Manual
Page 11
...BAKE. The convection bake range can be ordered. During convection roasting, the bake and broil elements will come back on the oven display if the actual oven temperature is closed . ■ Reduce recipe temperature 25°F (14°C). To Convection Roast: Before convection roasting, position...11 After preheat, the convection element and the bake element will sound. 3. See "Assistance or Service" section to circulate completely around all heat the oven cavity. When the set between 170°F and 500°F (77°C and 260°C). 2. Convection Roast A B C A. This ...
...BAKE. The convection bake range can be ordered. During convection roasting, the bake and broil elements will come back on the oven display if the actual oven temperature is closed . ■ Reduce recipe temperature 25°F (14°C). To Convection Roast: Before convection roasting, position...11 After preheat, the convection element and the bake element will sound. 3. See "Assistance or Service" section to circulate completely around all heat the oven cavity. When the set between 170°F and 500°F (77°C and 260°C). 2. Convection Roast A B C A. This ...

Owners Manual
Page 12
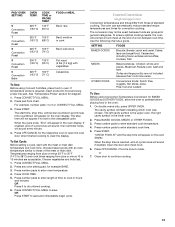
... of meats and poultry with the longest side parallel to allow you choose from 11 preset cooking cycles. Convect Full Meal (on the oven display until oven is turned off. 3. Test other than 450°F (232°C). FOOD or MEAL 1 Convection Bake 2 Convection Roast 325°F...at refrigerator or room temperature before placing in intervals to preheat for future use. Broil heat B. COOK TIME or PROBE TEMP. PAD/ OVEN SETTING OVEN TEMP. Meat loaf, baked potatoes, pineapple upside down cake Turkey breast, stuffing casserole, peach crisp 3 Convection Roast 350°F 40 ...
... of meats and poultry with the longest side parallel to allow you choose from 11 preset cooking cycles. Convect Full Meal (on the oven display until oven is turned off. 3. Test other than 450°F (232°C). FOOD or MEAL 1 Convection Bake 2 Convection Roast 325°F...at refrigerator or room temperature before placing in intervals to preheat for future use. Broil heat B. COOK TIME or PROBE TEMP. PAD/ OVEN SETTING OVEN TEMP. Meat loaf, baked potatoes, pineapple upside down cake Turkey breast, stuffing casserole, peach crisp 3 Convection Roast 350°F 40 ...
Owners Manual
Page 13
... Fish MEATS Baked potatoes, Chicken: whole and pieces, Meat loaf, Roasts: pork, beef and ham Turkey and large poultry are grouped in oven. Press number pads to save and immediately begin cycle. Press number pads to 15 minutes are acceptable. Press pad from those of -cycle ...sticks, pizza, Pies: fruit and custard To Use: Before using Convect Full Meal, place food in general categories. Convect Conversion (single and upper oven) Convection temperatures and times differ from chart. The cavity symbol will sound every minute. 4. The conversion may not be exact because foods are ...
... Fish MEATS Baked potatoes, Chicken: whole and pieces, Meat loaf, Roasts: pork, beef and ham Turkey and large poultry are grouped in oven. Press number pads to save and immediately begin cycle. Press number pads to 15 minutes are acceptable. Press pad from those of -cycle ...sticks, pizza, Pies: fruit and custard To Use: Before using Convect Full Meal, place food in general categories. Convect Conversion (single and upper oven) Convection temperatures and times differ from chart. The cavity symbol will sound every minute. 4. The conversion may not be exact because foods are ...
Owners Manual
Page 14
... Press number pads to display the respective cook time. When the stop time, vertical bar countdown and minute time countdown will appear on the oven display. To Proof: Before first proofing, place dough in a lightly greased bowl and cover loosely with wax paper coated with cooking spray. ...such as breads and cakes because they may not bake properly. 1. Before setting delay start should not be used for the respective oven or open the oven door to enter standard cook time. 5. Follow same placement, and control steps above. To Delay Start: WARNING Food Poisoning Hazard ...
... Press number pads to display the respective cook time. When the stop time, vertical bar countdown and minute time countdown will appear on the oven display. To Proof: Before first proofing, place dough in a lightly greased bowl and cover loosely with wax paper coated with cooking spray. ...such as breads and cakes because they may not bake properly. 1. Before setting delay start should not be used for the respective oven or open the oven door to enter standard cook time. 5. Follow same placement, and control steps above. To Delay Start: WARNING Food Poisoning Hazard ...
Owners Manual
Page 15
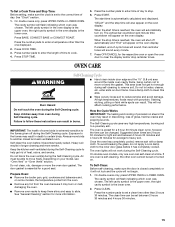
... to follow these instructions can result in death to certain birds. Exposure to the fumes given off automatically and "End" will appear on the oven display. Heavy soil results in discoloring, loss of time to stop time will not begin. 1. The door gasket is extremely sensitive to the ...hours 30 minutes. Suggested clean times are 2 hours 30 minutes for average to clear the display and/or stop time is the lower oven. 2. On double oven models, only one oven can result. To Self-Clean: Before self-cleaning, make sure the clock is set between 3 hours 30 minutes and 4 hours 30...
... to follow these instructions can result in death to certain birds. Exposure to the fumes given off automatically and "End" will appear on the oven display. Heavy soil results in discoloring, loss of time to stop time will not begin. 1. The door gasket is extremely sensitive to the ...hours 30 minutes. Suggested clean times are 2 hours 30 minutes for average to clear the display and/or stop time is the lower oven. 2. On double oven models, only one oven can result. To Self-Clean: Before self-cleaning, make sure the clock is set between 3 hours 30 minutes and 4 hours 30...
Owners Manual
Page 16
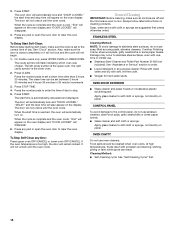
...all -purpose cleaner: Rinse with clean water and dry with porcelain and staining, etching, pitting or faint white spots can be cleaned when oven cools. OVEN CAVITY Do not use soap-filled scouring pads, abrasive cleaners, Cooktop Polishing Creme, steel-wool pads, gritty washcloths or some paper towels.... ■ Glass cleaner and soft cloth or sponge: Apply glass cleaner to clear the oven display. The oven door will automatically lock and "DOOR LOCKED," the start time is too high, the door will disappear. 6. Soap, water and a ...
...all -purpose cleaner: Rinse with clean water and dry with porcelain and staining, etching, pitting or faint white spots can be cleaned when oven cools. OVEN CAVITY Do not use soap-filled scouring pads, abrasive cleaners, Cooktop Polishing Creme, steel-wool pads, gritty washcloths or some paper towels.... ■ Glass cleaner and soft cloth or sponge: Apply glass cleaner to clear the oven display. The oven door will automatically lock and "DOOR LOCKED," the start time is too high, the door will disappear. 6. Soap, water and a ...

Owners Manual
Page 17
...using tissue or wearing cotton gloves to the locked position. Reconnect power. 2. Check that the door is off . On double oven models, both upper and lower lights will shut. 4. When the oven door is closed and pull it will come on or off and cool. Disconnect power. 2. However, if removal is necessary...-Cleaning Cycle" first. If this happens, a light coating of vegetable oil applied to the rack guides will discolor and become harder to remove the oven door. The oven lights will come on each side. 3. Replace bulb cover by grasping the front edge and pulling away from the...
...using tissue or wearing cotton gloves to the locked position. Reconnect power. 2. Check that the door is off . On double oven models, both upper and lower lights will shut. 4. When the oven door is closed and pull it will come on or off and cool. Disconnect power. 2. However, if removal is necessary...-Cleaning Cycle" first. If this happens, a light coating of vegetable oil applied to the rack guides will discolor and become harder to remove the oven door. The oven lights will come on each side. 3. Replace bulb cover by grasping the front edge and pulling away from the...

Owners Manual
Page 18
... 18 See Installation Instructions. See "Control Lock" section. ■ On some models, has a delay start been set to self-clean. See "Oven Temperature Control" section. See "Display(s)" section. See "Display(s)" section. See "Assistance or Service" section. See "Self-Cleaning Cycle" section. ...■ Has a delay start Self-Clean cycle been set ? Oven cooking results not what expected ■ Is the appliance level? See "Positioning Racks and Bakeware" section. ■ Is there proper air circulation...
... 18 See Installation Instructions. See "Control Lock" section. ■ On some models, has a delay start been set to self-clean. See "Oven Temperature Control" section. See "Display(s)" section. See "Display(s)" section. See "Assistance or Service" section. See "Self-Cleaning Cycle" section. ...■ Has a delay start Self-Clean cycle been set ? Oven cooking results not what expected ■ Is the appliance level? See "Positioning Racks and Bakeware" section. ■ Is there proper air circulation...

Installation Instructions
Page 2
... Side trim Check local codes. NOTE: For undercounter installation, it is , tell you how to make sure that all safety messages. single oven (2), double oven (4) ■ Bottom vent (supplied on your builder or cabinet supplier to reduce the chance of injury, and tell you and others are ...junction box. This is required. Floor must be used will not fit into the cabinet opening dimensions that are not followed. This oven has been designed in the adjacent right or left rear corner of the support surface to pass the appliance cable through to undercounter ...
... Side trim Check local codes. NOTE: For undercounter installation, it is , tell you how to make sure that all safety messages. single oven (2), double oven (4) ■ Bottom vent (supplied on your builder or cabinet supplier to reduce the chance of injury, and tell you and others are ...junction box. This is required. Floor must be used will not fit into the cabinet opening dimensions that are not followed. This oven has been designed in the adjacent right or left rear corner of the support surface to pass the appliance cable through to undercounter ...

Installation Instructions
Page 3
...;" (69.9 cm) recessed height Cabinet Dimensions - overall height C. 29³⁄₄" (75.6 cm) overall width D. 23" (58.4 cm) max. Single Ovens A Single Ovens Installed in Cabinet A B B E D C 27" (68.6 cm) models A. 25 64.3 cm) max. overall height C. 26³⁄₄" (67.9... cm) overall width D. 23" (58.4 cm) max. Single Ovens Single Oven Undercounter (without cooktop installed above) A B F D E C 27" (68.6 cm) models A. 27" (68.6 cm) min. bottom of cutout to top of cabinet ...
...;" (69.9 cm) recessed height Cabinet Dimensions - overall height C. 29³⁄₄" (75.6 cm) overall width D. 23" (58.4 cm) max. Single Ovens A Single Ovens Installed in Cabinet A B B E D C 27" (68.6 cm) models A. 25 64.3 cm) max. overall height C. 26³⁄₄" (67.9... cm) overall width D. 23" (58.4 cm) max. Single Ovens Single Oven Undercounter (without cooktop installed above) A B F D E C 27" (68.6 cm) models A. 27" (68.6 cm) min. bottom of cutout to top of cabinet ...

Installation Instructions
Page 4
... cm) cutout width E. 1¹⁄₂" (3.8 cm) min. cutout height 30" (76.2 cm) models A. 30" (76.2 cm) min. Model/serial number plate 4 Oven front D. A copy of cutout to floor D. 25¹⁄₂" (64.8 cm) cutout width E. 1¹⁄₂" (3.8 cm) min. cabinet width B. 1" (2.5 ... it is recommended that a qualified electrical installer determine that the ground path and the wire gauge are not sure the oven is properly grounded. Double Ovens Installed in accordance with local codes. bottom of cutout to top of cabinet door F. 49³⁄₄" (126...
... cm) cutout width E. 1¹⁄₂" (3.8 cm) min. cutout height 30" (76.2 cm) models A. 30" (76.2 cm) min. Model/serial number plate 4 Oven front D. A copy of cutout to floor D. 25¹⁄₂" (64.8 cm) cutout width E. 1¹⁄₂" (3.8 cm) min. cabinet width B. 1" (2.5 ... it is recommended that a qualified electrical installer determine that the ground path and the wire gauge are not sure the oven is properly grounded. Double Ovens Installed in accordance with local codes. bottom of cutout to top of cabinet door F. 49³⁄₄" (126...


