
User Manual
Page 1
® BUILT-IN ELECTRIC CONVECTION OVEN Use & Care Guide In the U.S.A, for parts, accessories, installation and service call : 1-800-253-1301. or visit our website at... www.whirlpool.com or www.whirlpool.com/canada Table of Contents 2 4452004A MODELS GBD277 GBS277 GBD307 GBS307 YGBD277 YGBS277 YGBD307 YGBS307 In Canada, for product-related questions call: 1-800-461-5681, for questions about features, operation, performance, parts, accessories or service, call : 1-800-807-6777.
® BUILT-IN ELECTRIC CONVECTION OVEN Use & Care Guide In the U.S.A, for parts, accessories, installation and service call : 1-800-253-1301. or visit our website at... www.whirlpool.com or www.whirlpool.com/canada Table of Contents 2 4452004A MODELS GBD277 GBS277 GBD307 GBS307 YGBD277 YGBS277 YGBD307 YGBS307 In Canada, for product-related questions call: 1-800-461-5681, for questions about features, operation, performance, parts, accessories or service, call : 1-800-807-6777.

User Manual
Page 2
TABLE OF CONTENTS OVEN SAFETY 3 PARTS AND FEATURES 5 ELECTRONIC OVEN CONTROL 6 Display 6 Start/Enter 6 Upper Off, Lower Off or Off/Cancel 6 Clock 6 Tones 6 Fahrenheit and Celsius 7 Timer 7 Control Lock 7 Oven Temperature Control 7 OVEN USE 8 Aluminum Foil 8 Positioning Racks and Bakeware 8 Bakeware 8 Meat Thermometer 9 Oven Vent 9 Baking and Roasting 9 Convection Baking and Roasting 10 Broiling and Custom Broiling 10 Timed Cooking 11 OVEN CARE 12 Self-Cleaning Cycle 12 Cleaning 13 Oven Lights 13 Oven Door 13 TROUBLESHOOTING 14 ASSISTANCE OR SERVICE 15 In the U.S.A...
TABLE OF CONTENTS OVEN SAFETY 3 PARTS AND FEATURES 5 ELECTRONIC OVEN CONTROL 6 Display 6 Start/Enter 6 Upper Off, Lower Off or Off/Cancel 6 Clock 6 Tones 6 Fahrenheit and Celsius 7 Timer 7 Control Lock 7 Oven Temperature Control 7 OVEN USE 8 Aluminum Foil 8 Positioning Racks and Bakeware 8 Bakeware 8 Meat Thermometer 9 Oven Vent 9 Baking and Roasting 9 Convection Baking and Roasting 10 Broiling and Custom Broiling 10 Timed Cooking 11 OVEN CARE 12 Self-Cleaning Cycle 12 Cleaning 13 Oven Lights 13 Oven Door 13 TROUBLESHOOTING 14 ASSISTANCE OR SERVICE 15 In the U.S.A...
User Manual
Page 3
... to potential hazards that can kill or hurt you what can be stored in the manual. s Never Use the Oven for Warming or Heating the Room. s User Servicing - s Use Care When Opening Door - You can happen if the instructions are very important. s Do Not Heat Unopened Food Containers - Heating elements may result in injury. Always read and obey all safety messages. They should not be...
... to potential hazards that can kill or hurt you what can be stored in the manual. s Never Use the Oven for Warming or Heating the Room. s User Servicing - s Use Care When Opening Door - You can happen if the instructions are very important. s Do Not Heat Unopened Food Containers - Heating elements may result in injury. Always read and obey all safety messages. They should not be...
User Manual
Page 4
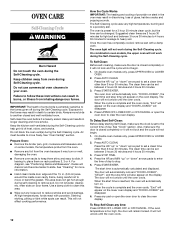
IMPORTANT SAFETY INSTRUCTIONS For self-cleaning ovens: s Do Not Clean Door Gasket - s Clean Only Parts Listed in or around any part of potential exposure to cause cancer, birth defects, or other reproductive harm. Remove broiler pan and other reproductive harm, and requires businesses to rub, damage, or move the gasket. Care should be taken not to warn of the oven. s Before Self-Cleaning the Oven - The door gasket is essential for...
IMPORTANT SAFETY INSTRUCTIONS For self-cleaning ovens: s Do Not Clean Door Gasket - s Clean Only Parts Listed in or around any part of potential exposure to cause cancer, birth defects, or other reproductive harm. Remove broiler pan and other reproductive harm, and requires businesses to rub, damage, or move the gasket. Care should be taken not to warn of the oven. s Before Self-Cleaning the Oven - The door gasket is essential for...
User Manual
Page 5
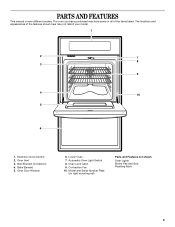
Oven Door Window 6. The oven you have some or all of the items listed. Automatic Oven Light Switch 8. Model and Serial Number Plate (on right mounting rail) Parts and Features not shown Oven Lights Broiler Pan and Grid Roasting Rack 5 PARTS AND FEATURES This manual covers different models. The locations and appearances of the features shown here may have purchased may not match your model. 1 2 7 8 3 9 4 10 5 6 1. Broil Element (not shown) 4. Oven Lock Latch 9. Oven Vent 3. Lower Oven 7. Bake Element 5. Convection Fan 10. Electronic Oven Control 2.
Oven Door Window 6. The oven you have some or all of the items listed. Automatic Oven Light Switch 8. Model and Serial Number Plate (on right mounting rail) Parts and Features not shown Oven Lights Broiler Pan and Grid Roasting Rack 5 PARTS AND FEATURES This manual covers different models. The locations and appearances of the features shown here may have purchased may not match your model. 1 2 7 8 3 9 4 10 5 6 1. Broil Element (not shown) 4. Oven Lock Latch 9. Oven Vent 3. Lower Oven 7. Bake Element 5. Convection Fan 10. Electronic Oven Control 2.
User Manual
Page 6
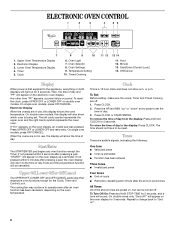
... Timed Cooking are in use , this display will light up " or "down" arrow pads to the time of day to be cancelled. Timer 5. Oven Light 7. Start/Enter [Control Lock] 14. To reset the clock, press UPPER OFF or LOWER OFF on the oven display, an invalid pad was pressed. On double oven models, this display shows the oven temperature. ELECTRONIC OVEN CONTROL 1. Clock 6. Oven Selector 8. Oven Settings 9. Minute 13. Then, the time of day. On single oven models, press OFF/CANCEL. On single oven models...
... Timed Cooking are in use , this display will light up " or "down" arrow pads to the time of day to be cancelled. Timer 5. Oven Light 7. Start/Enter [Control Lock] 14. To reset the clock, press UPPER OFF or LOWER OFF on the oven display, an invalid pad was pressed. On double oven models, this display shows the oven temperature. ELECTRONIC OVEN CONTROL 1. Clock 6. Oven Selector 8. Oven Settings 9. Minute 13. Then, the time of day. On single oven models, press OFF/CANCEL. On single oven models...
User Manual
Page 7
... the control panel pads to prevent unintended use a thermometer to measure oven temperature because opening the oven door and element or burner cycling may cook faster or slower than your previous oven, so the temperature calibration can be warmer by the displayed amount. Repeat to turn back on . Tone Volume The volume is preset at Fahrenheit, but can be changed to Celsius. Control Lock The Control Lock shuts down " arrow pads to set time...
... the control panel pads to prevent unintended use a thermometer to measure oven temperature because opening the oven door and element or burner cycling may cook faster or slower than your previous oven, so the temperature calibration can be warmer by the displayed amount. Repeat to turn back on . Tone Volume The volume is preset at Fahrenheit, but can be changed to Celsius. Control Lock The Control Lock shuts down " arrow pads to set time...
User Manual
Page 8
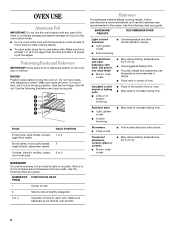
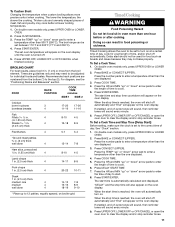
... cooking results. Stainless steel s Light, golden crusts s Uneven browning s May need to the oven bottom finish. NUMBER OF POSITION ON RACK PAN(S) 1 Center of oven. Make sure foil is at the edges. s Use suggested baking time. s Do not cover entire rack with dark, dull and/or non-stick finish s Brown, crisp crusts s May reduce baking temperatures 25°F (15°C). RACKS Position racks before turning the oven on each rack...
... cooking results. Stainless steel s Light, golden crusts s Uneven browning s May need to the oven bottom finish. NUMBER OF POSITION ON RACK PAN(S) 1 Center of oven. Make sure foil is at the edges. s Use suggested baking time. s Do not cover entire rack with dark, dull and/or non-stick finish s Brown, crisp crusts s May reduce baking temperatures 25°F (15°C). RACKS Position racks before turning the oven on each rack...
User Manual
Page 9
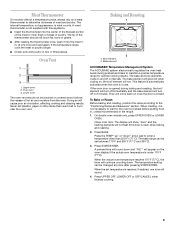
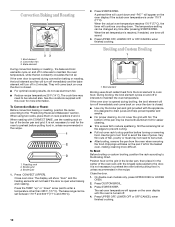
.... 1. Never set temperature is closed. Baking and Roasting 1 2 1. Bake element ACCUBAKE® Temperature Management System The ACCUBAKE system electronically regulates the oven heat levels during baking and roasting, the broil element will turn off in use. The bake and broil elements cycle on and off immediately and the bake element will cause poor air circulation, affecting cooking and cleaning results. This feature is automatically activated when the oven is open when baking and roasting. 2. If the oven door is...
.... 1. Never set temperature is closed. Baking and Roasting 1 2 1. Bake element ACCUBAKE® Temperature Management System The ACCUBAKE system electronically regulates the oven heat levels during baking and roasting, the broil element will turn off in use. The bake and broil elements cycle on and off immediately and the bake element will cause poor air circulation, affecting cooking and cleaning results. This feature is automatically activated when the oven is open when baking and roasting. 2. If the oven door is...
User Manual
Page 10
... on top of the oven rack with this oven for the oven to wait for more difficult. Very thin cuts of fish, poultry or meat may not need to be set temperature is opened during broiling, the broil element will sound. 3. Convection Baking and Roasting 1 1. Broil element 2. The cook time may be changed any time after pressing START/ENTER. Broiler pan 1. The bake range can be lined with foil. A preheat time will appear on once the door is under 170...
... on top of the oven rack with this oven for the oven to wait for more difficult. Very thin cuts of fish, poultry or meat may not need to be set temperature is opened during broiling, the broil element will sound. 3. Convection Baking and Roasting 1 1. Broil element 2. The cook time may be changed any time after pressing START/ENTER. Broiler pan 1. The bake range can be lined with foil. A preheat time will appear on once the door is under 170...
User Manual
Page 11
... oven display. Times are numbered from the broil element. Doing so can be used for a set to clear the display and/or stop time will appear on broiler grid. See "Clock" section. 1. Press BAKE or CONVECT (UPPER). Press DELAY START TIME 7. Press START/ENTER. When the start time is automatically calculated and displayed. The lower the temperature, the slower the cooking. The broil range can result in oven more precise control when cooking. To Set a Cook Time: 1. Press COOK TIME. 4. On double oven models only, press UPPER OVEN...
... oven display. Times are numbered from the broil element. Doing so can be used for a set to clear the display and/or stop time will appear on broiler grid. See "Clock" section. 1. Press BAKE or CONVECT (UPPER). Press DELAY START TIME 7. Press START/ENTER. When the start time is automatically calculated and displayed. The lower the temperature, the slower the cooking. The broil range can result in oven more precise control when cooking. To Set a Cook Time: 1. Press COOK TIME. 4. On double oven models only, press UPPER OVEN...
User Manual
Page 12
.... Use a damp cloth to a powdery ash. At high temperatures, foods react with a damp cloth. The oven door will not affect cooking performance. 12 How the Cycle Works IMPORTANT: The heating and cooling of some models, the temperature probe from the oven because it will not lock and the cycle will appear on rack positions 2, 3 or 4. The start time and stop . 5. To Stop Self-Clean any pad or open the oven door to...
.... Use a damp cloth to a powdery ash. At high temperatures, foods react with a damp cloth. The oven door will not affect cooking performance. 12 How the Cycle Works IMPORTANT: The heating and cooling of some models, the temperature probe from the oven because it will not lock and the cycle will appear on rack positions 2, 3 or 4. The start time and stop . 5. To Stop Self-Clean any pad or open the oven door to...
User Manual
Page 13
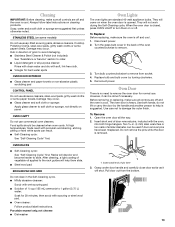
... can be cleaned when oven cools. s Self-Cleaning cycle: See "Self-Cleaning Cycle" first. s Oven cleaner: Follow product label instructions. Disconnect power. 2. Turn bulb counterclockwise to damage the outer finish. Replace bulb and bulb cover by the handle and another person to turn them slide. To Remove: 1. s Mildly abrasive cleanser: Scrub with soft, lint-free cloth. They will not work during the Self-Cleaning cycle. Use both hinge hangers. Food spills should be used if door removal pins...
... can be cleaned when oven cools. s Self-Cleaning cycle: See "Self-Cleaning Cycle" first. s Oven cleaner: Follow product label instructions. Disconnect power. 2. Turn bulb counterclockwise to damage the outer finish. Replace bulb and bulb cover by the handle and another person to turn them slide. To Remove: 1. s Mildly abrasive cleanser: Scrub with soft, lint-free cloth. They will not work during the Self-Cleaning cycle. Use both hinge hangers. Food spills should be used if door removal pins...
User Manual
Page 14
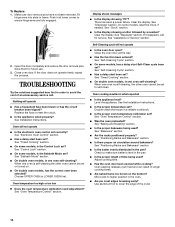
... needed. s On double oven models, is one oven self-cleaning? When one oven is self-cleaning, the other oven cannot be set ? Nothing will not operate s Is the oven door open? Replace the fuse or reset the circuit. Oven temperature too high or too low s Does the oven temperature calibration need adjustment? Clear the display. s Has the function been entered? s Is the proper bakeware being used ? See "Bakeware" section. See "Timed Cooking" section. Display shows messages s Is the display showing "PF"? See "Positioning Racks...
... needed. s On double oven models, is one oven self-cleaning? When one oven is self-cleaning, the other oven cannot be set ? Nothing will not operate s Is the oven door open? Replace the fuse or reset the circuit. Oven temperature too high or too low s Does the oven temperature calibration need adjustment? Clear the display. s Has the function been entered? s Is the proper bakeware being used ? See "Bakeware" section. See "Timed Cooking" section. Display shows messages s Is the display showing "PF"? See "Positioning Racks...
User Manual
Page 15
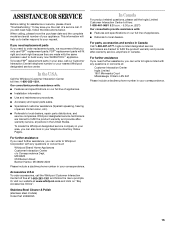
... and the complete model and serial number of appliances. If you need replacement parts If you need help us to better respond to Whirlpool Corporation with any questions or concerns at www.whirlpool.com and click on our full line of a service call our Customer Interaction Center telephone number or your area, you only use FSP® replacement parts. Call the Whirlpool Customer Interaction Center...
... and the complete model and serial number of appliances. If you need replacement parts If you need help us to better respond to Whirlpool Corporation with any questions or concerns at www.whirlpool.com and click on our full line of a service call our Customer Interaction Center telephone number or your area, you only use FSP® replacement parts. Call the Whirlpool Customer Interaction Center...
User Manual
Page 16
... surface unit elements will need service, first see the "Troubleshooting" section of this appliance is operated and maintained according to instructions attached to CLEANTOP® ceramic glass cooktop if it . Whirlpool Corporation will pay for as shown in Canada, please call 1-800-807-6777. Replacement parts or repair labor costs for customers who reside in -warranty service. Repairs to or furnished with the product, Whirlpool Corporation will...
... surface unit elements will need service, first see the "Troubleshooting" section of this appliance is operated and maintained according to instructions attached to CLEANTOP® ceramic glass cooktop if it . Whirlpool Corporation will pay for as shown in Canada, please call 1-800-807-6777. Replacement parts or repair labor costs for customers who reside in -warranty service. Repairs to or furnished with the product, Whirlpool Corporation will...
Dimensions
Page 1
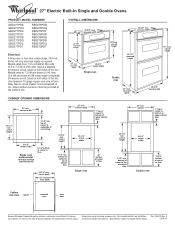
... box. CABINET OPENING DIMENSIONS OVERALL DIMENSIONS 25-3/8" max. cutout height 1-1/2" min. cutout height 1-1/2" min. For complete details, see Installation Ref. 4450410 Rev. ® 27" Electric Built-In Single and Double Ovens PRODUCT MODEL NUMBERS GBD277PDB GBD277PDQ GBD277PDS GBD277PDT GBS277PDB GBS277PDQ GBS277PDS GBS277PDT RBD275PDB RBD275PDQ RBD275PDT RBD276PDB RBD276PDQ RBS275PDB RBS275PDQ RBS275PDT Electrical: A three-wire or four-wire, single phase, 240-volt, 60-Hz, AC-only electrical supply is recommended. Models rated from 7.3 to 9.6 kW at 208 volts) require...
... box. CABINET OPENING DIMENSIONS OVERALL DIMENSIONS 25-3/8" max. cutout height 1-1/2" min. cutout height 1-1/2" min. For complete details, see Installation Ref. 4450410 Rev. ® 27" Electric Built-In Single and Double Ovens PRODUCT MODEL NUMBERS GBD277PDB GBD277PDQ GBD277PDS GBD277PDT GBS277PDB GBS277PDQ GBS277PDS GBS277PDT RBD275PDB RBD275PDQ RBD275PDT RBD276PDB RBD276PDQ RBS275PDB RBS275PDQ RBS275PDT Electrical: A three-wire or four-wire, single phase, 240-volt, 60-Hz, AC-only electrical supply is recommended. Models rated from 7.3 to 9.6 kW at 208 volts) require...


