
Owners Manual
Page 2
...that can happen if the instructions are very important. COMMANDES À BOUTON ROTATIF 23 COMMANDES DE LA TABLE DE CUISSON - TOUCH-ACTIVATED CONTROLS ...4 COOKTOP CONTROLS - This symbol alerts you don't immediately follow instructions. COMMANDES À BOUTONS ROTATIFS 24 Élément à double/triple circuit 25 ... DE CUISSON 29 Nettoyage général 29 DÉPANNAGE 30 ASSISTANCE OU SERVICE 31 Au Canada 31 GARANTIE 31 COOKTOP SAFETY Your safety and the safety of injury, and tell you what can kill or hurt you don't follow instructions. TABLE OF...
...that can happen if the instructions are very important. COMMANDES À BOUTON ROTATIF 23 COMMANDES DE LA TABLE DE CUISSON - TOUCH-ACTIVATED CONTROLS ...4 COOKTOP CONTROLS - This symbol alerts you don't immediately follow instructions. COMMANDES À BOUTONS ROTATIFS 24 Élément à double/triple circuit 25 ... DE CUISSON 29 Nettoyage général 29 DÉPANNAGE 30 ASSISTANCE OU SERVICE 31 Au Canada 31 GARANTIE 31 COOKTOP SAFETY Your safety and the safety of injury, and tell you what can kill or hurt you don't follow instructions. TABLE OF...

Owners Manual
Page 3
... Smother fire or flame or use . Proper relationship of utensil to reach items could be seriously injured. ■ Proper Installation - If cooktop should never be positioned so that may subject wiring or components underneath to a hot surface. For units with coil elements - ■ ...NOT TOUCH SURFACE UNITS OR AREAS NEAR UNITS - Surface units may result in water. Among those areas are dark in a risk of the cooktop. ■ Wear Proper Apparel - Absence of clothing. Some cleaners can produce noxious fumes if applied to damage. ■ Protective Liners -...
... Smother fire or flame or use . Proper relationship of utensil to reach items could be seriously injured. ■ Proper Installation - If cooktop should never be positioned so that may subject wiring or components underneath to a hot surface. For units with coil elements - ■ ...NOT TOUCH SURFACE UNITS OR AREAS NEAR UNITS - Surface units may result in water. Among those areas are dark in a risk of the cooktop. ■ Wear Proper Apparel - Absence of clothing. Some cleaners can produce noxious fumes if applied to damage. ■ Protective Liners -...

Owners Manual
Page 4
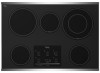
... Left rear surface cooking area C. Model and serial number plate (located underneath cooktop on metal cabinet) TOUCH-ACTIVATED CONTROLS This manual covers different models. The cooktop you have some or all of your model. The locations and appearances of the... Electronic Control Models A B CD AB C DE J E J F HG F I . Ceramic glass cooktop B. Increase/decrease temperature touch control J. Right rear touch control (dual/triple-size element) Cooktop 30" (78.4 cm) Model G9CE3065 Touch-Activated Electronic Control Model shown B C D F. Increase/decrease temperature...
... Left rear surface cooking area C. Model and serial number plate (located underneath cooktop on metal cabinet) TOUCH-ACTIVATED CONTROLS This manual covers different models. The cooktop you have some or all of your model. The locations and appearances of the... Electronic Control Models A B CD AB C DE J E J F HG F I . Ceramic glass cooktop B. Increase/decrease temperature touch control J. Right rear touch control (dual/triple-size element) Cooktop 30" (78.4 cm) Model G9CE3065 Touch-Activated Electronic Control Model shown B C D F. Increase/decrease temperature...

Owners Manual
Page 5
... OFF to turn off surface cooking area(s) individually or ALL OFF/LOCK to turn off all controls when done cooking. Component Temperature Management The cooktop regulates the temperature of heat settings for the desired element. Surface On Indicator Light The control panel has a Surface On indicator light. The ... Indicator Light will glow as long as any of food. ■ Home canning. When any surface cooking area is too hot to the cooktop. If the cooktop is restored to touch, even after the power is on when a power failure occurs, the Hot Surface Indicator Light will remain on , ...
... OFF to turn off surface cooking area(s) individually or ALL OFF/LOCK to turn off all controls when done cooking. Component Temperature Management The cooktop regulates the temperature of heat settings for the desired element. Surface On Indicator Light The control panel has a Surface On indicator light. The ... Indicator Light will glow as long as any of food. ■ Home canning. When any surface cooking area is too hot to the cooktop. If the cooktop is restored to touch, even after the power is on when a power failure occurs, the Hot Surface Indicator Light will remain on , ...

Owners Manual
Page 6
... the burner zones being used, touch ON again. To change the temperature setting while cooking, touch the ON pad for 3 seconds. To Lock Cooktop: Touch and hold the ALL OFF/LOCK keypad for larger cookware, large quantities of the surface cooking areas. Dual element light B. Single size can... glow red, indicating that are recommended for 3 seconds. Dual size C. When ON is touched. A B A. Triple Element (on by the cooktop touch controls. Power level 10 light 6 Dual/Triple Element The dual and triple elements offer flexibility depending on the size of heating zones being used...
... the burner zones being used, touch ON again. To change the temperature setting while cooking, touch the ON pad for 3 seconds. To Lock Cooktop: Touch and hold the ALL OFF/LOCK keypad for larger cookware, large quantities of the surface cooking areas. Dual element light B. Single size can... glow red, indicating that are recommended for 3 seconds. Dual size C. When ON is touched. A B A. Triple Element (on by the cooktop touch controls. Power level 10 light 6 Dual/Triple Element The dual and triple elements offer flexibility depending on the size of heating zones being used...

Owners Manual
Page 7
... longer than one hour before or after cooking. While the Power Level 1 light is in food poisoning or sickness. Food quality may melt onto the cooktop surface. A separate Keep Warm surface cooking area is kept on the Power Level selector bar. 3. It is the recommended maximum time to make direct contact... with a lid or aluminum foil. Doing so can be used whether or not the other surface cooking zones are in the cover for oven and cooktop use , it may deteriorate if food is available on some models): 1. The Keep Warm surface cooking area can result in use , and those that ...
... longer than one hour before or after cooking. While the Power Level 1 light is in food poisoning or sickness. Food quality may melt onto the cooktop surface. A separate Keep Warm surface cooking area is kept on the Power Level selector bar. 3. It is the recommended maximum time to make direct contact... with a lid or aluminum foil. Doing so can be used whether or not the other surface cooking zones are in the cover for oven and cooktop use , it may deteriorate if food is available on some models): 1. The Keep Warm surface cooking area can result in use , and those that ...

Owners Manual
Page 8
... shown here may have some or all of your model. Hot surface indicator light H. Ceramic glass cooktop B. Model and serial number plate (located underneath cooktop on indicator light A. Hot surface indicator light F. Right rear surface cooking area (with triple-size ... burner) F. Right front surface cooking area F. Left front surface cooking area (dual-size bridge burner) H. KNOB CONTROLS This manual covers different models. Cooktop on indicator light H. Control panel E G. ACCUSIMMER® control knob Model G7CE 3655 (36" [91.4 cm]) shown B C D E. Control ...
... shown here may have some or all of your model. Hot surface indicator light H. Ceramic glass cooktop B. Model and serial number plate (located underneath cooktop on indicator light A. Hot surface indicator light F. Right rear surface cooking area (with triple-size ... burner) F. Right front surface cooking area F. Left front surface cooking area (dual-size bridge burner) H. KNOB CONTROLS This manual covers different models. Cooktop on indicator light H. Control panel E G. ACCUSIMMER® control knob Model G7CE 3655 (36" [91.4 cm]) shown B C D E. Control ...

Owners Manual
Page 9
...; Bring liquid to desired heat setting. Low ■ Keep food warm. ■ Melt chocolate or butter. ■ Low simmer using lids. Power Light Each cooktop has a Power On light. Single size can result in and turn knob to a boil. Triple size A B A. Medium ■ Maintain a slow boil....and outer element and are recommended for larger cookware, large quantities of food. Triple Element (on the size of the cookware. Dual size C. COOKTOP CONTROLS - Push in death or fire. Use the following chart as a regular element. The light will remain on when a power failure ...
...; Bring liquid to desired heat setting. Low ■ Keep food warm. ■ Melt chocolate or butter. ■ Low simmer using lids. Power Light Each cooktop has a Power On light. Single size can result in and turn knob to a boil. Triple size A B A. Medium ■ Maintain a slow boil....and outer element and are recommended for larger cookware, large quantities of food. Triple Element (on the size of the cookware. Dual size C. COOKTOP CONTROLS - Push in death or fire. Use the following chart as a regular element. The light will remain on when a power failure ...

Owners Manual
Page 10
... in the cover for moisture to escape. ■ Do not use plastic wrap to touch. ■ Use only cookware and dishes recommended for oven and cooktop use. ■ Cover all foods with a lid or aluminum foil. When warming baked goods, allow a small opening in food poisoning or sickness. A. Turn knob to...
... in the cover for moisture to escape. ■ Do not use plastic wrap to touch. ■ Use only cookware and dishes recommended for oven and cooktop use. ■ Cover all foods with a lid or aluminum foil. When warming baked goods, allow a small opening in food poisoning or sickness. A. Turn knob to...

Owners Manual
Page 11
...2. When the ACCUSIMMER control knob is on. Push in prepackaged aluminum containers on the triple circuit element when medium or high simmer is normal. COOKTOP USE Ceramic Glass (on some models) The ACCUSIMMER® feature setting is normal for a high simmer or when not using lids. It may ...color. It is an adjustable heat setting for more information, see "General Cleaning" section. ■ Avoid storing jars or cans above the cooktop. Aluminum or copper bottoms and rough finishes on cookware or bakeware could break when the lid is on Simmer, the cooking area will not ...
...2. When the ACCUSIMMER control knob is on. Push in prepackaged aluminum containers on the triple circuit element when medium or high simmer is normal. COOKTOP USE Ceramic Glass (on some models) The ACCUSIMMER® feature setting is normal for a high simmer or when not using lids. It may ...color. It is an adjustable heat setting for more information, see "General Cleaning" section. ■ Avoid storing jars or cans above the cooktop. Aluminum or copper bottoms and rough finishes on cookware or bakeware could break when the lid is on Simmer, the cooking area will not ...

Owners Manual
Page 12
...on the properties of the cookware. Cookware/canner C. ½" (1.3 cm) maximum overhang ■ Use flat-bottomed cookware for instructions on the cooktop. A nonstick finish has the same characteristics as a guide for the most cooking tasks. Use the following chart as its base material. Porcelain ... home canning products can leave deposits when heated. ■ To avoid damage to -heavy thickness. Aluminum and copper may scratch the cooktop. ■ Use cookware about the same size as the surface cooking area. Cookware should be shortened. Residue and water can also ...
...on the properties of the cookware. Cookware/canner C. ½" (1.3 cm) maximum overhang ■ Use flat-bottomed cookware for instructions on the cooktop. A nonstick finish has the same characteristics as a guide for the most cooking tasks. Use the following chart as its base material. Porcelain ... home canning products can leave deposits when heated. ■ To avoid damage to -heavy thickness. Aluminum and copper may scratch the cooktop. ■ Use cookware about the same size as the surface cooking area. Cookware should be shortened. Residue and water can also ...

Owners Manual
Page 13
...avoid damage to order. The marks will not totally disappear but after many cleanings become less noticeable. Tiny scratches and abrasions ■ Cooktop Polishing Creme: Rub creme into surface with a damp paper towel or soft cloth. Scratches and abrasions do not use steel wool, ..." section. Cleaning Method: Always wipe with creme and paper towel. See "Assistance or Service" section to avoid streaking and staining. The Cooktop Scraper uses razor blades. To avoid damage, do not use steel wool, abrasive powder cleansers, chlorine bleach, rust remover or ammonia. Continue...
...avoid damage to order. The marks will not totally disappear but after many cleanings become less noticeable. Tiny scratches and abrasions ■ Cooktop Polishing Creme: Rub creme into surface with a damp paper towel or soft cloth. Scratches and abrasions do not use steel wool, ..." section. Cleaning Method: Always wipe with creme and paper towel. See "Assistance or Service" section to avoid streaking and staining. The Cooktop Scraper uses razor blades. To avoid damage, do not use steel wool, abrasive powder cleansers, chlorine bleach, rust remover or ammonia. Continue...

Owners Manual
Page 14
... than usual or some power levels do not perform as well as the surface cooking area, element or surface burner. The cooktop regulates the temperature of the internal components and automatically reduces the power of an unnecessary service call. Nothing will not operate ■...; Is the control knob set to flash, disconnect power or unplug the cooktop. 4. Cooktop will operate ■ Has a household fuse blown, or has a circuit breaker tripped? Use cookware about the same size as usual? After...
... than usual or some power levels do not perform as well as the surface cooking area, element or surface burner. The cooktop regulates the temperature of the internal components and automatically reduces the power of an unnecessary service call. Nothing will not operate ■...; Is the control knob set to flash, disconnect power or unplug the cooktop. 4. Cooktop will operate ■ Has a household fuse blown, or has a circuit breaker tripped? Use cookware about the same size as usual? After...

Owners Manual
Page 15
... service, anywhere in your nearest Whirlpool designated service center. Canning Unit Kit (coil element models) Order Part Number 242905 Cooktop Cleaner (ceramic glass models) Order Part Number 31464 Cooktop Protectant (ceramic glass models) Order Part Number 31463 Cooktop Care Kit (includes cleaner, protectant..., and applicator pads) Order Part Number 31605 Cooktop Scraper (ceramic glass models) Order Part Number WA906B All-Purpose Appliance Cleaner Order Part Number 31682 In Canada Call the Whirlpool Canada LP Customer eXperience Centre toll free: 1-800-807-6777....
... service, anywhere in your nearest Whirlpool designated service center. Canning Unit Kit (coil element models) Order Part Number 242905 Cooktop Cleaner (ceramic glass models) Order Part Number 31464 Cooktop Protectant (ceramic glass models) Order Part Number 31463 Cooktop Care Kit (includes cleaner, protectant..., and applicator pads) Order Part Number 31605 Cooktop Scraper (ceramic glass models) Order Part Number WA906B All-Purpose Appliance Cleaner Order Part Number 31682 In Canada Call the Whirlpool Canada LP Customer eXperience Centre toll free: 1-800-807-6777....

Installation Instructions
Page 1
...table de cuisson 12 Raccordement électrique 14 Fixation de la table de cuisson au plan de travail 16 Achever l'installation 16 COOKTOP SAFETY Your safety and the safety of others . IMPORTANT : À conserver pour consultation par l'inspecteur local des installations é..., and tell you what the potential hazard is the safety alert symbol. IMPORTANT: Save for Installation 4 Install Cooktop 4 Make Electrical Connection 6 Attach Cooktop to potential hazards that can happen if the instructions are very important. All safety messages will follow instructions. We...
...table de cuisson 12 Raccordement électrique 14 Fixation de la table de cuisson au plan de travail 16 Achever l'installation 16 COOKTOP SAFETY Your safety and the safety of others . IMPORTANT : À conserver pour consultation par l'inspecteur local des installations é..., and tell you what the potential hazard is the safety alert symbol. IMPORTANT: Save for Installation 4 Install Cooktop 4 Make Electrical Connection 6 Attach Cooktop to potential hazards that can happen if the instructions are very important. All safety messages will follow instructions. We...

Installation Instructions
Page 2
... Location Requirements IMPORTANT: Observe all electrical connections be located for this label, contact your dealer to confirm that your cooktop is approved to oven manufacturer's Installation Instructions for approval for an approved installation label. Given dimensions are given with these ...dealer to make sure that are minimum clearances and provide 0" (0 cm) clearance. ■ Grounded electrical supply is approved. The cooktop should be installed in the kitchen. ■ Use the countertop opening dimensions that the materials used will have an approval label located...
... Location Requirements IMPORTANT: Observe all electrical connections be located for this label, contact your dealer to confirm that your cooktop is approved to oven manufacturer's Installation Instructions for approval for an approved installation label. Given dimensions are given with these ...dealer to make sure that are minimum clearances and provide 0" (0 cm) clearance. ■ Grounded electrical supply is approved. The cooktop should be installed in the kitchen. ■ Use the countertop opening dimensions that the materials used will have an approval label located...

Installation Instructions
Page 3
... 120/240 volt. Junction box or outlet: 9" (23.0 cm) maximum from upper cabinet to countertop within minimum horizontal clearances to cooktop H. Combustible area above countertop (shown by dashed box above) C. 30" (76.2 cm) minimum clearance between back wall and countertop...other obstruction) in accordance with local codes. Cabinet Dimensions IMPORTANT: If installing a range hood or microwave hood combination above the cooktop, follow these instructions can be obtained from: National Fire Protection Association Batterymarch Park, Quincy, MA 02269 CSA International 8501 East ...
... 120/240 volt. Junction box or outlet: 9" (23.0 cm) maximum from upper cabinet to countertop within minimum horizontal clearances to cooktop H. Combustible area above countertop (shown by dashed box above) C. 30" (76.2 cm) minimum clearance between back wall and countertop...other obstruction) in accordance with local codes. Cabinet Dimensions IMPORTANT: If installing a range hood or microwave hood combination above the cooktop, follow these instructions can be obtained from: National Fire Protection Association Batterymarch Park, Quincy, MA 02269 CSA International 8501 East ...

Installation Instructions
Page 4
...apply foam strip adhesive-side down on the final location for Installation WARNING Excessive Weight Hazard Use two or more people to move and install cooktop. Failure to do so can be moved if servicing becomes necessary in the future. ■ Do not cut the conduit. Remove one ...of conduit provided. ■ A UL listed or CSA approved conduit connector must conform with local codes and industry accepted wiring practices. ■ The cooktop should be connected directly to the junction box. ■ Locate the junction box to allow as much slack as possible between the junction box and...
...apply foam strip adhesive-side down on the final location for Installation WARNING Excessive Weight Hazard Use two or more people to move and install cooktop. Failure to do so can be moved if servicing becomes necessary in the future. ■ Do not cut the conduit. Remove one ...of conduit provided. ■ A UL listed or CSA approved conduit connector must conform with local codes and industry accepted wiring practices. ■ The cooktop should be connected directly to the junction box. ■ Locate the junction box to allow as much slack as possible between the junction box and...

Installation Instructions
Page 5
... the front edge of the cooktop is needed , lift entire cooktop up from the cooktop for illustration of cooktop base bottom B. B E D C A. Using 2 or more people, place cooktop right side up and place in place when cooktop is needed , lift entire cooktop up from cutout to extend ...2. If repositioning is parallel to avoid scratching the countertop. 8. Installing Brackets Before Placing Cooktop in cutout. 7. Select bracket mounting holes that the front edge of the cooktop is parallel to Countertop" section for the installation of the countertop. NOTE: Make sure...
... the front edge of the cooktop is needed , lift entire cooktop up from the cooktop for illustration of cooktop base bottom B. B E D C A. Using 2 or more people, place cooktop right side up and place in place when cooktop is needed , lift entire cooktop up from cutout to extend ...2. If repositioning is parallel to avoid scratching the countertop. 8. Installing Brackets Before Placing Cooktop in cutout. 7. Select bracket mounting holes that the front edge of the cooktop is parallel to Countertop" section for the installation of the countertop. NOTE: Make sure...

Installation Instructions
Page 6
... to: 4-wire direct 5" (12.7 cm) A fused disconnect or circuit breaker box Go to Section: 4-Wire Cable from Power Supply to 3-Wire Cable from Cooktop IMPORTANT: Use the 4-wire cable from power supply where local codes do not permit connecting the frame-ground conductor to the junction box using the... to: 4-wire direct 5" (12.7 cm) A fused disconnect or circuit breaker box Go to Section: 4-Wire Cable from Power Supply to 4-Wire Cable from Cooktop 3-wire direct 3¹⁄₂" (8.9 cm) A fused disconnect or circuit breaker box 3-Wire Cable from Power Supply to 4-Wire Cable from...
... to: 4-wire direct 5" (12.7 cm) A fused disconnect or circuit breaker box Go to Section: 4-Wire Cable from Power Supply to 3-Wire Cable from Cooktop IMPORTANT: Use the 4-wire cable from power supply where local codes do not permit connecting the frame-ground conductor to the junction box using the... to: 4-wire direct 5" (12.7 cm) A fused disconnect or circuit breaker box Go to Section: 4-Wire Cable from Power Supply to 4-Wire Cable from Cooktop 3-wire direct 3¹⁄₂" (8.9 cm) A fused disconnect or circuit breaker box 3-Wire Cable from Power Supply to 4-Wire Cable from...


