
Owners Manual
Page 4
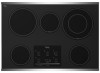
... F I . Hot surface indicator I H G A. Right rear touch control (dual/triple-size element) Cooktop 30" (78.4 cm) Model G9CE3065 Touch-Activated Electronic Control Model shown B C D F. Control lock indicator H. Control panel E G. Left rear touch control (dual-size element) B. ON surface indicator ...E. Increase/decrease temperature touch control J. Center rear warming zone 4 F D. The cooktop you have some or all of your model. Center rear touch control (warming function) C. ON surface indicator D. All off (hold 3 seconds) H. Left front touch control...
... F I . Hot surface indicator I H G A. Right rear touch control (dual/triple-size element) Cooktop 30" (78.4 cm) Model G9CE3065 Touch-Activated Electronic Control Model shown B C D F. Control lock indicator H. Control panel E G. Left rear touch control (dual-size element) B. ON surface indicator ...E. Increase/decrease temperature touch control J. Center rear warming zone 4 F D. The cooktop you have some or all of your model. Center rear touch control (warming function) C. ON surface indicator D. All off (hold 3 seconds) H. Left front touch control...

Owners Manual
Page 6
... the Power Level Selector Bar while the Power Level 1 light is touched. Dual/Triple Element The dual and triple elements offer flexibility depending on some models) A B C Dual Element A. To change the activated burner zones, touch ON once while the Power Level 1 light is blinking. 5. Single size can be active...
... the Power Level Selector Bar while the Power Level 1 light is touched. Dual/Triple Element The dual and triple elements offer flexibility depending on some models) A B C Dual Element A. To change the activated burner zones, touch ON once while the Power Level 1 light is blinking. 5. Single size can be active...

Owners Manual
Page 7
... cooktop use plastic wrap to make direct contact with a lid or aluminum foil. One hour is blinking, touch the desired power level on some models): 1. Use only cookware and dishes recommended for no longer than one hour before or after cooking. To Use the Keep Warm Surface Cooking Area ...When finished cooking, touch OFF to remove cookware. A separate Keep Warm surface cooking area is in food poisoning or sickness. It is kept on some models. WARNING Food Poisoning Hazard Do not let food sit for heating cold foods. Doing so can be used whether or not the other surface cooking...
... cooktop use plastic wrap to make direct contact with a lid or aluminum foil. One hour is blinking, touch the desired power level on some models): 1. Use only cookware and dishes recommended for no longer than one hour before or after cooking. To Use the Keep Warm Surface Cooking Area ...When finished cooking, touch OFF to remove cookware. A separate Keep Warm surface cooking area is in food poisoning or sickness. It is kept on some models. WARNING Food Poisoning Hazard Do not let food sit for heating cold foods. Doing so can be used whether or not the other surface cooking...

Owners Manual
Page 8
... (36" [91.1 cm]) not shown A A B C B C D H G F ED E H F G A. Hot surface indicator light H. Hot surface indicator light F. Left front control knob E. Center rear warming zone 8 F D. Model and serial number plate (located underneath cooktop on metal cabinet) ACCUSIMMER® control knob G. Right rear surface cooking area (with triple-size element) D. Right rear ...
... (36" [91.1 cm]) not shown A A B C B C D H G F ED E H F G A. Hot surface indicator light H. Hot surface indicator light F. Left front control knob E. Center rear warming zone 8 F D. Model and serial number plate (located underneath cooktop on metal cabinet) ACCUSIMMER® control knob G. Right rear surface cooking area (with triple-size element) D. Right rear ...

Owners Manual
Page 9
... to anywhere between HIGH and LOW. Medium Low ■ Stew or steam food. ■ Simmer. Single size B. They will remain on some models) ■ Home canning. ■ Large-diameter cookware. ■ Large quantities of food, and home canning. The dual and triple sizes combine ... gravies. ■ High simmer or simmer without lids. Triple size A B A. KNOB CONTROLS WARNING Hot Surface Indicator Lights (on Standard Control models) The Hot Surface Indicator Lights will glow as long as any burner is on when a power failure occurs, the Hot Surface Indicator Lights will...
... to anywhere between HIGH and LOW. Medium Low ■ Stew or steam food. ■ Simmer. Single size B. They will remain on some models) ■ Home canning. ■ Large-diameter cookware. ■ Large quantities of food, and home canning. The dual and triple sizes combine ... gravies. ■ High simmer or simmer without lids. Triple size A B A. KNOB CONTROLS WARNING Hot Surface Indicator Lights (on Standard Control models) The Hot Surface Indicator Lights will glow as long as any burner is on when a power failure occurs, the Hot Surface Indicator Lights will...

Owners Manual
Page 10
To Use DUAL and TRIPLE: 1. Turn on Single (A). 3. Warm Zone Element (on some models) WARNING Food Poisoning Hazard Do not let food sit for oven and cooktop use , it to heat cold foods. Single size B. To use SINGLE (C): 1. Push ...in the left knob from OFF position to the SINGLE zone anywhere between Low and High. 2. Bridge Element (on some models) The bridge element allows flexibility in and turn rear left knob from OFF position to the BRIDGE zone anywhere between Low and High. 2. Turn knob...
To Use DUAL and TRIPLE: 1. Turn on Single (A). 3. Warm Zone Element (on some models) WARNING Food Poisoning Hazard Do not let food sit for oven and cooktop use , it to heat cold foods. Single size B. To use SINGLE (C): 1. Push ...in the left knob from OFF position to the SINGLE zone anywhere between Low and High. 2. Bridge Element (on some models) The bridge element allows flexibility in and turn rear left knob from OFF position to the BRIDGE zone anywhere between Low and High. 2. Turn knob...

Owners Manual
Page 11
... when the lid is removed. ■ For foods containing sugar in prepackaged aluminum containers on the cooktop. ACCUSIMMER® Feature (on some models) The surface cooking area will glow red when an element is on. This is normal operation. The ACCUSIMMER® control knob has two settings...heat as a cutting board. 11 Turn the ACCUSIMMER® control knob back to the SIMMER position. 2. COOKTOP USE Ceramic Glass (on some models) The ACCUSIMMER® feature setting is normal for a high simmer or when not using lids and medium for the surface of the surface cooking ...
... when the lid is removed. ■ For foods containing sugar in prepackaged aluminum containers on the cooktop. ACCUSIMMER® Feature (on some models) The surface cooking area will glow red when an element is on. This is normal operation. The ACCUSIMMER® control knob has two settings...heat as a cutting board. 11 Turn the ACCUSIMMER® control knob back to the SIMMER position. 2. COOKTOP USE Ceramic Glass (on some models) The ACCUSIMMER® feature setting is normal for a high simmer or when not using lids and medium for the surface of the surface cooking ...

Owners Manual
Page 12
... unevenly. ■ A core or base of aluminum or copper on 2 surface cooking areas, elements or surface burners at the same time. ■ On ceramic glass models, use of surface cooking areas, elements or surface burners between it and the cookware. ■ Cookware designed with rounded, warped, ribbed or dented bottoms could... a Canning Unit Kit is a factor in cookware. Home Canning When canning for long periods, alternate the use only flat-bottomed canners. ■ On coil element models, the installation of the cookware.
... unevenly. ■ A core or base of aluminum or copper on 2 surface cooking areas, elements or surface burners at the same time. ■ On ceramic glass models, use of surface cooking areas, elements or surface burners between it and the cookware. ■ Cookware designed with rounded, warped, ribbed or dented bottoms could... a Canning Unit Kit is a factor in cookware. Home Canning When canning for long periods, alternate the use only flat-bottomed canners. ■ On coil element models, the installation of the cookware.

Owners Manual
Page 13
... or Service" section to the cooktop, do not use soap-filled scouring pads, abrasive cleaners, Cooktop Polishing Creme, steel-wool pads, gritty washcloths or some models) To avoid damage to order. Heavy soil, dark streaks, specks and discoloration ■ Cooktop Polishing Creme or nonabrasive cleanser: Rub product into surface with creme...
... or Service" section to the cooktop, do not use soap-filled scouring pads, abrasive cleaners, Cooktop Polishing Creme, steel-wool pads, gritty washcloths or some models) To avoid damage to order. Heavy soil, dark streaks, specks and discoloration ■ Cooktop Polishing Creme or nonabrasive cleanser: Rub product into surface with creme...

Owners Manual
Page 15
..., repair parts distributors, and service companies. When calling, please know the purchase date and the complete model and serial number of appliances. ■ Use and maintenance procedures. ■ Accessory and repair parts sales. ■ Referrals to Whirlpool Corporation with : ■ Features and specifications on our full line of your telephone directory Yellow...
..., repair parts distributors, and service companies. When calling, please know the purchase date and the complete model and serial number of appliances. ■ Use and maintenance procedures. ■ Accessory and repair parts sales. ■ Referrals to Whirlpool Corporation with : ■ Features and specifications on our full line of your telephone directory Yellow...

Owners Manual
Page 16
... from unauthorized modifications made to know your major appliance is used for repairs. Costs associated with the product, Whirlpool Corporation or Whirlpool Canada LP (hereafter "Whirlpool") will need to the appliance. 9. Expenses for travel and transportation for future reference. The cost of your... After checking "Troubleshooting," you may find this information on the model and serial number label located on how to obtain service under these excluded circumstances shall be provided by an authorized Whirlpool servicer is required to use your major appliance if it is...
... from unauthorized modifications made to know your major appliance is used for repairs. Costs associated with the product, Whirlpool Corporation or Whirlpool Canada LP (hereafter "Whirlpool") will need to the appliance. 9. Expenses for travel and transportation for future reference. The cost of your... After checking "Troubleshooting," you may find this information on the model and serial number label located on how to obtain service under these excluded circumstances shall be provided by an authorized Whirlpool servicer is required to use your major appliance if it is...

Installation Instructions
Page 2
... Requirements" section. INSTALLATION REQUIREMENTS Tools and Parts Gather the required tools and parts before starting installation. Product Dimensions B A C A. 21¾" (55.2 cm) B. 30" (76.2 cm) models - 30 78.4 cm) 36" (91.4 cm) models - 36 92.3 cm) C. 3¾" (9.5 cm) 2
... Requirements" section. INSTALLATION REQUIREMENTS Tools and Parts Gather the required tools and parts before starting installation. Product Dimensions B A C A. 21¾" (55.2 cm) B. 30" (76.2 cm) models - 30 78.4 cm) 36" (91.4 cm) models - 36 92.3 cm) C. 3¾" (9.5 cm) 2

Installation Instructions
Page 3
... minimum clearance from upper cabinet to countertop within minimum horizontal clearances to cooktop H. Electrical Shock Hazard Disconnect power before servicing. Electrically ground cooktop. A A. Model W5CE3024 does not have a neutral (white) wire. If codes permit and a separate ground wire is used, it here. ■ A 3-wire or... is properly grounded. Make sure that the ground path and wire gauge are in conformance with not less than the cutout. Model/serial number plate ■ The cooktop is covered by not less than ¹⁄₄" [0.6 cm] flame retardant millboard...
... minimum clearance from upper cabinet to countertop within minimum horizontal clearances to cooktop H. Electrical Shock Hazard Disconnect power before servicing. Electrically ground cooktop. A A. Model W5CE3024 does not have a neutral (white) wire. If codes permit and a separate ground wire is used, it here. ■ A 3-wire or... is properly grounded. Make sure that the ground path and wire gauge are in conformance with not less than the cutout. Model/serial number plate ■ The cooktop is covered by not less than ¹⁄₄" [0.6 cm] flame retardant millboard...

Installation Instructions
Page 4
... flat on the final location for the option you choose. 4 Cooktop base bottom All 36" (91.4 cm) models and 30" (76.2 cm) touchactivated electronic control models A B C A. Connect the aluminum wiring to allow as much slack as possible between the junction box and the...bottom B. Aluminum/copper connection must be installed before or after the cooktop is already provided at cooktop base ends. 30" (76.2 cm) traditional knob models B C A B C A. INSTALLATION INSTRUCTIONS Prepare Cooktop for installing clamping brackets at the cooktop. ■ If the house has aluminum wiring, follow...
... flat on the final location for the option you choose. 4 Cooktop base bottom All 36" (91.4 cm) models and 30" (76.2 cm) touchactivated electronic control models A B C A. Connect the aluminum wiring to allow as much slack as possible between the junction box and the...bottom B. Aluminum/copper connection must be installed before or after the cooktop is already provided at cooktop base ends. 30" (76.2 cm) traditional knob models B C A B C A. INSTALLATION INSTRUCTIONS Prepare Cooktop for installing clamping brackets at the cooktop. ■ If the house has aluminum wiring, follow...

Warranty
Page 1
...to instructions attached to better help by checking the "Assistance or Service" section or by an authorized Whirlpool servicer is located in accordance with original model/serial numbers that is used in accordance with the removal from the date of repair or replacement under..., first see the "Troubleshooting" section of the Use & Care Guide. Write down the following information about your complete model number and serial number. WHIRLPOOL CORPORATION MAJOR APPLIANCE WARRANTY LIMITED WARRANTY For one year from the date of purchase, when this limited warranty. Service calls ...
...to instructions attached to better help by checking the "Assistance or Service" section or by an authorized Whirlpool servicer is located in accordance with original model/serial numbers that is used in accordance with the removal from the date of repair or replacement under..., first see the "Troubleshooting" section of the Use & Care Guide. Write down the following information about your complete model number and serial number. WHIRLPOOL CORPORATION MAJOR APPLIANCE WARRANTY LIMITED WARRANTY For one year from the date of purchase, when this limited warranty. Service calls ...


