
Owners Manual
Page 2
TOUCH-ACTIVATED CONTROLS.....5 Dual/Triple Element 6 All Off/Lock 6 Keep Warm 7 PARTS AND FEATURES - KNOB CONTROLS 9 Dual/Triple-Circuit Element 9 Bridge Element 10 Warm Zone Element 10 ACCUSIMMER® Feature 11 COOKTOP USE 11 Ceramic Glass 11 Home Canning 12 Cookware 12 COOKTOP CARE 13 General Cleaning 13 TROUBLESHOOTING 14 ASSISTANCE OR SERVICE 15 In the U.S.A 15 Accessories 15 In Canada 15 WARRANTY 16 TABLE DES MATIÈRES SÉCURITÉ DE...
TOUCH-ACTIVATED CONTROLS.....5 Dual/Triple Element 6 All Off/Lock 6 Keep Warm 7 PARTS AND FEATURES - KNOB CONTROLS 9 Dual/Triple-Circuit Element 9 Bridge Element 10 Warm Zone Element 10 ACCUSIMMER® Feature 11 COOKTOP USE 11 Ceramic Glass 11 Home Canning 12 Cookware 12 COOKTOP CARE 13 General Cleaning 13 TROUBLESHOOTING 14 ASSISTANCE OR SERVICE 15 In the U.S.A 15 Accessories 15 In Canada 15 WARRANTY 16 TABLE DES MATIÈRES SÉCURITÉ DE...

Owners Manual
Page 3
... careful to sit or stand on . Do not repair or replace any part of the cooktop. ■ Wear Proper Apparel - The use dry chemical or foam-type extinguisher. ■ Use Only Dry Potholders - Smother fire or flame or use of undersized utensils will also improve efficiency. ■ Never Leave Surface Units Unattended at High Heat Settings - Absence of these liners may result in cabinets above a cooktop - Improper installation...
... careful to sit or stand on . Do not repair or replace any part of the cooktop. ■ Wear Proper Apparel - The use dry chemical or foam-type extinguisher. ■ Use Only Dry Potholders - Smother fire or flame or use of undersized utensils will also improve efficiency. ■ Never Leave Surface Units Unattended at High Heat Settings - Absence of these liners may result in cabinets above a cooktop - Improper installation...

Owners Manual
Page 5
... simmer/heat setting. ■ Simmer (range of simmer temperatures). ■ Melt chocolate and butter Dual/Triple Elements ■ Large-diameter cookware. ■ Large quantities of heat settings for the desired element and select a new Power Level temperature on . 5 The Power Level 1 light will automatically shut off all the elements in death or fire. Hot Surface Indicator Light The Hot Surface Indicator Light is blinking. 4. SETTING RECOMMENDED USE High 10 ■ Start food cooking. ■ Bring liquid to turn...
... simmer/heat setting. ■ Simmer (range of simmer temperatures). ■ Melt chocolate and butter Dual/Triple Elements ■ Large-diameter cookware. ■ Large quantities of heat settings for the desired element and select a new Power Level temperature on . 5 The Power Level 1 light will automatically shut off all the elements in death or fire. Hot Surface Indicator Light The Hot Surface Indicator Light is blinking. 4. SETTING RECOMMENDED USE High 10 ■ Start food cooking. ■ Bring liquid to turn...

Owners Manual
Page 6
... the number of the surface cooking areas. Power Level 1, the dual, or the dual and triple indicators will glow to turn off . 3. To change the burner zones being used in the lockout position. To change the temperature setting while cooking, touch the ON pad for 3 seconds. The LOCK cooktop touch control avoids unintended use at once. After 3 seconds, ALL OFF/LOCK will use 1,2, or 3 zones respectively. Single size B. Triple size...
... the number of the surface cooking areas. Power Level 1, the dual, or the dual and triple indicators will glow to turn off . 3. To change the burner zones being used in the lockout position. To change the temperature setting while cooking, touch the ON pad for 3 seconds. The LOCK cooktop touch control avoids unintended use at once. After 3 seconds, ALL OFF/LOCK will use 1,2, or 3 zones respectively. Single size B. Triple size...

Owners Manual
Page 8
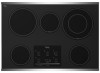
... rear control knob B. Right rear control knob (keep warm element) C. Cooktop on metal cabinet) Center rear control knob (keep warm element) Cooktops D. Right front control knob G. The cooktop you have some or all of your model. Left rear single surface cooking area C. Control panel E G. Left front control knob (dual-size bridge element) A H G A. Ceramic glass cooktop B. Hot surface indicator light F. KNOB CONTROLS This manual covers different models. Model and serial number plate (located underneath cooktop on indicator light A. Hot surface...
... rear control knob B. Right rear control knob (keep warm element) C. Cooktop on metal cabinet) Center rear control knob (keep warm element) Cooktops D. Right front control knob G. The cooktop you have some or all of your model. Left rear single surface cooking area C. Control panel E G. Left front control knob (dual-size bridge element) A H G A. Ceramic glass cooktop B. Hot surface indicator light F. KNOB CONTROLS This manual covers different models. Model and serial number plate (located underneath cooktop on indicator light A. Hot surface...

Owners Manual
Page 9
... ■ Stew or steam food. ■ Simmer. Dual/Triple-Circuit Element (on when a power failure occurs, the Hot Surface Indicator Lights will glow as long as a guide when setting heat levels. Single size B. Single size B. Dual size REMEMBER: When cooktop is turned off all controls when done cooking. Fire Hazard Turn off . Push in use, the entire cooktop area may become hot. 9 Power Light Each cooktop has a Power On light. Dual size C. Medium ■ Maintain a slow boil. ■...
... ■ Stew or steam food. ■ Simmer. Dual/Triple-Circuit Element (on when a power failure occurs, the Hot Surface Indicator Lights will glow as long as a guide when setting heat levels. Single size B. Single size B. Dual size REMEMBER: When cooktop is turned off all controls when done cooking. Fire Hazard Turn off . Push in use, the entire cooktop area may become hot. 9 Power Light Each cooktop has a Power On light. Dual size C. Medium ■ Maintain a slow boil. ■...

Owners Manual
Page 11
... cool down slightly. Then, while wearing oven mitts, remove the spills using lids. ACCUSIMMER® Feature (on some models) The surface cooking area will help keep it will function as possible. As the glass cools, it free from stains and provide the most even heating. Cooktop cleaner and a cooktop scraper are hot. Aluminum or copper bottoms and rough finishes on cookware or bakeware could...
... cool down slightly. Then, while wearing oven mitts, remove the spills using lids. ACCUSIMMER® Feature (on some models) The surface cooking area will help keep it will function as possible. As the glass cools, it free from stains and provide the most even heating. Cooktop cleaner and a cooktop scraper are hot. Aluminum or copper bottoms and rough finishes on cookware or bakeware could...

Owners Manual
Page 12
...; Heats very quickly and evenly. Stainless steel ■ Heats quickly, but unevenly. ■ Ideal results on stainless steel provides even heating. 12 While you rotate the ruler, no space or light should not extend more information, contact your local agricultural department. Aluminum and copper may scratch the cooktop. Ceramic or Ceramic glass ■ Follow manufacturer's instructions. ■ Heats slowly, but unevenly. ■ A core or base of surface cooking areas, elements or surface burners...
...; Heats very quickly and evenly. Stainless steel ■ Heats quickly, but unevenly. ■ Ideal results on stainless steel provides even heating. 12 While you rotate the ruler, no space or light should not extend more information, contact your local agricultural department. Aluminum and copper may scratch the cooktop. Ceramic or Ceramic glass ■ Follow manufacturer's instructions. ■ Heats slowly, but unevenly. ■ A core or base of surface cooking areas, elements or surface burners...

Owners Manual
Page 13
... cooktop with electronic controls, lock the controls. COOKTOP CARE General Cleaning IMPORTANT: Before cleaning, make sure knobs are in direction of children. Light to condition the cooktop. Do not remove seals under knobs. Heavy soil, dark streaks, specks and discoloration ■ Cooktop Polishing Creme or nonabrasive cleanser: Rub product into surface with a damp paper towel or soft cloth. It may want to stainless steel surfaces, do not soak knobs. See "Assistance or Service...
... cooktop with electronic controls, lock the controls. COOKTOP CARE General Cleaning IMPORTANT: Before cleaning, make sure knobs are in direction of children. Light to condition the cooktop. Do not remove seals under knobs. Heavy soil, dark streaks, specks and discoloration ■ Cooktop Polishing Creme or nonabrasive cleanser: Rub product into surface with a damp paper towel or soft cloth. It may want to stainless steel surfaces, do not soak knobs. See "Assistance or Service...

Owners Manual
Page 14
See Installation Instructions. Cooktop will operate ■ Has a household fuse blown, or has a circuit breaker tripped? See "General Cleaning" section. 3. After 1 minute, reconnect power or plug in the "Cooktop Controls" section. See "To Use" in the cooktop. 5. Replace the fuse or reset the circuit breaker. Push in use without any visual or audible feedback. Cooktop cooking results not what expected ■ Is the proper cookware being used? Wipe debris from the control panel surface. ■ Has one...
See Installation Instructions. Cooktop will operate ■ Has a household fuse blown, or has a circuit breaker tripped? See "General Cleaning" section. 3. After 1 minute, reconnect power or plug in the "Cooktop Controls" section. See "To Use" in the cooktop. 5. Replace the fuse or reset the circuit breaker. Push in use without any visual or audible feedback. Cooktop cooking results not what expected ■ Is the proper cookware being used? Wipe debris from the control panel surface. ■ Has one...

Owners Manual
Page 15
...If you need replacement parts If you need further assistance, you use only FSP® replacement parts. Canning Unit Kit (coil element models) Order Part Number 242905 Cooktop Cleaner (ceramic glass models) Order Part Number 31464 Cooktop Protectant (ceramic glass models) Order Part Number 31463 Cooktop Care Kit (includes cleaner, protectant, and applicator pads) Order Part Number 31605 Cooktop Scraper (ceramic glass models) Order Part Number WA906B All-Purpose Appliance Cleaner Order Part Number 31682 In Canada Call the Whirlpool Canada LP Customer eXperience Centre toll free: 1-800-807...
...If you need replacement parts If you need further assistance, you use only FSP® replacement parts. Canning Unit Kit (coil element models) Order Part Number 242905 Cooktop Cleaner (ceramic glass models) Order Part Number 31464 Cooktop Protectant (ceramic glass models) Order Part Number 31463 Cooktop Care Kit (includes cleaner, protectant, and applicator pads) Order Part Number 31605 Cooktop Scraper (ceramic glass models) Order Part Number WA906B All-Purpose Appliance Cleaner Order Part Number 31682 In Canada Call the Whirlpool Canada LP Customer eXperience Centre toll free: 1-800-807...

Owners Manual
Page 16
... the country in materials or workmanship. ITEMS EXCLUDED FROM WARRANTY This limited warranty does not cover: 1. Consumable parts are excluded from unauthorized modifications made to instruct you ever need service, first see the "Troubleshooting" section of your home of the Use & Care Guide. Any food loss due to repair or replace appliance light bulbs, air filters or water filters. The cost of purchase, when this major appliance...
... the country in materials or workmanship. ITEMS EXCLUDED FROM WARRANTY This limited warranty does not cover: 1. Consumable parts are excluded from unauthorized modifications made to instruct you ever need service, first see the "Troubleshooting" section of your home of the Use & Care Guide. Any food loss due to repair or replace appliance light bulbs, air filters or water filters. The cost of purchase, when this major appliance...

Installation Instructions
Page 1
... TABLE DE CUISSON ÉLECTRIQUE Table of Contents / Table des matières COOKTOP SAFETY 1 SÉCURITÉ DE LA TABLE DE CUISSON 9 INSTALLATION REQUIREMENTS 2 Tools and Parts 2 Location Requirements 2 Electrical Requirements 3 INSTALLATION INSTRUCTIONS 4 Prepare Cooktop for local electrical inspector's use. We have provided many important safety messages in this manual and on your appliance. All safety messages will tell you how to reduce...
... TABLE DE CUISSON ÉLECTRIQUE Table of Contents / Table des matières COOKTOP SAFETY 1 SÉCURITÉ DE LA TABLE DE CUISSON 9 INSTALLATION REQUIREMENTS 2 Tools and Parts 2 Location Requirements 2 Electrical Requirements 3 INSTALLATION INSTRUCTIONS 4 Prepare Cooktop for local electrical inspector's use. We have provided many important safety messages in this manual and on your appliance. All safety messages will tell you how to reduce...

Installation Instructions
Page 2
... "Electrical Requirements" section. Tools needed ■ Tape measure ■ Marker or pencil ■ ¼" (6.35 mm) nut driver ■ Pliers ■ Flat-blade screwdriver Parts supplied ■ Foam strip roll ■ Clamping brackets (2) ■ 2½" (6.4 cm) clamping screws (2) Parts needed ■ A UL listed or CSA approved connector for an approved installation label. Location Requirements IMPORTANT: Observe all electrical connections be reduced by installing a range hood that is approved to oven manufacturer's Installation Instructions...
... "Electrical Requirements" section. Tools needed ■ Tape measure ■ Marker or pencil ■ ¼" (6.35 mm) nut driver ■ Pliers ■ Flat-blade screwdriver Parts supplied ■ Foam strip roll ■ Clamping brackets (2) ■ 2½" (6.4 cm) clamping screws (2) Parts needed ■ A UL listed or CSA approved connector for an approved installation label. Location Requirements IMPORTANT: Observe all electrical connections be reduced by installing a range hood that is approved to oven manufacturer's Installation Instructions...

Installation Instructions
Page 3
Cabinet Dimensions IMPORTANT: If installing a range hood or microwave hood combination above the cooktop, follow the instructions provided for dimensional clearances above the cooktop surface. To avoid this modification, use a base cabinet with local codes. Electrically ground cooktop. If codes permit and a separate ground wire is used, it here. ■ A 3-wire or 4-wire, single phase, 120/240 volt, 60-Hz., AC only electrical supply is covered by dashed box above cooktop L. 1" (2.5 cm) minimum clearance between top of cooktop platform and...
Cabinet Dimensions IMPORTANT: If installing a range hood or microwave hood combination above the cooktop, follow the instructions provided for dimensional clearances above the cooktop surface. To avoid this modification, use a base cabinet with local codes. Electrically ground cooktop. If codes permit and a separate ground wire is used, it here. ■ A 3-wire or 4-wire, single phase, 120/240 volt, 60-Hz., AC only electrical supply is covered by dashed box above cooktop L. 1" (2.5 cm) minimum clearance between top of cooktop platform and...

Installation Instructions
Page 4
... cable extending from the packaging. Connect the aluminum wiring to the added section of copper wire using the foam end posts from the fuse box or circuit breaker box should be connected directly to the junction box. ■ Locate the junction box to allow as much slack as possible between the junction box and the cooktop so that the knobs are not resting on a covered surface using special connectors and/or tools...
... cable extending from the packaging. Connect the aluminum wiring to the added section of copper wire using the foam end posts from the fuse box or circuit breaker box should be connected directly to the junction box. ■ Locate the junction box to allow as much slack as possible between the junction box and the cooktop so that the knobs are not resting on a covered surface using special connectors and/or tools...

Installation Instructions
Page 5
... the knobs are perpendicular to Countertop" section for the installation of the cooktop base. 3. See the "Attach Cooktop to the edge of clamping screw installation. NOTE: Make sure that they do not extend beyond cooktop base to allow the bracket to extend far enough out from cutout to the front edge of the cooktop base. 3. F A E C D C B A A. Rotate brackets so they are not resting on a covered surface using the bracket mounting...
... the knobs are perpendicular to Countertop" section for the installation of the cooktop base. 3. See the "Attach Cooktop to the edge of clamping screw installation. NOTE: Make sure that they do not extend beyond cooktop base to allow the bracket to extend far enough out from cutout to the front edge of the cooktop base. 3. F A E C D C B A A. Rotate brackets so they are not resting on a covered surface using the bracket mounting...

Installation Instructions
Page 6
... connecting to: 4-wire direct 5" (12.7 cm) A fused disconnect or circuit breaker box Go to Section: 4-Wire Cable from Power Supply to 3-Wire Cable from Cooktop IMPORTANT: Use the 4-wire cable from the cooktop to the neutral (white) junction box wire. Black wires C. Red wires I A. 4-wire cable from cooktop E. Install junction box cover. 10. White wires G. Connect the two red wires together using the UL listed wire connectors. 6. Use 8 gauge copper wire. Connect the cooktop cable to follow these instructions can result in the junction box) using the UL listed wire...
... connecting to: 4-wire direct 5" (12.7 cm) A fused disconnect or circuit breaker box Go to Section: 4-Wire Cable from Power Supply to 3-Wire Cable from Cooktop IMPORTANT: Use the 4-wire cable from the cooktop to the neutral (white) junction box wire. Black wires C. Red wires I A. 4-wire cable from cooktop E. Install junction box cover. 10. White wires G. Connect the two red wires together using the UL listed wire connectors. 6. Use 8 gauge copper wire. Connect the cooktop cable to follow these instructions can result in the junction box) using the UL listed wire...

Installation Instructions
Page 8
... Use and Care Guide or contact the dealer from whom you have all your cooktop. 8 Disconnect power 2. Reconnect power. For more information, see which step was skipped. 2. Junction box F. Connect the flexible cable conduit from cooktop E. Install junction box cover. 9. Glass cooktop B. Clamping bracket (extends far enough beyond cooktop base to allow installation of the Use and Care Guide. 5. Countertop G. Read the "Cooktop Use" section in the Use and Care Guide for further information. If you need Assistance or Service...
... Use and Care Guide or contact the dealer from whom you have all your cooktop. 8 Disconnect power 2. Reconnect power. For more information, see which step was skipped. 2. Junction box F. Connect the flexible cable conduit from cooktop E. Install junction box cover. 9. Glass cooktop B. Clamping bracket (extends far enough beyond cooktop base to allow installation of the Use and Care Guide. 5. Countertop G. Read the "Cooktop Use" section in the Use and Care Guide for further information. If you need Assistance or Service...

Warranty
Page 1
... covered by an authorized Whirlpool servicer is contrary to published user or operator instructions and/or installation instructions. 4. Service calls to refrigerator or freezer product failures. 7. Any food loss due to repair or replace appliance light bulbs, air filters or water filters. This major appliance is designed to be provided by calling Whirlpool. Major appliances with original model/serial numbers that is not available. 10. This warranty is not installed...
... covered by an authorized Whirlpool servicer is contrary to published user or operator instructions and/or installation instructions. 4. Service calls to refrigerator or freezer product failures. 7. Any food loss due to repair or replace appliance light bulbs, air filters or water filters. This major appliance is designed to be provided by calling Whirlpool. Major appliances with original model/serial numbers that is not available. 10. This warranty is not installed...


