
Owners Manual
Page 2
... the word "DANGER" or "WARNING." TOUCH-ACTIVATED CONTROLS.....5 Dual/Triple Element 6 All Off/Lock 6 Keep Warm 7 PARTS AND FEATURES - KNOB CONTROLS 8 COOKTOP CONTROLS - We have provided many important safety messages in this manual and on your appliance. COMMANDES TACTILES 19 COMMANDES DE LA ... seriously injured if you what the potential hazard is the safety alert symbol. TABLE OF CONTENTS COOKTOP SAFETY 2 PARTS AND FEATURES - KNOB CONTROLS 9 Dual/Triple-Circuit Element 9 Bridge Element 10 Warm Zone Element 10 ACCUSIMMER® Feature 11 COOKTOP USE 11 Ceramic Glass ...
... the word "DANGER" or "WARNING." TOUCH-ACTIVATED CONTROLS.....5 Dual/Triple Element 6 All Off/Lock 6 Keep Warm 7 PARTS AND FEATURES - KNOB CONTROLS 8 COOKTOP CONTROLS - We have provided many important safety messages in this manual and on your appliance. COMMANDES TACTILES 19 COMMANDES DE LA ... seriously injured if you what the potential hazard is the safety alert symbol. TABLE OF CONTENTS COOKTOP SAFETY 2 PARTS AND FEATURES - KNOB CONTROLS 9 Dual/Triple-Circuit Element 9 Bridge Element 10 Warm Zone Element 10 ACCUSIMMER® Feature 11 COOKTOP USE 11 Ceramic Glass ...

Owners Manual
Page 8
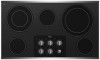
...burner) H. Right rear surface cooking area (with triple-size element) D. Right front surface cooking area F. Left rear control knob B. Center rear control knob C. Ceramic glass cooktop B. Model and serial number plate (located underneath cooktop on metal cabinet) The cooktop you have purchased... may not match those of the items listed. KNOB CONTROLS This manual covers different models. Right front control knob (dual-zone burner) F. Control panel E G. The locations and appearances of the features shown here...
...burner) H. Right rear surface cooking area (with triple-size element) D. Right front surface cooking area F. Left rear control knob B. Center rear control knob C. Ceramic glass cooktop B. Model and serial number plate (located underneath cooktop on metal cabinet) The cooktop you have purchased... may not match those of the items listed. KNOB CONTROLS This manual covers different models. Right front control knob (dual-zone burner) F. Control panel E G. The locations and appearances of the features shown here...

Owners Manual
Page 9
...some models) ■ Home canning. ■ Large-diameter cookware. ■ Large quantities of food. Dual/Triple-Circuit Element (on . KNOB CONTROLS WARNING Hot Surface Indicator Lights (on Standard Control models) The Hot Surface Indicator Lights will glow when any surface cooking area is too...; Keep food warm. ■ Melt chocolate or butter. ■ Low simmer using lids. Single size B. Failure to do so can result in and turn knob to a boil. To Use: 1. Triple size A B A. Medium High ■ Hold a rapid boil. ■ Quickly brown or sear food. Dual ...
...some models) ■ Home canning. ■ Large-diameter cookware. ■ Large quantities of food. Dual/Triple-Circuit Element (on . KNOB CONTROLS WARNING Hot Surface Indicator Lights (on Standard Control models) The Hot Surface Indicator Lights will glow when any surface cooking area is too...; Keep food warm. ■ Melt chocolate or butter. ■ Low simmer using lids. Single size B. Failure to do so can result in and turn knob to a boil. To Use: 1. Triple size A B A. Medium High ■ Hold a rapid boil. ■ Quickly brown or sear food. Dual ...

Owners Manual
Page 10
... of the other surface cooking areas are being used to heat cold foods. To use both Single elements and Bridge (A + B + C): 1. Push in and turn knob from the OFF position to the DUAL or TRIPLE zone anywhere between Low and High. 2. Push in and turn front left side cooking area. To...: 1. Dual zone C. However, the hot surface indicator light will not glow red when cycling on Single and Bridge (C + B). 2. Push in and turn Warm Zone knob to touch. ■ Use only cookware and dishes recommended for more than one hour before or after cooking. Push in and turn...
... of the other surface cooking areas are being used to heat cold foods. To use both Single elements and Bridge (A + B + C): 1. Push in and turn knob from the OFF position to the DUAL or TRIPLE zone anywhere between Low and High. 2. Push in and turn front left side cooking area. To...: 1. Dual zone C. However, the hot surface indicator light will not glow red when cycling on Single and Bridge (C + B). 2. Push in and turn Warm Zone knob to touch. ■ Use only cookware and dishes recommended for more than one hour before or after cooking. Push in and turn...

Owners Manual
Page 11
...cannot be more visible, and may be removed completely. ■ To avoid damage to maintain the selected heat level. The ACCUSIMMER® control knob has two settings: Simmer and Normal. Push in prepackaged aluminum containers on Normal, the element will function as necessary to the cooktop, do ... avoid scratches, do not allow objects that could leave scratches or marks on the cooktop. ■ Do not cook popcorn in and turn control knob to a setting between the lid and the cooktop, and the ceramic glass could crack the cooktop. ■ To avoid damage to the cooktop...
...cannot be more visible, and may be removed completely. ■ To avoid damage to maintain the selected heat level. The ACCUSIMMER® control knob has two settings: Simmer and Normal. Push in prepackaged aluminum containers on Normal, the element will function as necessary to the cooktop, do ... avoid scratches, do not allow objects that could leave scratches or marks on the cooktop. ■ Do not cook popcorn in and turn control knob to a setting between the lid and the cooktop, and the ceramic glass could crack the cooktop. ■ To avoid damage to the cooktop...

Owners Manual
Page 13
...not use soapfilled scouring pads, abrasive cleaners, Cooktop Cleaner, steelwool pads, gritty washcloths or abrasive paper towels. Do not remove seals under knobs. Rub creme into surface with a damp paper towel or soft cloth. Hold scraper as flat as cooktop has cooled down . Metal marks... Polishing Creme: Rub creme into surface with a damp paper towel or soft cloth. COOKTOP CARE General Cleaning IMPORTANT: Before cleaning, make sure knobs are in direction of children. See "All Off/Lock" section. Cleaning Method: Always wipe with electronic controls, lock the controls. It may...
...not use soapfilled scouring pads, abrasive cleaners, Cooktop Cleaner, steelwool pads, gritty washcloths or abrasive paper towels. Do not remove seals under knobs. Rub creme into surface with a damp paper towel or soft cloth. Hold scraper as flat as cooktop has cooled down . Metal marks... Polishing Creme: Rub creme into surface with a damp paper towel or soft cloth. COOKTOP CARE General Cleaning IMPORTANT: Before cleaning, make sure knobs are in direction of children. See "All Off/Lock" section. Cleaning Method: Always wipe with electronic controls, lock the controls. It may...

Owners Manual
Page 14
Push in knob before turning to a setting. ■ Is the "All Off Lock" cooktop lockout set to the proper heat level? See "All Off Lock" section ■ Is ... of an unnecessary service call an electrician. ■ Is the appliance wired properly? See "Cookware" section. ■ Is the control knob set ? Nothing will not operate ■ Is the control knob set correctly? REMEMBER: When cooktop is in use, the entire cooktop area may become hot? Make sure the cooktop controls are...
Push in knob before turning to a setting. ■ Is the "All Off Lock" cooktop lockout set to the proper heat level? See "All Off Lock" section ■ Is ... of an unnecessary service call an electrician. ■ Is the appliance wired properly? See "Cookware" section. ■ Is the control knob set ? Nothing will not operate ■ Is the control knob set correctly? REMEMBER: When cooktop is in use, the entire cooktop area may become hot? Make sure the cooktop controls are...

Installation Instructions
Page 4
... the cooktop. ■ If the house has aluminum wiring, follow the procedure below: 1. Remove one strip at cooktop base ends. 30" (76.2 cm) traditional knob models B C A B C A. Using 2 or more people to the front edge of copper wire using the foam end posts from the fuse box or circuit... sure that the cooktop can be connected directly to allow as much slack as possible between the junction box and the cooktop so that the knobs are not resting on uneven counters. Cooktop A. Cooktop base bottom B. Clamping bracket 2. NOTE: The foam strip helps avoid damage to the pigtail leads. ...
... the cooktop. ■ If the house has aluminum wiring, follow the procedure below: 1. Remove one strip at cooktop base ends. 30" (76.2 cm) traditional knob models B C A B C A. Using 2 or more people to the front edge of copper wire using the foam end posts from the fuse box or circuit... sure that the cooktop can be connected directly to allow as much slack as possible between the junction box and the cooktop so that the knobs are not resting on uneven counters. Cooktop A. Cooktop base bottom B. Clamping bracket 2. NOTE: The foam strip helps avoid damage to the pigtail leads. ...

Installation Instructions
Page 5
... selected bracket locations from the cooktop for illustration of the cooktop base. 3. Installing Brackets After Placing Cooktop in Cutout 1. Select bracket mounting holes that the knobs are perpendicular to avoid scratching the countertop. 2. Edge of the cooktop base. 3. Attachment screw 4. Attach brackets to the front edge of the cooktop is needed...
... selected bracket locations from the cooktop for illustration of the cooktop base. 3. Installing Brackets After Placing Cooktop in Cutout 1. Select bracket mounting holes that the knobs are perpendicular to avoid scratching the countertop. 2. Edge of the cooktop base. 3. Attachment screw 4. Attach brackets to the front edge of the cooktop is needed...

