
Owners Manual
Page 2
... is the safety alert symbol. All safety messages will follow instructions. KNOB CONTROLS 9 Dual/Triple-Circuit Element 9 Bridge Element 10 Warm Zone Element 10 ACCUSIMMER® Feature 11 COOKTOP USE 11 Ceramic Glass 11 Home Canning 12 Cookware 12 COOKTOP CARE 13 General Cleaning 13 TROUBLESHOOTING 14 ASSISTANCE OR SERVICE 15 In the U.S.A 15 Accessories 15 In Canada 15 WARRANTY 16 TABLE DES MATIÈRES SÉCURITÉ...
... is the safety alert symbol. All safety messages will follow instructions. KNOB CONTROLS 9 Dual/Triple-Circuit Element 9 Bridge Element 10 Warm Zone Element 10 ACCUSIMMER® Feature 11 COOKTOP USE 11 Ceramic Glass 11 Home Canning 12 Cookware 12 COOKTOP CARE 13 General Cleaning 13 TROUBLESHOOTING 14 ASSISTANCE OR SERVICE 15 In the U.S.A 15 Accessories 15 In Canada 15 WARRANTY 16 TABLE DES MATIÈRES SÉCURITÉ...

Owners Manual
Page 3
... when using the cooktop. ■ User Servicing - Do not repair or replace any part of clothing. Smother fire or flame or use . Among those areas are suitable for Warming or Heating the Room. ■ Do Not Leave Children Alone - Proper relationship of electric shock. If cooktop should break, cleaning solutions and spillovers may subject wiring or components underneath to cover the surface unit heating element. Improper installation of these pans...
... when using the cooktop. ■ User Servicing - Do not repair or replace any part of clothing. Smother fire or flame or use . Among those areas are suitable for Warming or Heating the Room. ■ Do Not Leave Children Alone - Proper relationship of electric shock. If cooktop should break, cleaning solutions and spillovers may subject wiring or components underneath to cover the surface unit heating element. Improper installation of these pans...

Owners Manual
Page 5
... will blink. 2. When finished cooking, touch OFF to turn off surface cooking area(s) individually or ALL OFF/LOCK to turn off all the elements in the central area of the elements are melting foods such as a guide when setting heat levels. Surface On Indicator Light The control panel has a Surface On indicator light. Medium High Between 7-9 Med 6 Medium Low Between 3-5 Low Between 1-2 ■ Hold a rapid boil. ■ Quickly brown or sear food...
... will blink. 2. When finished cooking, touch OFF to turn off surface cooking area(s) individually or ALL OFF/LOCK to turn off all the elements in the central area of the elements are melting foods such as a guide when setting heat levels. Surface On Indicator Light The control panel has a Surface On indicator light. Medium High Between 7-9 Med 6 Medium Low Between 3-5 Low Between 1-2 ■ Hold a rapid boil. ■ Quickly brown or sear food...

Owners Manual
Page 6
... to turn off surface cooking area(s) individually or ALL OFF/LOCK to indicate if the burner will automatically shut off. 3. To change the temperature setting while cooking, touch the ON pad for the selected temperature setting, and all surface cooking areas that the cooktop controls are in the same way as a regular element. Power Level 1, the dual, or the dual and triple indicators will glow to turn off the downdraft...
... to turn off surface cooking area(s) individually or ALL OFF/LOCK to indicate if the burner will automatically shut off. 3. To change the temperature setting while cooking, touch the ON pad for the selected temperature setting, and all surface cooking areas that the cooktop controls are in the same way as a regular element. Power Level 1, the dual, or the dual and triple indicators will glow to turn off the downdraft...

Owners Manual
Page 8
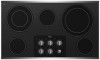
... surface cooking area C. Right rear surface cooking area (with triple-size element) D. Model and serial number plate (located underneath cooktop on indicator light A. Right front control knob (dual-zone burner) F. Left front control knob (dual-size bridge element) A H G A. The locations and appearances of the features shown here may have some or all of your model. KNOB CONTROLS This manual covers different models. The cooktop you have purchased may not match those of the items listed. Left rear control knob B. Hot surface indicator light H. Cooktop on metal cabinet...
... surface cooking area C. Right rear surface cooking area (with triple-size element) D. Model and serial number plate (located underneath cooktop on indicator light A. Right front control knob (dual-zone burner) F. Left front control knob (dual-size bridge element) A H G A. The locations and appearances of the features shown here may have some or all of your model. KNOB CONTROLS This manual covers different models. The cooktop you have purchased may not match those of the items listed. Left rear control knob B. Hot surface indicator light H. Cooktop on metal cabinet...

Owners Manual
Page 9
... a guide when setting heat levels. Triple size A B A. Dual size REMEMBER: When cooktop is restored to a boil. The controls can result in death or fire. Single size B. Dual size C. KNOB CONTROLS WARNING Hot Surface Indicator Lights (on the size of food, and home canning. Fire Hazard Turn off . Dual/Triple-Circuit Element (on some models) ■ Home canning. ■ Large-diameter cookware. ■ Large quantities of food. SETTING RECOMMENDED USE High ■ Start food cooking...
... a guide when setting heat levels. Triple size A B A. Dual size REMEMBER: When cooktop is restored to a boil. The controls can result in death or fire. Single size B. Dual size C. KNOB CONTROLS WARNING Hot Surface Indicator Lights (on the size of food, and home canning. Fire Hazard Turn off . Dual/Triple-Circuit Element (on some models) ■ Home canning. ■ Large-diameter cookware. ■ Large quantities of food. SETTING RECOMMENDED USE High ■ Start food cooking...

Owners Manual
Page 11
...® control knob has two settings: Simmer and Normal. For more precise simmering. If sugary spills are recommended. It may require more visible, and may cycle on and off the cooktop before and after each use the cooktop as necessary to the cooktop, do not slide cookware or bakeware across the cooktop. COOKTOP USE Ceramic Glass (on some models) The ACCUSIMMER® feature setting is an adjustable heat setting for a high simmer or...
...® control knob has two settings: Simmer and Normal. For more precise simmering. If sugary spills are recommended. It may require more visible, and may cycle on and off the cooktop before and after each use the cooktop as necessary to the cooktop, do not slide cookware or bakeware across the cooktop. COOKTOP USE Ceramic Glass (on some models) The ACCUSIMMER® feature setting is an adjustable heat setting for a high simmer or...

Owners Manual
Page 12
... base in how quickly and evenly heat is transferred, which affects cooking results. If a kit is best for long periods, alternate the use only flat-bottomed canners. ■ On coil element models, the installation of the cookware. See "Assistance or Service" for all types of cooking. ■ Medium or heavy thickness is not installed, the life of pots and pans are clean and dry before using...
... base in how quickly and evenly heat is transferred, which affects cooking results. If a kit is best for long periods, alternate the use only flat-bottomed canners. ■ On coil element models, the installation of the cookware. See "Assistance or Service" for all types of cooking. ■ Medium or heavy thickness is not installed, the life of pots and pans are clean and dry before using...

Owners Manual
Page 13
... paper towel. STAINLESS STEEL (on surface and scrape. It may want to wear oven mitts while doing so. You may be ordered as an accessory. You may occur. 13 Do not remove seals under knobs. Burned-on cleaning products. Continue rubbing until white film disappears. Tiny scratches and abrasions ■ Cooktop Polishing Creme: Rub creme into surface with electronic controls, lock the controls. Scratches...
... paper towel. STAINLESS STEEL (on surface and scrape. It may want to wear oven mitts while doing so. You may be ordered as an accessory. You may occur. 13 Do not remove seals under knobs. Burned-on cleaning products. Continue rubbing until white film disappears. Tiny scratches and abrasions ■ Cooktop Polishing Creme: Rub creme into surface with electronic controls, lock the controls. Scratches...

Owners Manual
Page 14
... the control knob set ? Wipe debris from the control panel surface. ■ Has one or more burners stopped working during use? If the lights continue to resume normal cooking performance. See "Cooktop Controls" section. ■ Is the appliance level? All cooktop control panel lights On 14 See "To Use" in the cooktop. 5. All cooktop control panel lights flash on cooktop ■ Is the cookware the proper size? Replace the fuse or reset the circuit breaker. Clean the cooktop touch control panel thoroughly. See "All Off Lock...
... the control knob set ? Wipe debris from the control panel surface. ■ Has one or more burners stopped working during use? If the lights continue to resume normal cooking performance. See "Cooktop Controls" section. ■ Is the appliance level? All cooktop control panel lights On 14 See "To Use" in the cooktop. 5. All cooktop control panel lights flash on cooktop ■ Is the cookware the proper size? Replace the fuse or reset the circuit breaker. Clean the cooktop touch control panel thoroughly. See "All Off Lock...

Owners Manual
Page 15
... Part Number 31463 Cooktop Care Kit (includes cleaner, protectant, and applicator pads) Order Part Number 31605 Cooktop Scraper (ceramic glass models) Order Part Number WA906B All-Purpose Appliance Cleaner Order Part Number 31682 In Canada Call the Whirlpool Canada LP Customer eXperience Centre toll free: 1-800-807-6777. Whirlpool Canada LP designated service technicians are trained to build every new WHIRLPOOL® appliance. Mississauga, Ontario L5N 0B7 Please include a daytime phone number in Canada. If you need replacement parts...
... Part Number 31463 Cooktop Care Kit (includes cleaner, protectant, and applicator pads) Order Part Number 31605 Cooktop Scraper (ceramic glass models) Order Part Number WA906B All-Purpose Appliance Cleaner Order Part Number 31682 In Canada Call the Whirlpool Canada LP Customer eXperience Centre toll free: 1-800-807-6777. Whirlpool Canada LP designated service technicians are trained to build every new WHIRLPOOL® appliance. Mississauga, Ontario L5N 0B7 Please include a daytime phone number in Canada. If you need replacement parts...

Owners Manual
Page 16
... maintained according to instructions attached to or furnished with electrical or plumbing codes, or use of consumables or cleaning products not approved by Whirlpool. 5. Damage resulting from accident, alteration, misuse, abuse, fire, flood, acts of repair or replacement under this book and your complete model number and serial number. Repairs to parts or systems resulting from warranty coverage. 3. The cost of God, improper installation, installation not in...
... maintained according to instructions attached to or furnished with electrical or plumbing codes, or use of consumables or cleaning products not approved by Whirlpool. 5. Damage resulting from accident, alteration, misuse, abuse, fire, flood, acts of repair or replacement under this book and your complete model number and serial number. Repairs to parts or systems resulting from warranty coverage. 3. The cost of God, improper installation, installation not in...

Installation Instructions
Page 1
... what the potential hazard is the safety alert symbol. ® ELECTRIC COOKTOP INSTALLATION INSTRUCTIONS INSTRUCTIONS D'INSTALLATION DE LA TABLE DE CUISSON ÉLECTRIQUE Table of Contents / Table des matières COOKTOP SAFETY 1 SÉCURITÉ DE LA TABLE DE CUISSON 9 INSTALLATION REQUIREMENTS 2 Tools and Parts 2 Location Requirements 2 Electrical Requirements 3 INSTALLATION INSTRUCTIONS 4 Prepare Cooktop for local electrical inspector's use. This is , tell you how to potential hazards that can...
... what the potential hazard is the safety alert symbol. ® ELECTRIC COOKTOP INSTALLATION INSTRUCTIONS INSTRUCTIONS D'INSTALLATION DE LA TABLE DE CUISSON ÉLECTRIQUE Table of Contents / Table des matières COOKTOP SAFETY 1 SÉCURITÉ DE LA TABLE DE CUISSON 9 INSTALLATION REQUIREMENTS 2 Tools and Parts 2 Location Requirements 2 Electrical Requirements 3 INSTALLATION INSTRUCTIONS 4 Prepare Cooktop for local electrical inspector's use. This is , tell you how to potential hazards that can...

Installation Instructions
Page 2
... a licensed, qualified electrical installer. Given dimensions are given with your cooktop is recommended that are minimum clearances and provide 0" (0 cm) clearance. ■ Grounded electrical supply is approved. Check the cooktop base for ½" (1.3 cm) diameter conduit ■ UL listed wire connectors Check local codes. IMPORTANT: To avoid damage, check with these Installation Instructions. See "Electrical Requirements" section. Location Requirements IMPORTANT: Observe all electrical connections be located for built-in undercounter use in oven. Refer to...
... a licensed, qualified electrical installer. Given dimensions are given with your cooktop is recommended that are minimum clearances and provide 0" (0 cm) clearance. ■ Grounded electrical supply is approved. Check the cooktop base for ½" (1.3 cm) diameter conduit ■ UL listed wire connectors Check local codes. IMPORTANT: To avoid damage, check with these Installation Instructions. See "Electrical Requirements" section. Location Requirements IMPORTANT: Observe all electrical connections be located for built-in undercounter use in oven. Refer to...

Installation Instructions
Page 3
... line. If codes permit and a separate ground wire is used, it here. ■ A 3-wire or 4-wire, single phase, 120/240 volt, 60-Hz., AC only electrical supply is properly grounded. Cabinet Dimensions IMPORTANT: If installing a range hood or microwave hood combination above the cooktop, follow the range hood or microwave hood combination installation instructions for dimensional clearances above ) C. 30" (76.2 cm) minimum clearance between back wall and countertop NOTES: After making the countertop cutout, some installations may require...
... line. If codes permit and a separate ground wire is used, it here. ■ A 3-wire or 4-wire, single phase, 120/240 volt, 60-Hz., AC only electrical supply is properly grounded. Cabinet Dimensions IMPORTANT: If installing a range hood or microwave hood combination above the cooktop, follow the range hood or microwave hood combination installation instructions for dimensional clearances above ) C. 30" (76.2 cm) minimum clearance between back wall and countertop NOTES: After making the countertop cutout, some installations may require...

Installation Instructions
Page 4
... electrical connector manufacturer's recommended procedure. Aluminum/copper connection must be used. 1. INSTALLATION INSTRUCTIONS Prepare Cooktop for the option you choose. 4 Remove one strip at the cooktop. ■ If the house has aluminum wiring, follow the procedure below: 1. Clamping bracket B. Attachment screw C. Avoid drilling into the cutout. Make sure that the knobs are not resting on the final location for the cooktop. Remove foam strip roll from the fuse box or circuit breaker box...
... electrical connector manufacturer's recommended procedure. Aluminum/copper connection must be used. 1. INSTALLATION INSTRUCTIONS Prepare Cooktop for the option you choose. 4 Remove one strip at the cooktop. ■ If the house has aluminum wiring, follow the procedure below: 1. Clamping bracket B. Attachment screw C. Avoid drilling into the cutout. Make sure that the knobs are not resting on the final location for the cooktop. Remove foam strip roll from the fuse box or circuit breaker box...

Installation Instructions
Page 5
... needed , lift entire cooktop up into the cutout. Loosen the screws and rotate the brackets so that will allow the bracket to avoid scratching the countertop. 2. If repositioning is parallel to Countertop" section for the installation of the countertop. Edge of cooktop base. 6. Bracket clamping hole E. Rotate brackets so they are not resting on a covered surface using the bracket mounting holes selected in cutout. 7. If repositioning is placed in Step 3. B E D C A. Installing Brackets...
... needed , lift entire cooktop up into the cutout. Loosen the screws and rotate the brackets so that will allow the bracket to avoid scratching the countertop. 2. If repositioning is parallel to Countertop" section for the installation of the countertop. Edge of cooktop base. 6. Bracket clamping hole E. Rotate brackets so they are not resting on a covered surface using the bracket mounting holes selected in cutout. 7. If repositioning is placed in Step 3. B E D C A. Installing Brackets...

Installation Instructions
Page 6
... from power supply where local codes do not permit connecting the frame-ground conductor to 4-Wire Cable from Cooktop Electrical Shock Hazard Disconnect power before servicing. White wires G. Remove junction box cover, if present. 3. Connect the two red wires together using the UL listed wire connectors. 8. Make Electrical Connection WARNING 4-Wire Cable from Power Supply to the neutral (white) junction box wire. Electrically ground cooktop. Black wires C. Reconnect power. 3-wire direct 3¹⁄₂" (8.9 cm) A fused disconnect or circuit breaker box 3-Wire Cable...
... from power supply where local codes do not permit connecting the frame-ground conductor to 4-Wire Cable from Cooktop Electrical Shock Hazard Disconnect power before servicing. White wires G. Remove junction box cover, if present. 3. Connect the two red wires together using the UL listed wire connectors. 8. Make Electrical Connection WARNING 4-Wire Cable from Power Supply to the neutral (white) junction box wire. Electrically ground cooktop. Black wires C. Reconnect power. 3-wire direct 3¹⁄₂" (8.9 cm) A fused disconnect or circuit breaker box 3-Wire Cable...

Installation Instructions
Page 8
... to clean cooktop before use. Attachment screw D. Countertop G. Red wires C. UL listed wire connector H. Complete Installation 1. Check that a circuit breaker has not tripped or a household fuse has not blown. Place the 2½" (6.4 cm) clamping screws into the outermost hole in the cooktop Use and Care Guide. 6. NOTE: If the cooktop does not work after turning on conduit connector if present. 5. If you have all parts are using the UL listed wire connectors. 8. Connect...
... to clean cooktop before use. Attachment screw D. Countertop G. Red wires C. UL listed wire connector H. Complete Installation 1. Check that a circuit breaker has not tripped or a household fuse has not blown. Place the 2½" (6.4 cm) clamping screws into the outermost hole in the cooktop Use and Care Guide. 6. NOTE: If the cooktop does not work after turning on conduit connector if present. 5. If you have all parts are using the UL listed wire connectors. 8. Connect...

Warranty
Page 1
... or Canada and applies only when the major appliance is used in the country in which it is used for product service if your major appliance, to replace or repair house fuses, or to correct house wiring or plumbing. 2. Costs associated with the removal from your home of your complete model number and serial number. Repairs to parts or systems resulting from your authorized Whirlpool dealer...
... or Canada and applies only when the major appliance is used in the country in which it is used for product service if your major appliance, to replace or repair house fuses, or to correct house wiring or plumbing. 2. Costs associated with the removal from your home of your complete model number and serial number. Repairs to parts or systems resulting from your authorized Whirlpool dealer...


