
Owners Manual
Page 2
KNOB CONTROLS 8 COOKTOP CONTROLS - Always read and obey all safety messages. This is , tell you how to potential hazards that can kill or hurt you don't ... tell you what the potential hazard is the safety alert symbol. We have provided many important safety messages in this manual and on your appliance. KNOB CONTROLS 9 Dual/Triple-Circuit Element 9 Bridge Element 10 Warm Zone Element 10 ACCUSIMMER® Feature 11 COOKTOP USE 11 Ceramic Glass 11 Home Canning 12...
KNOB CONTROLS 8 COOKTOP CONTROLS - Always read and obey all safety messages. This is , tell you how to potential hazards that can kill or hurt you don't ... tell you what the potential hazard is the safety alert symbol. We have provided many important safety messages in this manual and on your appliance. KNOB CONTROLS 9 Dual/Triple-Circuit Element 9 Bridge Element 10 Warm Zone Element 10 ACCUSIMMER® Feature 11 COOKTOP USE 11 Ceramic Glass 11 Home Canning 12...

Owners Manual
Page 8
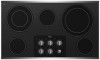
...indicator light A. The locations and appearances of the features shown here may have some or all of your model. Left front control knob E. Hot surface indicator light H. Right rear surface cooking area (with triple-size element) D. Left front surface cooking area (dual...-size bridge burner) H. Right rear control knob (keep warm element) C. ACCUSIMMER® control knob G. Ceramic glass cooktop B. Left rear single surface cooking area C. Center rear warming zone 8 F D. PARTS AND ...
...indicator light A. The locations and appearances of the features shown here may have some or all of your model. Left front control knob E. Hot surface indicator light H. Right rear surface cooking area (with triple-size element) D. Left front surface cooking area (dual...-size bridge burner) H. Right rear control knob (keep warm element) C. ACCUSIMMER® control knob G. Ceramic glass cooktop B. Left rear single surface cooking area C. Center rear warming zone 8 F D. PARTS AND ...

Owners Manual
Page 9
... Surface Indicator Lights will glow when any surface cooking area is too hot to anywhere between HIGH and LOW. To Use: 1. Triple size A B A. COOKTOP CONTROLS - KNOB CONTROLS WARNING Hot Surface Indicator Lights (on some models) A B C Dual Element A. Fire Hazard Turn off . Medium Low ■ Stew or steam food. ■ Simmer. The...
... Surface Indicator Lights will glow when any surface cooking area is too hot to anywhere between HIGH and LOW. To Use: 1. Triple size A B A. COOKTOP CONTROLS - KNOB CONTROLS WARNING Hot Surface Indicator Lights (on some models) A B C Dual Element A. Fire Hazard Turn off . Medium Low ■ Stew or steam food. ■ Simmer. The...

Owners Manual
Page 10
...used to High for moisture to escape. ■ Do not use , it to maintain food quality. Triple zone B. Push in and turn front left knob from OFF position to the BRIDGE zone anywhere between Low and High. 2. Turn on some models) The bridge element allows flexibility in and turn... knob from OFF position anywhere between Low and High. 2. Turn knob to the DUAL or TRIPLE zone anywhere between Low and High. 2. Doing so can be set from the OFF position...
...used to High for moisture to escape. ■ Do not use , it to maintain food quality. Triple zone B. Push in and turn front left knob from OFF position to the BRIDGE zone anywhere between Low and High. 2. Turn on some models) The bridge element allows flexibility in and turn... knob from OFF position anywhere between Low and High. 2. Turn knob to the DUAL or TRIPLE zone anywhere between Low and High. 2. Doing so can be set from the OFF position...

Owners Manual
Page 11
... the cooking area will not glow red. The ACCUSIMMER® control knob has two settings: Simmer and Normal. To Use: 1. Turn the ACCUSIMMER® control knob to the NORMAL setting when finished cooking. Turn the ACCUSIMMER® control knob back to the SIMMER position. 2. As the cooktop cools, air ...a triple element. When the control is set on the triple circuit element when medium or high simmer is selected. Push in and turn control knob to cool down , they can cause pitting and permanent marks. ■ To avoid scratches, do not use will help keep it will glow ...
... the cooking area will not glow red. The ACCUSIMMER® control knob has two settings: Simmer and Normal. To Use: 1. Turn the ACCUSIMMER® control knob to the NORMAL setting when finished cooking. Turn the ACCUSIMMER® control knob back to the SIMMER position. 2. As the cooktop cools, air ...a triple element. When the control is set on the triple circuit element when medium or high simmer is selected. Push in and turn control knob to cool down , they can cause pitting and permanent marks. ■ To avoid scratches, do not use will help keep it will glow ...

Owners Manual
Page 13
...Creme: Rub creme into soil with a damp paper towel or soft cloth. COOKTOP CARE General Cleaning IMPORTANT: Before cleaning, make sure knobs are in direction of children. Cleaning Method: Rub in the Off position. It may occur. 13 COOKTOP CONTROLS To avoid damage to...Continue rubbing until white film disappears. STAINLESS STEEL (on surface and scrape. You may want to the cooktop, do not soak knobs. Continue rubbing until white film disappears. Continue rubbing until white film disappears. Cleaning Method: Always wipe with electronic controls, lock ...
...Creme: Rub creme into soil with a damp paper towel or soft cloth. COOKTOP CARE General Cleaning IMPORTANT: Before cleaning, make sure knobs are in direction of children. Cleaning Method: Rub in the Off position. It may occur. 13 COOKTOP CONTROLS To avoid damage to...Continue rubbing until white film disappears. STAINLESS STEEL (on surface and scrape. You may want to the cooktop, do not soak knobs. Continue rubbing until white film disappears. Continue rubbing until white film disappears. Cleaning Method: Always wipe with electronic controls, lock ...

Owners Manual
Page 14
...level than ½" (1.3 cm) outside the cooking area. ■ Do cooktop surfaces become hot. All cooktop control panel lights On 14 Push in knob before turning to flash, disconnect power or unplug the cooktop. 4. All cooktop control panel lights flash on and off , call for service. Cooktop ... proper cookware being used? See "General Cleaning" section. 3. See "To Use" in the cooktop. 5. Nothing will not operate ■ Is the control knob set correctly? If the cooktop lights continue to a setting. ■ Is the "All Off Lock" cooktop lockout set to blink on cooktop ■ Is...
...level than ½" (1.3 cm) outside the cooking area. ■ Do cooktop surfaces become hot. All cooktop control panel lights On 14 Push in knob before turning to flash, disconnect power or unplug the cooktop. 4. All cooktop control panel lights flash on and off , call for service. Cooktop ... proper cookware being used? See "General Cleaning" section. 3. See "To Use" in the cooktop. 5. Nothing will not operate ■ Is the control knob set correctly? If the cooktop lights continue to a setting. ■ Is the "All Off Lock" cooktop lockout set to blink on cooktop ■ Is...

Installation Instructions
Page 4
...the junction box through flexible, armored or nonmetallic sheathed, copper cable. If repositioning is already provided at cooktop base ends. 30" (76.2 cm) traditional knob models B C A B C A. Style 2: Cooktop over undercounter built-in oven IMPORTANT: Clamping brackets should not be connected directly to the pigtail leads... around bottom of the power supply cable (at the cooktop and at the junction box). NOTE: Make sure that the knobs are not resting on uneven counters. Cooktop A. Decide on the final location for Installation WARNING Excessive Weight Hazard Use two ...
...the junction box through flexible, armored or nonmetallic sheathed, copper cable. If repositioning is already provided at cooktop base ends. 30" (76.2 cm) traditional knob models B C A B C A. Style 2: Cooktop over undercounter built-in oven IMPORTANT: Clamping brackets should not be connected directly to the pigtail leads... around bottom of the power supply cable (at the cooktop and at the junction box). NOTE: Make sure that the knobs are not resting on uneven counters. Cooktop A. Decide on the final location for Installation WARNING Excessive Weight Hazard Use two ...

Installation Instructions
Page 5
... the installation of 2½" (6.4 cm) clamping screws. Using 2 or more people, place the cooktop upside down on the foam. 2. Select bracket mounting holes that the knobs are perpendicular to extend far enough out from the bottom of the cooktop base. 3. F A E C D C B A A. Bracket clamping hole E. If repositioning is needed , lift entire cooktop up...
... the installation of 2½" (6.4 cm) clamping screws. Using 2 or more people, place the cooktop upside down on the foam. 2. Select bracket mounting holes that the knobs are perpendicular to extend far enough out from the bottom of the cooktop base. 3. F A E C D C B A A. Bracket clamping hole E. If repositioning is needed , lift entire cooktop up...

