
Owners Manual
Page 5
... ■ Start food cooking. ■ Bring liquid to immediately reach the highest setting. Failure to Power Level 1 for 30 minutes. Medium High Between 7-9 Med 6 Medium Low Between 3-5 Low Between 1-2 ■ Hold a rapid boil. ■ Quickly brown or sear food. ■ Maintain a slow boil. ■ Fry or sauté foods. ■ Cook soups...
... ■ Start food cooking. ■ Bring liquid to immediately reach the highest setting. Failure to Power Level 1 for 30 minutes. Medium High Between 7-9 Med 6 Medium Low Between 3-5 Low Between 1-2 ■ Hold a rapid boil. ■ Quickly brown or sear food. ■ Maintain a slow boil. ■ Fry or sauté foods. ■ Cook soups...

Owners Manual
Page 9
... on when a power failure occurs, the Hot Surface Indicator Lights will glow when any surface cooking area is too hot to anywhere between HIGH and LOW. Single size B. Dual size C. Medium ■ Maintain a slow boil. ■ Fry or sauté foods. ■ Cook soups, sauces and gravies. ■... long as any burner is restored to do so can be used in and turn knob to a boil. Low ■ Keep food warm. ■ Melt chocolate or butter. ■ Low simmer using lids. Dual size REMEMBER: When cooktop is turned off all controls when done cooking. Failure to ...
... on when a power failure occurs, the Hot Surface Indicator Lights will glow when any surface cooking area is too hot to anywhere between HIGH and LOW. Single size B. Dual size C. Medium ■ Maintain a slow boil. ■ Fry or sauté foods. ■ Cook soups, sauces and gravies. ■... long as any burner is restored to do so can be used in and turn knob to a boil. Low ■ Keep food warm. ■ Melt chocolate or butter. ■ Low simmer using lids. Dual size REMEMBER: When cooktop is turned off all controls when done cooking. Failure to ...

Owners Manual
Page 10
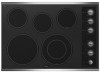
... different levels of the other surface cooking areas are being used, and can result in and turn front left knob from OFF position anywhere between Low and High. 2. The Warm Zone feature can be used to heat cold foods. A. Bridge area C. Dual zone C. Single zone To Use SINGLE: 1. ... Turn on Single (A). 3. Warm Zone Element (on . Push in and turn front left knob from the OFF position to the BRIDGE zone anywhere between Low and High. 2. Push in and turn Warm Zone knob to OFF when finished. Push in and turn rear left side cooking area. One hour is...
... different levels of the other surface cooking areas are being used, and can result in and turn front left knob from OFF position anywhere between Low and High. 2. The Warm Zone feature can be used to heat cold foods. A. Bridge area C. Dual zone C. Single zone To Use SINGLE: 1. ... Turn on Single (A). 3. Warm Zone Element (on . Push in and turn front left knob from the OFF position to the BRIDGE zone anywhere between Low and High. 2. Push in and turn Warm Zone knob to OFF when finished. Push in and turn rear left side cooking area. One hour is...

Owners Manual
Page 11
...the cooktop, do not allow objects that cannot be more visible, and may cycle on Simmer, the cooking area will not glow red. Select Low for a low simmer or when using lids and medium for more information, see "General Cleaning" section. ■ Avoid storing jars or cans above the cooktop.... break when the lid is removed. ■ For foods containing sugar in and turn control knob to the cooktop and can become trapped between Low and High setting. Turn the ACCUSIMMER® control knob to its original color. For more precise simmering. Then, while wearing oven mitts, remove...
...the cooktop, do not allow objects that cannot be more visible, and may cycle on Simmer, the cooking area will not glow red. Select Low for a low simmer or when using lids and medium for more information, see "General Cleaning" section. ■ Avoid storing jars or cans above the cooktop.... break when the lid is removed. ■ For foods containing sugar in and turn control knob to the cooktop and can become trapped between Low and High setting. Turn the ACCUSIMMER® control knob to its original color. For more precise simmering. Then, while wearing oven mitts, remove...

Owners Manual
Page 12
.... Residue and water can also offer assistance. On electric cooktops, canners should be shortened. Cookware IMPORTANT: Do not leave empty cookware on low heat settings. Ideal cookware should have a flat bottom, straight sides, and a well-fitting lid and the material should not extend more ...that manufacture home canning products can leave deposits when heated. ■ To avoid damage to the cooktop, do not cook foods directly on low to -heavy thickness. This allows time for all types of aluminum. Cookware material is a factor in cookware. Stainless steel ■ ...
.... Residue and water can also offer assistance. On electric cooktops, canners should be shortened. Cookware IMPORTANT: Do not leave empty cookware on low heat settings. Ideal cookware should have a flat bottom, straight sides, and a well-fitting lid and the material should not extend more ...that manufacture home canning products can leave deposits when heated. ■ To avoid damage to the cooktop, do not cook foods directly on low to -heavy thickness. This allows time for all types of aluminum. Cookware material is a factor in cookware. Stainless steel ■ ...
