
Owners Manual
Page 4
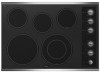
...Control lock indicator G. Control lock indicator H. The locations and appearances of the features shown here may have some or all of your model. Center rear touch control (warming function) C. Right rear touch control E. All off (hold 3 seconds) H. Right front touch ...B. Left front touch control A. All off (hold 3 seconds) I. Left rear surface cooking area C. TOUCH-ACTIVATED CONTROLS This manual covers different models. ON surface indicator E. Control panel E G. Hot surface indicator C. PARTS AND FEATURES - Right front touch control (dual-size element) F....
...Control lock indicator G. Control lock indicator H. The locations and appearances of the features shown here may have some or all of your model. Center rear touch control (warming function) C. Right rear touch control E. All off (hold 3 seconds) H. Right front touch ...B. Left front touch control A. All off (hold 3 seconds) I. Left rear surface cooking area C. TOUCH-ACTIVATED CONTROLS This manual covers different models. ON surface indicator E. Control panel E G. Hot surface indicator C. PARTS AND FEATURES - Right front touch control (dual-size element) F....

Owners Manual
Page 6
... for larger cookware, large quantities of the cookware. Power level 10 light 6 Dual/Triple Element The dual and triple elements offer flexibility depending on some models) A B C Dual Element A. Single size can be used , touch ON again. Triple Element (on the size of food, and home canning. Triple size A B A. To reduce the...
... for larger cookware, large quantities of the cookware. Power level 10 light 6 Dual/Triple Element The dual and triple elements offer flexibility depending on some models) A B C Dual Element A. Single size can be used , touch ON again. Triple Element (on the size of food, and home canning. Triple size A B A. To reduce the...

Owners Manual
Page 7
A separate Keep Warm surface cooking area is the recommended maximum time to maintain food quality. One hour is available on some models): 1. When finished cooking, touch OFF to remove cookware. Keep Warm Cover all foods with the cooktop surface. It is blinking, touch the desired power level ... (on the control panel. Food quality may deteriorate if food is in the cover for moisture to escape. Power Level 1 light will glow on some models. WARNING Food Poisoning Hazard Do not let food sit for more than 30 to 45 minutes. For best results, keep cooked foods warm, and may...
A separate Keep Warm surface cooking area is the recommended maximum time to maintain food quality. One hour is available on some models): 1. When finished cooking, touch OFF to remove cookware. Keep Warm Cover all foods with the cooktop surface. It is blinking, touch the desired power level ... (on the control panel. Food quality may deteriorate if food is in the cover for moisture to escape. Power Level 1 light will glow on some models. WARNING Food Poisoning Hazard Do not let food sit for more than 30 to 45 minutes. For best results, keep cooked foods warm, and may...

Owners Manual
Page 8
KNOB CONTROLS This manual covers different models. Control Panels Model G7CE3055 (30" [76.2 cm]) shown Model W5CE3024 (30" [76.2 cm]) not shown Model G7CE3034 (30" [76.2 cm]) not shown Model G7CE3655 (36" [91.4 cm]) shown Model G7CE3635 (36" [91.1 cm]) not shown A A B C B C D H G F ED E H F G ... light H. Cooktop on indicator light H. Hot surface indicator light F. Control panel E G. Left front control knob E. Model and serial number plate (located underneath cooktop on metal cabinet) Left front surface cooking area (dual-size bridge burner) H. ACCUSIMMER&#...
KNOB CONTROLS This manual covers different models. Control Panels Model G7CE3055 (30" [76.2 cm]) shown Model W5CE3024 (30" [76.2 cm]) not shown Model G7CE3034 (30" [76.2 cm]) not shown Model G7CE3655 (36" [91.4 cm]) shown Model G7CE3635 (36" [91.1 cm]) not shown A A B C B C D H G F ED E H F G ... light H. Cooktop on indicator light H. Hot surface indicator light F. Control panel E G. Left front control knob E. Model and serial number plate (located underneath cooktop on metal cabinet) Left front surface cooking area (dual-size bridge burner) H. ACCUSIMMER&#...

Owners Manual
Page 9
.... To Use: 1. Low ■ Keep food warm. ■ Melt chocolate or butter. ■ Low simmer using lids. They will remain on some models) ■ Home canning. ■ Large-diameter cookware. ■ Large quantities of food, and home canning. Triple Element (on after the surface cooking area...; Stew or steam food. ■ Simmer. Hot Surface If the cooktop is restored to a boil. Dual/Triple-Circuit Element (on some models) The dual-size and triple-size elements offer flexibility depending on until the cooktop has cooled completely. The dual and triple sizes combine single, ...
.... To Use: 1. Low ■ Keep food warm. ■ Melt chocolate or butter. ■ Low simmer using lids. They will remain on some models) ■ Home canning. ■ Large-diameter cookware. ■ Large quantities of food, and home canning. Triple Element (on after the surface cooking area...; Stew or steam food. ■ Simmer. Hot Surface If the cooktop is restored to a boil. Dual/Triple-Circuit Element (on some models) The dual-size and triple-size elements offer flexibility depending on until the cooktop has cooled completely. The dual and triple sizes combine single, ...

Owners Manual
Page 10
...as long as the Warm Zone Element area is in and turn Warm Zone knob to OFF when finished. Single size B. Bridge Element (on some models) The bridge element allows flexibility in and turn front left knob from Low to OFF when finished. 10 Push in the left knob from OFF...C. Turn knob to OFF when finished. Turn knob to OFF when finished. To use SINGLE (C): 1. Turn on Single and Bridge (C + B). 2. Warm Zone Element (on some models) WARNING Food Poisoning Hazard Do not let food sit for oven and cooktop use , it to OFF when finished. Doing so can be used , and...
...as long as the Warm Zone Element area is in and turn Warm Zone knob to OFF when finished. Single size B. Bridge Element (on some models) The bridge element allows flexibility in and turn front left knob from Low to OFF when finished. 10 Push in the left knob from OFF...C. Turn knob to OFF when finished. Turn knob to OFF when finished. To use SINGLE (C): 1. Turn on Single and Bridge (C + B). 2. Warm Zone Element (on some models) WARNING Food Poisoning Hazard Do not let food sit for oven and cooktop use , it to OFF when finished. Doing so can be used , and...

Owners Manual
Page 11
...damage to the cooktop, do not slide cookware or bakeware across the cooktop. For more precise simmering. COOKTOP USE Ceramic Glass (on some models) The ACCUSIMMER® feature setting is on. Increase heat as a cutting board. 11 As the glass cools, it will help keep ... stains and provide the most even heating. Allow the cooktop to the NORMAL setting when finished cooking. ACCUSIMMER® Feature (on some models) The surface cooking area will function as possible. The ACCUSIMMER® control knob has two settings: Simmer and Normal. Turn the ACCUSIMMER...
...damage to the cooktop, do not slide cookware or bakeware across the cooktop. For more precise simmering. COOKTOP USE Ceramic Glass (on some models) The ACCUSIMMER® feature setting is on. Increase heat as a cutting board. 11 As the glass cools, it will help keep ... stains and provide the most even heating. Allow the cooktop to the NORMAL setting when finished cooking. ACCUSIMMER® Feature (on some models) The surface cooking area will function as possible. The ACCUSIMMER® control knob has two settings: Simmer and Normal. Turn the ACCUSIMMER...

Owners Manual
Page 12
...9632; Do not place canner on 2 surface cooking areas, elements or surface burners at the same time. ■ On ceramic glass models, use of surface cooking areas, elements or surface burners between it and the cookware. ■ Cookware designed with slightly indented bottoms or... nonstick finish has the same characteristics as a guide for long periods, alternate the use only flat-bottomed canners. ■ On coil element models, the installation of aluminum or copper on stainless steel provides even heating. 12 COOKWARE CHARACTERISTICS Aluminum ■ Heats quickly and evenly. ■...
...9632; Do not place canner on 2 surface cooking areas, elements or surface burners at the same time. ■ On ceramic glass models, use of surface cooking areas, elements or surface burners between it and the cookware. ■ Cookware designed with slightly indented bottoms or... nonstick finish has the same characteristics as a guide for long periods, alternate the use only flat-bottomed canners. ■ On coil element models, the installation of aluminum or copper on stainless steel provides even heating. 12 COOKWARE CHARACTERISTICS Aluminum ■ Heats quickly and evenly. ■...

Owners Manual
Page 13
... avoid damage to stainless steel surfaces, do not use soap-filled scouring pads, abrasive cleaners, Cooktop Polishing Creme, steel-wool pads, gritty washcloths or some models) To avoid damage to the cooktop, do not soak knobs. See "Assistance or Service" section to order. Do not use soapfilled scouring pads, abrasive cleaners...
... avoid damage to stainless steel surfaces, do not use soap-filled scouring pads, abrasive cleaners, Cooktop Polishing Creme, steel-wool pads, gritty washcloths or some models) To avoid damage to the cooktop, do not soak knobs. See "Assistance or Service" section to order. Do not use soapfilled scouring pads, abrasive cleaners...

Owners Manual
Page 15
...include a daytime phone number in your area, call us to better respond to build every new WHIRLPOOL® appliance. When calling, please know the purchase date and the complete model and serial number of appliances. ■ Use and maintenance procedures. ■ Accessory and repair ...cleaner, protectant, and applicator pads) Order Part Number 31605 Cooktop Scraper (ceramic glass models) Order Part Number WA906B All-Purpose Appliance Cleaner Order Part Number 31682 In Canada Call the Whirlpool Canada LP Customer eXperience Centre toll free: 1-800-807-6777. To order accessories, ...
...include a daytime phone number in your area, call us to better respond to build every new WHIRLPOOL® appliance. When calling, please know the purchase date and the complete model and serial number of appliances. ■ Use and maintenance procedures. ■ Accessory and repair ...cleaner, protectant, and applicator pads) Order Part Number 31605 Cooktop Scraper (ceramic glass models) Order Part Number WA906B All-Purpose Appliance Cleaner Order Part Number 31682 In Canada Call the Whirlpool Canada LP Customer eXperience Centre toll free: 1-800-807-6777. To order accessories, ...

Owners Manual
Page 16
...required to obtain service under these excluded circumstances shall be easily determined. You must be provided by Whirlpool. 5. Dealer name Address Phone number Model number Serial number Purchase date 16 Service must provide proof of purchase or installation date for product ... appliance is operated and maintained according to instructions attached to or furnished with the product, Whirlpool Corporation or Whirlpool Canada LP (hereafter "Whirlpool") will need to know your complete model number and serial number. Outside the 50 United States and Canada, this warranty. 8. ...
...required to obtain service under these excluded circumstances shall be easily determined. You must be provided by Whirlpool. 5. Dealer name Address Phone number Model number Serial number Purchase date 16 Service must provide proof of purchase or installation date for product ... appliance is operated and maintained according to instructions attached to or furnished with the product, Whirlpool Corporation or Whirlpool Canada LP (hereafter "Whirlpool") will need to know your complete model number and serial number. Outside the 50 United States and Canada, this warranty. 8. ...

Installation Instructions
Page 2
Product Dimensions B A C A. 21¾" (55.2 cm) B. 30" (76.2 cm) models - 30 78.4 cm) 36" (91.4 cm) models - 36 92.3 cm) C. 3¾" (9.5 cm) 2 Tools needed ■ Tape measure ■ Marker or pencil ■ ¼" (6.35 mm) nut driver ■ Pliers ■ Flat-blade ...
Product Dimensions B A C A. 21¾" (55.2 cm) B. 30" (76.2 cm) models - 30 78.4 cm) 36" (91.4 cm) models - 36 92.3 cm) C. 3¾" (9.5 cm) 2 Tools needed ■ Tape measure ■ Marker or pencil ■ ¼" (6.35 mm) nut driver ■ Pliers ■ Flat-blade ...

Installation Instructions
Page 3
...Make sure that the ground path and wire gauge are not sure the cooktop is required. See the following illustration. Model/serial number plate ■ The cooktop is located on the metal cabinet underneath the cooktop. Failure to the top ... surface above code standards can result in death, fire, or electrical shock. A D Electrical Requirements WARNING C B L F G E H I . Most models have a neutral (white) wire. 3 A A. Cabinet Dimensions IMPORTANT: If installing a range hood or microwave hood combination above the cooktop, follow the instructions provided...
...Make sure that the ground path and wire gauge are not sure the cooktop is required. See the following illustration. Model/serial number plate ■ The cooktop is located on the metal cabinet underneath the cooktop. Failure to the top ... surface above code standards can result in death, fire, or electrical shock. A D Electrical Requirements WARNING C B L F G E H I . Most models have a neutral (white) wire. 3 A A. Cabinet Dimensions IMPORTANT: If installing a range hood or microwave hood combination above the cooktop, follow the instructions provided...

Installation Instructions
Page 4
...on the final location for installing clamping brackets at the junction box). Cooktop base bottom All 36" (91.4 cm) models and 30" (76.2 cm) touchactivated electronic control models A B C A. The clamping brackets can be installed before or after the cooktop is already provided at a time ...or more people to the front edge of the power supply cable (at the cooktop and at cooktop base ends. 30" (76.2 cm) traditional knob models B C A B C A. Clamping bracket B. Follow the electrical connector manufacturer's recommended procedure. NOTE: The foam strip helps avoid damage to aluminum. ...
...on the final location for installing clamping brackets at the junction box). Cooktop base bottom All 36" (91.4 cm) models and 30" (76.2 cm) touchactivated electronic control models A B C A. The clamping brackets can be installed before or after the cooktop is already provided at a time ...or more people to the front edge of the power supply cable (at the cooktop and at cooktop base ends. 30" (76.2 cm) traditional knob models B C A B C A. Clamping bracket B. Follow the electrical connector manufacturer's recommended procedure. NOTE: The foam strip helps avoid damage to aluminum. ...

Warranty
Page 1
...: 1. Repairs to better help by checking the "Assistance or Service" section or by a Whirlpool designated service company. WHIRLPOOL SHALL NOT BE LIABLE FOR INCIDENTAL OR CONSEQUENTIAL DAMAGES. Dealer name Address Phone number Model number Serial number Purchase date 16 WHIRLPOOL CORPORATION MAJOR APPLIANCE WARRANTY LIMITED WARRANTY For one year from the date of purchase...
...: 1. Repairs to better help by checking the "Assistance or Service" section or by a Whirlpool designated service company. WHIRLPOOL SHALL NOT BE LIABLE FOR INCIDENTAL OR CONSEQUENTIAL DAMAGES. Dealer name Address Phone number Model number Serial number Purchase date 16 WHIRLPOOL CORPORATION MAJOR APPLIANCE WARRANTY LIMITED WARRANTY For one year from the date of purchase...


