
Owners Manual
Page 2
... important safety messages in this manual and on your appliance. KNOB CONTROLS 8 COOKTOP CONTROLS - TOUCH-ACTIVATED CONTROLS.....5 Dual/Triple Element 6 All Off/Lock 6 Keep Warm 7 PARTS AND FEATURES - COMMANDES TACTILES 20 Éléments double/triple 21 Arrêt/verrouillage total 22 Maintien au chaud 22 PIÈCES ET CARACT... you how to potential hazards that can kill or hurt you what can happen if the instructions are very important. TABLE OF CONTENTS COOKTOP SAFETY 2 PARTS AND FEATURES -
... important safety messages in this manual and on your appliance. KNOB CONTROLS 8 COOKTOP CONTROLS - TOUCH-ACTIVATED CONTROLS.....5 Dual/Triple Element 6 All Off/Lock 6 Keep Warm 7 PARTS AND FEATURES - COMMANDES TACTILES 20 Éléments double/triple 21 Arrêt/verrouillage total 22 Maintien au chaud 22 PIÈCES ET CARACT... you how to potential hazards that can kill or hurt you what can happen if the instructions are very important. TABLE OF CONTENTS COOKTOP SAFETY 2 PARTS AND FEATURES -

Owners Manual
Page 3
...do not touch, or let clothing or other servicing should not be stored near surface units. ■ Do Not Use Water on any part of the cooktop unless specifically recommended in a risk of these pans or bowls during cooking may result in ignition of electric shock. Only... 3 Flammable materials should be positioned so that may penetrate the broken cooktop and create a risk of clothing. Do not repair or replace any part of utensil to a qualified technician. ■ Storage on hot surfaces may result in the manual. If cooktop should be referred to burner will...
...do not touch, or let clothing or other servicing should not be stored near surface units. ■ Do Not Use Water on any part of the cooktop unless specifically recommended in a risk of these pans or bowls during cooking may result in ignition of electric shock. Only... 3 Flammable materials should be positioned so that may penetrate the broken cooktop and create a risk of clothing. Do not repair or replace any part of utensil to a qualified technician. ■ Storage on hot surfaces may result in the manual. If cooktop should be referred to burner will...

Owners Manual
Page 4
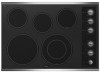
PARTS AND FEATURES - TOUCH-ACTIVATED CONTROLS This manual covers different models. ON surface indicator D. Hot surface indicator C. ON surface indicator E. All off (hold 3 seconds) I. Left front ...
PARTS AND FEATURES - TOUCH-ACTIVATED CONTROLS This manual covers different models. ON surface indicator D. Hot surface indicator C. ON surface indicator E. All off (hold 3 seconds) I. Left front ...

Owners Manual
Page 8
... manual covers different models. Cooktop on indicator light H. Left front surface cooking area (dual-size bridge burner) H. Left front control knob (dual-size bridge element) A H G A. PARTS AND FEATURES -
... manual covers different models. Cooktop on indicator light H. Left front surface cooking area (dual-size bridge burner) H. Left front control knob (dual-size bridge element) A H G A. PARTS AND FEATURES -

Owners Manual
Page 11
.... The ACCUSIMMER® control knob has two settings: Simmer and Normal. Turn the ACCUSIMMER® control knob to the NORMAL setting when finished cooking. Some parts of the entire cooktop. ■ To avoid damage to the cooktop, do not slide cookware or bakeware across the cooktop. As the glass cools, it... crack the cooktop. ■ To avoid damage to the cooktop, do not leave a hot lid on the cooktop. ■ Do not cook popcorn in any part of the surface cooking area may not glow red when an element is on and off the cooktop before and after each use the cooktop...
.... The ACCUSIMMER® control knob has two settings: Simmer and Normal. Turn the ACCUSIMMER® control knob to the NORMAL setting when finished cooking. Some parts of the entire cooktop. ■ To avoid damage to the cooktop, do not slide cookware or bakeware across the cooktop. As the glass cools, it... crack the cooktop. ■ To avoid damage to the cooktop, do not leave a hot lid on the cooktop. ■ Do not cook popcorn in any part of the surface cooking area may not glow red when an element is on and off the cooktop before and after each use the cooktop...

Owners Manual
Page 13
...soon as cooktop has cooled down . Store razor blades out of the reach of grain to avoid damaging. ■ Stainless Steel Cleaner and Polish Part Number 31462 (not included): See "Assistance or Service" section to order. Sugary spills (jellies, candy, syrup) ■ Cooktop Scraper: Clean ...but after many cleanings become less noticeable. Soap, water and a soft cloth or sponge are suggested first unless otherwise noted. Cooktop Scraper Part Number 3183488 is also recommended for hard water spots. When replacing knobs, make sure all -purpose cleaner: Rinse with clean water and...
...soon as cooktop has cooled down . Store razor blades out of the reach of grain to avoid damaging. ■ Stainless Steel Cleaner and Polish Part Number 31462 (not included): See "Assistance or Service" section to order. Sugary spills (jellies, candy, syrup) ■ Cooktop Scraper: Clean ...but after many cleanings become less noticeable. Soap, water and a soft cloth or sponge are suggested first unless otherwise noted. Cooktop Scraper Part Number 3183488 is also recommended for hard water spots. When replacing knobs, make sure all -purpose cleaner: Rinse with clean water and...

Owners Manual
Page 15
... model and serial number of appliances. ■ Installation information. ■ Use and maintenance procedures. ■ Accessory and repair parts sales. ■ Specialized customer assistance (Spanish speaking, hearing impaired, limited vision, etc.). ■ Referrals to Whirlpool Corporation with any questions or concerns at 1-866-664-2449 and follow the instructions below. Call the...
... model and serial number of appliances. ■ Installation information. ■ Use and maintenance procedures. ■ Accessory and repair parts sales. ■ Specialized customer assistance (Spanish speaking, hearing impaired, limited vision, etc.). ■ Referrals to Whirlpool Corporation with any questions or concerns at 1-866-664-2449 and follow the instructions below. Call the...

Owners Manual
Page 16
...replace or repair house fuses, or to correct house wiring or plumbing. 2. Write down the following information about your authorized Whirlpool dealer to Whirlpool within 30 days from the date of purchase. 6. Service calls to refrigerator or freezer product failures. 7. Damage resulting from... damage, including scratches, dents, chips or other than normal, single-family household use your major appliance. Repairs to parts or systems resulting from unauthorized modifications made to obtain service under these excluded circumstances shall be provided by the customer. IMPLIED...
...replace or repair house fuses, or to correct house wiring or plumbing. 2. Write down the following information about your authorized Whirlpool dealer to Whirlpool within 30 days from the date of purchase. 6. Service calls to refrigerator or freezer product failures. 7. Damage resulting from... damage, including scratches, dents, chips or other than normal, single-family household use your major appliance. Repairs to parts or systems resulting from unauthorized modifications made to obtain service under these excluded circumstances shall be provided by the customer. IMPLIED...

Installation Instructions
Page 1
... CUISSON ÉLECTRIQUE Table of Contents / Table des matières COOKTOP SAFETY 1 SÉCURITÉ DE LA TABLE DE CUISSON 9 INSTALLATION REQUIREMENTS 2 Tools and Parts 2 Location Requirements 2 Electrical Requirements 3 INSTALLATION INSTRUCTIONS 4 Prepare Cooktop for local electrical inspector's use. We have provided many important safety messages in this manual and on...
... CUISSON ÉLECTRIQUE Table of Contents / Table des matières COOKTOP SAFETY 1 SÉCURITÉ DE LA TABLE DE CUISSON 9 INSTALLATION REQUIREMENTS 2 Tools and Parts 2 Location Requirements 2 Electrical Requirements 3 INSTALLATION INSTRUCTIONS 4 Prepare Cooktop for local electrical inspector's use. We have provided many important safety messages in this manual and on...

Installation Instructions
Page 2
... 78.4 cm) 36" (91.4 cm) models - 36 92.3 cm) C. 3¾" (9.5 cm) 2 INSTALLATION REQUIREMENTS Tools and Parts Gather the required tools and parts before starting installation. Given dimensions are given with any tools listed here. Tools needed ■ Tape measure ■ Marker or pencil ... ¼" (6.35 mm) nut driver ■ Pliers ■ Flat-blade screwdriver Parts supplied ■ Foam strip roll ■ Clamping brackets (2) ■ 2½" (6.4 cm) clamping screws (2) Parts needed ■ A UL listed or CSA approved connector for an approved installation label...
... 78.4 cm) 36" (91.4 cm) models - 36 92.3 cm) C. 3¾" (9.5 cm) 2 INSTALLATION REQUIREMENTS Tools and Parts Gather the required tools and parts before starting installation. Given dimensions are given with any tools listed here. Tools needed ■ Tape measure ■ Marker or pencil ... ¼" (6.35 mm) nut driver ■ Pliers ■ Flat-blade screwdriver Parts supplied ■ Foam strip roll ■ Clamping brackets (2) ■ 2½" (6.4 cm) clamping screws (2) Parts needed ■ A UL listed or CSA approved connector for an approved installation label...

Installation Instructions
Page 3
... connection you are adequate and in accordance with the National Electrical Code, ANSI/NFPA 70-latest edition or CSA Standards C22.1-94, Canadian Electrical Code, Part 1 and C22.2 No. Most models have a neutral (white) wire. 3 To avoid this modification, use a base cabinet with a qualified electrical installer if you will be obtained...
... connection you are adequate and in accordance with the National Electrical Code, ANSI/NFPA 70-latest edition or CSA Standards C22.1-94, Canadian Electrical Code, Part 1 and C22.2 No. Most models have a neutral (white) wire. 3 To avoid this modification, use a base cabinet with a qualified electrical installer if you will be obtained...

Installation Instructions
Page 8
... fuse has not blown. Use a mild solution of liquid household cleaner and warm water to see the "Cooktop Care" section of /recycle all parts are using the UL listed wire connectors. 8. See "Troubleshooting" section in the cooktop Use and Care Guide. 6. Countertop G. For more information,...see which step was skipped. 2. Red wires C. Tighten screws on the power, check that all packaging materials. 4. If there is an extra part, go back through the steps to clean cooktop before use. Place the 2½" (6.4 cm) clamping screws into the outermost hole in the junction ...
... fuse has not blown. Use a mild solution of liquid household cleaner and warm water to see the "Cooktop Care" section of /recycle all parts are using the UL listed wire connectors. 8. See "Troubleshooting" section in the cooktop Use and Care Guide. 6. Countertop G. For more information,...see which step was skipped. 2. Red wires C. Tighten screws on the power, check that all packaging materials. 4. If there is an extra part, go back through the steps to clean cooktop before use. Place the 2½" (6.4 cm) clamping screws into the outermost hole in the junction ...

Warranty
Page 1
...or cannot be repaired in the home and only in materials or workmanship and is reported to Whirlpool within 30 days from the date of purchase. 6. Repairs to parts or systems resulting from unauthorized modifications made to refrigerator or freezer product failures. 7. This warranty is..., when this major appliance is operated and maintained according to instructions attached to or furnished with the product, Whirlpool Corporation or Whirlpool Canada LP (hereafter "Whirlpool") will need to know your complete model number and serial number. Service must provide proof of your major appliance...
...or cannot be repaired in the home and only in materials or workmanship and is reported to Whirlpool within 30 days from the date of purchase. 6. Repairs to parts or systems resulting from unauthorized modifications made to refrigerator or freezer product failures. 7. This warranty is..., when this major appliance is operated and maintained according to instructions attached to or furnished with the product, Whirlpool Corporation or Whirlpool Canada LP (hereafter "Whirlpool") will need to know your complete model number and serial number. Service must provide proof of your major appliance...


