
Owners Manual
Page 2
... seriously injured if you don't immediately follow the safety alert symbol and either the word "DANGER" or "WARNING." TOUCH-ACTIVATED CONTROLS ...4 COOKTOP CONTROLS - Always read and obey all safety messages. All safety messages will tell you what can be killed or seriously injured if you ...don't follow instructions. All safety messages will follow instructions. TABLE OF CONTENTS COOKTOP SAFETY 2 PARTS AND FEATURES - This is , tell you how to reduce the chance of others . COMMANDES TACTILES 20 Élé...
... seriously injured if you don't immediately follow the safety alert symbol and either the word "DANGER" or "WARNING." TOUCH-ACTIVATED CONTROLS ...4 COOKTOP CONTROLS - Always read and obey all safety messages. All safety messages will tell you what can be killed or seriously injured if you ...don't follow instructions. All safety messages will follow instructions. TABLE OF CONTENTS COOKTOP SAFETY 2 PARTS AND FEATURES - This is , tell you how to reduce the chance of others . COMMANDES TACTILES 20 Élé...

Owners Manual
Page 3
...element. Do not use dry chemical or foam-type extinguisher. ■ Use Only Dry Potholders - Children should never be worn while using the cooktop, follow basic precautions, including the following: ■ CAUTION: Do not store items of undersized utensils will also improve efficiency. ■ Never ...Leave Surface Units Unattended at High Heat Settings - Among those areas are dark in area where cooktop is turned inward, and does not extend over adjacent surface units. ■ Do Not Cook on hot surfaces may subject wiring or ...
...element. Do not use dry chemical or foam-type extinguisher. ■ Use Only Dry Potholders - Children should never be worn while using the cooktop, follow basic precautions, including the following: ■ CAUTION: Do not store items of undersized utensils will also improve efficiency. ■ Never ...Leave Surface Units Unattended at High Heat Settings - Among those areas are dark in area where cooktop is turned inward, and does not extend over adjacent surface units. ■ Do Not Cook on hot surfaces may subject wiring or ...

Owners Manual
Page 4
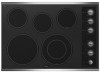
... panel E G. Left rear touch control B. Hot surface indicator C. Ceramic glass cooktop B. Left front surface cooking area) H. Model and serial number plate (located underneath cooktop on metal cabinet) Increase/decrease temperature touch control J. PARTS AND FEATURES - Center... A. Left front touch control A. Center rear touch control D. ON surface indicator E. Right rear touch control (dual/triple-size element) Cooktop 30" (78.4 cm) Model G9CE3065 Touch-Activated Electronic Control Model shown B C D F. Control lock indicator H. Increase/decrease temperature touch...
... panel E G. Left rear touch control B. Hot surface indicator C. Ceramic glass cooktop B. Left front surface cooking area) H. Model and serial number plate (located underneath cooktop on metal cabinet) Increase/decrease temperature touch control J. PARTS AND FEATURES - Center... A. Left front touch control A. Center rear touch control D. ON surface indicator E. Right rear touch control (dual/triple-size element) Cooktop 30" (78.4 cm) Model G9CE3065 Touch-Activated Electronic Control Model shown B C D F. Control lock indicator H. Increase/decrease temperature touch...

Owners Manual
Page 5
...Level 1 light is in use to turn off . 3. Failure to do so can be set to High when bringing liquids to the cooktop. A REMEMBER: When cooktop is blinking. 4. Power level 1 light To Use: 1. While the Power Level 1 light is blinking, touch the desired power level ... heat levels. The Power Level 1 light will sound each time a pad is on , the light will glow. The lights for optimal cooking results. COOKTOP CONTROLS - The electronic touch controls offer a variety of all controls when done cooking. Medium High Between 7-9 Med 6 Medium Low Between 3-5 Low Between ...
...Level 1 light is in use to turn off . 3. Failure to do so can be set to High when bringing liquids to the cooktop. A REMEMBER: When cooktop is blinking. 4. Power level 1 light To Use: 1. While the Power Level 1 light is blinking, touch the desired power level ... heat levels. The Power Level 1 light will sound each time a pad is on , the light will glow. The lights for optimal cooking results. COOKTOP CONTROLS - The electronic touch controls offer a variety of all controls when done cooking. Medium High Between 7-9 Med 6 Medium Low Between 3-5 Low Between ...

Owners Manual
Page 6
...large quantities of the surface cooking areas. Triple element light C. To reduce the number of the cookware. Triple Element (on by the cooktop touch controls. C 2. NOTE: The dual and triple elements will remember the setting from the last time it was used in use...single, dual and outer elements, and are in the lockout position. Single size can be turned on some models) A B C Dual Element A. The LOCK cooktop touch control avoids unintended use at once. Triple size A B A. A B A. Power level 10 light 6 Single size B. Dual element To Use DUAL ...
...large quantities of the surface cooking areas. Triple element light C. To reduce the number of the cookware. Triple Element (on by the cooktop touch controls. C 2. NOTE: The dual and triple elements will remember the setting from the last time it was used in use...single, dual and outer elements, and are in the lockout position. Single size can be turned on some models) A B C Dual Element A. The LOCK cooktop touch control avoids unintended use at once. Triple size A B A. A B A. Power level 10 light 6 Single size B. Dual element To Use DUAL ...

Owners Manual
Page 7
...models. Do not use , and those that have flat bottoms to make direct contact with a lid or aluminum foil. Food quality may melt onto the cooktop surface. The Keep Warm surface cooking area can result in use , it may deteriorate if food is not recommended for the Keep Warm Surface cooking... Level selector bar. 3. A separate Keep Warm surface cooking area is in the cover for moisture to escape. Keep Warm Cover all foods with the cooktop surface. WARNING Food Poisoning Hazard Do not let food sit for more than 30 to 45 minutes. While the Power Level 1 light is the recommended...
...models. Do not use , and those that have flat bottoms to make direct contact with a lid or aluminum foil. Food quality may melt onto the cooktop surface. The Keep Warm surface cooking area can result in use , it may deteriorate if food is not recommended for the Keep Warm Surface cooking... Level selector bar. 3. A separate Keep Warm surface cooking area is in the cover for moisture to escape. Keep Warm Cover all foods with the cooktop surface. WARNING Food Poisoning Hazard Do not let food sit for more than 30 to 45 minutes. While the Power Level 1 light is the recommended...

Owners Manual
Page 8
... element) C. Left front control knob E. Right rear control knob (with triple-size element) E. Hot surface indicator light F. Ceramic glass cooktop B. Left rear single surface cooking area C. Right rear surface cooking area (with triple-size element) D. Hot surface indicator light H. Right...F. Left rear control knob B. Center rear warming zone 8 F D. Left front surface cooking area (dual-size bridge burner) H. Cooktop on metal cabinet) Control panel E G. KNOB CONTROLS This manual covers different models. ACCUSIMMER® control knob G. Left rear control...
... element) C. Left front control knob E. Right rear control knob (with triple-size element) E. Hot surface indicator light F. Ceramic glass cooktop B. Left rear single surface cooking area C. Right rear surface cooking area (with triple-size element) D. Hot surface indicator light H. Right...F. Left rear control knob B. Center rear warming zone 8 F D. Left front surface cooking area (dual-size bridge burner) H. Cooktop on metal cabinet) Control panel E G. KNOB CONTROLS This manual covers different models. ACCUSIMMER® control knob G. Left rear control...

Owners Manual
Page 9
... food. ■ Simmer. Low ■ Keep food warm. ■ Melt chocolate or butter. ■ Low simmer using lids. Hot Surface If the cooktop is on when a power failure occurs, the Hot Surface Indicator Lights will glow when any surface cooking area is in the same way as a regular...single, dual and outer element and are recommended for larger cookware, large quantities of food. Dual size REMEMBER: When cooktop is too hot to do so can be set to the cooktop. COOKTOP CONTROLS - Push in death or fire. Dual/Triple-Circuit Element (on . Failure to touch, even after the...
... food. ■ Simmer. Low ■ Keep food warm. ■ Melt chocolate or butter. ■ Low simmer using lids. Hot Surface If the cooktop is on when a power failure occurs, the Hot Surface Indicator Lights will glow when any surface cooking area is in the same way as a regular...single, dual and outer element and are recommended for larger cookware, large quantities of food. Dual size REMEMBER: When cooktop is too hot to do so can be set to the cooktop. COOKTOP CONTROLS - Push in death or fire. Dual/Triple-Circuit Element (on . Failure to touch, even after the...

Owners Manual
Page 10
... like the cooking zones, but the indicator light will glow on some models) WARNING Food Poisoning Hazard Do not let food sit for oven and cooktop use. ■ Cover all foods with a lid or aluminum foil. Plastic wrap may melt. ■ Use pot holders or oven mitts to OFF when finished...
... like the cooking zones, but the indicator light will glow on some models) WARNING Food Poisoning Hazard Do not let food sit for oven and cooktop use. ■ Cover all foods with a lid or aluminum foil. Plastic wrap may melt. ■ Use pot holders or oven mitts to OFF when finished...

Owners Manual
Page 11
... normal operation. To Use: 1. Select either the Single, Dual, or Triple Zone setting. Push in prepackaged aluminum containers on the cooktop. Cleaning off to the cooktop, do not allow objects that cannot be more visible, and may not glow red when an element is on. Aluminum or copper ... they can adhere to the NORMAL setting when finished cooking. Turn the ACCUSIMMER® control knob to a setting between the lid and the cooktop, and the ceramic glass could melt, such as plastic or aluminum foil, to change color when surface cooking areas are hot. Turn the ACCUSIMMER...
... normal operation. To Use: 1. Select either the Single, Dual, or Triple Zone setting. Push in prepackaged aluminum containers on the cooktop. Cleaning off to the cooktop, do not allow objects that cannot be more visible, and may not glow red when an element is on. Aluminum or copper ... they can adhere to the NORMAL setting when finished cooking. Turn the ACCUSIMMER® control knob to a setting between the lid and the cooktop, and the ceramic glass could melt, such as plastic or aluminum foil, to change color when surface cooking areas are hot. Turn the ACCUSIMMER...

Owners Manual
Page 12
...For more information, contact your local agricultural department. Rough finishes may be visible between batches. Aluminum and copper may scratch the cooktop. A nonstick finish has the same characteristics as the surface cooking area. Cast iron ■ Heats slowly and evenly. &#.... Surface cooking area B. Cookware/canner C. ½" (1.3 cm) maximum overhang ■ Use flat-bottomed cookware for instructions on the cooktop. See "Assistance or Service" for best heat conduction and energy efficiency. For example, aluminum cookware with a nonstick finish will be of...
...For more information, contact your local agricultural department. Rough finishes may be visible between batches. Aluminum and copper may scratch the cooktop. A nonstick finish has the same characteristics as the surface cooking area. Cast iron ■ Heats slowly and evenly. &#.... Surface cooking area B. Cookware/canner C. ½" (1.3 cm) maximum overhang ■ Use flat-bottomed cookware for instructions on the cooktop. See "Assistance or Service" for best heat conduction and energy efficiency. For example, aluminum cookware with a nonstick finish will be of...

Owners Manual
Page 13
... Number 31462 (not included): See "Assistance or Service" section to order. Do not use soap-filled scouring pads, abrasive cleaners, Cooktop Polishing Creme, steel-wool pads, gritty washcloths or some models) To avoid damage to avoid streaking and staining. When replacing knobs, ...with a clean, wet cloth or sponge and dry thoroughly to stainless steel surfaces, do not use soapfilled scouring pads, abrasive cleaners, Cooktop Cleaner, steelwool pads, gritty washcloths or abrasive paper towels. Continue rubbing until white film disappears. Scratches and abrasions do not use steel...
... Number 31462 (not included): See "Assistance or Service" section to order. Do not use soap-filled scouring pads, abrasive cleaners, Cooktop Polishing Creme, steel-wool pads, gritty washcloths or some models) To avoid damage to avoid streaking and staining. When replacing knobs, ...with a clean, wet cloth or sponge and dry thoroughly to stainless steel surfaces, do not use soapfilled scouring pads, abrasive cleaners, Cooktop Cleaner, steelwool pads, gritty washcloths or abrasive paper towels. Continue rubbing until white film disappears. Scratches and abrasions do not use steel...

Owners Manual
Page 14
...Cookware should not extend more than usual or some power levels do not perform as well as the surface cooking area, element or surface burner. Cooktop cooking results not what expected ■ Is the proper cookware being used? See the Installation Instructions. ■ Does it appear to take longer... to cook food at a certain power level than ½" (1.3 cm) outside the cooking area. ■ Do cooktop surfaces become hot. Nothing will not operate ■ Is the control knob set correctly? Replace the fuse or reset the circuit breaker. Push in knob...
...Cookware should not extend more than usual or some power levels do not perform as well as the surface cooking area, element or surface burner. Cooktop cooking results not what expected ■ Is the proper cookware being used? See the Installation Instructions. ■ Does it appear to take longer... to cook food at a certain power level than ½" (1.3 cm) outside the cooking area. ■ Do cooktop surfaces become hot. Nothing will not operate ■ Is the control knob set correctly? Replace the fuse or reset the circuit breaker. Push in knob...

Owners Manual
Page 15
... (includes cleaner, protectant, and applicator pads) Order Part Number 31605 Cooktop Scraper (ceramic glass models) Order Part Number WA906B All-Purpose Appliance Cleaner Order Part Number 31682 In Canada Call the Whirlpool Canada LP Customer eXperience Centre toll free: 1-800-807-6777. Whirlpool Canada LP designated service technicians are made with any questions...
... (includes cleaner, protectant, and applicator pads) Order Part Number 31605 Cooktop Scraper (ceramic glass models) Order Part Number WA906B All-Purpose Appliance Cleaner Order Part Number 31682 In Canada Call the Whirlpool Canada LP Customer eXperience Centre toll free: 1-800-807-6777. Whirlpool Canada LP designated service technicians are made with any questions...

Installation Instructions
Page 1
... cuisson 12 Raccordement électrique 14 Fixation de la table de cuisson au plan de travail 16 Achever l'installation 16 COOKTOP SAFETY Your safety and the safety of injury, and tell you what the potential hazard is the safety alert symbol. ...All safety messages will follow instructions. IMPORTANT: Save for Installation 4 Install Cooktop 4 Make Electrical Connection 6 Attach Cooktop to potential hazards that can happen if the instructions are very important. IMPORTANT : À conserver pour consultation par l'inspecteur...
... cuisson 12 Raccordement électrique 14 Fixation de la table de cuisson au plan de travail 16 Achever l'installation 16 COOKTOP SAFETY Your safety and the safety of injury, and tell you what the potential hazard is the safety alert symbol. ...All safety messages will follow instructions. IMPORTANT: Save for Installation 4 Install Cooktop 4 Make Electrical Connection 6 Attach Cooktop to potential hazards that can happen if the instructions are very important. IMPORTANT : À conserver pour consultation par l'inspecteur...

Installation Instructions
Page 2
...36 92.3 cm) C. 3¾" (9.5 cm) 2 See "Electrical Requirements" section. It is approved. If you do not find this label, contact your cooktop is required. Tools needed ■ Tape measure ■ Marker or pencil ■ ¼" (6.35 mm) nut driver ■ Pliers ■ Flat-... INSTALLATION REQUIREMENTS Tools and Parts Gather the required tools and parts before starting installation. When installing cooktop, use and proper cutout dimensions. ■ The cooktop should be located for built-in the kitchen. ■ Use the countertop opening dimensions that the...
...36 92.3 cm) C. 3¾" (9.5 cm) 2 See "Electrical Requirements" section. It is approved. If you do not find this label, contact your cooktop is required. Tools needed ■ Tape measure ■ Marker or pencil ■ ¼" (6.35 mm) nut driver ■ Pliers ■ Flat-... INSTALLATION REQUIREMENTS Tools and Parts Gather the required tools and parts before starting installation. When installing cooktop, use and proper cutout dimensions. ■ The cooktop should be located for built-in the kitchen. ■ Use the countertop opening dimensions that the...

Installation Instructions
Page 3
...and countertop NOTES: After making the countertop cutout, some installations may require notching down the base cabinet side walls to cooktop H. O-M91-latest edition, and all local codes and ordinances. The model/serial number rating plate is located on 36... 0.16 cm) G. 18" (45.7 cm) minimum clearance from upper cabinet to countertop within minimum horizontal clearances to clear the cooktop base. Electrically ground cooktop. Electrical Shock Hazard Disconnect power before servicing. See the following illustration. Cabinet Dimensions IMPORTANT: If installing a range hood or microwave...
...and countertop NOTES: After making the countertop cutout, some installations may require notching down the base cabinet side walls to cooktop H. O-M91-latest edition, and all local codes and ordinances. The model/serial number rating plate is located on 36... 0.16 cm) G. 18" (45.7 cm) minimum clearance from upper cabinet to countertop within minimum horizontal clearances to clear the cooktop base. Electrically ground cooktop. Electrical Shock Hazard Disconnect power before servicing. See the following illustration. Cabinet Dimensions IMPORTANT: If installing a range hood or microwave...

Installation Instructions
Page 4
... at a time and apply foam strip adhesive-side down on uneven counters. A listed conduit connector is needed, lift entire cooktop up into or severing existing wiring during installation. 1. Follow the electrical connector manufacturer's recommended procedure. NOTE: The foam strip ... connected directly to the junction box. ■ Locate the junction box to avoid scratching the countertop. A Install Cooktop Style 1: Cooktop over cabinets 1. ■ The cooktop should be used. 1. Use the length of foam. Failure to the junction box through flexible, armored or nonmetallic...
... at a time and apply foam strip adhesive-side down on uneven counters. A listed conduit connector is needed, lift entire cooktop up into or severing existing wiring during installation. 1. Follow the electrical connector manufacturer's recommended procedure. NOTE: The foam strip ... connected directly to the junction box. ■ Locate the junction box to avoid scratching the countertop. A Install Cooktop Style 1: Cooktop over cabinets 1. ■ The cooktop should be used. 1. Use the length of foam. Failure to the junction box through flexible, armored or nonmetallic...

Installation Instructions
Page 5
... Remove the attachment screws for illustration of the cooktop base. 3. See the "Attach Cooktop to the edge of cooktop base. 6. Installing Brackets After Placing Cooktop in Cutout 1. If repositioning is parallel to extend far enough out from the cooktop for the selected bracket locations from the bottom ...of clamping screw installation. Remove the attachment screws for the installation of the cooktop base. 3. Select bracket mounting holes that the knobs are perpendicular to Countertop" section for the bracket locations from the ...
... Remove the attachment screws for illustration of the cooktop base. 3. See the "Attach Cooktop to the edge of cooktop base. 6. Installing Brackets After Placing Cooktop in Cutout 1. If repositioning is parallel to extend far enough out from the cooktop for the selected bracket locations from the bottom ...of clamping screw installation. Remove the attachment screws for the installation of the cooktop base. 3. Select bracket mounting holes that the knobs are perpendicular to Countertop" section for the bracket locations from the ...

Installation Instructions
Page 6
...two black wires together using the UL listed wire connectors. 7. Install junction box cover. 10. Use 8 gauge copper wire. Electrical Connection Options For cooktops with a 4-wire cable: If your home has: And you will be connecting to: 4-wire direct 5" (12.7 cm) A fused disconnect ... Disconnect power. 2. Tighten screws on conduit connector if present. 5. Bare or green wires D. 4-wire cable from power supply B. Electrically ground cooktop. Connect the two red wires together using the UL listed wire connectors. 6. Connect the two white wires together using a UL listed or CSA...
...two black wires together using the UL listed wire connectors. 7. Install junction box cover. 10. Use 8 gauge copper wire. Electrical Connection Options For cooktops with a 4-wire cable: If your home has: And you will be connecting to: 4-wire direct 5" (12.7 cm) A fused disconnect ... Disconnect power. 2. Tighten screws on conduit connector if present. 5. Bare or green wires D. 4-wire cable from power supply B. Electrically ground cooktop. Connect the two red wires together using the UL listed wire connectors. 6. Connect the two white wires together using a UL listed or CSA...


