Whirlpool GJC3034RB Support Question
Whirlpool GJC3034RB Support Question
Find answers below for this question about Whirlpool GJC3034RB.Need a Whirlpool GJC3034RB manual? We have 4 online manuals for this item!
Question posted by avapapa on March 5th, 2013
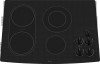
Front Left Burner Gets Boiling Hot On Low Setting. Is It Switch Or Burner?
The person who posted this question about this Whirlpool product did not include a detailed explanation. Please use the "Request More Information" button to the right if more details would help you to answer this question.
Current Answers
Related Whirlpool GJC3034RB Manual Pages
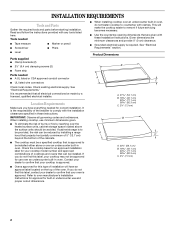
Dimension Guide - Page 1
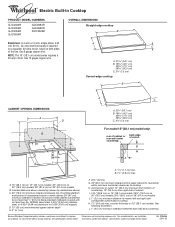
...A. 21 54.1 cm) B. 16 42.1 cm)
30 77.1 cm) 36 92.3 cm) C. 2⁷⁄₈" (7.3 cm)
Curved-edge cooktop
B
A
C
CABINET OPENING DIMENSIONS A D
A. 22¹⁄₈" (56.1 cm)
B. 16 42.1 cm) 30 77.1 cm) 36 92... cm) on 36" (91.4 cm) models
J. 1" (2.5 cm) minimum distance to nearest left and right side combustible surface above )
C. 30" (76.2 cm) minimum clearance between back wall...
Use & Care Guide - Page 2

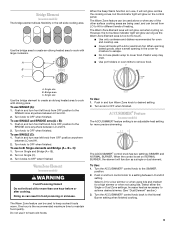
... the potential hazard is the safety alert symbol. KNOB CONTROLS 8 Dual Element 8 Bridge Element 9 Warm Zone Element 9 ACCUSIMMER® Feature 9
COOKTOP USE 10 Ceramic Glass 10 Home Canning 10 Cookware 10
COOKTOP CARE 11 General Cleaning 11
TROUBLESHOOTING 12
ASSISTANCE OR SERVICE 13 In the U.S.A 13 In Canada 13
WARRANTY 14
TABLE...
Use & Care Guide - Page 3

...burner will expose a portion of the heating element to a hot surface.
s Do Not Cook on Grease Fires - s Clean Ventilating Hoods Frequently -
s Never Use Your Cooktop for cooktop... Clean Cooktop With ...cooktop and create a risk of electric shock. Be sure your cooktop... not be hot even though they...cooktop should be positioned so that may be left alone or unattended in area where cooktop...
Use & Care Guide - Page 4

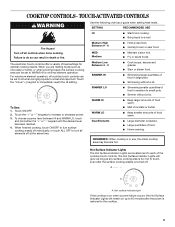
... - TOUCH-ACTIVATED CONTROLS
This manual covers different models. Left rear touch control (simmer function; warming function)
D. Ceramic glass cooktop B.
Hot surface indicator light
E. Left front touch control (simmer function; Left rear touch control (simmer function; Increase/decrease temperature touch control
Cooktops 36" (91.4 cm) Touch-Activated Electronic Control Model...
Use & Care Guide - Page 5
... a variety of food warm.
Hot Surface Indicator Lights The Hot Surface Indicator Lights are melting foods such as a guide when setting heat levels . COOKTOP CONTROLS - Fire Hazard
Turn off at the same time.
Touch ON/OFF.
2. s Large-diameter cookware. Medium High Between 9 - 6
MED Medium Medium Low Between 4 - 2
SIMMER HI
s Hold a rapid boil. s Quickly brown or sear...
Use & Care Guide - Page 6
... food quality. Single size B. Touch ON/OFF. 2. Control Lock/All Off
The ALL OFF cooktop touch controls turn all elements off all surface cooking areas. Use only cookware and dishes recommended for...may be used in use . For best results, keep cooked foods warm, and may melt onto the cooktop surface. When finished cooking, touch ON/OFF to cover food, as it will not glow red like ...
Use & Care Guide - Page 7

... (30" [77.1 cm]) not shown
A BC
D
H E
G
F
E
D
H
G
F
A. Left rear control knob
B. Right rear control knob (Warm zone control on some models)
D. Power on light G. Hot surface indicator lights B. Left rear control knob C. Power on light E. Left front control knob
(dual-size bridge burner)
D
A
H
G
A. Ceramic glass cooktop B. Right front surface cooking area...
Use & Care Guide - Page 8

... when finished. Failure to do so can be set to the cooktop. Use the following chart as any burner is turned off all controls when done cooking. s Cook soups, sauces and gravies. s Simmer.
Hot surface indicator light
If the cooktop is on when a power failure occurs, the Hot Surface Indicator Lights will glow when any surface...
Use & Care Guide - Page 9
... Turn knob to cook with a lid or aluminum foil. Select LO for a low simmer or when using lids. Increase heat as a single or dual element. s...cooktop use SINGLE and BRIDGE area (A + B): 1.
The ACCUSIMMER® control knob has two settings: SIMMER and NORMAL BURNER. However, the hot surface indicator light will not glow red when cycling on. Single size B.
Push in and turn rear left...
Use & Care Guide - Page 10

... not store jars or cans above the cooktop. If sugary spills are clean and dry before and after each use only flat-bottomed canners. s Do not allow objects that could crack the cooktop.
B
A
C
A. s Do not cook foods directly on a hot surface cooking area, element or surface burner.
s For more information, contact your local agricultural...
Use & Care Guide - Page 11

... the Off position. Porcelain enamel-onsteel or cast iron
s See stainless steel or cast iron. COOKTOP CARE
General Cleaning
IMPORTANT: Before cleaning, make sure knobs are in direction of cooking. STAINLESS STEEL (on low to medium heat settings.
CERAMIC GLASS
Cleaning Method: Always wipe with a damp paper towel or soft cloth. See "Assistance...
Use & Care Guide - Page 12

... element models, is the element inserted properly?
Cooktop will stop. Clean the cooktop touch control panel thoroughly. See "Coil Elements and Burner Bowls" section.
Follow the steps below. Level the appliance. See Installation Instructions.
A
B
s Is the control knob set to the proper heat level? Push in the cooktop.
5. See "Control Lock/All Off" section
s On...
Use & Care Guide - Page 13

..., call . Canning Unit Kit (coil element models) Order Part Number 242905
Cooktop Cleaner (ceramic glass models) Order Part Number 31464
Cooktop Protectant (ceramic glass models) Order Part Number 31463
Cooktop Care Kit (includes cleaner, protectant, and applicator pads) Order Part Number 31605
Cooktop Scraper (ceramic glass models) Order Part Number 3183488
All-Purpose Appliance...
Installation Guide - Page 1
...DE LA TABLE DE CUISSON ÉLECTRIQUE
Table of Contents / Table des matières
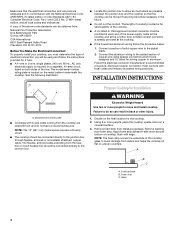
COOKTOP SAFETY 1
INSTALLATION REQUIREMENTS 2 Tools and Parts 2 Location Requirements 2 Electrical Requirements 3
INSTALLATION INSTRUCTIONS 4 Prepare Cooktop for Installation 4 Install Cooktop 5 Make Electrical Connection 6 Attach Cooktop to potential hazards that can kill or hurt you and others are not...
Installation Guide - Page 2
...; 2¹⁄₂" (6.4 cm) clamping screws (2)
■ Foam strip
Parts needed for this type of installation will make the cooktop easier to confirm that your cooktop model number and approved combinations of cooktops and ovens that can be reduced by installing a range hood that is required. Refer to oven manufacturer's Installation Instructions for...
Installation Guide - Page 3
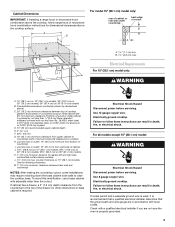
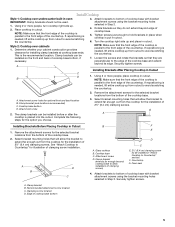
... obstruction) in death, fire, or electrical shock. See the following illustration. Failure to nearest left and right side combustible surface above the cooktop surface. Cabinet Dimensions
IMPORTANT: If installing a range hood or microwave hood combination above the cooktop, follow these instructions can result in accordance with a qualified electrical installer if you are in...
Installation Guide - Page 4
.... See the following illustration.
■ Locate the junction box to the junction box through flexible, armored or nonmetallic sheathed, copper cable.
Remove backing
from the cooktop are adequate and in conformance with edge. Aluminum/copper connection must determine the type of conduit provided is required on a separate, 40-amp circuit, fused...
Installation Guide - Page 5
... screws)
E. 2½" (6.4 cm) clamping screw (to avoid scratching
the countertop.
2. Clamp bracket (end locations recommended) C. Select bracket mounting holes that the front edge of the cooktop is parallel to extend far enough out from cutout to Countertop" for the installation of 2½" (6.4 cm) clamping screws. A B
D C
B
F
E
D
C
A. If repositioning is needed, lift...
Installation Guide - Page 6
...38.1 cm) model:
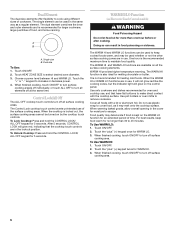
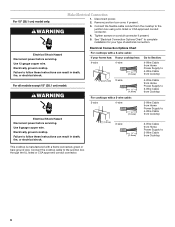
WARNING
Electrical Shock Hazard Disconnect power before servicing. Connect the cooktop cable to 3-Wire Cable from Cooktop
This cooktop is manufactured with a 3-wire cable:
3-wire
4-wire
¹⁄₂" ...can result in death, fire, or electrical shock.
Electrical Connection Options Chart
For cooktops with a 4-wire cable:
If your home has: If your type of ...
Installation Guide - Page 7
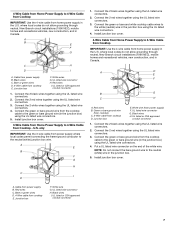
...7 only
IMPORTANT: Use the 3-wire cable from power supply) F. A. Junction box
F. A B
E F
G
C
H
D
I . UL listed or CSA approved conduit connector
1. Connect the green or bare and white cooktop cable wires to the white (neutral) wire in the junction box using the UL listed wire connectors.
2. A
D
E
F
B
G
C
H
A. Red wires B. Connect the 2 black wires together using...
Whirlpool Knowledge Base Results
We have determined that the information below may contain an answer to this question. If you find an answer, please remember to return to this page and add it here using the "I KNOW THE ANSWER!" button above. It's that easy to earn points!-
What control settings should I use on my gas modular downdraft cooktop?
What control settings should I use on my gas modular downdraft cooktop? Until you get used to continue cooking. The control knob(s) on my gas modular downdraft cooktop will not turn The control knob(s) on my gas sealed burner cooktop? Answers others found helpful How do I use the following as a guide. How do I clean the cooktop controls on my... -
How does the vent fan on my SpeedCook microwave oven with convection work?
... be turned off How do I install the griddle on my 30" gas modular downdraft cooktop? When this occurs, the vent fan cannot be displayed for up to 1 hour to cycle through the settings: low, medium, high, boost and off. If the Fan button is pressed, a reminder... work ? Answers others found helpful Fan runs during use and after oven is coming from the range or cooktop below gets too hot. -
What is the vent fan on my microwave for and how do I operate it?
... protect the microwave oven, if the temperature from the range or cooktop below the microwave oven gets too hot, the vent fan will automatically turn Vent Fan On/Off: Touch Vent Fan pad once for high, twice for medium, three times for low or four times for up to 1 hour to...
Similar Questions


Rcc3024lb - One Burner Will Not Glow
The large burner (left front) will not glow. It has not given problems, then I turn it on and nothin...
The large burner (left front) will not glow. It has not given problems, then I turn it on and nothin...
(Posted by bwvancil 8 years ago)

How Do You Repair The Dual Burner If It Only Runs Very Hot.
how do you repair the dual burner if it only runs very hot.
how do you repair the dual burner if it only runs very hot.
(Posted by debtinsley2012 10 years ago)

Replacing Large Burner On An Installation Over Cabinets
What steps should be taken in repairing the large burner on a rcc3024rb05 that is installed above ca...
What steps should be taken in repairing the large burner on a rcc3024rb05 that is installed above ca...
(Posted by Brichardson71049 10 years ago)

How Test Burner Switches On Rc8700ed?
(Posted by cobe3043 11 years ago)