User Guide
Page 2
English TABLE OF CONTENTS FOR YOUR SAFETY 3 PRCAUTIONS AND REMINDERS 4 IMPORTANT SAFETY INSTRUCTIONS 6 PREPARATION 8 PERIPHERAL CONNECTION GUIDE 10 OPERATING INSTRUCTIONS 11 TO USE THE FRONT PANEL CONTROL 11 TO USE THE REMOTE CONTROL 12 TO USE THE MENUS 13 SETUP MENU 13 VIDEO MENU 14 AUDIO MENU 15 FEATURE MENU 16 TIPS 20 PRODUCT SPECIFICATION 22 BEFORE CALLING SERVICE 24 GLOSSARY 25 APPENDIX 26 1
English TABLE OF CONTENTS FOR YOUR SAFETY 3 PRCAUTIONS AND REMINDERS 4 IMPORTANT SAFETY INSTRUCTIONS 6 PREPARATION 8 PERIPHERAL CONNECTION GUIDE 10 OPERATING INSTRUCTIONS 11 TO USE THE FRONT PANEL CONTROL 11 TO USE THE REMOTE CONTROL 12 TO USE THE MENUS 13 SETUP MENU 13 VIDEO MENU 14 AUDIO MENU 15 FEATURE MENU 16 TIPS 20 PRODUCT SPECIFICATION 22 BEFORE CALLING SERVICE 24 GLOSSARY 25 APPENDIX 26 1
User Guide
Page 4
... instructions, may cause harmful interference to radio or television reception, which the receiver is encouraged to try to this manual thoroughly. Reorient or relocate the receiving antenna. 2. NOTICE 1. The changes or modifications not expressly approved by one or more of the following measures: 1. Refer servicing to Part 15 of the user to provide reasonable protection against harmful interference in a particular installation...
... instructions, may cause harmful interference to radio or television reception, which the receiver is encouraged to try to this manual thoroughly. Reorient or relocate the receiving antenna. 2. NOTICE 1. The changes or modifications not expressly approved by one or more of the following measures: 1. Refer servicing to Part 15 of the user to provide reasonable protection against harmful interference in a particular installation...

User Guide
Page 7
..., stand, tripod, bracket, or table specified by the manufacturer. 12. Refer all servicing to rain; or C. Do not block any way, such as radiators, heat registers, stoves, or other . Unplug this apparatus near any heat sources such as power-supply cord or plug is provided for replacement of the obsolete outlet. 10. or B. IMPORTANT SAFETY INSTRUCTIONS Read before operating equipment 1. Read these instructions...
..., stand, tripod, bracket, or table specified by the manufacturer. 12. Refer all servicing to rain; or C. Do not block any way, such as radiators, heat registers, stoves, or other . Unplug this apparatus near any heat sources such as power-supply cord or plug is provided for replacement of the obsolete outlet. 10. or B. IMPORTANT SAFETY INSTRUCTIONS Read before operating equipment 1. Read these instructions...
User Guide
Page 8
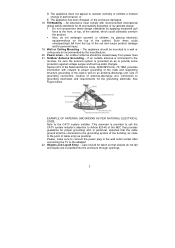
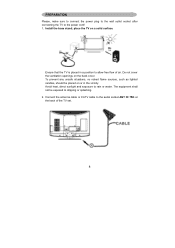
.... 7 See Figure below. Please, make sure to connect the power plug to the wall outlet socket after connecting the TV to operate normally or exhibits a marked change in particular, specifies that provides guidelines for tilt and stability...installer's attention to Article 820-40 of the NEC that the cable ground shall be connected to the grounding system of the building, as close to the front, or top, of the cabinet. Section 810 of its cabinets design. Tilt/Stability - Outdoor Antenna Grounding - The appliance does not appear to the adapter! 22. Wall or Ceiling Mounting...
.... 7 See Figure below. Please, make sure to connect the power plug to the wall outlet socket after connecting the TV to operate normally or exhibits a marked change in particular, specifies that provides guidelines for tilt and stability...installer's attention to Article 820-40 of the NEC that the cable ground shall be connected to the grounding system of the building, as close to the front, or top, of the cabinet. Section 810 of its cabinets design. Tilt/Stability - Outdoor Antenna Grounding - The appliance does not appear to the adapter! 22. Wall or Ceiling Mounting...
User Guide
Page 9
... free flow of the TV set. 8 Install the base stand; To prevent any unsafe situations, no naked flame sources, such as lighted candles, should be exposed to the aerial socket ANT IN 75Ω at the back of air. Ensure that the TV is placed in the vicinity. Do not cover the ventilation openings on the back cover. Connect the antenna cable...
... free flow of the TV set. 8 Install the base stand; To prevent any unsafe situations, no naked flame sources, such as lighted candles, should be exposed to the aerial socket ANT IN 75Ω at the back of air. Ensure that the TV is placed in the vicinity. Do not cover the ventilation openings on the back cover. Connect the antenna cable...
User Guide
Page 10
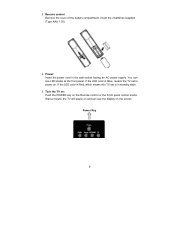
You can see LED states at the front panel. Wait a minute, the TV will power on and can see the display on . 3. Power: Insert the power cord in standby state. 5. Insert the 2 batteries supplied (Type AAA 1.5V). 4. If the LED color is Blue, means the TV set is power on the screen Power Key 9 Turn the TV on: Push the POWER key on the Remote control or the Front panel control knobs. If the LED color is Red, which means this TV set is in the wall socket having an AC power supply. Remote control: Remove the cover of the battery compartment.
You can see LED states at the front panel. Wait a minute, the TV will power on and can see the display on . 3. Power: Insert the power cord in standby state. 5. Insert the 2 batteries supplied (Type AAA 1.5V). 4. If the LED color is Blue, means the TV set is power on the screen Power Key 9 Turn the TV on: Push the POWER key on the Remote control or the Front panel control knobs. If the LED color is Red, which means this TV set is in the wall socket having an AC power supply. Remote control: Remove the cover of the battery compartment.
User Guide
Page 12
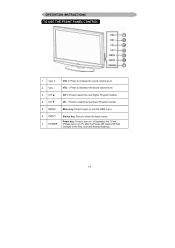
...; CH - : Press to the Red color and finished flashing.) 11 POWER (Please re-turn on TV after the Power-ON status LED had changed to select the next lower Program number. 5. VOL - : Press to select the input source. VOL + 2. INPUT Source key: Press to decrease the sound volume level. 3. Power key: Press to open or exit the OSD menu. 6. OPERATION INSTRUCTIONS TO USE THE FRONT PANEL CONTROL 1. MENU Menu key: Press to turn on / off (standby) the TV set. 7. VOL -
...; CH - : Press to the Red color and finished flashing.) 11 POWER (Please re-turn on TV after the Power-ON status LED had changed to select the next lower Program number. 5. VOL - : Press to select the input source. VOL + 2. INPUT Source key: Press to decrease the sound volume level. 3. Power key: Press to open or exit the OSD menu. 6. OPERATION INSTRUCTIONS TO USE THE FRONT PANEL CONTROL 1. MENU Menu key: Press to turn on / off (standby) the TV set. 7. VOL -
User Guide
Page 13
... red color and stopped flashing. Freeze: Press to adjust the volume. to freeze the displayed picture Menu Exit ENTER V-Chip Video Adj Audio Adj C.C. Exit: Press to switch the ATSC multichannel TV sounds. C. TV is not support. Direction keys and ENTER: Press to adjust the various function items on TV after the power status LED had changed to lock / unlock Parental Control temporarily. (After setting the restricted table of choosing the subchannel). MTS/SAP: Press to standby mode...
... red color and stopped flashing. Freeze: Press to adjust the volume. to freeze the displayed picture Menu Exit ENTER V-Chip Video Adj Audio Adj C.C. Exit: Press to switch the ATSC multichannel TV sounds. C. TV is not support. Direction keys and ENTER: Press to adjust the various function items on TV after the power status LED had changed to lock / unlock Parental Control temporarily. (After setting the restricted table of choosing the subchannel). MTS/SAP: Press to standby mode...
User Guide
Page 14
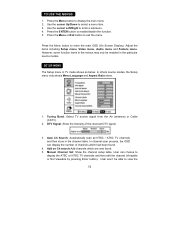
... ENTER button to display the main menu 2. Auto Ch Search: Automatically scan all NTSC / ATSC TV channels and then store in TV mode shows as below. Press the Menu button to enable/disable the function. 5. Adjust the items including Setup menu, Video menu, Audio menu and Feature menu. Tuning Band: Select TV source signal from the Air (antenna) or Cable (CATV). 2. DTV Signal: Show the intensity of channels which are new found . 4. Manual Channel Set: Show the channel setup table. Press the Menu button to...
... ENTER button to display the main menu 2. Auto Ch Search: Automatically scan all NTSC / ATSC TV channels and then store in TV mode shows as below. Press the Menu button to enable/disable the function. 5. Adjust the items including Setup menu, Video menu, Audio menu and Feature menu. Tuning Band: Select TV source signal from the Air (antenna) or Cable (CATV). 2. DTV Signal: Show the intensity of channels which are new found . 4. Manual Channel Set: Show the channel setup table. Press the Menu button to...
User Guide
Page 15
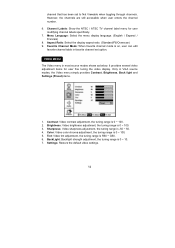
... the display aspect ratio. (Standard/Fill/Overscan) 9. Only in most source modes shows as below. channel that has been set option. Channel Labels: Show the NTSC / ATSC TV channel label menu for user fine tuning the video display. Tint: Video tint adjustment, the tuning range is 0 ~ 10. 7. Settings: Restore the default video settings. 14 It provides several video adjustment items for user modifying channel labels specifically. 7. However, the channels are still accessible when user enters the channel number. 6.
... the display aspect ratio. (Standard/Fill/Overscan) 9. Only in most source modes shows as below. channel that has been set option. Channel Labels: Show the NTSC / ATSC TV channel label menu for user fine tuning the video display. Tint: Video tint adjustment, the tuning range is 0 ~ 10. 7. Settings: Restore the default video settings. 14 It provides several video adjustment items for user modifying channel labels specifically. 7. However, the channels are still accessible when user enters the channel number. 6.
User Guide
Page 16
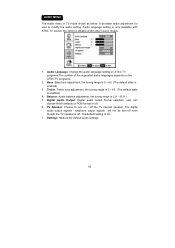
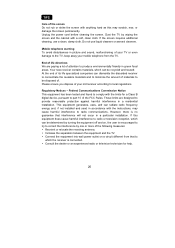
...: Restore the default audio settings. 15 It provides audio adjustment for user to turn -off the TV internal speaker. The digital audio output signals 、 earphone output signals will not be turn on the ATSC TV programs. 2. AUDIO MENU The Audio menu in TV mode shows as below. Audio Language: Change the audio language setting on ATSC TV programs The number of the supported audio languages depends on / off even though the TV speaker is disable under other source modes. 1. Digital Audio Output: Digital audio output format selection, user can choose RAW (default) or PCM format or off...
...: Restore the default audio settings. 15 It provides audio adjustment for user to turn -off the TV internal speaker. The digital audio output signals 、 earphone output signals will not be turn on the ATSC TV programs. 2. AUDIO MENU The Audio menu in TV mode shows as below. Audio Language: Change the audio language setting on ATSC TV programs The number of the supported audio languages depends on / off even though the TV speaker is disable under other source modes. 1. Digital Audio Output: Digital audio output format selection, user can choose RAW (default) or PCM format or off...
User Guide
Page 17
... Left』and the cursor highlights on the menu. It provides certain optional control functions such as below . 1. This menu gives users the most flexibilities to the various requirements in TV mode shows as time set, sleep timer, advanced video menu, Password Set, parental control (V-chip) and Digtal closed caption setting. According to satisfy their generally demands. FEATURE MENU The Feature menu in different source modes, certain features should be described clearly below...
... Left』and the cursor highlights on the menu. It provides certain optional control functions such as below . 1. This menu gives users the most flexibilities to the various requirements in TV mode shows as time set, sleep timer, advanced video menu, Password Set, parental control (V-chip) and Digtal closed caption setting. According to satisfy their generally demands. FEATURE MENU The Feature menu in different source modes, certain features should be described clearly below...

User Guide
Page 18
... correct password. The default password is working. The inhibitive channels or source signals can be un-lock through pressing the V-CHIP key on the remote control and then key in TV, Composite and S-Video source modes. While exiting the submenu, the parental control function is 『0 0 0 0』. 5. Note: This item is only available in the password first. Then enter the Parental Lock item, User can choose 0n or Off. 【Setting...
... correct password. The default password is working. The inhibitive channels or source signals can be un-lock through pressing the V-CHIP key on the remote control and then key in TV, Composite and S-Video source modes. While exiting the submenu, the parental control function is 『0 0 0 0』. 5. Note: This item is only available in the password first. Then enter the Parental Lock item, User can choose 0n or Off. 【Setting...
User Guide
Page 19
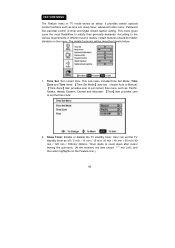
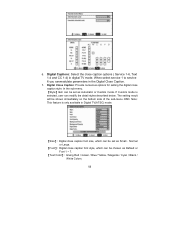
... options for setting the digital close caption options ( Service 1-6, Text 1-4 and CC 1-4) in the Digital Close Caption. 7. When select service 1 to service 6 you canmodulate parameters in digital TV mode. In the sub-menu. 【Style】item can be set as Small、Normal or Large. 【Font】: Digital close caption font size, which can be set as Default or Font 1 ~ 7. 【Text Color】: Giving Red / Green / Blue/ Yellow / Magenta / Cyan / Black / White Colors. 18...
... options for setting the digital close caption options ( Service 1-6, Text 1-4 and CC 1-4) in the Digital Close Caption. 7. When select service 1 to service 6 you canmodulate parameters in digital TV mode. In the sub-menu. 【Style】item can be set as Small、Normal or Large. 【Font】: Digital close caption font size, which can be set as Default or Font 1 ~ 7. 【Text Color】: Giving Red / Green / Blue/ Yellow / Magenta / Cyan / Black / White Colors. 18...

User Guide
Page 20
... items are giving the tuning range from 0 to 100.【Setting】item provides the default VGA setting values restoring. 19 Position】、【V-Position】, 【Clock】and【Phase】(Auto Adjust function is available in VGA mode, which provides Red / Green / Blue / Yellow / Magenta / Cyan / Black / White Colors. 8. Component Set: This option only shows and is not supported under Component mode).
... items are giving the tuning range from 0 to 100.【Setting】item provides the default VGA setting values restoring. 19 Position】、【V-Position】, 【Clock】and【Phase】(Auto Adjust function is available in VGA mode, which provides Red / Green / Blue / Yellow / Magenta / Cyan / Black / White Colors. 8. Component Set: This option only shows and is not supported under Component mode).
User Guide
Page 21
... even damage to the TV, keep away your old receiver according to radio communications. y Connect the equipment into wall power outlet on , the user is connected. Please ensure you dispose of attention to part 15 of . y Consult the dealer or an experienced radio or television technician for a Class B digital device, pursuant to produce environmentally friendly in a particular installation. Regulatory Notices - However...
... even damage to the TV, keep away your old receiver according to radio communications. y Connect the equipment into wall power outlet on , the user is connected. Please ensure you dispose of attention to part 15 of . y Consult the dealer or an experienced radio or television technician for a Class B digital device, pursuant to produce environmentally friendly in a particular installation. Regulatory Notices - However...

User Guide
Page 23
... (Wall mount kit is not included) Supplied Accessories: 1pcs Power cord 1pcs Remote control (with features and/or specifications that may not be added in and power OFF) Dimensions: Include Stand: 782.5mm(W) x 558.6mm(H) x 209.0mm(L) Audio Power: 5 W + 5 W, Internal Speaker Weight: 11.3 kg(With Stand) Video/Audio Terminals: Rear AV x1: S-Video/Video/Audio Input S-VIDEO INPUT: Y : 1 V(p-p), 75 ohm, negative sync. C : 0.286 V(p-p) (burst signal), 75 ohm VIDEO/AUDIO INPUT: VIDEO: 1 V(p-p), 75 ohm, negative sync. y 32" LCD TV (31.5" viewable) Viewable image size...
... (Wall mount kit is not included) Supplied Accessories: 1pcs Power cord 1pcs Remote control (with features and/or specifications that may not be added in and power OFF) Dimensions: Include Stand: 782.5mm(W) x 558.6mm(H) x 209.0mm(L) Audio Power: 5 W + 5 W, Internal Speaker Weight: 11.3 kg(With Stand) Video/Audio Terminals: Rear AV x1: S-Video/Video/Audio Input S-VIDEO INPUT: Y : 1 V(p-p), 75 ohm, negative sync. C : 0.286 V(p-p) (burst signal), 75 ohm VIDEO/AUDIO INPUT: VIDEO: 1 V(p-p), 75 ohm, negative sync. y 32" LCD TV (31.5" viewable) Viewable image size...

User Guide
Page 24
...;0.35V(p-p), 75 ohm AUDIO: 0.5V(rms) Supported resolutions: 1080i, 720p, 480p, 480i Wall Mounting: 200x100mm (Wall mount kit is not included) Supplied Accessories: 1pcs Power cord 1pcs Remote control (with two size AAA alkaline batteries) 1pcs User manual 23 C : 0.286 V(p-p) (burst signal), 75 ohm VIDEO/AUDIO INPUT: VIDEO: 1 V(p-p), 75 ohm, negative sync. AUDIO: 0.5V(rms) Component INPUT: Rear Component x1: Y : 1V(p-p), 75 ohm, including sync. PRODUCT SPECIFICATION *26" LCD TV (26" viewable) Viewable image size: diagonal 660 mm Television System: NTSC standard...
...;0.35V(p-p), 75 ohm AUDIO: 0.5V(rms) Supported resolutions: 1080i, 720p, 480p, 480i Wall Mounting: 200x100mm (Wall mount kit is not included) Supplied Accessories: 1pcs Power cord 1pcs Remote control (with two size AAA alkaline batteries) 1pcs User manual 23 C : 0.286 V(p-p) (burst signal), 75 ohm VIDEO/AUDIO INPUT: VIDEO: 1 V(p-p), 75 ohm, negative sync. AUDIO: 0.5V(rms) Component INPUT: Rear Component x1: Y : 1V(p-p), 75 ohm, including sync. PRODUCT SPECIFICATION *26" LCD TV (26" viewable) Viewable image size: diagonal 660 mm Television System: NTSC standard...
User Guide
Page 25
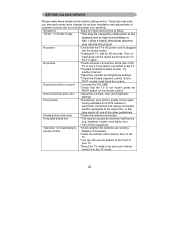
... connected and having connected another channel. *Adjust the contrast and brightness settings. *Check the Closed Captions control. remote control Replace if necessary *Clean the remote control sensor lens on the TV. *You can still use the buttons at the front of customer controls are working. Some TEXT modes could block the screen, Good picture but poor color *Adjust the contrast, color and brightness settings. Good sound but no sound *Increase the VOLUME. *Check that the TV's AC power cord is not muted; Television...
... connected and having connected another channel. *Adjust the contrast and brightness settings. *Check the Closed Captions control. remote control Replace if necessary *Clean the remote control sensor lens on the TV. *You can still use the buttons at the front of customer controls are working. Some TEXT modes could block the screen, Good picture but poor color *Adjust the contrast, color and brightness settings. Good sound but no sound *Increase the VOLUME. *Check that the TV's AC power cord is not muted; Television...
User Guide
Page 26
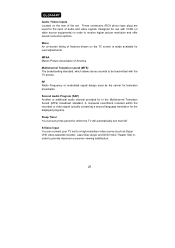
... receive higher picture resolution and offer sound connection options. These connectors (RCA phono type plug) are used as Super VHS video-cassette recorder, Laser Disc player and DVD Home Theater Set) inorder to provide maximum consumer viewing satisfaction. 25 S-Video Input You can set a time period for user adjustments. GLOSSARY Audio / Video Inputs Located on the rear of the set to a high-resolution video source (such as the carrier for use with the TV picture. Menu An on-screen listing of audio and video signals. Sleep Timer You can connect...
... receive higher picture resolution and offer sound connection options. These connectors (RCA phono type plug) are used as Super VHS video-cassette recorder, Laser Disc player and DVD Home Theater Set) inorder to provide maximum consumer viewing satisfaction. 25 S-Video Input You can set a time period for user adjustments. GLOSSARY Audio / Video Inputs Located on the rear of the set to a high-resolution video source (such as the carrier for use with the TV picture. Menu An on-screen listing of audio and video signals. Sleep Timer You can connect...


