User Manual
Page 3
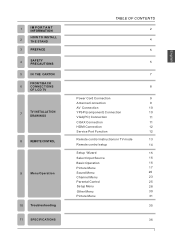
...INFORMATION HOW TO INSTALL 2 THE STAND 3 PREFACE SAFETY 4 PRECAUTIONS 5 IN THE CARTON FRONT/BACK 6 CONNECTIONS OF LCD TV TV INSTALLATI ON 7 DRAWINGS 8 REMOTE CONTROL 9 Menu Operation 10 Troubleshooting 11 SPECIFICATIONS TABLE OF CONTENTS 2 4 5 5 7 8 Power Cord Connection 9 Antenna Connection 9 AV Connection 10 YPbPr(component...10 VGA(PC) Connection 11 COAX Connection 11 HDMI Connection 12 Service Port Function 12 Remote control instructions in TV mode 13 Remote control setup 14 Setup Wizard 15 Select Input Source 16 Basic Operation 16 Picture Menu ...
...INFORMATION HOW TO INSTALL 2 THE STAND 3 PREFACE SAFETY 4 PRECAUTIONS 5 IN THE CARTON FRONT/BACK 6 CONNECTIONS OF LCD TV TV INSTALLATI ON 7 DRAWINGS 8 REMOTE CONTROL 9 Menu Operation 10 Troubleshooting 11 SPECIFICATIONS TABLE OF CONTENTS 2 4 5 5 7 8 Power Cord Connection 9 Antenna Connection 9 AV Connection 10 YPbPr(component...10 VGA(PC) Connection 11 COAX Connection 11 HDMI Connection 12 Service Port Function 12 Remote control instructions in TV mode 13 Remote control setup 14 Setup Wizard 15 Select Input Source 16 Basic Operation 16 Picture Menu ...
User Manual
Page 9
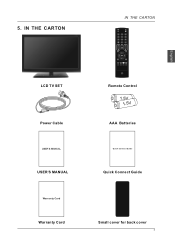
5. IN THE CARTON LCD TV SET Power Cable USER'S MANUAL Warranty Card Warranty Card IN THE CARTON PO WE R MU TE DI SP LAY AS PE CT ME NU EX IT OK EN TE R SL EE P SO UR CE CC FAV LIST MTS Remote Control 1.5V 1.5V AAA Batteries Quick Connect Guide Quick Connect Guide Small cover for back cover 7 English
5. IN THE CARTON LCD TV SET Power Cable USER'S MANUAL Warranty Card Warranty Card IN THE CARTON PO WE R MU TE DI SP LAY AS PE CT ME NU EX IT OK EN TE R SL EE P SO UR CE CC FAV LIST MTS Remote Control 1.5V 1.5V AAA Batteries Quick Connect Guide Quick Connect Guide Small cover for back cover 7 English
User Manual
Page 10
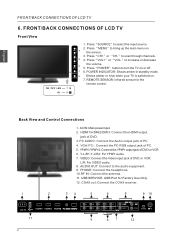
...DVD. 3. VGA(PC): Connect the PC-RGB output jack of DVD or VCR. 6. Press"CH+"or "CH-"to increase or decrease the volume. 5. REMOTE SENSOR: infrared sensor for Factory Use Only. 12. YPbPr1/YPbPr2: Connect the YPbPr output jack of PC. 5. VIDEO: Connect the Video input jack of DVD...12 Press"SOURCE"to the audio equipment. 9. POWER INDICATOR: Shows amber in standby mode. AC IN: Main power input. 2. USB SERVICE: USB Port for the remote control. 7 6 Back View and Control Connections 1. English FRONT/BACK CONNECTIONS OF LCD TV 6. Press "MENU"to turn the TV on or off. 6. Press"...
...DVD. 3. VGA(PC): Connect the PC-RGB output jack of DVD or VCR. 6. Press"CH+"or "CH-"to increase or decrease the volume. 5. REMOTE SENSOR: infrared sensor for Factory Use Only. 12. YPbPr1/YPbPr2: Connect the YPbPr output jack of PC. 5. VIDEO: Connect the Video input jack of DVD...12 Press"SOURCE"to the audio equipment. 9. POWER INDICATOR: Shows amber in standby mode. AC IN: Main power input. 2. USB SERVICE: USB Port for the remote control. 7 6 Back View and Control Connections 1. English FRONT/BACK CONNECTIONS OF LCD TV 6. Press "MENU"to turn the TV on or off. 6. Press"...

User Manual
Page 12
... Connect the VIDEO and AUDIO output jack of the DVD or VCR to the VIDEO jacks on the set using the SOURCE button on the remote control. 5 Y1 Pb1 Pr1 Y-R1 Y-L1 Video Cable TV Back VIDEO R L DVD or VCR Back DVD or VCR YPbPr(Component) Connection Connect the YPbPr output... jack colors: Video is yellow, Audio left is white and Audio right in red. compared to connecting a regular VCR to the YPbPr input on the remote control. TV Back TV Back YPbPr cable AUDIO cable Y Pb Pr R L DVD or VCR Back DVD or VCR 10 YPbPr cable AUDIO cable Y Pb Pr...
... Connect the VIDEO and AUDIO output jack of the DVD or VCR to the VIDEO jacks on the set using the SOURCE button on the remote control. 5 Y1 Pb1 Pr1 Y-R1 Y-L1 Video Cable TV Back VIDEO R L DVD or VCR Back DVD or VCR YPbPr(Component) Connection Connect the YPbPr output... jack colors: Video is yellow, Audio left is white and Audio right in red. compared to connecting a regular VCR to the YPbPr input on the remote control. TV Back TV Back YPbPr cable AUDIO cable Y Pb Pr R L DVD or VCR Back DVD or VCR 10 YPbPr cable AUDIO cable Y Pb Pr...
User Manual
Page 13
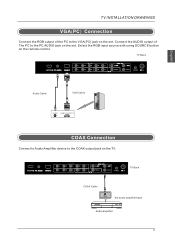
TV INSTALLATION DRAWINGS VGA(PC) Connection Connect the RGB output of The PC to the PC AUDIO jack on the set . Connect the AUDIO output of the PC to the COAX output jack on the remote control. TV Back 5 English Audio Cable VGA Cable AUDIO RGB-PC OUTPUT COAX Connection Connect to Audio Amplifier device to the VGA(PC) jack on the set . TV Back 5 COAX Cable COAX the audio amplifier back Audio amplifier 11 Select the RGB input source with using SOURCE button on the TV.
TV INSTALLATION DRAWINGS VGA(PC) Connection Connect the RGB output of The PC to the PC AUDIO jack on the set . Connect the AUDIO output of the PC to the COAX output jack on the remote control. TV Back 5 English Audio Cable VGA Cable AUDIO RGB-PC OUTPUT COAX Connection Connect to Audio Amplifier device to the VGA(PC) jack on the set . TV Back 5 COAX Cable COAX the audio amplifier back Audio amplifier 11 Select the RGB input source with using SOURCE button on the TV.
User Manual
Page 15
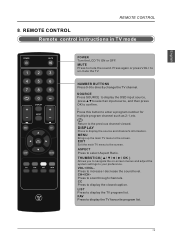
... TV menu to your preference. THUMBSTICK OK ) Allows you to navigate the on-screen menus and adjust the system settings to the screen. English REMOTE CONTROL 8.REMOTE CONTROL Remote control instructions in TV mode POWER MUTE DISPLAY ASPECT MENU EXIT OK ENTER SLEEP SOURCE CC FAV LI ST MT S POWER Turn the LCD...
... TV menu to your preference. THUMBSTICK OK ) Allows you to navigate the on-screen menus and adjust the system settings to the screen. English REMOTE CONTROL 8.REMOTE CONTROL Remote control instructions in TV mode POWER MUTE DISPLAY ASPECT MENU EXIT OK ENTER SLEEP SOURCE CC FAV LI ST MT S POWER Turn the LCD...

User Manual
Page 16
Open the cover. 2. Replace the battery cover. English REMOTE CONTROL Remote control setup 1. rtment markings . 3. Install all batteries correctly, and as marked on the batteries line up correctly with compa. To prevent battery leakage which may result in bodily injury or damage to the remote: 1. Uses three A size batteries.When inserting the batteries, make sure correct polarities "+"and "-" marks on the remote control. 2. Do not mix batteries:(OLD and NEW or CARBON and ALKALINE, etc) Remove batteries when the remote is not used for a long period of time. 14
Open the cover. 2. Replace the battery cover. English REMOTE CONTROL Remote control setup 1. rtment markings . 3. Install all batteries correctly, and as marked on the batteries line up correctly with compa. To prevent battery leakage which may result in bodily injury or damage to the remote: 1. Uses three A size batteries.When inserting the batteries, make sure correct polarities "+"and "-" marks on the remote control. 2. Do not mix batteries:(OLD and NEW or CARBON and ALKALINE, etc) Remove batteries when the remote is not used for a long period of time. 14
User Manual
Page 17
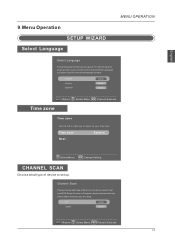
... Spanish Enter Enter Enter MENU :Return :Select Menu :Press to Execute Time zone Time zone Use the left or right key to set up your remote control and select the Language you want to select on your TV.
... Spanish Enter Enter Enter MENU :Return :Select Menu :Press to Execute Time zone Time zone Use the left or right key to set up your remote control and select the Language you want to select on your TV.
User Manual
Page 36
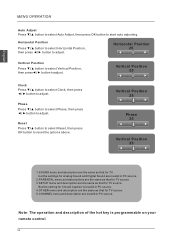
... above. Reset Press ▼/▲ button to select Reset, then press OK button to adjust. But the setting for Closed Caption is programmable on your remote control. 34 Horizontal Position Press ▼/▲ button to select Horizontal Position, then press ◄/► button to select Vertical Position, then press◄/►...
... above. Reset Press ▼/▲ button to select Reset, then press OK button to adjust. But the setting for Closed Caption is programmable on your remote control. 34 Horizontal Position Press ▼/▲ button to select Horizontal Position, then press ◄/► button to select Vertical Position, then press◄/►...
User Manual
Page 37
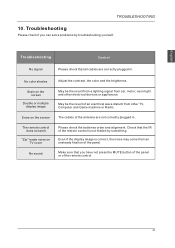
... is not hidden by troubleshooting yourself. Stain on TV cover Please check the batteries order and alignment. Snow on the screen The cables of the remote control is correct, the noise may come from an unsteady fixation of an electrical wave disturb from car, motor, neon light and other TV, Computer... and Game machine or Radio. The remote control does not work "Zip" made noise on the screen Double or multiple display image May be the result of the panel.
... is not hidden by troubleshooting yourself. Stain on TV cover Please check the batteries order and alignment. Snow on the screen The cables of the remote control is correct, the noise may come from an unsteady fixation of an electrical wave disturb from car, motor, neon light and other TV, Computer... and Game machine or Radio. The remote control does not work "Zip" made noise on the screen Double or multiple display image May be the result of the panel.


