User Manual
Page 2
Français Español English TABLE OF CONTENTS IMPORTANT SAFETY AND PRECAUTIONS 1 Important Information...1 Safety Precautions...2 Important Safety Instructions 4 GENERAL INFORMATION 6 Feature...6 Controls and Ports of the Panel 7 Accessories ...9 Remote Control...10 INSTALLATION AND FUNCTION ADJUSTMENT 12 Installation...12 How to remove the BASE 15 Function adjustment ...16 TROUBLESHOOTING ...31 PC INPUT PRESET TIMMING TABLE 34 PRODUCT SPECIFICATION 35 I
Français Español English TABLE OF CONTENTS IMPORTANT SAFETY AND PRECAUTIONS 1 Important Information...1 Safety Precautions...2 Important Safety Instructions 4 GENERAL INFORMATION 6 Feature...6 Controls and Ports of the Panel 7 Accessories ...9 Remote Control...10 INSTALLATION AND FUNCTION ADJUSTMENT 12 Installation...12 How to remove the BASE 15 Function adjustment ...16 TROUBLESHOOTING ...31 PC INPUT PRESET TIMMING TABLE 34 PRODUCT SPECIFICATION 35 I
User Manual
Page 4
...Do not leave stationary images, patterns, PIP windows, or letterbox images on the screen for prolonged periods of time as this type of copyrighted TV programs is not covered under warranty. To prevent this may void the user's authority to , potentially hazardous display output: side bar images,...game patterns, closed captioning, channel logos and letterbox black bars. Certain Canadian programs may also be copyrighted and any service issues to the LCD panel. This type of damage is an infringement of electric shock. Although we produce panels with more than 99.9% active cells, there...
...Do not leave stationary images, patterns, PIP windows, or letterbox images on the screen for prolonged periods of time as this type of copyrighted TV programs is not covered under warranty. To prevent this may void the user's authority to , potentially hazardous display output: side bar images,...game patterns, closed captioning, channel logos and letterbox black bars. Certain Canadian programs may also be copyrighted and any service issues to the LCD panel. This type of damage is an infringement of electric shock. Although we produce panels with more than 99.9% active cells, there...
User Manual
Page 5
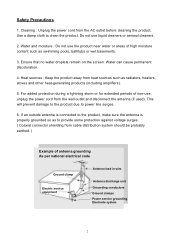
Water and moisture : Do not use the product near water or areas of non-use liquid cleaners or aerosol cleaners. 2. Do not use , unplug the power cord from cable distribution system should be probably earthed. ) Example of antenna grounding As per national electrical code Ground clamp Electric service equipment Antenna lead in wire Antenna discharge unit Grounding conductors Ground clamps Power service grounding Electrode system 2 Water can cause permanent discoloration. 4. This will prevent damage to the product due to clean the product. For added protection during a lightning ...
Water and moisture : Do not use the product near water or areas of non-use liquid cleaners or aerosol cleaners. 2. Do not use , unplug the power cord from cable distribution system should be probably earthed. ) Example of antenna grounding As per national electrical code Ground clamp Electric service equipment Antenna lead in wire Antenna discharge unit Grounding conductors Ground clamps Power service grounding Electrode system 2 Water can cause permanent discoloration. 4. This will prevent damage to the product due to clean the product. For added protection during a lightning ...
User Manual
Page 6
... 11. When installing an outside antenna system should not be fatal. 3 Stand : Do not place the product on a rolling cart. During the LCD panel lifespan it can block ventilation openings. Use care when moving the product on an unstable cart, stand, tripod or table. Use only a cart,... stand, tripod, bracket or table recommended by the manufacturer. 8. The LCD panel used in the vicinity of the product. Don't place the product in an enclosed environment. Use only mounting hardware recommended by the manufacturer or...
... 11. When installing an outside antenna system should not be fatal. 3 Stand : Do not place the product on a rolling cart. During the LCD panel lifespan it can block ventilation openings. Use care when moving the product on an unstable cart, stand, tripod or table. Use only a cart,... stand, tripod, bracket or table recommended by the manufacturer. 8. The LCD panel used in the vicinity of the product. Don't place the product in an enclosed environment. Use only mounting hardware recommended by the manufacturer or...
User Manual
Page 7
Do not install near water. 6. A polarized plug has two blades with dry cloth. 7. Only use caution when moving the cart/apparatus combination to avoid injury from the apparatus. 11. Follow all warnings. 4. If the provided plug does not fit into your safety. Read these instructions. 3. Heed all instructions. 5. Do not block any heat sources such as radiators, heat registers, stoves, or other . A grounding type plug has two blades and a third grounding prong. The wide blade or the third prong are provided by your outlet, consult an electrician for replacement of the ...
Do not install near water. 6. A polarized plug has two blades with dry cloth. 7. Only use caution when moving the cart/apparatus combination to avoid injury from the apparatus. 11. Follow all warnings. 4. If the provided plug does not fit into your safety. Read these instructions. 3. Heed all instructions. 5. Do not block any heat sources such as radiators, heat registers, stoves, or other . A grounding type plug has two blades and a third grounding prong. The wide blade or the third prong are provided by your outlet, consult an electrician for replacement of the ...
User Manual
Page 8
Unplug the apparatus during lightening storms or when unused for long periods of time. 14. Refer all servicing to rain or moisture, does not operate normally, or has dropped. 5 Français Español English 13. Servicing is required when the apparatus has been damaged in an way, such as power-supply cord is damaged, liquid has been spilled or objects have fallen into apparatus, the apparatus has been exposed to qualified service personnel.
Unplug the apparatus during lightening storms or when unused for long periods of time. 14. Refer all servicing to rain or moisture, does not operate normally, or has dropped. 5 Français Español English 13. Servicing is required when the apparatus has been damaged in an way, such as power-supply cord is damaged, liquid has been spilled or objects have fallen into apparatus, the apparatus has been exposed to qualified service personnel.
User Manual
Page 9
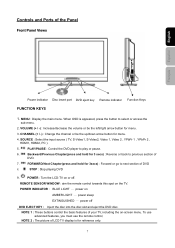
GENERAL INFORMATION Feature Your TV is designed with the latest technology and is a high-performance unit that includes the following special feature : ‹ Multi-sources input included RF IN, D-SUB, ... picture possible. ‹ Provided multi-channel sound decoder for stereo and bilingual broadcasts. ‹ Automatic sleep timer control. ‹ Component video input for high definition TV programming (HDTV ready), resolution up to 720p, 1080i. 6
GENERAL INFORMATION Feature Your TV is designed with the latest technology and is a high-performance unit that includes the following special feature : ‹ Multi-sources input included RF IN, D-SUB, ... picture possible. ‹ Provided multi-channel sound decoder for stereo and bilingual broadcasts. ‹ Automatic sleep timer control. ‹ Component video input for high definition TV programming (HDTV ready), resolution up to 720p, 1080i. 6
User Manual
Page 10
... or be the up/down arrow button for menu. 3. PLAY/PAUSE : Control the DVD player to play or pause. 6. POWER : Turn the LCD-TV on AMBER LIGHT ─ power sleep EXTINGUISHED ─ power off . STOP : Stop playing DVD 9. POWER INDICATOR : BLUE LIGHT ─ power ...MENU : Display the main menu. SOURCE : Select the input source ( TV, S-Video1, S-Video2, Video 1, Video 2 , YPbPr 1 , YPbPr 2 , HDMI1, HDMI2, PC ). 5. To use advanced features, you must use the remote control. Controls and Ports of LCD TV display is appeared, press the button to select or access the sub-menu...
... or be the up/down arrow button for menu. 3. PLAY/PAUSE : Control the DVD player to play or pause. 6. POWER : Turn the LCD-TV on AMBER LIGHT ─ power sleep EXTINGUISHED ─ power off . STOP : Stop playing DVD 9. POWER INDICATOR : BLUE LIGHT ─ power ...MENU : Display the main menu. SOURCE : Select the input source ( TV, S-Video1, S-Video2, Video 1, Video 2 , YPbPr 1 , YPbPr 2 , HDMI1, HDMI2, PC ). 5. To use advanced features, you must use the remote control. Controls and Ports of LCD TV display is appeared, press the button to select or access the sub-menu...
User Manual
Page 11
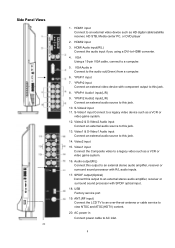
... Audio1 input(L/R) 9. Video1 input Connect the Composite video to a legacy video device such as a VCR or video game system. 16. ANT.(RF input) Connect the LCD TV to an over-the-air antenna or cable service to an external video device such as HD digital cable/satellite receiver, HD STB, Media center...
... Audio1 input(L/R) 9. Video1 input Connect the Composite video to a legacy video device such as a VCR or video game system. 16. ANT.(RF input) Connect the LCD TV to an over-the-air antenna or cable service to an external video device such as HD digital cable/satellite receiver, HD STB, Media center...
User Manual
Page 13
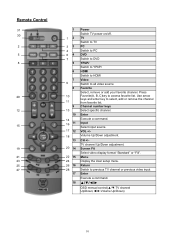
... favorite list. Use arrow keys and enter key to access favorite list. Channel number keys Select specific channel. CH +/TV channel Up/Down adjustment. TV Switch to TV PC Switch to PC DVD Switch to DVD YPbPr Switch to YPbPr HDMI Switch to HDMI Video Switch to previous...Enter Execute a command. VOL +/Volume Up/Down adjustment. Screen Fit Select video display format "Standard" or "Fill". OSD menual control(▲/▼:TV channel Up/Down;◄/►:Volume Up/Down) 10 Input Select input source. Menu Display the User setup menu. Enter Execute a command. Remote Control...
... favorite list. Use arrow keys and enter key to access favorite list. Channel number keys Select specific channel. CH +/TV channel Up/Down adjustment. TV Switch to TV PC Switch to PC DVD Switch to DVD YPbPr Switch to YPbPr HDMI Switch to HDMI Video Switch to previous...Enter Execute a command. VOL +/Volume Up/Down adjustment. Screen Fit Select video display format "Standard" or "Fill". OSD menual control(▲/▼:TV channel Up/Down;◄/►:Volume Up/Down) 10 Input Select input source. Menu Display the User setup menu. Enter Execute a command. Remote Control...
User Manual
Page 14
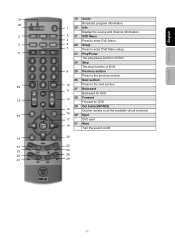
Display the source and channel information. 2 3 21 DVD Menu 4 Press to enter DVD Menu. 5 6 22 Setup 7 Press to enter DVD Menu setup. 8 23 Play/Pause The play/pause function of DVD. 24 Stop The stop function of DVD. 9 25 Previous section Press to the previous section. 26 Next section 29 10 Press to the next section. 11 27 Backward Backward for DVD. 12 13 28 Forward Forward for DVD. 29 Dot bbutton(NOTES) 14 Quicker access to all the available virtual channels 15 16 30 Eject 17 DVD eject 18 31 Mute Turn the sound on/off. 19 20 21 22 23 24 25 26 27 28 11...
Display the source and channel information. 2 3 21 DVD Menu 4 Press to enter DVD Menu. 5 6 22 Setup 7 Press to enter DVD Menu setup. 8 23 Play/Pause The play/pause function of DVD. 24 Stop The stop function of DVD. 9 25 Previous section Press to the previous section. 26 Next section 29 10 Press to the next section. 11 27 Backward Backward for DVD. 12 13 28 Forward Forward for DVD. 29 Dot bbutton(NOTES) 14 Quicker access to all the available virtual channels 15 16 30 Eject 17 DVD eject 18 31 Mute Turn the sound on/off. 19 20 21 22 23 24 25 26 27 28 11...
User Manual
Page 15
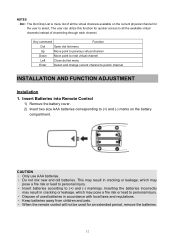
Inserting the batteries incorrectly may result in accordance with local laws and regulations. ‧ Keep batteries away from children and pets. ‧ When the remote control will not be used for an extended period, remove the batteries. 12 Key command Function Dot Open dot list menu Up Move point to previous virtual channel Down Move point to next virtual channel Left Close dot list menu Enter Select and change current channel to select. CAUTION ‧ Only use AAA batteries. ‧ Do not mix new and old batteries. The user can utilize this function for the user ...
Inserting the batteries incorrectly may result in accordance with local laws and regulations. ‧ Keep batteries away from children and pets. ‧ When the remote control will not be used for an extended period, remove the batteries. 12 Key command Function Dot Open dot list menu Up Move point to previous virtual channel Down Move point to next virtual channel Left Close dot list menu Enter Select and change current channel to select. CAUTION ‧ Only use AAA batteries. ‧ Do not mix new and old batteries. The user can utilize this function for the user ...
User Manual
Page 17
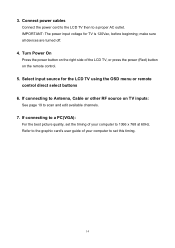
...select buttons 6. Turn Power On Press the power button on the right side of your computer to set the timing of the LCD TV, or press the power (Red) button on TV inputs: See page 19 to a proper AC outlet. If connecting to Antenna, Cable or other RF source on the remote control.... 5. make sure all devices are turned off. 4. Select input source for TV is 120Vac, before beginning; If connecting to a PC(VGA): For the best picture quality, set this timing. 14 Connect power cables Connect the power cord...
...select buttons 6. Turn Power On Press the power button on the right side of your computer to set the timing of the LCD TV, or press the power (Red) button on TV inputs: See page 19 to a proper AC outlet. If connecting to Antenna, Cable or other RF source on the remote control.... 5. make sure all devices are turned off. 4. Select input source for TV is 120Vac, before beginning; If connecting to a PC(VGA): For the best picture quality, set this timing. 14 Connect power cables Connect the power cord...
User Manual
Page 18
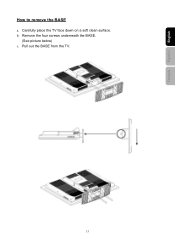
Carefully place the TV face down on a soft clean surface. b. Pull out the BASE from the TV. 15 Français Español English How to remove the BASE a. Remove the four screws underneath the BASE. (See picture below) c.
Carefully place the TV face down on a soft clean surface. b. Pull out the BASE from the TV. 15 Français Español English How to remove the BASE a. Remove the four screws underneath the BASE. (See picture below) c.
User Manual
Page 19
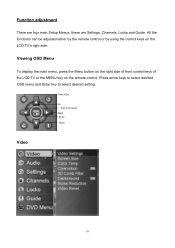
Viewing OSD Menu To display the main menu, press the Menu button on the right side of front control keys of the LCD TV or the MENU key on the LCD TV's right side. Function adjustment There are Settings, Channels, Locks and Guide. Press arrow keys to select desired OSD menu and Enter key to previous Right Enter Down Video 16 Menu/Exit Up Exit to select desired setting. All the functions can be adjusted either by the remote control or by using the control keys on the remote control. these are four main Setup Menus;
Viewing OSD Menu To display the main menu, press the Menu button on the right side of front control keys of the LCD TV or the MENU key on the LCD TV's right side. Function adjustment There are Settings, Channels, Locks and Guide. Press arrow keys to select desired OSD menu and Enter key to previous Right Enter Down Video 16 Menu/Exit Up Exit to select desired setting. All the functions can be adjusted either by the remote control or by using the control keys on the remote control. these are four main Setup Menus;

User Manual
Page 20
Cool/Neutral/Warm/User 3D Comb Filter: Press arrow keys to select or adjust your preferred settings. Off/Low/Medium/High 17 Off/Low/Medium/High Temporal NR: Press arrow keys to select or adjust your preferred settings. DONE button to handle different picture formats. Français Español English Video settings: Press arrow keys to select or adjust your preferred color temperature settings. Standard/Fill/Overscan Color Temp.: Press arrow keys to select or adjust your favorite picture settings. Screen Fit: Adjust your TV screen to close picture setting menu.
Cool/Neutral/Warm/User 3D Comb Filter: Press arrow keys to select or adjust your preferred settings. Off/Low/Medium/High 17 Off/Low/Medium/High Temporal NR: Press arrow keys to select or adjust your preferred settings. DONE button to handle different picture formats. Français Español English Video settings: Press arrow keys to select or adjust your preferred color temperature settings. Standard/Fill/Overscan Color Temp.: Press arrow keys to select or adjust your favorite picture settings. Screen Fit: Adjust your TV screen to close picture setting menu.
User Manual
Page 21
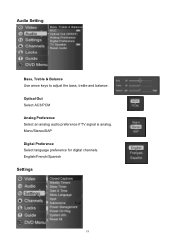
Optical Out Select AC3/PCM Analog Preference Select an analog audio preference if TV signal is analog. Mono/Stereo/SAP Digital Preference Select language preference for digital channels. Audio Setting Bass, Treble & Balance Use arrow keys to adjust the bass, treble and balance. English/French/Spanish Settings 18
Optical Out Select AC3/PCM Analog Preference Select an analog audio preference if TV signal is analog. Mono/Stereo/SAP Digital Preference Select language preference for digital channels. Audio Setting Bass, Treble & Balance Use arrow keys to adjust the bass, treble and balance. English/French/Spanish Settings 18
User Manual
Page 22
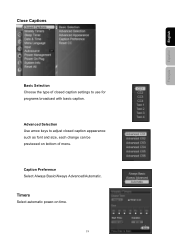
Français Español English Close Captions Basic Selection Choose the type of menu. Advanced Selection Use arrow keys to adjust closed caption settings to use for programs broadcast with basic caption. Timers Select automatic power-on bottom of closed caption appearance such as font and size, each change can be previewed on time. 19 Caption Preference Select Always Basic/Always Advanced/Automatic.
Français Español English Close Captions Basic Selection Choose the type of menu. Advanced Selection Use arrow keys to adjust closed caption settings to use for programs broadcast with basic caption. Timers Select automatic power-on bottom of closed caption appearance such as font and size, each change can be previewed on time. 19 Caption Preference Select Always Basic/Always Advanced/Automatic.
User Manual
Page 23
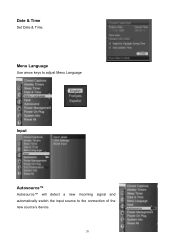
Date & Time Set Date & Time. Menu Language Use arrow keys to adjust Menu Language Input Autosource™ Autosource™ will detect a new incoming signal and automatically switch the input source to the connection of the new source's device. 20
Date & Time Set Date & Time. Menu Language Use arrow keys to adjust Menu Language Input Autosource™ Autosource™ will detect a new incoming signal and automatically switch the input source to the connection of the new source's device. 20
User Manual
Page 24
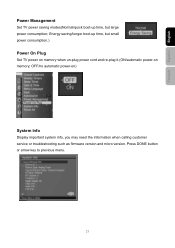
Press DONE button or arrow key to previous menu. 21 Energy saving/longer boot-up time, but small power consumption.) Power On Plug Set TV power on memory when un-plug power cord and re-plug it.(ON/automatic power-on ) System Info Display important system info, you may need the information when calling customer service or troubleshooting such as firmware version and micro version. OFF/no automatic power-on memory; Français Español English Power Management Set TV power saving modes(Normal/quick boot-up time, but large power consumption;
Press DONE button or arrow key to previous menu. 21 Energy saving/longer boot-up time, but small power consumption.) Power On Plug Set TV power on memory when un-plug power cord and re-plug it.(ON/automatic power-on ) System Info Display important system info, you may need the information when calling customer service or troubleshooting such as firmware version and micro version. OFF/no automatic power-on memory; Français Español English Power Management Set TV power saving modes(Normal/quick boot-up time, but large power consumption;