
User Manual
Page 4
English TABLE OF CONTENTS BASIC OPERATIONS 22 TURNING THE POWER ON AND OFF 22 ADJUSTING THE VOLUME 22 CHANGING CHANNELS 23 SELECTING THE INPUT SOURCE 23 ADJUSTING THE DISPLAY FORMAT 24 ADJUSTING THE LCD BACKLIGHT 24 SETUP MENUS 25 SETUP MENU OPERATION 25 PICTURE 26 AUDIO 30 VIEW MODE 33 VIEW MODE (VGA 33 CHANNELS 35 SETTINGS 40 WALL MOUNT OPTION 51 WALL MOUNT INSTALLATION REMINDERS 51 TROUBLESHOOTING 52 SPECIFICATIONS 55 ii
English TABLE OF CONTENTS BASIC OPERATIONS 22 TURNING THE POWER ON AND OFF 22 ADJUSTING THE VOLUME 22 CHANGING CHANNELS 23 SELECTING THE INPUT SOURCE 23 ADJUSTING THE DISPLAY FORMAT 24 ADJUSTING THE LCD BACKLIGHT 24 SETUP MENUS 25 SETUP MENU OPERATION 25 PICTURE 26 AUDIO 30 VIEW MODE 33 VIEW MODE (VGA 33 CHANNELS 35 SETTINGS 40 WALL MOUNT OPTION 51 WALL MOUNT INSTALLATION REMINDERS 51 TROUBLESHOOTING 52 SPECIFICATIONS 55 ii
User Manual
Page 23
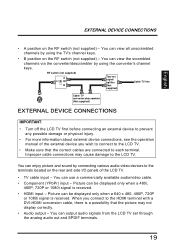
...cable, there is a possibility that the correct cables are connected to each terminal. You can enjoy picture and sound by using the converter's channel keys. You can output audio signals from the LCD TV set signal splitter (Not supplied) Cable TV line Cable TV converter/descrambler (Not supplied) ...by connecting various audio-video devices to the LCD TV. RF switch (not supplied) A OUT IN B Two-set through the analog audio out and SPDIF terminals. 19 When you wish to connect to the LCD TV. • Make sure that the picture may cause damage to the terminals located ...
...cable, there is a possibility that the correct cables are connected to each terminal. You can enjoy picture and sound by using the converter's channel keys. You can output audio signals from the LCD TV set signal splitter (Not supplied) Cable TV line Cable TV converter/descrambler (Not supplied) ...by connecting various audio-video devices to the LCD TV. RF switch (not supplied) A OUT IN B Two-set through the analog audio out and SPDIF terminals. 19 When you wish to connect to the LCD TV. • Make sure that the picture may cause damage to the terminals located ...

User Manual
Page 24
... Antenna cable 3.5 mm stereo PC Audio mini jack cable Video RGB cable * If your external device has a component terminal, COMPONENT connection is recommended (high-quality pictures can be viewed) Audio (L) Audio (R) Audio cable Y Component cable Pb Pr SPDIF cable AUDIO OUT Audio amplifier Audio output terminal 20 English EXTERNAL DEVICE CONNECTIONS...
... Antenna cable 3.5 mm stereo PC Audio mini jack cable Video RGB cable * If your external device has a component terminal, COMPONENT connection is recommended (high-quality pictures can be viewed) Audio (L) Audio (R) Audio cable Y Component cable Pb Pr SPDIF cable AUDIO OUT Audio amplifier Audio output terminal 20 English EXTERNAL DEVICE CONNECTIONS...
User Manual
Page 28
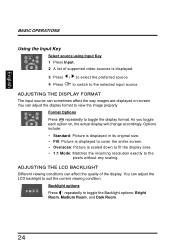
... viewing condition. As you toggle each option on -screen. Backlight options Press repeatedly to toggle the display format. ADJUSTING THE LCD BACKLIGHT Different viewing conditions can sometimes affect the way images are displayed on , the actual display will change accordingly. English BASIC...: Bright Room, Medium Room, and Dark Room. 24 Options include: • Standard: Picture is displayed in its original size. • Fill: Picture is displayed to cover the entire screen. • Overscan: Picture is displayed. 3 Press / to select the preferred source. 4 Press to switch to...
... viewing condition. As you toggle each option on -screen. Backlight options Press repeatedly to toggle the display format. ADJUSTING THE LCD BACKLIGHT Different viewing conditions can sometimes affect the way images are displayed on , the actual display will change accordingly. English BASIC...: Bright Room, Medium Room, and Dark Room. 24 Options include: • Standard: Picture is displayed in its original size. • Fill: Picture is displayed to cover the entire screen. • Overscan: Picture is displayed. 3 Press / to select the preferred source. 4 Press to switch to...

User Manual
Page 30
English SETUP MENUS PICTURE Use the Picture sub-menus to save and exit the screen. 26 Brightness Adjusting Brightness 1 Use the / keys to select Brightness and press...on the remote control or Menu on the remote control to adjust the option level. 3 Press to display the Picture sub-menu. Contrast Adjusting Contrast 1 Use the / keys to select Contrast and press . 2 Press the .../ keys on the control panel to display the setup menu screen then select Picture to save and exit the screen. Brightness Use Brightness to darkness ratio. Contrast Use Contrast to adjust the ...
English SETUP MENUS PICTURE Use the Picture sub-menus to save and exit the screen. 26 Brightness Adjusting Brightness 1 Use the / keys to select Brightness and press...on the remote control or Menu on the remote control to adjust the option level. 3 Press to display the Picture sub-menu. Contrast Adjusting Contrast 1 Use the / keys to select Contrast and press . 2 Press the .../ keys on the control panel to display the setup menu screen then select Picture to save and exit the screen. Brightness Use Brightness to darkness ratio. Contrast Use Contrast to adjust the ...

User Manual
Page 31
... to adjust the color intensity. Video Presets Showroom Movie Game Sports Custom The following options are available: • Showroom: Increased color and sharpness for a vibrant picture display. • Movie: Images are displayed as accurately near to select one of four preset view options optimized for viewing sports events. • Custom: Customize...
... to adjust the color intensity. Video Presets Showroom Movie Game Sports Custom The following options are available: • Showroom: Increased color and sharpness for a vibrant picture display. • Movie: Images are displayed as accurately near to select one of four preset view options optimized for viewing sports events. • Custom: Customize...

User Manual
Page 32
Color Temparture Warm Neutral Cool There are three available settings: • Warm: Pictures appear more reddish. • Neutral: Pictures appear more white. • Cool: Pictures appear with a bluish tint. 28 Color Temperature Color temperature refers to save and exit the screen. English SETUP MENUS Adjusting Video Presets 1 Use the / keys ...
Color Temparture Warm Neutral Cool There are three available settings: • Warm: Pictures appear more reddish. • Neutral: Pictures appear more white. • Cool: Pictures appear with a bluish tint. 28 Color Temperature Color temperature refers to save and exit the screen. English SETUP MENUS Adjusting Video Presets 1 Use the / keys ...

User Manual
Page 33
... the desired option. 3 Press to adjust the balance of the red, green, and blue colors in the display. Reset NOTE: The configuration settings for the Picture sub-menus will only be applied to save and exit the screen. Hue Adjusting Hue 1 Use the / keys to select Hue and press . 2 Press the...
... the desired option. 3 Press to adjust the balance of the red, green, and blue colors in the display. Reset NOTE: The configuration settings for the Picture sub-menus will only be applied to save and exit the screen. Hue Adjusting Hue 1 Use the / keys to select Hue and press . 2 Press the...

User Manual
Page 37
... available: • 1:1 Mode: Matches the incoming resolution exactly to the pixels without any scaling. • Standard: Picture is displayed in its original size. • Fill: Picture is scaled down to fit the display area. Press on the remote control or Menu on the control panel to display...Mode sub-menu. The following options: • 1:1 Mode: Matches the incoming resolution exactly to the pixels without any scaling. • Standard: Picture is displayed in VGA mode. Press on the remote control or Menu on the control panel to display the setup menu screen then select View...
... available: • 1:1 Mode: Matches the incoming resolution exactly to the pixels without any scaling. • Standard: Picture is displayed in its original size. • Fill: Picture is scaled down to fit the display area. Press on the remote control or Menu on the control panel to display...Mode sub-menu. The following options: • 1:1 Mode: Matches the incoming resolution exactly to the pixels without any scaling. • Standard: Picture is displayed in VGA mode. Press on the remote control or Menu on the control panel to display the setup menu screen then select View...

User Manual
Page 38
Position Use this sub-menu to synchronize the display automatically. 16:9 A Auto Sync 34 Position Fine Tune Use this sub-menu to fine tune the display. 16:9 A Fine Tune Auto Sync Use this sub-menu to fit the display area. 16:9 A Aspect Ratio 1:1 Mode Standard Fill Overscan H. Position Use this sub-menu to adjust the display's vertical position. 16:9 A V. Position V. English SETUP MENUS • Overscan: Picture is scaled down to adjust the display's horizontal position. 16:9 A H.
Position Use this sub-menu to synchronize the display automatically. 16:9 A Auto Sync 34 Position Fine Tune Use this sub-menu to fine tune the display. 16:9 A Fine Tune Auto Sync Use this sub-menu to fit the display area. 16:9 A Aspect Ratio 1:1 Mode Standard Fill Overscan H. Position Use this sub-menu to adjust the display's vertical position. 16:9 A V. Position V. English SETUP MENUS • Overscan: Picture is scaled down to adjust the display's horizontal position. 16:9 A H.

User Manual
Page 56
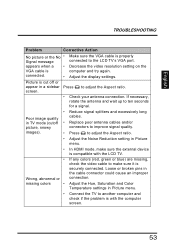
... for a list of remote codes. • Make sure the video input cable is properly connected to verify that it is supplying the proper voltage. No picture Corrective Action • Make sure the power indicator is illuminated blue. • Make sure the power cord is securely connected to reset your password. •...
... for a list of remote codes. • Make sure the video input cable is properly connected to verify that it is supplying the proper voltage. No picture Corrective Action • Make sure the power indicator is illuminated blue. • Make sure the power cord is securely connected to reset your password. •...
User Manual
Page 57
...the Aspect ratio. • Adjust the Noise Reduction setting in Picture menu. • • Wrong, abnormal or missing colors • In HDMI mode, make sure it is with the LCD TV. Loose or broken pins in Picture menu. • Connect the TV to improve signal quality. Decrease... the video resolution setting on the computer and try again. English TROUBLESHOOTING Problem Corrective Action No picture or the No • Signal message ...
...the Aspect ratio. • Adjust the Noise Reduction setting in Picture menu. • • Wrong, abnormal or missing colors • In HDMI mode, make sure it is with the LCD TV. Loose or broken pins in Picture menu. • Connect the TV to improve signal quality. Decrease... the video resolution setting on the computer and try again. English TROUBLESHOOTING Problem Corrective Action No picture or the No • Signal message ...

