
User Manual
Page 2
Français Español English TABLE OF CONTENTS IMPORTANT SAFETY AND PRECAUTIONS 1 Important Information...1 Safety Precautions...2 GENERAL INFORMATION 4 Feature...4 Controls and Ports of the Panel 5 Accessories ...7 Remote Control...8 INSTALLATION & FUNCTION ADJUSTMENT 10 Installation...10 How to remove the Base 13 Function Adjustment ...14 TROUBLESHOOTING ...25 PC INPUT PRESET TIMMING TABLE 29 PRODUCT SPECIFICATION 30 I
Français Español English TABLE OF CONTENTS IMPORTANT SAFETY AND PRECAUTIONS 1 Important Information...1 Safety Precautions...2 GENERAL INFORMATION 4 Feature...4 Controls and Ports of the Panel 5 Accessories ...7 Remote Control...8 INSTALLATION & FUNCTION ADJUSTMENT 10 Installation...10 How to remove the Base 13 Function Adjustment ...14 TROUBLESHOOTING ...25 PC INPUT PRESET TIMMING TABLE 29 PRODUCT SPECIFICATION 30 I
User Manual
Page 7
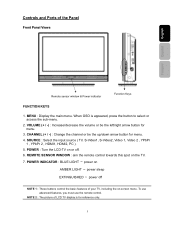
NOTE 2 : The picture of the Panel Front Panel Views Français Español English Remote sensor window & Power indicator Function Keys FUNCTION KEYS 1. Controls and Ports of LCD TV display is appeared, press the button to select or access the sub-menu. 2. CHANNEL (+ /.... 4. SOURCE : Select the input source ( TV, S-Video1, S-Video2, Video 1, Video 2 , YPbPr 1 , YPbPr 2 , HDMI1, HDMI2, PC ). 5. POWER : Turn the LCD-TV on -screen menu. When OSD is for reference only. 5 To use advanced features, you must use the remote control. VOLUME (+ / -) : Increase/decrease ...
NOTE 2 : The picture of the Panel Front Panel Views Français Español English Remote sensor window & Power indicator Function Keys FUNCTION KEYS 1. Controls and Ports of LCD TV display is appeared, press the button to select or access the sub-menu. 2. CHANNEL (+ /.... 4. SOURCE : Select the input source ( TV, S-Video1, S-Video2, Video 1, Video 2 , YPbPr 1 , YPbPr 2 , HDMI1, HDMI2, PC ). 5. POWER : Turn the LCD-TV on -screen menu. When OSD is for reference only. 5 To use advanced features, you must use the remote control. VOLUME (+ / -) : Increase/decrease ...
User Manual
Page 10
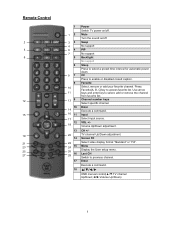
... channel. Screen Fit Select video display format "Standard" or "Fill". Remote Control 2 5 8 12 15 19 21 23 25 27 1 1 2 3 3 4 6 4 7 5 6 9 7 8 10 11 13 9 10 14 16 11 17 12 18 13 20 14 22 24 15 26 28 16 17 18 Power Switch TV power on /off . Use arrow keys and enter key to...
... channel. Screen Fit Select video display format "Standard" or "Fill". Remote Control 2 5 8 12 15 19 21 23 25 27 1 1 2 3 3 4 6 4 7 5 6 9 7 8 10 11 13 9 10 14 16 11 17 12 18 13 20 14 22 24 15 26 28 16 17 18 Power Switch TV power on /off . Use arrow keys and enter key to...

User Manual
Page 12
... may result in accordance with local laws and regulations. ‧ Keep batteries away from children and pets. ‧ When the remote control will not be used for an extended period, remove the batteries. 10 Insert Batteries into Remote Control 1) Remove the battery cover. 2) Insert two size AAA batteries corresponding to (+) and (-) markings.
... may result in accordance with local laws and regulations. ‧ Keep batteries away from children and pets. ‧ When the remote control will not be used for an extended period, remove the batteries. 10 Insert Batteries into Remote Control 1) Remove the battery cover. 2) Insert two size AAA batteries corresponding to (+) and (-) markings.
User Manual
Page 14
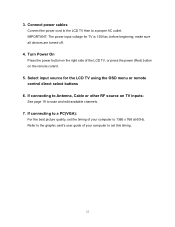
...: See page 19 to the graphic card's user guide of the LCD TV, or press the power (Red) button on the remote control. 5. IMPORTANT: The power input voltage for the LCD TV using the OSD menu or remote control direct select buttons 6. If connecting to a proper AC outlet. Connect power... cables Connect the power cord to the LCD TV then to a PC(VGA): For the...
...: See page 19 to the graphic card's user guide of the LCD TV, or press the power (Red) button on the remote control. 5. IMPORTANT: The power input voltage for the LCD TV using the OSD menu or remote control direct select buttons 6. If connecting to a proper AC outlet. Connect power... cables Connect the power cord to the LCD TV then to a PC(VGA): For the...
User Manual
Page 16
Viewing OSD Menu To display the main menu, press the Menu button on the right side of front control keys of the LCD TV or the MENU key on the LCD TV's right side. All the functions can be adjusted either by the remote control or by using the control keys on the remote control. Press arrow keys to select desired OSD menu and Enter key to select desired setting. 14 Function adjustment There are Settings, Channels, Locks and Guide. these are four main Setup Menus;
Viewing OSD Menu To display the main menu, press the Menu button on the right side of front control keys of the LCD TV or the MENU key on the LCD TV's right side. All the functions can be adjusted either by the remote control or by using the control keys on the remote control. Press arrow keys to select desired OSD menu and Enter key to select desired setting. 14 Function adjustment There are Settings, Channels, Locks and Guide. these are four main Setup Menus;

User Manual
Page 24
... not age-appropriate, such as programs containing violence or adult language. You can compile the name you want to enter Locks menu, just use the remote control to be required to find a channel. The factory default pin number is to key in channel list. Find Channel Enter channel number via number.... The pin number is required when you like, then press "Done" button, the edition is 0000. 22 Enter the edited channel, press "enter" button of remote control, shows "Change name" menu. You may be finished.
... not age-appropriate, such as programs containing violence or adult language. You can compile the name you want to enter Locks menu, just use the remote control to be required to find a channel. The factory default pin number is to key in channel list. Find Channel Enter channel number via number.... The pin number is required when you like, then press "Done" button, the edition is 0000. 22 Enter the edited channel, press "enter" button of remote control, shows "Change name" menu. You may be finished.
User Manual
Page 29
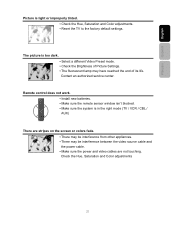
... not work. ▪ Install new batteries. ▪ Make sure the remote sensor window isn't blocked. ▪ Make sure the system is in the right mode (TV / VCR / CBL / AUX) There are stripes on the screen or colors fade. ▪ There may be interference between the video source cable... Saturation and Color adjustments 27 The picture is light or improperly tinted. ▪ Check the Hue, Saturation and Color adjustments. ▪ Reset the TV to the factory default settings. Contact an authorized service center. Français Español English Picture is too dark. ▪ Select a ...
... not work. ▪ Install new batteries. ▪ Make sure the remote sensor window isn't blocked. ▪ Make sure the system is in the right mode (TV / VCR / CBL / AUX) There are stripes on the screen or colors fade. ▪ There may be interference between the video source cable... Saturation and Color adjustments 27 The picture is light or improperly tinted. ▪ Check the Hue, Saturation and Color adjustments. ▪ Reset the TV to the factory default settings. Contact an authorized service center. Français Español English Picture is too dark. ▪ Select a ...


