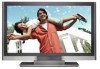
User Manual
Page 2
... Ratio / Backlight / Reset 15 PC PARAMETERS: Auto Adjust / Clock / Phase / Position 16 AUDIO SETTINGS: Volume / Bass / Treble / Balance / Mute / Speaker / Reset 17 PICTURE-IN-PICTURE: Display Mode / Main Source / PIP Source / Swap / PIP Position / PIP Size / Audio From..... 18 GENERAL SETTINGS: Menu Position / Menu Timeout / Language / Sleep Timer / Transparency / DPMS / LED...
... Ratio / Backlight / Reset 15 PC PARAMETERS: Auto Adjust / Clock / Phase / Position 16 AUDIO SETTINGS: Volume / Bass / Treble / Balance / Mute / Speaker / Reset 17 PICTURE-IN-PICTURE: Display Mode / Main Source / PIP Source / Swap / PIP Position / PIP Size / Audio From..... 18 GENERAL SETTINGS: Menu Position / Menu Timeout / Language / Sleep Timer / Transparency / DPMS / LED...
User Manual
Page 4
...place the HD Monitor in a well-ventilated area; The HD Monitor shall not be exposed to reduce glare. • Always handle the HD display with liquids, such as a bookcase or rack unless proper ventilation is clean and free of time, unplug the HD Monitor and remove the batteries... Avoid exposing the HD Monitor to direct sunlight or high temperatures. • Avoid exposing the HD Monitor to protect it off and contact the Westinghouse Service Center. • WARNING - Orient the HD Monitor away from overheating, these openings must not be used for ventilation purposes. Skin oils ...
...place the HD Monitor in a well-ventilated area; The HD Monitor shall not be exposed to reduce glare. • Always handle the HD display with liquids, such as a bookcase or rack unless proper ventilation is clean and free of time, unplug the HD Monitor and remove the batteries... Avoid exposing the HD Monitor to direct sunlight or high temperatures. • Avoid exposing the HD Monitor to protect it off and contact the Westinghouse Service Center. • WARNING - Orient the HD Monitor away from overheating, these openings must not be used for ventilation purposes. Skin oils ...
User Manual
Page 9
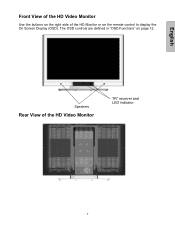
English Front View of the HD Video Monitor Use the buttons on the right side of the HD Video Monitor "IR" receiver and LED indicator 7 The OSD controls are defined in "OSD Functions" on the remote control to display the On Screen Display (OSD). Speakers Rear View of the HD Monitor or on page 12.
English Front View of the HD Video Monitor Use the buttons on the right side of the HD Video Monitor "IR" receiver and LED indicator 7 The OSD controls are defined in "OSD Functions" on the remote control to display the On Screen Display (OSD). Speakers Rear View of the HD Monitor or on page 12.
User Manual
Page 12
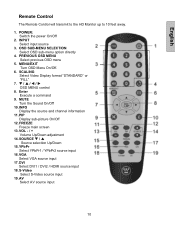
... directly 4. T / S / W / X OSD MENU control 8. VGA Select VGA source input 17. DVI Select DVI1 / DVI2 / HDMI source input 18. SCALING Select Video Display format "STANDARD" or "FILL" 7. MUTE Turn the Sound On/Off 10. SOURCE T / S Source selection Up/Down 15. Enter Execute a command 9. S-Video Select S-Video ...source input 19. INPUT Select input source 3. PIP Display sub-picture On/Off 12. PREVIOUS OSD MENU Select previous OSD menu 5. MENU/EXIT Turn OSD Menu On/Off. 6. INFO...
... directly 4. T / S / W / X OSD MENU control 8. VGA Select VGA source input 17. DVI Select DVI1 / DVI2 / HDMI source input 18. SCALING Select Video Display format "STANDARD" or "FILL" 7. MUTE Turn the Sound On/Off 10. SOURCE T / S Source selection Up/Down 15. Enter Execute a command 9. S-Video Select S-Video ...source input 19. INPUT Select input source 3. PIP Display sub-picture On/Off 12. PREVIOUS OSD MENU Select previous OSD menu 5. MENU/EXIT Turn OSD Menu On/Off. 6. INFO...
User Manual
Page 16
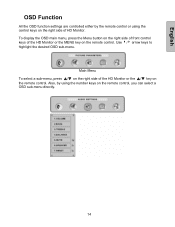
.... 14 English OSD Function All the OSD function settings are controlled either by using the control keys on the right side of HD Monitor. To display the OSD main menu, press the Menu button on the right side of front control keys of the HD Monitor or the MENU key on...
.... 14 English OSD Function All the OSD function settings are controlled either by using the control keys on the right side of HD Monitor. To display the OSD main menu, press the Menu button on the right side of front control keys of the HD Monitor or the MENU key on...
User Manual
Page 17
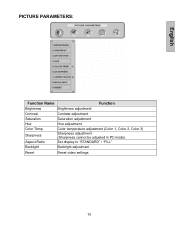
PICTURE PARAMETERS: English Function Name Function Brightness Brightness adjustment Contrast Contrast adjustment Saturation Saturation adjustment Hue Hue adjustment Color Temp Sharpness Aspect Ratio Color temperature adjustment (Color 1, Color 2, Color 3) Sharpness adjustment (Sharpness cannot be adjusted in PC mode) Set display to "STANDARD" / "FILL" Backlight Backlight adjustment Reset Reset video settings 15
PICTURE PARAMETERS: English Function Name Function Brightness Brightness adjustment Contrast Contrast adjustment Saturation Saturation adjustment Hue Hue adjustment Color Temp Sharpness Aspect Ratio Color temperature adjustment (Color 1, Color 2, Color 3) Sharpness adjustment (Sharpness cannot be adjusted in PC mode) Set display to "STANDARD" / "FILL" Backlight Backlight adjustment Reset Reset video settings 15

User Manual
Page 21
GENERAL SETTINGS: English Function Name Function Menu Position OSD horizontal/vertical position adjustment Menu Timeout Set the time to turn off the OSD automatically Language OSD language selection Sleep Timer Set sleep timer to turn off the power automatically Transparency Set OSD transparency level DPMS Select DPMS On/Off LED Turn the LED ON or OFF System Info Display Input source, type and signal Factory Reset Restore factory default settings 19
GENERAL SETTINGS: English Function Name Function Menu Position OSD horizontal/vertical position adjustment Menu Timeout Set the time to turn off the OSD automatically Language OSD language selection Sleep Timer Set sleep timer to turn off the power automatically Transparency Set OSD transparency level DPMS Select DPMS On/Off LED Turn the LED ON or OFF System Info Display Input source, type and signal Factory Reset Restore factory default settings 19

