User Manual
Page 4
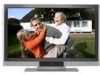
SEV Canada CSA Britain BASE/BS Germany..........VDE Japan Electric Appliance Control Act IMPORTANT NOTICE CONCERNING POWER CORD SELECTION The specific power cord for this 1080p monitor is connected. • Consult the Westinghouse Service Center or an experienced technician for assistance. For 1080p monitors that to which can radiate radio frequency energy, and may...
SEV Canada CSA Britain BASE/BS Germany..........VDE Japan Electric Appliance Control Act IMPORTANT NOTICE CONCERNING POWER CORD SELECTION The specific power cord for this 1080p monitor is connected. • Consult the Westinghouse Service Center or an experienced technician for assistance. For 1080p monitors that to which can radiate radio frequency energy, and may...
User Manual
Page 5
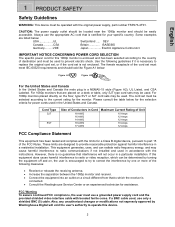
...they exit from the remote control • Only use this user's manual for your LCD display with care when moving the cart/apparatus combination to remove. • Never remove the ... during lightning storms or when unused for replacement of time, unplug it off and contact the Westinghouse Service Center. 3 Other Notices • Avoid exposing the 1080p monitor to direct sunlight or high...high-voltage parts. Do not use attachments/accessories specified by the manufacturer. 12. Protect the power cord from being walked on the 1080p Monitor. You may be used , use attachments/...
...they exit from the remote control • Only use this user's manual for your LCD display with care when moving the cart/apparatus combination to remove. • Never remove the ... during lightning storms or when unused for replacement of time, unplug it off and contact the Westinghouse Service Center. 3 Other Notices • Avoid exposing the 1080p monitor to direct sunlight or high...high-voltage parts. Do not use attachments/accessories specified by the manufacturer. 12. Protect the power cord from being walked on the 1080p Monitor. You may be used , use attachments/...
User Manual
Page 6
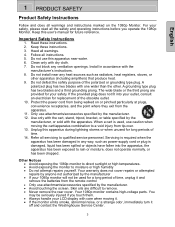
English 2 INSTALLATION Package Contents Your product package includes: • 37" Westinghouse LCD 1080p Monitor • Remote Control (with batteries) • Power Cord • User's Manual • Quick Connect Guide • Warranty Card 4
English 2 INSTALLATION Package Contents Your product package includes: • 37" Westinghouse LCD 1080p Monitor • Remote Control (with batteries) • Power Cord • User's Manual • Quick Connect Guide • Warranty Card 4
User Manual
Page 7
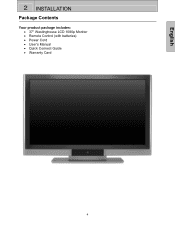
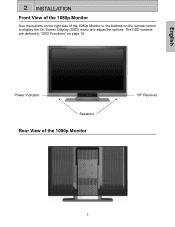
Power Indicator Speakers Rear View of the 1080p Monitor or the buttons on the remote control to display the On Screen Display (OSD) menu and adjust the options. English 2 INSTALLATION Front View of the 1080p Monitor Use the buttons on the right side of the 1080p Monitor "IR" Receiver 5 The OSD controls are defined in "OSD Functions" on page 16.
Power Indicator Speakers Rear View of the 1080p Monitor or the buttons on the remote control to display the On Screen Display (OSD) menu and adjust the options. English 2 INSTALLATION Front View of the 1080p Monitor Use the buttons on the right side of the 1080p Monitor "IR" Receiver 5 The OSD controls are defined in "OSD Functions" on page 16.
User Manual
Page 8
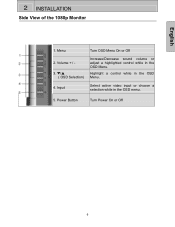
Highlight a control while in the OSD Menu. T/S ( OSD Selection) Increase/Decrease sound volume or adjust a highlighted control while in the OSD Menu. 4. Power Button Turn Power On or Off 6 Input Select active video input or choose a selection while in the OSD menu. 5. Volume + / - 3. English 2 INSTALLATION Side View of the 1080p Monitor 1. Menu Turn OSD Menu On or Off 2.
Highlight a control while in the OSD Menu. T/S ( OSD Selection) Increase/Decrease sound volume or adjust a highlighted control while in the OSD Menu. 4. Power Button Turn Power On or Off 6 Input Select active video input or choose a selection while in the OSD menu. 5. Volume + / - 3. English 2 INSTALLATION Side View of the 1080p Monitor 1. Menu Turn OSD Menu On or Off 2.

User Manual
Page 9
... Using a 3.5mm mini-jack cable, connect to an external video device such as a VCR. 5 4. S-Video Connect to a power source. 7 2 INSTALLATION English SIDE CONNECTORS 1 1. Audio Out (Left / Right) Connect this jack. AC-IN (Power) Connect the power cord from AC-IN to an external video device such as a VCR. 7 5. S-Video & AV Audio (Left / Right...
... Using a 3.5mm mini-jack cable, connect to an external video device such as a VCR. 5 4. S-Video Connect to a power source. 7 2 INSTALLATION English SIDE CONNECTORS 1 1. Audio Out (Left / Right) Connect this jack. AC-IN (Power) Connect the power cord from AC-IN to an external video device such as a VCR. 7 5. S-Video & AV Audio (Left / Right...
User Manual
Page 10
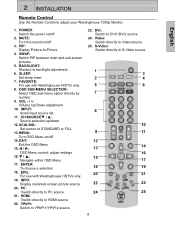
...directly to PC source 21. English 1. SWAP: Switch PIP between main and sub-screen pictures 5. EPG: For use with Westinghouse HDTVs only. 19. INFO: Display main/sub-screen picture source 20. PC: Switch directly to Video source 25. S-Video: Switch directly to YPbPr1/YPrPr2 ...source 23. MUTE: Turn the sound on /off 2. PIP: Display Picture-In-Picture 4. SLEEP: Set sleep timer 7. ENTER: To choose a selection 18. POWER: Switch the power on /off 14. T / S: Navigate within OSD Menu 17. VOL - / +: Volume Up/Down adjustment...
...directly to PC source 21. English 1. SWAP: Switch PIP between main and sub-screen pictures 5. EPG: For use with Westinghouse HDTVs only. 19. INFO: Display main/sub-screen picture source 20. PC: Switch directly to Video source 25. S-Video: Switch directly to YPbPr1/YPrPr2 ...source 23. MUTE: Turn the sound on /off 2. PIP: Display Picture-In-Picture 4. SLEEP: Set sleep timer 7. ENTER: To choose a selection 18. POWER: Switch the power on /off 14. T / S: Navigate within OSD Menu 17. VOL - / +: Volume Up/Down adjustment...
User Manual
Page 12
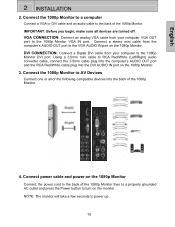
...of the 1080p Monitor. Using a 3.5mm mini cable to the back of the 1080p Monitor. 4. English 2 INSTALLATION 2. Connect power cable and power on the 1080p Monitor Connect the power cord to the back of the following compatible devices into the DVI AUDIO IN port on the monitor. Connect a stereo mini...: The monitor will take a few seconds to the 1080p Monitor DVI port. DVI CONNECTION: Connect a Digital DVI cable from your computer to power up. 10 Connect the 1080p Monitor to the 1080p Monitor VGA IN port. VGA CONNECTION: Connect an analog VGA cable from your computer VGA ...
...of the 1080p Monitor. Using a 3.5mm mini cable to the back of the 1080p Monitor. 4. English 2 INSTALLATION 2. Connect power cable and power on the 1080p Monitor Connect the power cord to the back of the following compatible devices into the DVI AUDIO IN port on the monitor. Connect a stereo mini...: The monitor will take a few seconds to the 1080p Monitor DVI port. DVI CONNECTION: Connect a Digital DVI cable from your computer to power up. 10 Connect the 1080p Monitor to the 1080p Monitor VGA IN port. VGA CONNECTION: Connect an analog VGA cable from your computer VGA ...
User Manual
Page 19
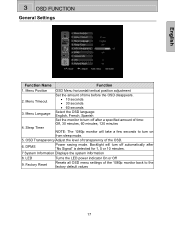
... 30 minutes, 60 minutes, 120 minutes NOTE: The 1080p monitor will turn on from sleep mode. 5. LED 9. DPMS Power saving mode. Factory Reset Turns the LED power indicator On or Off Resets all OSD menu settings of the OSD. 6. Menu Position 2. OSD Transparency Adjust the level of ...transparency of the 1080p monitor back to turn off after "No Signal" is detected for 1, 5 or 10 minutes. 7 System Information Displays the system information ...
... 30 minutes, 60 minutes, 120 minutes NOTE: The 1080p monitor will turn on from sleep mode. 5. LED 9. DPMS Power saving mode. Factory Reset Turns the LED power indicator On or Off Resets all OSD menu settings of the OSD. 6. Menu Position 2. OSD Transparency Adjust the level of ...transparency of the 1080p monitor back to turn off after "No Signal" is detected for 1, 5 or 10 minutes. 7 System Information Displays the system information ...
User Manual
Page 20
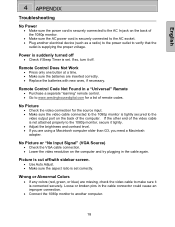
...Source) • Check the VGA cable connection. • Lower the video resolution on the back of the 1080p monitor. • Make sure the AC power cord is securely connected to the AC socket. • Plug another computer. 18 If so, turn it tightly. • Adjust the brightness and contrast ...are inserted correctly. • Replace the batteries with sidebar screen. • Use Auto Adjust. • Make sure the aspect ratio is connected securely. Power is suddenly turned off • Check if Sleep Timer is not attached properly to another electrical device (such as a radio) to the...
...Source) • Check the VGA cable connection. • Lower the video resolution on the back of the 1080p monitor. • Make sure the AC power cord is securely connected to the AC socket. • Plug another computer. 18 If so, turn it tightly. • Adjust the brightness and contrast ...are inserted correctly. • Replace the batteries with sidebar screen. • Use Auto Adjust. • Make sure the aspect ratio is connected securely. Power is suddenly turned off • Check if Sleep Timer is not attached properly to another electrical device (such as a radio) to the...
User Manual
Page 23
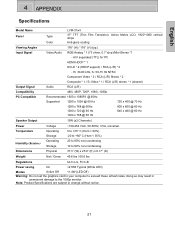
English 4 APPENDIX Specifications Model Name Panel Type Color LVM-37w3 37" TFT (Thin Film Transistor), Active Matrix LCD, 1920*1080 vertical stripe Anti-glare coating Viewing Angles 176° (H) / 176° (V) (typ.) Input Signal Video/Audio RGB Analog * 1 (75 ohms, 0.7 Vp-p)/Mini-Stereo *1 -... 1280 x 720 @ 60 Hz 1024 x 768 @ 60 Hz 720 x 400 @ 70 Hz 800 x 600 @ 60 Hz 640 x 480 @ 60 Hz Speaker Output 15W (x2 Channels) Power Voltage ~100-264 VAC, 50-60Hz, 3.5A, universal. Temperature Operating Storage 0 to +35° C (Hum < 90%) -20 to +60o C (Hum < 35%) Humidity (Relative)...
English 4 APPENDIX Specifications Model Name Panel Type Color LVM-37w3 37" TFT (Thin Film Transistor), Active Matrix LCD, 1920*1080 vertical stripe Anti-glare coating Viewing Angles 176° (H) / 176° (V) (typ.) Input Signal Video/Audio RGB Analog * 1 (75 ohms, 0.7 Vp-p)/Mini-Stereo *1 -... 1280 x 720 @ 60 Hz 1024 x 768 @ 60 Hz 720 x 400 @ 70 Hz 800 x 600 @ 60 Hz 640 x 480 @ 60 Hz Speaker Output 15W (x2 Channels) Power Voltage ~100-264 VAC, 50-60Hz, 3.5A, universal. Temperature Operating Storage 0 to +35° C (Hum < 90%) -20 to +60o C (Hum < 35%) Humidity (Relative)...

