User Manual
Page 2
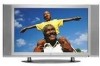
English Contents Product Safety Instructions 1 Antenna Installation Safety 2 Safety Guidelines 3 Cleaning the LCD TV 4 INSTALLATION Package Content 5 Side View of the LCD TV 5 Front View of the LCD TV 6 Rear View of the LCD TV 7 Remote Controls 8 Installation 9 OSD Functions PICTURE PARAMETERS: Brightness / Contrast / Saturation .../ PIP Source / Swap / PIP Position / PIP Size / Audio From 16 TV: TV / CATV / Auto Scan / Channel EDIT / Caption Mode 17 PARENTAL CONTROLS: Lock Menu / MPAA Rating / TV PG Rating / Password EDIT 17 GENERAL SETTINGS: Menu Position / Menu Timeout / Language...
English Contents Product Safety Instructions 1 Antenna Installation Safety 2 Safety Guidelines 3 Cleaning the LCD TV 4 INSTALLATION Package Content 5 Side View of the LCD TV 5 Front View of the LCD TV 6 Rear View of the LCD TV 7 Remote Controls 8 Installation 9 OSD Functions PICTURE PARAMETERS: Brightness / Contrast / Saturation .../ PIP Source / Swap / PIP Position / PIP Size / Audio From 16 TV: TV / CATV / Auto Scan / Channel EDIT / Caption Mode 17 PARENTAL CONTROLS: Lock Menu / MPAA Rating / TV PG Rating / Password EDIT 17 GENERAL SETTINGS: Menu Position / Menu Timeout / Language...

User Manual
Page 3
... be installed near the wall socket outlet and the plug on the LCD TV, video cable, or power cord. • If the LCD TV emits smoke, abnormal noise, or a strange odor, immediately turn it off and contact the Westinghouse Service Center. • WARNING - Skin oils are difficult to direct sunlight ...or another heat source. Your LCD TV contains high-voltage parts. To Reduce The Risk Of Fire Or Electric Shock, Do Not Expose The LCD TV To Rain Or Moisture! You may...
... be installed near the wall socket outlet and the plug on the LCD TV, video cable, or power cord. • If the LCD TV emits smoke, abnormal noise, or a strange odor, immediately turn it off and contact the Westinghouse Service Center. • WARNING - Skin oils are difficult to direct sunlight ...or another heat source. Your LCD TV contains high-voltage parts. To Reduce The Risk Of Fire Or Electric Shock, Do Not Expose The LCD TV To Rain Or Moisture! You may...

User Manual
Page 4
... cord, causing serious injury. Power Lines An outside antenna system should be taken to qualified service personnel. Servicing is required when the LCD TV has been damaged in wire to an antenna discharge unit, connection to bypass the safety purpose of the obsolete outlet. 10) Protect ...warnings. 4) Follow all servicing to keep from the wall outlet and disconnect the antenna or cable system. This will prevent damage to the LCD TV due to improve. Turn off your wall outlet, consult an electrician for the grounding electrode. Article 810 of the National Electrical Code, ANS...
... cord, causing serious injury. Power Lines An outside antenna system should be taken to qualified service personnel. Servicing is required when the LCD TV has been damaged in wire to an antenna discharge unit, connection to bypass the safety purpose of the obsolete outlet. 10) Protect ...warnings. 4) Follow all servicing to keep from the wall outlet and disconnect the antenna or cable system. This will prevent damage to the LCD TV due to improve. Turn off your wall outlet, consult an electrician for the grounding electrode. Article 810 of the National Electrical Code, ANS...

User Manual
Page 5
...cords used . This equipment generates, uses, and can be used , use only a shielded BNC (5) cable. For LCD TVs that to correct the interference by Westinghouse Digital will not occur in the United States and Canada. Cord Type SJT SVT Size of destination and must be ... television reception, which can radiate radio frequency energy, and may be selected according to prevent electric shock. If this LCD TV is certified for the LCD TV. However, there is no guarantee that is enclosed and has been selected according to radio communications if not installed and...
...cords used . This equipment generates, uses, and can be used , use only a shielded BNC (5) cable. For LCD TVs that to correct the interference by Westinghouse Digital will not occur in the United States and Canada. Cord Type SJT SVT Size of destination and must be ... television reception, which can radiate radio frequency energy, and may be selected according to prevent electric shock. If this LCD TV is certified for the LCD TV. However, there is no guarantee that is enclosed and has been selected according to radio communications if not installed and...

User Manual
Page 6
...free cloth, and wipe the screen. Manufacturer will not be liable for damage resulting from use of any ammonia or alcohol-based cleaners on the LCD TV screen or case. If still not clean, apply a small amount of non-ammonia, non-alcohol based, mild non- abrasive detergent onto a ... 2. Some chemical cleaners have been reported to damage the screen and or LCD TV case. Disclaimer Manufacturer does not recommend the use of any ammonia or alcohol-based cleaners. 4 English Cleaning the LCD TV • MAKE SURE THE LCD TV IS TURNED OFF • NEVER SPRAY OR POUR ANY LIQUID DIRECTLY ONTO...
...free cloth, and wipe the screen. Manufacturer will not be liable for damage resulting from use of any ammonia or alcohol-based cleaners on the LCD TV screen or case. If still not clean, apply a small amount of non-ammonia, non-alcohol based, mild non- abrasive detergent onto a ... 2. Some chemical cleaners have been reported to damage the screen and or LCD TV case. Disclaimer Manufacturer does not recommend the use of any ammonia or alcohol-based cleaners. 4 English Cleaning the LCD TV • MAKE SURE THE LCD TV IS TURNED OFF • NEVER SPRAY OR POUR ANY LIQUID DIRECTLY ONTO...
User Manual
Page 7
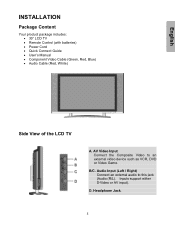
English INSTALLATION Package Content Your product package includes: • 30" LCD TV • Remote Control (with batteries) • Power Cord • Quick Connect Guide • User's Manual • Component Video Cable (Green, Red, Blue) • Audio Cable (Red, White) Side View of the LCD TV A. Headphone Jack. 5 B/C. Audio Input (Left / Right) Connect an external audio to an external video device such as VCR, DVD or Video Game. AV Video Input Connect the Composite Video to this jack (Audio (R/L). D. Inputs support either S-Video or AV input).
English INSTALLATION Package Content Your product package includes: • 30" LCD TV • Remote Control (with batteries) • Power Cord • Quick Connect Guide • User's Manual • Component Video Cable (Green, Red, Blue) • Audio Cable (Red, White) Side View of the LCD TV A. Headphone Jack. 5 B/C. Audio Input (Left / Right) Connect an external audio to an external video device such as VCR, DVD or Video Game. AV Video Input Connect the Composite Video to this jack (Audio (R/L). D. Inputs support either S-Video or AV input).
User Manual
Page 8
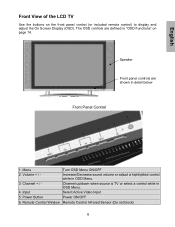
Menu Turn OSD Menu ON/OFF 2. Channel up/down when source is TV or select a control while in OSD Menu. 3. Increase/Decrease sound volume or adjust a highlighted control while in OSD Menu. 4. Power Button Power ON/OFF 6. Remote ... Control Infrared Sensor (Do not block) 6 Volume + / - Speaker Front panel controls are defined in detail below Front Panel Control 1. Channel + / - English Front View of the LCD TV Use the buttons on page 14. Input Select Active Video Input 5. The OSD controls are shown in "OSD Functions" on the front panel control (or...
Menu Turn OSD Menu ON/OFF 2. Channel up/down when source is TV or select a control while in OSD Menu. 3. Increase/Decrease sound volume or adjust a highlighted control while in OSD Menu. 4. Power Button Power ON/OFF 6. Remote ... Control Infrared Sensor (Do not block) 6 Volume + / - Speaker Front panel controls are defined in detail below Front Panel Control 1. Channel + / - English Front View of the LCD TV Use the buttons on page 14. Input Select Active Video Input 5. The OSD controls are shown in "OSD Functions" on the front panel control (or...

User Manual
Page 9
... such as VCR, DVD or video game system D. DVI Audio Input (Right / Left) Connect an external audio to this output. 7 K. English Rear View of the LCD TV A. AV Video Input Connect the Composite Video to an external video device such as VCR, DVD and video game system. Audio Output (Right / Left) Connect... Connect an external video devices with component output to this jack. RGB Audio IN Using the cable provided, connect to the antenna or cable service C. TV Input (RF-input) Connect to the Audio out (Green) on your PC. G.
... such as VCR, DVD or video game system D. DVI Audio Input (Right / Left) Connect an external audio to this output. 7 K. English Rear View of the LCD TV A. AV Video Input Connect the Composite Video to an external video device such as VCR, DVD and video game system. Audio Output (Right / Left) Connect... Connect an external video devices with component output to this jack. RGB Audio IN Using the cable provided, connect to the antenna or cable service C. TV Input (RF-input) Connect to the Audio out (Green) on your PC. G.

User Manual
Page 10
LAST CH Switch to 23 feet away. 1. MUTE/EXIT Turn the Sound On/Off 10. PIP Display Sub picture On/Off 12. TV Select TV source input 18. T / S / W / X OSD MENU control 8. YPbPr Select YPbPr1 / YPbPr2 source input 16. MENU/EXIT Turn OSD Menu On/Off 6. SCALING... 4. PC Select VGA / DVI source input 17. Enter Execute a command 9. English Remote Control The Remote Control will transmit to the LCD TV up to previous channel 5. CH -/+ TV Channel Up/Down adjustment 15. POWER: Switch the power On/Off 2. INPUT Select input source 3. S-Video Select S-Video source input 19...
LAST CH Switch to 23 feet away. 1. MUTE/EXIT Turn the Sound On/Off 10. PIP Display Sub picture On/Off 12. TV Select TV source input 18. T / S / W / X OSD MENU control 8. YPbPr Select YPbPr1 / YPbPr2 source input 16. MENU/EXIT Turn OSD Menu On/Off 6. SCALING... 4. PC Select VGA / DVI source input 17. Enter Execute a command 9. English Remote Control The Remote Control will transmit to the LCD TV up to previous channel 5. CH -/+ TV Channel Up/Down adjustment 15. POWER: Switch the power On/Off 2. INPUT Select input source 3. S-Video Select S-Video source input 19...

User Manual
Page 12
...: Before beginning, make sure all devices are turned off. AUDIO CONNECTION: Connect a stereo mini cable from your PC VGA OUT port to the LCD TV RGB IN port. Connect AV, Component, S-Video, Antenna/Cable to Video Devices Connect Video/Audio cables from your PC or DVD DVI OUT port to a ...PC Connect one or all of the following into the back of the LCD TV. 10 Connect audio and video cables to the LCD TV DVI HDCP port. RGB CONNECTION: Connect an analog VGA cable from compatible devices to the AUDIO IN port on the...
...: Before beginning, make sure all devices are turned off. AUDIO CONNECTION: Connect a stereo mini cable from your PC VGA OUT port to the LCD TV RGB IN port. Connect AV, Component, S-Video, Antenna/Cable to Video Devices Connect Video/Audio cables from your PC or DVD DVI OUT port to a ...PC Connect one or all of the following into the back of the LCD TV. 10 Connect audio and video cables to the LCD TV DVI HDCP port. RGB CONNECTION: Connect an analog VGA cable from compatible devices to the AUDIO IN port on the...

User Manual
Page 13
... a properly grounded AC outlet. 5. Turn Power On Press the Power ON button on the front of the LCD TV, or press the Power ON (Red) button on how to set LCD TV timing mode to VESA 1280x768 at 60Hz (refer to a PC (RGB/DVI): For the best picture quality, set this timing mode). 11... Select input source for questions on the remote control. 6. If connecting to the graphic card's user guide for LCD TV using the OSD menu or remote control 7. Connect power cables Connect the power cord to the...
... a properly grounded AC outlet. 5. Turn Power On Press the Power ON button on the front of the LCD TV, or press the Power ON (Red) button on how to set LCD TV timing mode to VESA 1280x768 at 60Hz (refer to a PC (RGB/DVI): For the best picture quality, set this timing mode). 11... Select input source for questions on the remote control. 6. If connecting to the graphic card's user guide for LCD TV using the OSD menu or remote control 7. Connect power cables Connect the power cord to the...

User Manual
Page 14
Use 3/4 arrow keys to highlight the desired OSD sub-menu. Main Menu To select a sub-menu, press ▲/▼ on the front control keys or the ▲/▼ key on the remote control. To display the OSD main menu, press the Menu button on the front control keys of the LCD TV or the MENU key on the remote control. 12 English OSD Function All the function settings for the LCD TV are controlled either by the remote control or using the bottom control keys on the front panel.
Use 3/4 arrow keys to highlight the desired OSD sub-menu. Main Menu To select a sub-menu, press ▲/▼ on the front control keys or the ▲/▼ key on the remote control. To display the OSD main menu, press the Menu button on the front control keys of the LCD TV or the MENU key on the remote control. 12 English OSD Function All the function settings for the LCD TV are controlled either by the remote control or using the bottom control keys on the front panel.

User Manual
Page 22
English Specifications Panel Type Color 30" (29.53" viewable diagonal area), TFT (Thin Film Transistor), Active Matrix WXGA LCD, 1280*768 vertical stripe Anti-reflective coating + Anti-glare coating Viewing Angles 170° (H) / 170° (V) Input Signal Video/Audio RGB ...Analog * 1 (75 ohms, 0.7 Vp-p)/Mini-Stereo *1 H/V separated (TTL) for PC DVI-D * 1 (HDCP support) / RCA (L/R) * 1 fh: 30-80 kHz, fv: 50-75 Hz TV system ...
English Specifications Panel Type Color 30" (29.53" viewable diagonal area), TFT (Thin Film Transistor), Active Matrix WXGA LCD, 1280*768 vertical stripe Anti-reflective coating + Anti-glare coating Viewing Angles 170° (H) / 170° (V) Input Signal Video/Audio RGB ...Analog * 1 (75 ohms, 0.7 Vp-p)/Mini-Stereo *1 H/V separated (TTL) for PC DVI-D * 1 (HDCP support) / RCA (L/R) * 1 fh: 30-80 kHz, fv: 50-75 Hz TV system ...

User Manual
Page 23
..." and enter "0000" to reset the password. Loose or broken pins in the cable connector could cause an improper connection. • Connect the LCD TV to another electrical device (such as a radio) to the power outlet to verify that MUTE disappears from the screen. • Check the audio settings.... AUDIO Interconnection Issues • Remember that headphones are using a Macintosh computer older than G3, you are not connected to the Headphone Jack on the LCD TV. • Make sure the speaker setting is set to SAP or minimum. • Press the Volume + (Up) key on Screen • ...
..." and enter "0000" to reset the password. Loose or broken pins in the cable connector could cause an improper connection. • Connect the LCD TV to another electrical device (such as a radio) to the power outlet to verify that MUTE disappears from the screen. • Check the audio settings.... AUDIO Interconnection Issues • Remember that headphones are using a Macintosh computer older than G3, you are not connected to the Headphone Jack on the LCD TV. • Make sure the speaker setting is set to SAP or minimum. • Press the Volume + (Up) key on Screen • ...


