
User Manual
Page 2
... openings. No user-serviceable parts inside. Important Safety Instructions 1 Read these instructions. 2 Keep these instructions. 3 Heed all warnings. 4 Follow all instructions. 5 Do not use this apparatus near any way, such as power-supply cord or plug is damaged, liquid has been spilled or objects have fallen into your outlet, consult an electrician for replacement of the obsolete outlet. 10 Protect the power cord from being...
... openings. No user-serviceable parts inside. Important Safety Instructions 1 Read these instructions. 2 Keep these instructions. 3 Heed all warnings. 4 Follow all instructions. 5 Do not use this apparatus near any way, such as power-supply cord or plug is damaged, liquid has been spilled or objects have fallen into your outlet, consult an electrician for replacement of the obsolete outlet. 10 Protect the power cord from being...

User Manual
Page 3
... than that may void your warranty. Modifying the LCD TV in such a manner not approved by the manufacturer and function are for repair. Caution: These servicing instructions are the same as the original parts. User's record You can find the serial number and model on the LCD TV screen or case. Be sure to provide the model and serial number when you are high voltages...
... than that may void your warranty. Modifying the LCD TV in such a manner not approved by the manufacturer and function are for repair. Caution: These servicing instructions are the same as the original parts. User's record You can find the serial number and model on the LCD TV screen or case. Be sure to provide the model and serial number when you are high voltages...

User Manual
Page 5
... and Setup 2-1 Power Connection 12 2-2 Connecting with Headphone 12 2-3 Antenna Connections 13 2-4 Connecting Other Components 14 2-4-1 Connecting Composite video/S-video 15 2-4-2 Connecting Component video 16 III. Introduction 1-1 Before Use 01 1-2 Specifications 01 1-3 Package Contents 02 1-4 Installation 03 1-5 Front panel controls 04 1-6 Back panel connections 05 1-7 Remote control 07 1-7-1 Inserting batteries and effective range of the remote 07 1-7-2 Remote Control Button Description 07 II. Basic operation and Adjustment 3-1 Turning on your LCD TV...
... and Setup 2-1 Power Connection 12 2-2 Connecting with Headphone 12 2-3 Antenna Connections 13 2-4 Connecting Other Components 14 2-4-1 Connecting Composite video/S-video 15 2-4-2 Connecting Component video 16 III. Introduction 1-1 Before Use 01 1-2 Specifications 01 1-3 Package Contents 02 1-4 Installation 03 1-5 Front panel controls 04 1-6 Back panel connections 05 1-7 Remote control 07 1-7-1 Inserting batteries and effective range of the remote 07 1-7-2 Remote Control Button Description 07 II. Basic operation and Adjustment 3-1 Turning on your LCD TV...

User Manual
Page 6
.... 1-2 Specifications Display panel Signals Input / Out Compatibility Audio Output Regulation Other Screen Size Aspect Ratio Pixel Pitch Number of our product specifications, which will provide a better understanding of Pixels Luminance (typ.) Contrast Ratio (typ.) Response time (typ.) Viewing angles (typ.) Video in Component in 408 (H) x 306 (V) 4:3 0.2125(H) x 0.6375(V) mm 640 x R.G.B. x 480 450 nits 400 : 1 16 ms 150 (H) / 130 (V) (AV + S-Video + R / L) x 2 (YPbPr + R / L) x 1 (support 480 i/p) Antenna In Color system Video system Built-in speaker...
.... 1-2 Specifications Display panel Signals Input / Out Compatibility Audio Output Regulation Other Screen Size Aspect Ratio Pixel Pitch Number of our product specifications, which will provide a better understanding of Pixels Luminance (typ.) Contrast Ratio (typ.) Response time (typ.) Viewing angles (typ.) Video in Component in 408 (H) x 306 (V) 4:3 0.2125(H) x 0.6375(V) mm 640 x R.G.B. x 480 450 nits 400 : 1 16 ms 150 (H) / 130 (V) (AV + S-Video + R / L) x 2 (YPbPr + R / L) x 1 (support 480 i/p) Antenna In Color system Video system Built-in speaker...

User Manual
Page 8
... Wall Mounting, for proper ventilation. Please ensure the product is required, use one with high temperature or high humidity dust or smoke, so as not to avoid tipping. 1-4 Installation 20" LCD TV User's Manual Please read the user manual carefully before performing the installation. The cord must be grounded and the grounding feature must not be installed on a flat surface to shorten the service...
... Wall Mounting, for proper ventilation. Please ensure the product is required, use one with high temperature or high humidity dust or smoke, so as not to avoid tipping. 1-4 Installation 20" LCD TV User's Manual Please read the user manual carefully before performing the installation. The cord must be grounded and the grounding feature must not be installed on a flat surface to shorten the service...

User Manual
Page 9
The LED indicator will glow green when the power is on. Headphone Connector Headphone Color Code Green Description For connecting the earphone. 04 1-5 Front panel controls 20" LCD TV User's Manual POWER / Remote LED sensor window indicator Button POWER / Remote sensor window Description Use this button to import. The LED indicator will glow red when the LCD-TV has no signal to indentify the LCD-TV current states.
The LED indicator will glow green when the power is on. Headphone Connector Headphone Color Code Green Description For connecting the earphone. 04 1-5 Front panel controls 20" LCD TV User's Manual POWER / Remote LED sensor window indicator Button POWER / Remote sensor window Description Use this button to import. The LED indicator will glow red when the LCD-TV has no signal to indentify the LCD-TV current states.
User Manual
Page 10
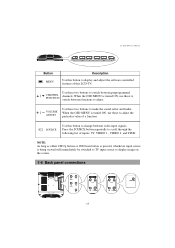
... screen. 1-6 Back panel connections 05 NOTE: As long as either CH Up button or CH Down button is pressed, whichever input source is turned ON, use these to adjust the particular value of a function. 20" LCD TV User's Manual Button MENU Description Use this button to display and adjust the software-controlled features of this button to change between video input signals. VOLUME ADJUST Use these two buttons to switch between preprogrammed CHANNEL channels. Press the SOURCE button repeatedly to make the sound softer and louder. Use...
... screen. 1-6 Back panel connections 05 NOTE: As long as either CH Up button or CH Down button is pressed, whichever input source is turned ON, use these to adjust the particular value of a function. 20" LCD TV User's Manual Button MENU Description Use this button to display and adjust the software-controlled features of this button to change between video input signals. VOLUME ADJUST Use these two buttons to switch between preprogrammed CHANNEL channels. Press the SOURCE button repeatedly to make the sound softer and louder. Use...

User Manual
Page 11
... attach a DVD player. AV: 3 RCA jacks. In our interior detection program, we setup the S-Video input terminal as Component. Only S-Video output will be seen with this set of connection. 20" LCD TV User's Manual Video Connectors Component Input Color Code Description Left Audio Y Right Audio Pb Pr White Red Green Blue Red 5 RCA jacks. NOTE: Video1 and Video2 inputs share the same AUDIO- Antenna input Connector VHF / UHF Input Color Code Silver Description Attach your TV antenna or analog cable service here. (75ohm coaxial cable with...
... attach a DVD player. AV: 3 RCA jacks. In our interior detection program, we setup the S-Video input terminal as Component. Only S-Video output will be seen with this set of connection. 20" LCD TV User's Manual Video Connectors Component Input Color Code Description Left Audio Y Right Audio Pb Pr White Red Green Blue Red 5 RCA jacks. NOTE: Video1 and Video2 inputs share the same AUDIO- Antenna input Connector VHF / UHF Input Color Code Silver Description Attach your TV antenna or analog cable service here. (75ohm coaxial cable with...

User Manual
Page 12
..., IEC R03 1.5V. Do not combine a used, old battery with a new one or mix battery types. 1-7 Remote control 20" LCD TV User's Manual 1-7-1 Inserting batteries and effective range of the remote Remove the back cover to prevent acid from the centre of the television. 30 1-7-2 Remote Control Button Description 1 2 Power Mute 1 2 3 4 5 6 3 7 8 9 100 0 4 6 C.C. 5 CH 7 8 9 10 CH MTS Source Pic-mode Sleep 11 12 13 Favorite Add Del 15...
..., IEC R03 1.5V. Do not combine a used, old battery with a new one or mix battery types. 1-7 Remote control 20" LCD TV User's Manual 1-7-1 Inserting batteries and effective range of the remote Remove the back cover to prevent acid from the centre of the television. 30 1-7-2 Remote Control Button Description 1 2 Power Mute 1 2 3 4 5 6 3 7 8 9 100 0 4 6 C.C. 5 CH 7 8 9 10 CH MTS Source Pic-mode Sleep 11 12 13 Favorite Add Del 15...

User Manual
Page 13
... screen (see the previous channel. This function is in the illustration. TV FUNCTION Index Button Description Use this button to switch the LCD-TV between on . Press 100 3 Number Button Pad followed by two digits for each button depicted in standby. 2 Mute Use this button to activate subtitle. The power indicator will glow 1 Power green when the power is on and standby modes. OFF Turns off completely. 20" LCD TV User's Manual The index number...
... screen (see the previous channel. This function is in the illustration. TV FUNCTION Index Button Description Use this button to switch the LCD-TV between on . Press 100 3 Number Button Pad followed by two digits for each button depicted in standby. 2 Mute Use this button to activate subtitle. The power indicator will glow 1 Power green when the power is on and standby modes. OFF Turns off completely. 20" LCD TV User's Manual The index number...

User Manual
Page 15
... open favorite list. 2 Press Number Button 0, 1~9 to choose your favorite channel. Press this button to add this channel into favorite channels table. When the Close Caption function is turned on . 16 i Press this button to select among 5 user situation 10 Pic-mode modes. < Standard Nature High bright Cinema User > 11 Source Use this button to choose the video input sources: The SLEEP feature is used to second audio programs when a signal is received. SAP Select for switching the TV...
... open favorite list. 2 Press Number Button 0, 1~9 to choose your favorite channel. Press this button to add this channel into favorite channels table. When the Close Caption function is turned on . 16 i Press this button to select among 5 user situation 10 Pic-mode modes. < Standard Nature High bright Cinema User > 11 Source Use this button to choose the video input sources: The SLEEP feature is used to second audio programs when a signal is received. SAP Select for switching the TV...

User Manual
Page 17
The headphone is not included in the supplied accessories. 2. Household power outlet 2-2 Connecting with Headphone Plug the headphone mini-plug into an AC wall socket. [Caution] Turn off your LCD TV and unplug the power cord when not used for a long period of the set . 12 No sound will be heard from the main unit speakers when connecting the headphone set . NOTE: 1. 2 Equipment Connections and Setup 20" LCD TV User's Manual 2-1 Power Connection Plug the power cord into the headphone jack location on the right side of time.
The headphone is not included in the supplied accessories. 2. Household power outlet 2-2 Connecting with Headphone Plug the headphone mini-plug into an AC wall socket. [Caution] Turn off your LCD TV and unplug the power cord when not used for a long period of the set . 12 No sound will be heard from the main unit speakers when connecting the headphone set . NOTE: 1. 2 Equipment Connections and Setup 20" LCD TV User's Manual 2-1 Power Connection Plug the power cord into the headphone jack location on the right side of time.

User Manual
Page 18
... Twin Lead Cable VHF / UHF Antenna Connector Rear of splitter, RF switch or combiner that might be required. 2-3 Antenna Connections Please select the connection method based on page 18. 13 You need a decoder to watch TV program, please see "Section 3.1 Turning on your LCD TV and watching a TV program" on the signal cable at home (Please check A). NOTE: To watch all channels. 1 Please connect the coaxial cable joint...
... Twin Lead Cable VHF / UHF Antenna Connector Rear of splitter, RF switch or combiner that might be required. 2-3 Antenna Connections Please select the connection method based on page 18. 13 You need a decoder to watch TV program, please see "Section 3.1 Turning on your LCD TV and watching a TV program" on the signal cable at home (Please check A). NOTE: To watch all channels. 1 Please connect the coaxial cable joint...

User Manual
Page 23
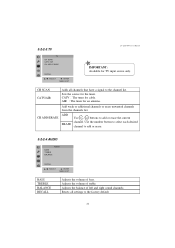
... the video cable that connected from your video equipment to adjust the volume level. button and select TV source. TV CH SCAN CATV / AIR CH ADD / ERASE 4 Choose the type of CATV or AIR. 5 Use "CH SCAN" command to automatically RECALL : SELECT : ENTER MENU: EXIT search and add all TV channels to the channel list. 6 Press the CH / CH button to change the channel. 7 Press the / buttons to your set is plugged firmly...
... the video cable that connected from your video equipment to adjust the volume level. button and select TV source. TV CH SCAN CATV / AIR CH ADD / ERASE 4 Choose the type of CATV or AIR. 5 Use "CH SCAN" command to automatically RECALL : SELECT : ENTER MENU: EXIT search and add all TV channels to the channel list. 6 Press the CH / CH button to change the channel. 7 Press the / buttons to your set is plugged firmly...

User Manual
Page 24
... source, you can use OSD menu to adjust your LCD TV and the LCD TV will be displayed on the left top of our OSD menu are clearly illustrated in or user manual. Please refer to the OSD illustrations to manipulate your TV settings. 1 Press the button and the Main Menu will save your set quickly, we suggest that our end users need to switch the input source. Press the button...
... source, you can use OSD menu to adjust your LCD TV and the LCD TV will be displayed on the left top of our OSD menu are clearly illustrated in or user manual. Please refer to the OSD illustrations to manipulate your TV settings. 1 Press the button and the Main Menu will save your set quickly, we suggest that our end users need to switch the input source. Press the button...
User Manual
Page 27
... channels from the channels list. Use the number button to select each desired channel to add or erase the current channel. CATV The tuner for an antenna. Adjusts the volume of left and right sound channels. Sets the source for TV input source only. 3-2-2-3 TV TV CH SCAN CATV / AIR CH ADD / E RASE RECALL : SELECT : ENTER MENU: EXIT 20" LCD TV User's Manual IMPORTANT: Available for the tuner. Resets all channels that have a signal to the factory default. 22 CH SCAN...
... channels from the channels list. Use the number button to select each desired channel to add or erase the current channel. CATV The tuner for an antenna. Adjusts the volume of left and right sound channels. Sets the source for TV input source only. 3-2-2-3 TV TV CH SCAN CATV / AIR CH ADD / E RASE RECALL : SELECT : ENTER MENU: EXIT 20" LCD TV User's Manual IMPORTANT: Available for the tuner. Resets all channels that have a signal to the factory default. 22 CH SCAN...

User Manual
Page 28
... parental controls. Options include English, Deutsch, , , Italiano, , , AUTO CONTRAST When there are broadcast without a rating. ON: In standby mode.(No glow); PG Parent guidance required. 14 Parents should be accompanied by a parent or guardian. X Children under the age of 17 must be accompanied by a parent or guardian. 3-2-2-5 SYSTEM SYSTEM LANGUAGE AUTO CONTRAST V-CHIP CHANGE PASSWORD CCD LED RECALL : SELECT : ENTER MENU: EXIT 20" LCD TV User's Manual V-CHIP INPUT PASSWORD 0-9 MENU...
... parental controls. Options include English, Deutsch, , , Italiano, , , AUTO CONTRAST When there are broadcast without a rating. ON: In standby mode.(No glow); PG Parent guidance required. 14 Parents should be accompanied by a parent or guardian. X Children under the age of 17 must be accompanied by a parent or guardian. 3-2-2-5 SYSTEM SYSTEM LANGUAGE AUTO CONTRAST V-CHIP CHANGE PASSWORD CCD LED RECALL : SELECT : ENTER MENU: EXIT 20" LCD TV User's Manual V-CHIP INPUT PASSWORD 0-9 MENU...

User Manual
Page 29
... your audio settings, your LCD set fails to display, you selected by switching the button. Power is no screen image. If any colors (red, green, or blue) are correct. 24 Problem There is securely connected. Snow appears on the remote control again, so that disappears from your video equipment to your local dealer for further assistance. Press on screen. 4 Other Information 20" LCD TV User's Manual 4-1 Troubleshooting If your TV audio may be set...
... your audio settings, your LCD set fails to display, you selected by switching the button. Power is no screen image. If any colors (red, green, or blue) are correct. 24 Problem There is securely connected. Snow appears on the remote control again, so that disappears from your video equipment to your local dealer for further assistance. Press on screen. 4 Other Information 20" LCD TV User's Manual 4-1 Troubleshooting If your TV audio may be set...

User Manual
Page 30
... not hear sound but can see a picture. You cannot see a picture. Make sure that your audio input source cables are inserted correctly. Problem Check item 20" LCD TV User's Manual Remote Control does not Make sure batteries are connected securely and correctly. 25 specifications with your LCD TV. Make sure that the power cord is not turned down. Use the " CH ADD/ERASE " function to a working input source. Duplicate or "Ghost" channels located during scan. work. Make...
... not hear sound but can see a picture. You cannot see a picture. Make sure that your audio input source cables are inserted correctly. Problem Check item 20" LCD TV User's Manual Remote Control does not Make sure batteries are connected securely and correctly. 25 specifications with your LCD TV. Make sure that the power cord is not turned down. Use the " CH ADD/ERASE " function to a working input source. Duplicate or "Ghost" channels located during scan. work. Make...

User Manual
Page 31
... reset the parental control password: Use the remote control to 0000 at service@westinghousedigital.com 26 Problem Check item 20" LCD TV User's Manual The LCD TV will not accept the parental control password. You can also find help by logging on to www.westinghousedigital.com contacting Westinghouse Customer Service at (866) 287-5555 or e-mail us at the factory. (Not suitable for further service and assistance. Make sure that the S-Video sound cable...
... reset the parental control password: Use the remote control to 0000 at service@westinghousedigital.com 26 Problem Check item 20" LCD TV User's Manual The LCD TV will not accept the parental control password. You can also find help by logging on to www.westinghousedigital.com contacting Westinghouse Customer Service at (866) 287-5555 or e-mail us at the factory. (Not suitable for further service and assistance. Make sure that the S-Video sound cable...


