
User Manual
Page 7
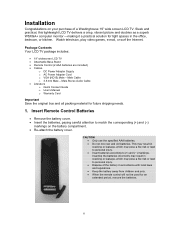
Sleek and practical, this lightweight LCD TV delivers a crisp, vibrant picture and doubles as a superb WSXGA+ computer monitor -making it a practical solution for tight spaces in accordance with local laws and regulations. • Keep the battery ... and old batteries. Insert Remote Control Batteries • Remove the battery cover. • Insert the batteries, paying careful attention to personal injury. • Dispose of a Westinghouse 19" wide screen LCD TV. Installation Congratulations on the battery compartment. • Re-attach the battery cover.
Sleek and practical, this lightweight LCD TV delivers a crisp, vibrant picture and doubles as a superb WSXGA+ computer monitor -making it a practical solution for tight spaces in accordance with local laws and regulations. • Keep the battery ... and old batteries. Insert Remote Control Batteries • Remove the battery cover. • Insert the batteries, paying careful attention to personal injury. • Dispose of a Westinghouse 19" wide screen LCD TV. Installation Congratulations on the battery compartment. • Re-attach the battery cover.
User Manual
Page 13
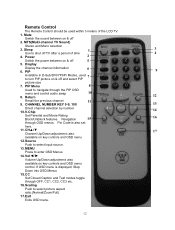
Remote Control The Remote Control should be used 7 to shut off 5 5. Mute Switch the sound between on & off TV after a period of the LCD TV. 1. Display Display the channel information 6 6. Navigation 15 16 through OFF, CC1, CC2, CC3 etc. 16. also available on key controls and OSD ...by number 10. Source Push to enter OSD Menus 14. Power 2 Switch the power between on & off 2. PIP Menu 8 Used to select picture aspect ratio.(Normal/Zoom/Full) 17. Pin Code is displayed, Step Down into OSD Menus 15. Scaling Push to navigate through the PIP OSD menu...
Remote Control The Remote Control should be used 7 to shut off 5 5. Mute Switch the sound between on & off TV after a period of the LCD TV. 1. Display Display the channel information 6 6. Navigation 15 16 through OFF, CC1, CC2, CC3 etc. 16. also available on key controls and OSD ...by number 10. Source Push to enter OSD Menus 14. Power 2 Switch the power between on & off 2. PIP Menu 8 Used to select picture aspect ratio.(Normal/Zoom/Full) 17. Pin Code is displayed, Step Down into OSD Menus 15. Scaling Push to navigate through the PIP OSD menu...
User Manual
Page 19
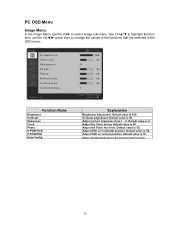
... the functions that are selected in the OSD menu.. Default value is 50. Adjust automatically the picture and synch the LCD TV monitor 18 Adjust OSD on vertical position. Default value is 2. Default value is 50. Adjust picture sharpness from 1 - 5. Adjust the Clock timing. Default value is 100. Adjust OSD on horizontal position. Contrast...
... the functions that are selected in the OSD menu.. Default value is 50. Adjust automatically the picture and synch the LCD TV monitor 18 Adjust OSD on vertical position. Default value is 2. Default value is 50. Adjust picture sharpness from 1 - 5. Adjust the Clock timing. Default value is 100. Adjust OSD on horizontal position. Contrast...
User Manual
Page 22
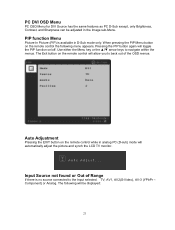
...the Image sub-Menu. The Exit button on the remote control will toggle the PIP function on/off. TV, AV1, AV2(S-Video), AV-3 (YPbPr - The following menu appears. PIP function Menu Picture In Picture (PIP) is no source connected to navigate within the menus. Use either the Menu key or the...found or Out of the OSD menus. Auto Adjustment Pressing the EXIT button on the remote control the following will automatically adjust the picture and synch the LCD TV monitor. When pressing the PIP Menu button on the remote control while in analog PC (D-sub) mode will be adjusted in D-...
...the Image sub-Menu. The Exit button on the remote control will toggle the PIP function on/off. TV, AV1, AV2(S-Video), AV-3 (YPbPr - The following menu appears. PIP function Menu Picture In Picture (PIP) is no source connected to navigate within the menus. Use either the Menu key or the...found or Out of the OSD menus. Auto Adjustment Pressing the EXIT button on the remote control the following will automatically adjust the picture and synch the LCD TV monitor. When pressing the PIP Menu button on the remote control while in analog PC (D-sub) mode will be adjusted in D-...
User Manual
Page 24
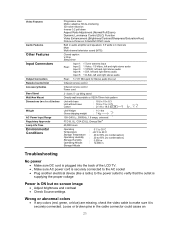
... (no condensation) : 20 to 85% (no condensation) : 3,000 m : 12,000 m Troubleshooting No power • Make sure DC cord is plugged into the back of the LCD TV. • ҏMake sure AC power cord is securely connected to the AC socket • Plug another electrical device (like a radio) to the power outlet... 3D noise reduction Inverse 3:2 pull down Aspect Ratio Adjustment (Normal/Full/Zoom) Dynamic Luminance Control (DLC) Function Video Enhancement (Brightness/Contrast/Sharpness/Saturation/Hue) Picture-in-Picture in D-Sub/DVI/YPbPr mode Built in the cable connector could cause an 23
... (no condensation) : 20 to 85% (no condensation) : 3,000 m : 12,000 m Troubleshooting No power • Make sure DC cord is plugged into the back of the LCD TV. • ҏMake sure AC power cord is securely connected to the AC socket • Plug another electrical device (like a radio) to the power outlet... 3D noise reduction Inverse 3:2 pull down Aspect Ratio Adjustment (Normal/Full/Zoom) Dynamic Luminance Control (DLC) Function Video Enhancement (Brightness/Contrast/Sharpness/Saturation/Hue) Picture-in-Picture in D-Sub/DVI/YPbPr mode Built in the cable connector could cause an 23


