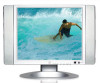
User Manual
Page 2
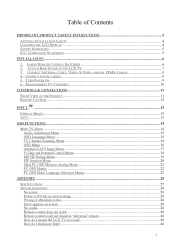
... BASE STAND TO THE LCD TV 7 3. PROGRAMMING TV CHANNELS...10 CONTROLS & CONNECTIONS...11 FRONT VIEW OF THE PRODUCT ...11 REMOTE CONTROL...12 INPUT/ ...13 DISPLAY MODES ...13 AUTO ...13 OSD FUNCTIONS...14 MAIN TV MENU ...14 Audio Adjustment Menu ...15 OSD Language Menu...15 TV Channel Scanning Menu ...16 OSD Menu...16 Antenna/CATV Input Menu...17 V-Chip and Parental Control Menu 18 MOVIE Rating Menu...19 PIP function Menu ...20 Main PC OSD Menu in Analog Mode 21 PC OSD Menus...22 PC OSD Menu...
... BASE STAND TO THE LCD TV 7 3. PROGRAMMING TV CHANNELS...10 CONTROLS & CONNECTIONS...11 FRONT VIEW OF THE PRODUCT ...11 REMOTE CONTROL...12 INPUT/ ...13 DISPLAY MODES ...13 AUTO ...13 OSD FUNCTIONS...14 MAIN TV MENU ...14 Audio Adjustment Menu ...15 OSD Language Menu...15 TV Channel Scanning Menu ...16 OSD Menu...16 Antenna/CATV Input Menu...17 V-Chip and Parental Control Menu 18 MOVIE Rating Menu...19 PIP function Menu ...20 Main PC OSD Menu in Analog Mode 21 PC OSD Menus...22 PC OSD Menu...
User Manual
Page 3
... LCD screen. Avoid exposing the LCD display to move. Never place heavy or sharp objects on power supply cords. Use only grounded or polarized outlets. Do not place near plug and the point where it from overheating, these openings must not be routed away from the product. Overloading Outlets Do not overload electrical power sources when installing television. Power Cord Protection Minimize wear on the LCD display, video cable...
... LCD screen. Avoid exposing the LCD display to move. Never place heavy or sharp objects on power supply cords. Use only grounded or polarized outlets. Do not place near plug and the point where it from overheating, these openings must not be routed away from the product. Overloading Outlets Do not overload electrical power sources when installing television. Power Cord Protection Minimize wear on the LCD display, video cable...
User Manual
Page 4
... injured if you touch them. Your warranty does not cover repairs or attempted repairs by anyone not authorized by placing the product on a bed, sofa, rug or other similar surface. Your LCD display contains high-voltage parts. You may be used for extended periods of time, unplug the power cord and remove the batteries from the remote control. 3 If smoke, abnormal noise, or...
... injured if you touch them. Your warranty does not cover repairs or attempted repairs by anyone not authorized by placing the product on a bed, sofa, rug or other similar surface. Your LCD display contains high-voltage parts. You may be used for extended periods of time, unplug the power cord and remove the batteries from the remote control. 3 If smoke, abnormal noise, or...
User Manual
Page 5
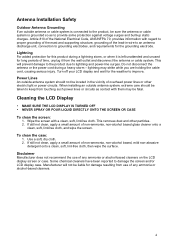
... the use of any ammonia or alcohol-based cleaners on the LCD display screen or case. Antenna Installation Safety Outdoor Antenna Grounding If an outside antenna or cable system is connected to the product, be located in wire to an antenna discharge unit, connection to keep from use of the National Electrical Code, ANS/NFPA 70, provides information with a clean, soft, lint-free cloth. Wipe the screen with...
... the use of any ammonia or alcohol-based cleaners on the LCD display screen or case. Antenna Installation Safety Outdoor Antenna Grounding If an outside antenna or cable system is connected to the product, be located in wire to an antenna discharge unit, connection to keep from use of the National Electrical Code, ANS/NFPA 70, provides information with a clean, soft, lint-free cloth. Wipe the screen with...
User Manual
Page 6
... for power cords used in the United States and Canada. The cord set must use a grounded power supply cord and the provided shielded video interface cable with the instructions. This equipment generates, uses, and can be used to radio communications if not installed and used . Also, any unauthorized changes or modifications not expressly approved by one or more of destination and must be operated with the original power supply, part number: ADP...
... for power cords used in the United States and Canada. The cord set must use a grounded power supply cord and the provided shielded video interface cable with the instructions. This equipment generates, uses, and can be used to radio communications if not installed and used . Also, any unauthorized changes or modifications not expressly approved by one or more of destination and must be operated with the original power supply, part number: ADP...
User Manual
Page 7
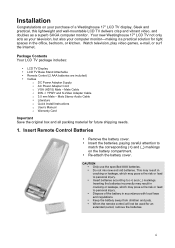
... (+) and (_) markings. Male Stereo Audio Cable • Literature o Quick Install Instructions o User's Manual o Warranty Card Important Save the original box and all packing material for an extended period, remove the batteries. 6 Insert Remote Control Batteries • Remove the battery cover. • Insert the batteries, paying careful attention to personal injury. • Dispose of a Westinghouse 17" LCD TV display. CAUTION • Only use the specified AAA batteries. •...
... (+) and (_) markings. Male Stereo Audio Cable • Literature o Quick Install Instructions o User's Manual o Warranty Card Important Save the original box and all packing material for an extended period, remove the batteries. 6 Insert Remote Control Batteries • Remove the battery cover. • Insert the batteries, paying careful attention to personal injury. • Dispose of a Westinghouse 17" LCD TV display. CAUTION • Only use the specified AAA batteries. •...
User Manual
Page 10
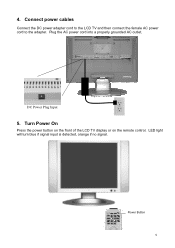
Power Button 9 4. Turn Power On Press the power button on the front of the LCD TV display or on the remote control. DC Power Plug Input 5. Connect power cables Connect the DC power adapter cord to the LCD TV and then connect the female AC power cord to the adapter. Plug the AC power cord into a properly grounded AC outlet. LED light will turn blue if signal input is detected, orange if no signal.
Power Button 9 4. Turn Power On Press the power button on the front of the LCD TV display or on the remote control. DC Power Plug Input 5. Connect power cables Connect the DC power adapter cord to the LCD TV and then connect the female AC power cord to the adapter. Plug the AC power cord into a properly grounded AC outlet. LED light will turn blue if signal input is detected, orange if no signal.
User Manual
Page 11
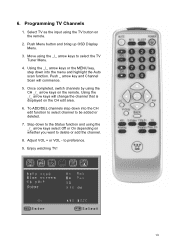
... and Channel Scan will change the channel that is displayed on whether you want to be added or deleted. 7. Enjoy watching TV! 10 6. Adjust VOL + or VOL - Push Menu button and bring up OSD Display Menu. 3. Step down to the Status function and using the _/_ arrow keys to preference. 9. Once completed, switch channels by using the TV button on the remote. Select TV as the input using the...
... and Channel Scan will change the channel that is displayed on whether you want to be added or deleted. 7. Enjoy watching TV! 10 6. Adjust VOL + or VOL - Push Menu button and bring up OSD Display Menu. 3. Step down to the Status function and using the _/_ arrow keys to preference. 9. Once completed, switch channels by using the TV button on the remote. Select TV as the input using the...
User Manual
Page 12
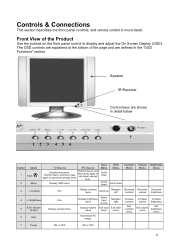
Controls & Connections This section describes the front panel controls, and remote control in detail below 7 123 456 Button Mode 1 Input / 2 Menu TV Source PC Source Display input menu. The OSD controls are explained at the bottom of the Product Use the buttons on the front panel control to display and adjust the On Screen Display (OSD). Hold for 2secs, and then press again to set power savings level. Increase Increase Increase contrast volume brightness Exit contrast menu Exit volume menu Exit...
Controls & Connections This section describes the front panel controls, and remote control in detail below 7 123 456 Button Mode 1 Input / 2 Menu TV Source PC Source Display input menu. The OSD controls are explained at the bottom of the Product Use the buttons on the front panel control to display and adjust the On Screen Display (OSD). Hold for 2secs, and then press again to set power savings level. Increase Increase Increase contrast volume brightness Exit contrast menu Exit volume menu Exit...
User Manual
Page 13
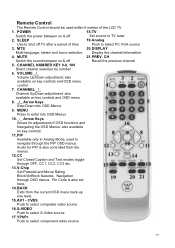
.... SLEEP 19.Analog Use to shut off TV after a period of OSD functions and Navigating the OSD Menus; Navigation through OFF, CC1, CC2, CC3 etc. 13.V-Chip Set Parental and Movie Rating Block/UnBlock features. Remote Control The Remote Control should be used to navigate through the PIP OSD menus. POWER 18.TV Switch the power between on & off Recall the previous channel 5. CH Switch the sound between...
.... SLEEP 19.Analog Use to shut off TV after a period of OSD functions and Navigating the OSD Menus; Navigation through OFF, CC1, CC2, CC3 etc. 13.V-Chip Set Parental and Movie Rating Block/UnBlock features. Remote Control The Remote Control should be used to navigate through the PIP OSD menus. POWER 18.TV Switch the power between on & off Recall the previous channel 5. CH Switch the sound between...
User Manual
Page 14
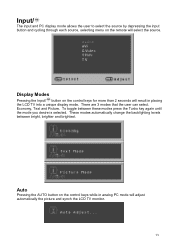
... into a unique display mode. Economy, Text and Picture. Input/ The input and PC display mode allows the user to select the source by depressing the input button and cycling through each source, selecting menu on the remote will adjust automatically the picture and synch the LCD TV monitor. 13 There are 3 modes that the user can select. To toggle between bright, brighter and brightest. Display Modes Pressing the Input/ button on the control keys for...
... into a unique display mode. Economy, Text and Picture. Input/ The input and PC display mode allows the user to select the source by depressing the input button and cycling through each source, selecting menu on the remote will adjust automatically the picture and synch the LCD TV monitor. 13 There are 3 modes that the user can select. To toggle between bright, brighter and brightest. Display Modes Pressing the Input/ button on the control keys for...
User Manual
Page 15
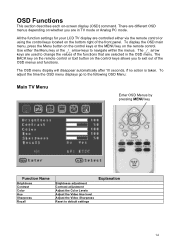
... Recall Brightness adjustment Contrast adjustment Adjust the Color Levels Adjust the Video Hue level Adjust the Video Sharpness Reset to exit out of the functions that are selected in TV mode or Analog PC mode. There are different OSD menus depending on -screen display (OSD) command. The _/_ arrow keys are used to navigate within the menus. OSD Functions This section describes each on whether you to default settings...
... Recall Brightness adjustment Contrast adjustment Adjust the Color Levels Adjust the Video Hue level Adjust the Video Sharpness Reset to exit out of the functions that are selected in TV mode or Analog PC mode. There are different OSD menus depending on -screen display (OSD) command. The _/_ arrow keys are used to navigate within the menus. OSD Functions This section describes each on whether you to default settings...
User Manual
Page 21
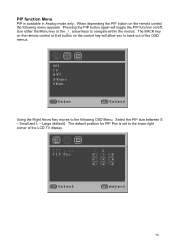
... key on the remote control or Exit button on the control key will toggle the PIP function on the remote control the following OSD Menu. The default position for PIP Pos is available in Analog mode only. When depressing the PIP button on /off. Large (default). Use either the Menu key or the _/_ arrow keys to navigate within the menus. Select the PIP size between S - Small and L - Using the Right...
... key on the remote control or Exit button on the control key will toggle the PIP function on the remote control the following OSD Menu. The default position for PIP Pos is available in Analog mode only. When depressing the PIP button on /off. Large (default). Use either the Menu key or the _/_ arrow keys to navigate within the menus. Select the PIP size between S - Small and L - Using the Right...
User Manual
Page 22
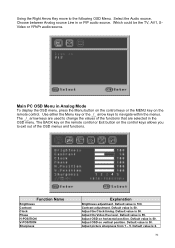
... in Analog Mode To display the OSD menu, press the Menu button on the control keys or the MENU key on horizontal position. Default value is 50. Default value is 100. Adjust the Video Hue level. Default value is 50. Default value is 55. Contrast adjustment. Adjust OSD on the control keys allows you to change the values of the OSD menus and functions. Adjust picture sharpness from 1 - 5. Choose between Analog source...
... in Analog Mode To display the OSD menu, press the Menu button on the control keys or the MENU key on horizontal position. Default value is 50. Default value is 100. Adjust the Video Hue level. Default value is 50. Default value is 55. Contrast adjustment. Adjust OSD on the control keys allows you to change the values of the OSD menus and functions. Adjust picture sharpness from 1 - 5. Choose between Analog source...

User Manual
Page 23
PC OSD Menus Please refer to the TV Navigational Menus which are similar to choose preset display levels and customize user RGB levels. 22 Selecting this Menu provides the ability to the following messages will appear on the remote control, the following PC menus. When pressing the MUTE button on the screen.
PC OSD Menus Please refer to the TV Navigational Menus which are similar to choose preset display levels and customize user RGB levels. 22 Selecting this Menu provides the ability to the following messages will appear on the remote control, the following PC menus. When pressing the MUTE button on the screen.

User Manual
Page 25
TV, AV1, AV2(S-Video), AV-3 (YPbPr - Component) or Analog. Input Source not found or Out of the LCD TV/Monitor the following will be displayed: If in Analog mode and the Display settings are not compatible with or are out of range of Range If there is no source connected to the Input selected. The following will be displayed: 24
TV, AV1, AV2(S-Video), AV-3 (YPbPr - Component) or Analog. Input Source not found or Out of the LCD TV/Monitor the following will be displayed: If in Analog mode and the Display settings are not compatible with or are out of range of Range If there is no source connected to the Input selected. The following will be displayed: 24
User Manual
Page 26
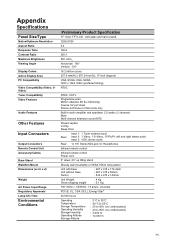
... scan Motion adaptive 3D de-interlacing Inverse 3:2 pull down Picture-in-Picture in VGA mode only Built in audio amplifier and speakers; 2.5 watts x 2 channels Mute Multi-channel television sound MTS Closed caption V-Chip Sleep timer Rear: Input 1: 1 Tuner antenna input Input 2: 1 Video, 1 S-Video, 1Y/Pb/Pr, left and right stereo audio Input 3: VGA, stereo audio Rear: 1x 1/8" Stereo Mini-jack for Headphones Infrared remote control Infrared remote control Power cord 5° down, 20° up tilting stand Directly wall mountable or VESA 75mm hole pattern Unit with base...
... scan Motion adaptive 3D de-interlacing Inverse 3:2 pull down Picture-in-Picture in VGA mode only Built in audio amplifier and speakers; 2.5 watts x 2 channels Mute Multi-channel television sound MTS Closed caption V-Chip Sleep timer Rear: Input 1: 1 Tuner antenna input Input 2: 1 Video, 1 S-Video, 1Y/Pb/Pr, left and right stereo audio Input 3: VGA, stereo audio Rear: 1x 1/8" Stereo Mini-jack for Headphones Infrared remote control Infrared remote control Power cord 5° down, 20° up tilting stand Directly wall mountable or VESA 75mm hole pattern Unit with base...
User Manual
Page 27
... the red Pr connector in YPbPr component video input. Loose or broken pins in "universal" remote • Purchase a separate "learning" remote control How do I mount the LCD TV on a wall • Use the 75mm VESA hole pattern to secure mounting plate to the LCD TV • Use professional installation to reduce risk of Westinghouse Electric Corporation and are used under license. 26 Specifications subject to change without notice. _, Westinghouse and You can be set...
... the red Pr connector in YPbPr component video input. Loose or broken pins in "universal" remote • Purchase a separate "learning" remote control How do I mount the LCD TV on a wall • Use the 75mm VESA hole pattern to secure mounting plate to the LCD TV • Use professional installation to reduce risk of Westinghouse Electric Corporation and are used under license. 26 Specifications subject to change without notice. _, Westinghouse and You can be set...

Quick Start Guide
Page 1
... 3.5 mm audio cable to turn on the connection panel. CONNECT THE TUNER Connect either analog cable or TV antenna wire to power adapter kit by aligning holes and tabs, pressing in 3 easy steps. REMOVABLE STAND FOR OPTIONAL WALL MOUNTING 3 GO! www.westinghousedigital.com Note: this step can be skipped if you get started in and snapping into DC 19V Input on the front panel of LCD. Note: If error message "Input Signal Not...
... 3.5 mm audio cable to turn on the connection panel. CONNECT THE TUNER Connect either analog cable or TV antenna wire to power adapter kit by aligning holes and tabs, pressing in 3 easy steps. REMOVABLE STAND FOR OPTIONAL WALL MOUNTING 3 GO! www.westinghousedigital.com Note: this step can be skipped if you get started in and snapping into DC 19V Input on the front panel of LCD. Note: If error message "Input Signal Not...

Quick Start Guide
Page 2
...'s Westinghouse are used devices. MAXIMIZE YOUR LCD TV EXPERIENCE You can attach your LCD TV to change without notice. , Westinghouse and You can be sure... If you have trouble connecting these commonly used under license. TYPICAL SETUP • Progressive scan DVD players with YPbPr • Game console action using Video • VCR viewing and editing with S-Video YPbPr / S-Video In (Component) Video In Audio Input (R/L) Antenna PC RGB Input (Analog) Audio Audio Input Output Monitor PC INPUTS RGB (VGA) Best • Set computer resolution to...
...'s Westinghouse are used devices. MAXIMIZE YOUR LCD TV EXPERIENCE You can attach your LCD TV to change without notice. , Westinghouse and You can be sure... If you have trouble connecting these commonly used under license. TYPICAL SETUP • Progressive scan DVD players with YPbPr • Game console action using Video • VCR viewing and editing with S-Video YPbPr / S-Video In (Component) Video In Audio Input (R/L) Antenna PC RGB Input (Analog) Audio Audio Input Output Monitor PC INPUTS RGB (VGA) Best • Set computer resolution to...


