User Manual
Page 2
...COMPLIANCE STATEMENT...5 INSTALLATION...6 1. ATTACH BASE STAND TO THE LCD TV 7 3. TURN POWER ON ...9 6. INSERT REMOTE CONTROL BATTERIES 6 2. PROGRAMMING TV CHANNELS...10 CONTROLS & CONNECTIONS...11 FRONT VIEW OF THE PRODUCT ...11 REMOTE CONTROL...12 INPUT/ ...13 DISPLAY MODES ...13 AUTO ...13 OSD FUNCTIONS...14 MAIN TV MENU ...14 Audio...ON but no screen image 26 Wrong or abnormal colors...26 Snow appears on screen ...26 No sound...26 Remote control does not work...26 Remote control code not found in "universal" remote 26 How do I mount the LCD TV on a wall 26 How do I find more help?...26...
...COMPLIANCE STATEMENT...5 INSTALLATION...6 1. ATTACH BASE STAND TO THE LCD TV 7 3. TURN POWER ON ...9 6. INSERT REMOTE CONTROL BATTERIES 6 2. PROGRAMMING TV CHANNELS...10 CONTROLS & CONNECTIONS...11 FRONT VIEW OF THE PRODUCT ...11 REMOTE CONTROL...12 INPUT/ ...13 DISPLAY MODES ...13 AUTO ...13 OSD FUNCTIONS...14 MAIN TV MENU ...14 Audio...ON but no screen image 26 Wrong or abnormal colors...26 Snow appears on screen ...26 No sound...26 Remote control does not work...26 Remote control code not found in "universal" remote 26 How do I mount the LCD TV on a wall 26 How do I find more help?...26...
User Manual
Page 4
... LCD display contains high-voltage parts. You may be used for extended periods of time, unplug the power cord and remove the batteries from the remote control. 3 Refer all servicing and repairs to qualified service personnel. Do not attempt repairs yourself. If smoke, abnormal noise, or strange odor is provided. Contact...
... LCD display contains high-voltage parts. You may be used for extended periods of time, unplug the power cord and remove the batteries from the remote control. 3 Refer all servicing and repairs to qualified service personnel. Do not attempt repairs yourself. If smoke, abnormal noise, or strange odor is provided. Contact...
User Manual
Page 7
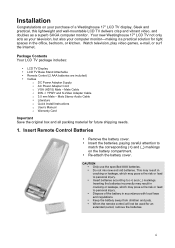
... and regulations. • Keep the battery away from children and pets. • When the remote control will not be used for an extended period, remove the batteries. 6 Your new Westinghouse 17" LCD TV not only acts as a superb SXGA computer monitor. Male Stereo Audio Cable ...Inserting the batteries incorrectly may result in cracking or leakage, which may pose a fire risk or lead to personal injury. • Dispose of a Westinghouse 17" LCD TV display. Installation Congratulations on the battery compartment. • Re-attach the battery cover. Male Cable o DIN -> YPbPr and S-Video...
... and regulations. • Keep the battery away from children and pets. • When the remote control will not be used for an extended period, remove the batteries. 6 Your new Westinghouse 17" LCD TV not only acts as a superb SXGA computer monitor. Male Stereo Audio Cable ...Inserting the batteries incorrectly may result in cracking or leakage, which may pose a fire risk or lead to personal injury. • Dispose of a Westinghouse 17" LCD TV display. Installation Congratulations on the battery compartment. • Re-attach the battery cover. Male Cable o DIN -> YPbPr and S-Video...
User Manual
Page 10
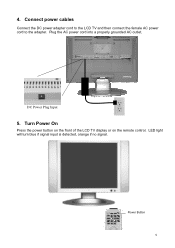
Connect power cables Connect the DC power adapter cord to the LCD TV and then connect the female AC power cord to the adapter. DC Power Plug Input 5. LED light will turn blue if signal input is detected, orange if no signal. Power Button 9 Plug the AC power cord into a properly grounded AC outlet. Turn Power On Press the power button on the front of the LCD TV display or on the remote control. 4.
Connect power cables Connect the DC power adapter cord to the LCD TV and then connect the female AC power cord to the adapter. DC Power Plug Input 5. LED light will turn blue if signal input is detected, orange if no signal. Power Button 9 Plug the AC power cord into a properly grounded AC outlet. Turn Power On Press the power button on the front of the LCD TV display or on the remote control. 4.
User Manual
Page 11
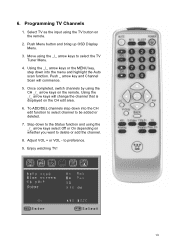
... select channel to preference. 9. to be added or deleted. 7. 6. Select TV as the input using the _/_ arrow keys select Off or On depending on the remote. 2. Move using the CH _/_ arrow keys on the CH edit area. 6. Push _ arrow key and Channel Scan will change the channel that is displayed on... the remote. Using the _/_ arrow keys will commence. 5. Step down to the Status function and using the TV button on whether you want to select the TV...
... select channel to preference. 9. to be added or deleted. 7. 6. Select TV as the input using the _/_ arrow keys select Off or On depending on the remote. 2. Move using the CH _/_ arrow keys on the CH edit area. 6. Push _ arrow key and Channel Scan will change the channel that is displayed on... the remote. Using the _/_ arrow keys will commence. 5. Step down to the Status function and using the TV button on whether you want to select the TV...
User Manual
Page 12
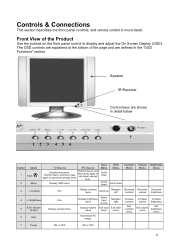
Controls & Connections This section describes the front panel controls, and remote control in detail below 7 123 456 Button Mode 1 Input / 2 Menu TV Source PC Source Display input menu. Display OSD menu Input Menu Scroll down Scroll ...
Controls & Connections This section describes the front panel controls, and remote control in detail below 7 123 456 Button Mode 1 Input / 2 Menu TV Source PC Source Display input menu. Display OSD menu Input Menu Scroll down Scroll ...
User Manual
Page 13
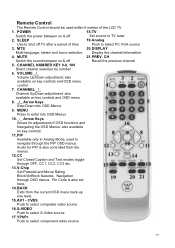
... adjustment; also available on key controls. 11.PIP Available only in Analog Mode, used within 5 meters of OSD functions and Navigating the OSD Menus; Remote Control The Remote Control should be used to TV tuner 2. MTS 20.DISPLAY Multi-language, stereo and mono selection Display the channel information 4. VOLUME _/_ Volume Up/Down...
... adjustment; also available on key controls. 11.PIP Available only in Analog Mode, used within 5 meters of OSD functions and Navigating the OSD Menus; Remote Control The Remote Control should be used to TV tuner 2. MTS 20.DISPLAY Multi-language, stereo and mono selection Display the channel information 4. VOLUME _/_ Volume Up/Down...
User Manual
Page 14
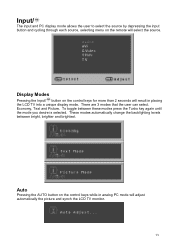
... and PC display mode allows the user to select the source by depressing the input button and cycling through each source, selecting menu on the remote will adjust automatically the picture and synch the LCD TV monitor. 13 Display Modes Pressing the Input/ button on the control keys while in placing...
... and PC display mode allows the user to select the source by depressing the input button and cycling through each source, selecting menu on the remote will adjust automatically the picture and synch the LCD TV monitor. 13 Display Modes Pressing the Input/ button on the control keys while in placing...
User Manual
Page 15
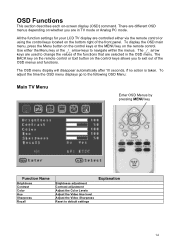
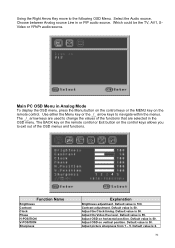
The BACK key on the remote control or Exit button on the remote control. To display the OSD main menu, press the Menu button on the control keys or the MENU key on the control keys allows you ... settings for your LCD TV display are controlled either the Menu key or the _/_ arrow keys to default settings Explanation 14 Use either via the remote control or using the control keys located on whether you to change the values of the functions that are different OSD menus depending on the...
The BACK key on the remote control or Exit button on the remote control. To display the OSD main menu, press the Menu button on the control keys or the MENU key on the control keys allows you ... settings for your LCD TV display are controlled either the Menu key or the _/_ arrow keys to default settings Explanation 14 Use either via the remote control or using the control keys located on whether you to change the values of the functions that are different OSD menus depending on the...
User Manual
Page 19
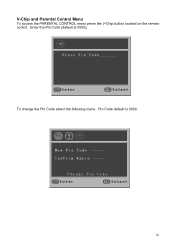
To change the Pin Code select the following menu. Enter the Pin Code (default is 0000. 18 Pin Code default is 0000). V-Chip and Parental Control Menu To access the PARENTAL CONTROL menu press the V-Chip button located on the remote control.
To change the Pin Code select the following menu. Enter the Pin Code (default is 0000. 18 Pin Code default is 0000). V-Chip and Parental Control Menu To access the PARENTAL CONTROL menu press the V-Chip button located on the remote control.
User Manual
Page 21
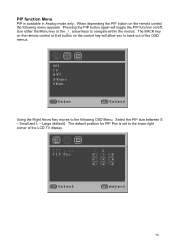
... moves to navigate within the menus. Use either the Menu key or the _/_ arrow keys to the following menu appears. The BACK key on the remote control or Exit button on the control key will toggle the PIP function on the...
... moves to navigate within the menus. Use either the Menu key or the _/_ arrow keys to the following menu appears. The BACK key on the remote control or Exit button on the control key will toggle the PIP function on the...
User Manual
Page 22
... 50. Adjust the Video Hue level. Which could be the TV, AV1, SVideo or YPbPr audio source. The BACK key on the remote control or Exit button on the remote control. Adjust the Clock timing. Default value is 50. Default value is 50. Function Name Brightness Contrast Clock Phase H-POSITION V-POSITION Sharpness...
... 50. Adjust the Video Hue level. Which could be the TV, AV1, SVideo or YPbPr audio source. The BACK key on the remote control or Exit button on the remote control. Adjust the Clock timing. Default value is 50. Default value is 50. Function Name Brightness Contrast Clock Phase H-POSITION V-POSITION Sharpness...

User Manual
Page 23
Selecting this Menu provides the ability to the following messages will appear on the screen. When pressing the MUTE button on the remote control, the following PC menus. PC OSD Menus Please refer to the TV Navigational Menus which are similar to choose preset display levels and customize user RGB levels. 22
Selecting this Menu provides the ability to the following messages will appear on the screen. When pressing the MUTE button on the remote control, the following PC menus. PC OSD Menus Please refer to the TV Navigational Menus which are similar to choose preset display levels and customize user RGB levels. 22
User Manual
Page 26
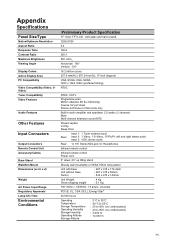
... 1Y/Pb/Pr, left and right stereo audio Input 3: VGA, stereo audio Rear: 1x 1/8" Stereo Mini-jack for Headphones Infrared remote control Infrared remote control Power cord 5° down, 20° up tilting stand Directly wall mountable or VESA 75mm hole pattern Unit with base Unit... Active Display Area PC Compatibility Video Compatibility (Video, SVideo) Tuner Compatibility Video Features Audio Features Other Features Input Connectors Output Connectors Remote Control Unit Accessory/Cables Base Stand Wall/Arm Mount Dimensions (w x h x d) Weight AC Power Input Range Regulatory Approvals Lamp...
... 1Y/Pb/Pr, left and right stereo audio Input 3: VGA, stereo audio Rear: 1x 1/8" Stereo Mini-jack for Headphones Infrared remote control Infrared remote control Power cord 5° down, 20° up tilting stand Directly wall mountable or VESA 75mm hole pattern Unit with base Unit... Active Display Area PC Compatibility Video Compatibility (Video, SVideo) Tuner Compatibility Video Features Audio Features Other Features Input Connectors Output Connectors Remote Control Unit Accessory/Cables Base Stand Wall/Arm Mount Dimensions (w x h x d) Weight AC Power Input Range Regulatory Approvals Lamp...
User Manual
Page 27
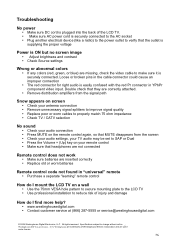
... found in "universal" remote • Purchase a separate "learning" remote control How do I mount the LCD TV on a wall • Use the 75mm VESA hole pattern to secure mounting plate to the LCD TV • Use professional installation to reduce risk of Westinghouse Electric Corporation and are ...from the screen • Check your audio settings, your remote control • Make sure that headphones are not connected Remote control does not work • Make sure batteries are missing, check the video cable to make sure it 's Westinghouse are trademarks of injury and damage How do I find...
... found in "universal" remote • Purchase a separate "learning" remote control How do I mount the LCD TV on a wall • Use the 75mm VESA hole pattern to secure mounting plate to the LCD TV • Use professional installation to reduce risk of Westinghouse Electric Corporation and are ...from the screen • Check your audio settings, your remote control • Make sure that headphones are not connected Remote control does not work • Make sure batteries are missing, check the video cable to make sure it 's Westinghouse are trademarks of injury and damage How do I find...


