User Manual
Page 2
CONNECT POWER CABLES ...9 5. INSERT REMOTE CONTROL BATTERIES 6 2. CONNECT ANTENNA, CABLE, VIDEO, S-VIDEO, AND/OR YPBPR CABLES 8 4. TURN POWER ON ...9 6. ATTACH BASE STAND TO THE LCD TV 7 3. PROGRAMMING TV CHANNELS...10 CONTROLS & CONNECTIONS...11 FRONT VIEW OF THE PRODUCT ...11 REMOTE CONTROL...12 INPUT/ ...13 DISPLAY MODES ...13 AUTO ...13 OSD FUNCTIONS...14 MAIN TV MENU ...14 Audio Adjustment Menu ...15 OSD Language Menu...15 TV Channel Scanning Menu ...16 OSD Menu...16 Antenna/CATV Input Menu...17 V-Chip and Parental Control Menu 18 MOVIE Rating Menu...19 PIP function Menu ...20 Main ...
CONNECT POWER CABLES ...9 5. INSERT REMOTE CONTROL BATTERIES 6 2. CONNECT ANTENNA, CABLE, VIDEO, S-VIDEO, AND/OR YPBPR CABLES 8 4. TURN POWER ON ...9 6. ATTACH BASE STAND TO THE LCD TV 7 3. PROGRAMMING TV CHANNELS...10 CONTROLS & CONNECTIONS...11 FRONT VIEW OF THE PRODUCT ...11 REMOTE CONTROL...12 INPUT/ ...13 DISPLAY MODES ...13 AUTO ...13 OSD FUNCTIONS...14 MAIN TV MENU ...14 Audio Adjustment Menu ...15 OSD Language Menu...15 TV Channel Scanning Menu ...16 OSD Menu...16 Antenna/CATV Input Menu...17 V-Chip and Parental Control Menu 18 MOVIE Rating Menu...19 PIP function Menu ...20 Main ...
User Manual
Page 3
... on the LCD display, video cable, or power cord. Do not route power cord under rugs or carpeting. Unplug cord and discontinue use if damage is discovered. Always position your LCD to move. Avoid exposing the LCD display to remove. Orient your LCD near plug and the point where it from direct sunlight to product. Overloading wall outlets, circuits, or extension cords can result in a convenient location for future...
... on the LCD display, video cable, or power cord. Do not route power cord under rugs or carpeting. Unplug cord and discontinue use if damage is discovered. Always position your LCD to move. Avoid exposing the LCD display to remove. Orient your LCD near plug and the point where it from direct sunlight to product. Overloading wall outlets, circuits, or extension cords can result in a convenient location for future...
User Manual
Page 4
... parts. Contact a qualified service technician If your LCD display will not be seriously injured if you touch them. Other Notices and Precautions Caution: Never remove the rear cover. Refer all servicing and repairs to qualified service personnel. You may be used for extended periods of time, unplug the power cord and remove the batteries from the remote control. 3 Do not place the product in a built-in installation...
... parts. Contact a qualified service technician If your LCD display will not be seriously injured if you touch them. Other Notices and Precautions Caution: Never remove the rear cover. Refer all servicing and repairs to qualified service personnel. You may be used for extended periods of time, unplug the power cord and remove the batteries from the remote control. 3 Do not place the product in a built-in installation...
User Manual
Page 5
... a clean, soft, lint-free cloth, and wipe the screen. This will not be liable for long periods of any ammonia or alcohol-based cleaners on the LCD display screen or case. Power Lines An outside antenna system should be taken to keep from use of overhead power lines or other particles. 2. This removes dust and other electric light or power circuits. If still...
... a clean, soft, lint-free cloth, and wipe the screen. This will not be liable for long periods of any ammonia or alcohol-based cleaners on the LCD display screen or case. Power Lines An outside antenna system should be taken to keep from use of overhead power lines or other particles. 2. This removes dust and other electric light or power circuits. If still...
User Manual
Page 6
... power supply cord and the provided shielded video interface cable with the original power supply, part number: ADP-60CF A. However, there is certified for your unit. Some examples are mounted on a circuit different from that is going to be used to prevent electric shock. Use the following measures: • Reorient or relocate the receiving antenna. • Increase the separation between the equipment and receiver. • Connect...
... power supply cord and the provided shielded video interface cable with the original power supply, part number: ADP-60CF A. However, there is certified for your unit. Some examples are mounted on a circuit different from that is going to be used to prevent electric shock. Use the following measures: • Reorient or relocate the receiving antenna. • Increase the separation between the equipment and receiver. • Connect...
User Manual
Page 7
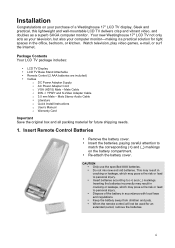
... for future shipping needs. 1. Male Stereo Audio Cable • Literature o Quick Install Instructions o User's Manual o Warranty Card Important Save the original box and all packing material for tight spaces in accordance with local laws and regulations. • Keep the battery away from children and pets. • When the remote control will not be used for an extended period, remove the batteries. 6 Watch television, play video games, e-mail, or...
... for future shipping needs. 1. Male Stereo Audio Cable • Literature o Quick Install Instructions o User's Manual o Warranty Card Important Save the original box and all packing material for tight spaces in accordance with local laws and regulations. • Keep the battery away from children and pets. • When the remote control will not be used for an extended period, remove the batteries. 6 Watch television, play video games, e-mail, or...
User Manual
Page 10
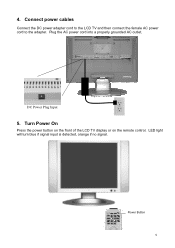
Plug the AC power cord into a properly grounded AC outlet. Turn Power On Press the power button on the front of the LCD TV display or on the remote control. LED light will turn blue if signal input is detected, orange if no signal. Power Button 9 DC Power Plug Input 5. 4. Connect power cables Connect the DC power adapter cord to the LCD TV and then connect the female AC power cord to the adapter.
Plug the AC power cord into a properly grounded AC outlet. Turn Power On Press the power button on the front of the LCD TV display or on the remote control. LED light will turn blue if signal input is detected, orange if no signal. Power Button 9 DC Power Plug Input 5. 4. Connect power cables Connect the DC power adapter cord to the LCD TV and then connect the female AC power cord to the adapter.
User Manual
Page 11
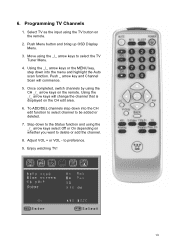
... or add the channel. 8. Push _ arrow key and Channel Scan will change the channel that is displayed on the remote. 2. Move using the CH _/_ arrow keys on whether you want to be added or deleted. 7. Once completed, switch channels by using the _/_ arrow keys to preference. 9. Programming TV Channels 1. Using the _/_ arrow keys or the MENU key, step down into the menu and highlight the Auto scan function.
... or add the channel. 8. Push _ arrow key and Channel Scan will change the channel that is displayed on the remote. 2. Move using the CH _/_ arrow keys on whether you want to be added or deleted. 7. Once completed, switch channels by using the _/_ arrow keys to preference. 9. Programming TV Channels 1. Using the _/_ arrow keys or the MENU key, step down into the menu and highlight the Auto scan function.
User Manual
Page 12
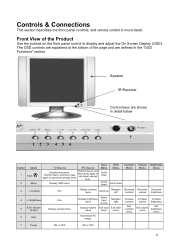
... for 2secs, and then press again to display and adjust the On Screen Display (OSD). The OSD controls are explained at the bottom of the Product Use the buttons on the front panel control to set power savings level. Controls & Connections This section describes the front panel controls, and remote control in detail below 7 123 456 Button Mode 1 Input / 2 Menu TV Source PC Source Display input menu. Front View of the page and are shown in more...
... for 2secs, and then press again to display and adjust the On Screen Display (OSD). The OSD controls are explained at the bottom of the Product Use the buttons on the front panel control to set power savings level. Controls & Connections This section describes the front panel controls, and remote control in detail below 7 123 456 Button Mode 1 Input / 2 Menu TV Source PC Source Display input menu. Front View of the page and are shown in more...
User Manual
Page 13
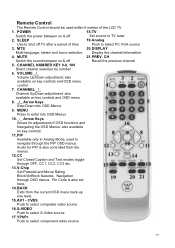
.... Remote Control The Remote Control should be used to navigate through the PIP OSD menus. SLEEP 19.Analog Use to shut off Recall the previous channel 5. CHANNEL NUMBER KEY 0-9, 100 Direct channel selection by number 6. MENU Press to select component video source 12 Pin Code is also controlled from the current OSD menu back-up one level. 15.AV1 - also available on key controls. 11.PIP Available only in Analog Mode, used within 5 meters of the LCD TV...
.... Remote Control The Remote Control should be used to navigate through the PIP OSD menus. SLEEP 19.Analog Use to shut off Recall the previous channel 5. CHANNEL NUMBER KEY 0-9, 100 Direct channel selection by number 6. MENU Press to select component video source 12 Pin Code is also controlled from the current OSD menu back-up one level. 15.AV1 - also available on key controls. 11.PIP Available only in Analog Mode, used within 5 meters of the LCD TV...
User Manual
Page 14
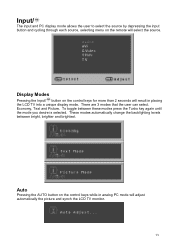
... the control keys while in placing the LCD TV into a unique display mode. There are 3 modes that the user can select. Economy, Text and Picture. To toggle between bright, brighter and brightest. Input/ The input and PC display mode allows the user to select the source by depressing the input button and cycling through each source, selecting menu on the remote will adjust automatically the picture and synch the LCD TV monitor...
... the control keys while in placing the LCD TV into a unique display mode. There are 3 modes that the user can select. Economy, Text and Picture. To toggle between bright, brighter and brightest. Input/ The input and PC display mode allows the user to select the source by depressing the input button and cycling through each source, selecting menu on the remote will adjust automatically the picture and synch the LCD TV monitor...
User Manual
Page 15
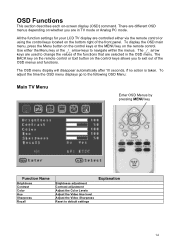
... Menu button on the control keys or the MENU key on -screen display (OSD) command. Use either via the remote control or using the control keys located on the bottom right of the front panel. To adjust the time the OSD menu displays go to the following OSD Menu: Main TV Menu Enter OSD Menus by pressing MENU key Function Name Brightness Contrast Color Hue Sharpness Recall Brightness adjustment Contrast adjustment Adjust the Color Levels Adjust the Video...
... Menu button on the control keys or the MENU key on -screen display (OSD) command. Use either via the remote control or using the control keys located on the bottom right of the front panel. To adjust the time the OSD menu displays go to the following OSD Menu: Main TV Menu Enter OSD Menus by pressing MENU key Function Name Brightness Contrast Color Hue Sharpness Recall Brightness adjustment Contrast adjustment Adjust the Color Levels Adjust the Video...
User Manual
Page 17
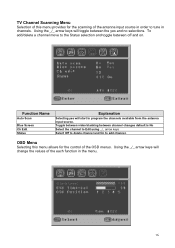
... values of the each function in channels. Toggle between video blanking between channel changes default is No Select the channel to Edit using _/_ arrow keys Select Off to delete channel and On to program the channels available from the antenna input source. Function Name Auto Scan Blue Screen Ch Edit Status Explanation Selecting yes will start to add channel. Using the _/_ arrow keys will toggle between off and...
... values of the each function in channels. Toggle between video blanking between channel changes default is No Select the channel to Edit using _/_ arrow keys Select Off to delete channel and On to program the channels available from the antenna input source. Function Name Auto Scan Blue Screen Ch Edit Status Explanation Selecting yes will start to add channel. Using the _/_ arrow keys will toggle between off and...
User Manual
Page 18
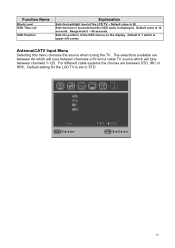
... STD, IRC or HRC. Antenna/CATV Input Menu Selecting this menu chooses the source when tuning the TV. For different cable systems the choices are between Air which will tune between channels 2-69 and a cable TV source which is upper left corner. Default setting for the LCD TV is displayed. Function Name Black Level OSD Time-out OSD Position Explanation Sets the backlight level of the...
... STD, IRC or HRC. Antenna/CATV Input Menu Selecting this menu chooses the source when tuning the TV. For different cable systems the choices are between Air which will tune between channels 2-69 and a cable TV source which is upper left corner. Default setting for the LCD TV is displayed. Function Name Black Level OSD Time-out OSD Position Explanation Sets the backlight level of the...
User Manual
Page 21
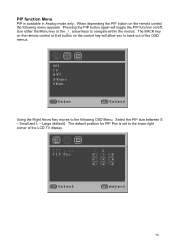
... back out of the LCD TV display. 20 PIP function Menu PIP is set to the following menu appears. Pressing the PIP button again will allow you to navigate within the menus. Select the PIP size between S - Large (default). The BACK key on the remote control or Exit button on the control key will toggle the PIP function on the remote control the following OSD Menu. Using the Right Arrow Key...
... back out of the LCD TV display. 20 PIP function Menu PIP is set to the following menu appears. Pressing the PIP button again will allow you to navigate within the menus. Select the PIP size between S - Large (default). The BACK key on the remote control or Exit button on the control key will toggle the PIP function on the remote control the following OSD Menu. Using the Right Arrow Key...
User Manual
Page 22
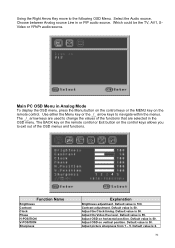
... Analog source Line in Analog Mode To display the OSD menu, press the Menu button on the control keys or the MENU key on the control keys allows you to the following OSD Menu. Contrast adjustment. Default value is 2. 21 Default value is 50. Main PC OSD Menu in or PIP audio source. Adjust the Video Hue level. Adjust OSD on horizontal position. The BACK key on the remote control or Exit button on the remote control. Default...
... Analog source Line in Analog Mode To display the OSD menu, press the Menu button on the control keys or the MENU key on the control keys allows you to the following OSD Menu. Contrast adjustment. Default value is 2. 21 Default value is 50. Main PC OSD Menu in or PIP audio source. Adjust the Video Hue level. Adjust OSD on horizontal position. The BACK key on the remote control or Exit button on the remote control. Default...

User Manual
Page 23
PC OSD Menus Please refer to the TV Navigational Menus which are similar to choose preset display levels and customize user RGB levels. 22 Selecting this Menu provides the ability to the following messages will appear on the screen. When pressing the MUTE button on the remote control, the following PC menus.
PC OSD Menus Please refer to the TV Navigational Menus which are similar to choose preset display levels and customize user RGB levels. 22 Selecting this Menu provides the ability to the following messages will appear on the screen. When pressing the MUTE button on the remote control, the following PC menus.

User Manual
Page 25
Component) or Analog. Input Source not found or Out of the LCD TV/Monitor the following will be displayed: If in Analog mode and the Display settings are not compatible with or are out of range of Range If there is no source connected to the Input selected. The following will be displayed: 24 TV, AV1, AV2(S-Video), AV-3 (YPbPr -
Component) or Analog. Input Source not found or Out of the LCD TV/Monitor the following will be displayed: If in Analog mode and the Display settings are not compatible with or are out of range of Range If there is no source connected to the Input selected. The following will be displayed: 24 TV, AV1, AV2(S-Video), AV-3 (YPbPr -
User Manual
Page 26
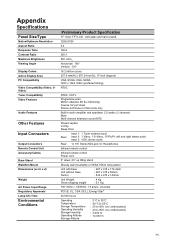
... scan Motion adaptive 3D de-interlacing Inverse 3:2 pull down Picture-in-Picture in VGA mode only Built in audio amplifier and speakers; 2.5 watts x 2 channels Mute Multi-channel television sound MTS Closed caption V-Chip Sleep timer Rear: Input 1: 1 Tuner antenna input Input 2: 1 Video, 1 S-Video, 1Y/Pb/Pr, left and right stereo audio Input 3: VGA, stereo audio Rear: 1x 1/8" Stereo Mini-jack for Headphones Infrared remote control Infrared remote control Power cord 5° down, 20° up tilting stand Directly wall mountable or VESA 75mm hole pattern Unit with base...
... scan Motion adaptive 3D de-interlacing Inverse 3:2 pull down Picture-in-Picture in VGA mode only Built in audio amplifier and speakers; 2.5 watts x 2 channels Mute Multi-channel television sound MTS Closed caption V-Chip Sleep timer Rear: Input 1: 1 Tuner antenna input Input 2: 1 Video, 1 S-Video, 1Y/Pb/Pr, left and right stereo audio Input 3: VGA, stereo audio Rear: 1x 1/8" Stereo Mini-jack for Headphones Infrared remote control Infrared remote control Power cord 5° down, 20° up tilting stand Directly wall mountable or VESA 75mm hole pattern Unit with base...
User Manual
Page 27
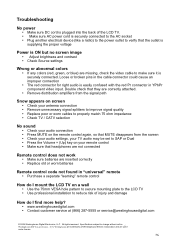
... batteries Remote control code not found in YPbPr component video input. if it is easily confused with the red Pr connector in "universal" remote • Purchase a separate "learning" remote control How do I mount the LCD TV on the remote control again, so that MUTE disappears from the signal path Snow appears on screen • Check your antenna connection • Remove unnecessary signal splitters to improve signal quality • Replace poor or worn cables to...
... batteries Remote control code not found in YPbPr component video input. if it is easily confused with the red Pr connector in "universal" remote • Purchase a separate "learning" remote control How do I mount the LCD TV on the remote control again, so that MUTE disappears from the signal path Snow appears on screen • Check your antenna connection • Remove unnecessary signal splitters to improve signal quality • Replace poor or worn cables to...


