User Manual
Page 3
... Overload 6 Power Cord Protection 6 Ventilation 6 WARNINGS AND PRECAUTIONS 7 ANTENNA INSTALLATION SAFETY 8 Lightning 8 Power lines 8 CLEANING THE LED TV 9 Dolby-Digital Notice 9 PACKAGE CONTENTS 10 CONTROL PANEL 11 TERMINALS 12 REMOTE CONTROL (TYPE A 13 REMOTE CONTROL (TYPE B 14 REMOTE CONTROL OPERATION 16 INSTALLING THE REMOTE CONTROL BATTERIES .. 16 REMOTE CONTROL TRANSMISSION RANGE...
... Overload 6 Power Cord Protection 6 Ventilation 6 WARNINGS AND PRECAUTIONS 7 ANTENNA INSTALLATION SAFETY 8 Lightning 8 Power lines 8 CLEANING THE LED TV 9 Dolby-Digital Notice 9 PACKAGE CONTENTS 10 CONTROL PANEL 11 TERMINALS 12 REMOTE CONTROL (TYPE A 13 REMOTE CONTROL (TYPE B 14 REMOTE CONTROL OPERATION 16 INSTALLING THE REMOTE CONTROL BATTERIES .. 16 REMOTE CONTROL TRANSMISSION RANGE...
User Manual
Page 15
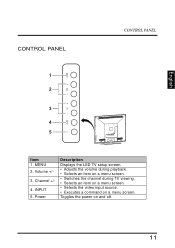
Channel +/- 4. INPUT 5. Toggles the power on a menu screen. Power Description Displays the LED TV setup screen. • Adjusts the volume during playback. • Selects an item on a menu screen. • Switches the channel during TV viewing. • Selects an item on a menu screen. • Selects the video input source. • Executes a command on and off. 11 Volume +/- 3. English CONTROL PANEL CONTROL PANEL MENU 1 2 3 4 5 INPUT CH VOL DC IN AUDIO IN VGA Y LR TUNER L R Item 1. MENU 2.
Channel +/- 4. INPUT 5. Toggles the power on a menu screen. Power Description Displays the LED TV setup screen. • Adjusts the volume during playback. • Selects an item on a menu screen. • Switches the channel during TV viewing. • Selects an item on a menu screen. • Selects the video input source. • Executes a command on and off. 11 Volume +/- 3. English CONTROL PANEL CONTROL PANEL MENU 1 2 3 4 5 INPUT CH VOL DC IN AUDIO IN VGA Y LR TUNER L R Item 1. MENU 2.
User Manual
Page 24
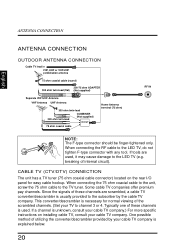
... has a TV tuner (75 ohm coaxial cable connector) located on installing cable TV, consult your cable TV company.) For more specific instructions on the rear I/O panel for normal viewing of these channels are used . Typically one of the scrambled channels. (Set your cable TV company is usually provided to the subscriber...
... has a TV tuner (75 ohm coaxial cable connector) located on installing cable TV, consult your cable TV company.) For more specific instructions on the rear I/O panel for normal viewing of these channels are used . Typically one of the scrambled channels. (Set your cable TV company is usually provided to the subscriber...
User Manual
Page 25
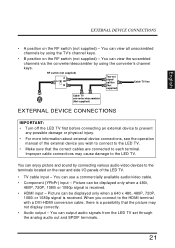
... off the LED TV first before connecting an external device to the LED TV. English EXTERNAL DEVICE CONNECTIONS • A position on the rear and side I/O panels of the external device you connect to the HDMI terminal with a DVI-HDMI conversion cable, there is a possibility that the correct cables are connected to...
... off the LED TV first before connecting an external device to the LED TV. English EXTERNAL DEVICE CONNECTIONS • A position on the rear and side I/O panels of the external device you connect to the HDMI terminal with a DVI-HDMI conversion cable, there is a possibility that the correct cables are connected to...
User Manual
Page 27
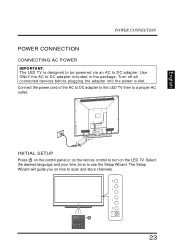
... desired language and your time zone to turn on the LED TV. DC IN AUDIO IN VGA Y LR TUNER L R INITIAL SETUP Press on the control panel or on how to DC adapter. Turn off all connected devices before plugging the adapter into the power outlet. The Setup Wizard will guide you...
... desired language and your time zone to turn on the LED TV. DC IN AUDIO IN VGA Y LR TUNER L R INITIAL SETUP Press on the control panel or on how to DC adapter. Turn off all connected devices before plugging the adapter into the power outlet. The Setup Wizard will guide you...
User Manual
Page 28
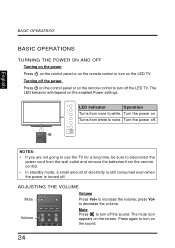
... and remove the batteries from white to none. The mute icon appears on the remote control to turn off the power Press on the control panel or on the screen. Press again to turn on the LED TV. LED indicator Operation Turns from none to increase the volume; English BASIC OPERATIONS... BASIC OPERATIONS TURNING THE POWER ON AND OFF Turning on the power Press on the control panel or on the remote control to turn on the sound. 24
... and remove the batteries from white to none. The mute icon appears on the remote control to turn off the power Press on the control panel or on the screen. Press again to turn on the LED TV. LED indicator Operation Turns from none to increase the volume; English BASIC OPERATIONS... BASIC OPERATIONS TURNING THE POWER ON AND OFF Turning on the power Press on the control panel or on the remote control to turn on the sound. 24
User Manual
Page 29
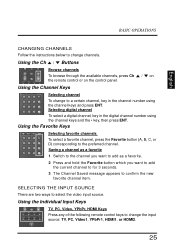
... Input Vol Ch YPbPr1 HDMI1 Video1 TV Browse channels To browse through the available channels, press Ch / on the remote control or on the control panel. ZZZ MTS Favorite A B C ENT D Selecting favorite channels To select a favorite channel, press the Favorite button (A, B, C, or D) corresponding to confirm the new favorite channel item...
... Input Vol Ch YPbPr1 HDMI1 Video1 TV Browse channels To browse through the available channels, press Ch / on the remote control or on the control panel. ZZZ MTS Favorite A B C ENT D Selecting favorite channels To select a favorite channel, press the Favorite button (A, B, C, or D) corresponding to confirm the new favorite channel item...
User Manual
Page 31
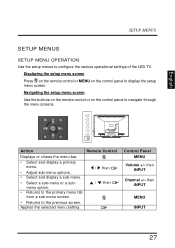
Displaying the setup menu screen Press on the remote control or MENU on the control panel to the previous screen. Applies the selected menu setting. then INPUT Channel +/- English SETUP MENUS SETUP MENUS SETUP MENU OPERATION Use the setup menus to ...-menu or a submenu option. • Returns to the primary menu tab from a sub-menu screen. / then • Returns to navigate through the menu screens. Control Panel MENU Volume +/- Navigating the setup menu screen Use the buttons on the remote control or on the control...
Displaying the setup menu screen Press on the remote control or MENU on the control panel to the previous screen. Applies the selected menu setting. then INPUT Channel +/- English SETUP MENUS SETUP MENUS SETUP MENU OPERATION Use the setup menus to ...-menu or a submenu option. • Returns to the primary menu tab from a sub-menu screen. / then • Returns to navigate through the menu screens. Control Panel MENU Volume +/- Navigating the setup menu screen Use the buttons on the remote control or on the control...
User Manual
Page 32
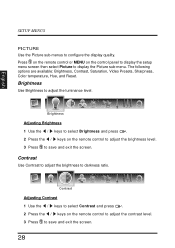
... adjust the brightness to adjust the luminance level. Contrast Adjusting Contrast 1 Use the / keys to select Contrast and press . 2 Press the / keys on the control panel to display the setup menu screen then select Picture to save and exit the screen. 28 English SETUP MENUS PICTURE Use the Picture sub-menus...
... adjust the brightness to adjust the luminance level. Contrast Adjusting Contrast 1 Use the / keys to select Contrast and press . 2 Press the / keys on the control panel to display the setup menu screen then select Picture to save and exit the screen. 28 English SETUP MENUS PICTURE Use the Picture sub-menus...
User Manual
Page 36
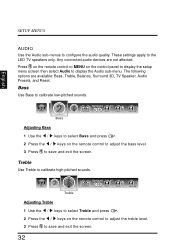
.... Bass Use Bass to calibrate high-pitched sounds. Treble Adjusting Treble 1 Use the / keys to select Treble and press . 2 Press the / keys on the control panel to display the setup menu screen then select Audio to save and exit the screen. 32 Any connected audio devices are available: Bass, Treble, Balance...
.... Bass Use Bass to calibrate high-pitched sounds. Treble Adjusting Treble 1 Use the / keys to select Treble and press . 2 Press the / keys on the control panel to display the setup menu screen then select Audio to save and exit the screen. 32 Any connected audio devices are available: Bass, Treble, Balance...
User Manual
Page 40
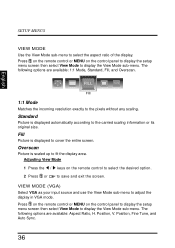
... control to select the desired option. 2 Press or to display the View Mode sub-menu. Press on the remote control or MENU on the control panel to display the setup menu screen then select View Mode to adjust the display in VGA mode. Fill Picture is displayed to select the aspect... SETUP MENUS VIEW MODE Use the View Mode sub-menu to cover the entire screen. Press on the remote control or MENU on the control panel to display the setup menu screen then select View Mode to save and exit the screen. VIEW MODE (VGA) Select VGA as your input source...
... control to select the desired option. 2 Press or to display the View Mode sub-menu. Press on the remote control or MENU on the control panel to display the setup menu screen then select View Mode to adjust the display in VGA mode. Fill Picture is displayed to select the aspect... SETUP MENUS VIEW MODE Use the View Mode sub-menu to cover the entire screen. Press on the remote control or MENU on the control panel to display the setup menu screen then select View Mode to save and exit the screen. VIEW MODE (VGA) Select VGA as your input source...
User Manual
Page 42
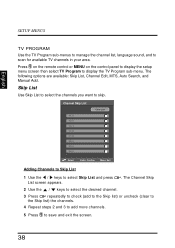
... to manage the channel list, language sound, and to save and exit the screen. 38 Press on the remote control or MENU on the control panel to display the setup menu screen then select TV Program to display the TV Program sub-menu.
... to manage the channel list, language sound, and to save and exit the screen. 38 Press on the remote control or MENU on the control panel to display the setup menu screen then select TV Program to display the TV Program sub-menu.
User Manual
Page 46
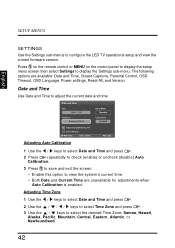
... to select Time Zone and press . 3 Use the / keys to display the Settings sub-menu. Press on the remote control or MENU on the control panel to display the setup menu screen then select Settings to select the desired Time Zone: Samoa, Hawaii, Alaska, Pacific, Mountain, Central, Eastern, Atlantic, or Newfoundland...
... to select Time Zone and press . 3 Use the / keys to display the Settings sub-menu. Press on the remote control or MENU on the control panel to display the setup menu screen then select Settings to select the desired Time Zone: Samoa, Hawaii, Alaska, Pacific, Mountain, Central, Eastern, Atlantic, or Newfoundland...
User Manual
Page 62
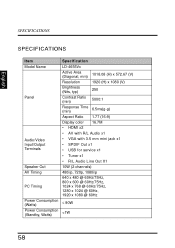
English SPECIFICATIONS SPECIFICATIONS Item Model Name Panel Audio/Video Input/Output Terminals Speaker Out AV Timing PC Timing Power Consumption (Watts) Power Consumption (Standby, Watts) Specification LD-4655Vx Active Area (Diagonal, mm) ...
English SPECIFICATIONS SPECIFICATIONS Item Model Name Panel Audio/Video Input/Output Terminals Speaker Out AV Timing PC Timing Power Consumption (Watts) Power Consumption (Standby, Watts) Specification LD-4655Vx Active Area (Diagonal, mm) ...


