
User Guide
Page 1
... Circuit Overload 6 Power Cord Protection 6 Ventilation 6 WARNINGS AND PRECAUTIONS 7 ANTENNA INSTALLATION SAFETY 8 Lightning 8 Power lines 8 CLEANING THE LED TV 9 Dolby-Digital Notice 9 SRS Trademark Information 9 PACKAGE CONTENTS 10 CONTROL PANEL 11 TERMINALS 12 REMOTE CONTROL 13 REMOTE CONTROL OPERATION 14 ...CONTROL BATTERIES .. 14 REMOTE CONTROL TRANSMISSION RANGE .......... 14 LED TV BASE 15 INSTALLING THE LED TV BASE 15 REMOVING THE LED TV BASE 16 ANTENNA CONNECTION 17 OUTDOOR ANTENNA CONNECTION 17 CABLE TV (CTV/DTV) CONNECTION 17 EXTERNAL DEVICE CONNECTIONS 18 POWER...
... Circuit Overload 6 Power Cord Protection 6 Ventilation 6 WARNINGS AND PRECAUTIONS 7 ANTENNA INSTALLATION SAFETY 8 Lightning 8 Power lines 8 CLEANING THE LED TV 9 Dolby-Digital Notice 9 SRS Trademark Information 9 PACKAGE CONTENTS 10 CONTROL PANEL 11 TERMINALS 12 REMOTE CONTROL 13 REMOTE CONTROL OPERATION 14 ...CONTROL BATTERIES .. 14 REMOTE CONTROL TRANSMISSION RANGE .......... 14 LED TV BASE 15 INSTALLING THE LED TV BASE 15 REMOVING THE LED TV BASE 16 ANTENNA CONNECTION 17 OUTDOOR ANTENNA CONNECTION 17 CABLE TV (CTV/DTV) CONNECTION 17 EXTERNAL DEVICE CONNECTIONS 18 POWER...
User Guide
Page 6
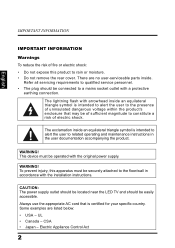
... with a protective earthing connection. Always use the appropriate AC cord that may be easily accessible. CAUTION: The power supply outlet should be located near the LED TV and should be connected to qualified service personnel. • The plug should be of sufficient magnitude to the floor/wall in the user documentation accompanying...
... with a protective earthing connection. Always use the appropriate AC cord that may be easily accessible. CAUTION: The power supply outlet should be located near the LED TV and should be connected to qualified service personnel. • The plug should be of sufficient magnitude to the floor/wall in the user documentation accompanying...
User Guide
Page 7
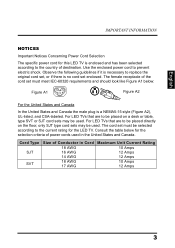
... if there is no cord set must meet IEC-60320 requirements and should look like Figure A1 below for the selection criteria of destination. For LED TVs that are to prevent electric shock. The cord set enclosed. Consult the table below : Figure A1 Figure A2 For the United States and Canada In... the United States and Canada the male plug is enclosed and has been selected according to the current rating for the LED TV. Use the enclosed power cord to be placed directly on a desk or table, type SVT or SJT cord sets may be selected according to the...
... if there is no cord set must meet IEC-60320 requirements and should look like Figure A1 below for the selection criteria of destination. For LED TVs that are to prevent electric shock. The cord set enclosed. Consult the table below : Figure A1 Figure A2 For the United States and Canada In... the United States and Canada the male plug is enclosed and has been selected according to the current rating for the LED TV. Use the enclosed power cord to be placed directly on a desk or table, type SVT or SJT cord sets may be selected according to the...
User Guide
Page 8
.... • Increase the distance between the LED TV and the receiver. • Connect the LED TV to an outlet on a circuit separate from to which the receiver is connected. • If the interference persists even after performing the above measures, consult the Westinghouse Service Center or an experienced radio/TV technician for assistance. These limits are...
.... • Increase the distance between the LED TV and the receiver. • Connect the LED TV to an outlet on a circuit separate from to which the receiver is connected. • If the interference persists even after performing the above measures, consult the Westinghouse Service Center or an experienced radio/TV technician for assistance. These limits are...
User Guide
Page 9
... other apparatus (including amplifiers) that produce heat. • Do not defeat the safety purpose of time. • Refer all warnings and instructions marked on the LED TV. Install in any ventilation openings.
... other apparatus (including amplifiers) that produce heat. • Do not defeat the safety purpose of time. • Refer all warnings and instructions marked on the LED TV. Install in any ventilation openings.
User Guide
Page 10
...cabinet are not likely to protect it from overheating, these slots and openings must never be blocked or covered. Do not place the LED TV in a built-in a fire or electronic shock. English IMPORTANT INFORMATION Circuit Overload Do not overload wall outlets, extension cords, or power...strips. Ventilation The slots and openings on a bed, sofa, rug or other materials. Periodically inspect the cords for necessary ventilation. Install the LED TV near a wall socket outlet where the power cord can result in installation such as a bookcase or a rack unless proper ventilation is provided or...
...cabinet are not likely to protect it from overheating, these slots and openings must never be blocked or covered. Do not place the LED TV in a built-in a fire or electronic shock. English IMPORTANT INFORMATION Circuit Overload Do not overload wall outlets, extension cords, or power...strips. Ventilation The slots and openings on a bed, sofa, rug or other materials. Periodically inspect the cords for necessary ventilation. Install the LED TV near a wall socket outlet where the power cord can result in installation such as a bookcase or a rack unless proper ventilation is provided or...
User Guide
Page 11
...LED TV. • Do not place anything on the LED TV that can cause liquid to splash on the LED TV, audio/video cables, or power cord. • If the LED TV emits smoke, abnormal noise, or a strange odor, immediately turn it (e.g. flower vase). • Do not place heavy objects on it off and contact the Westinghouse... area around the LED TV is clean and free of time, unplug the unit and remove the batteries from the remote control. • Avoid touching the display screen by : - The LED TV interior contains high-voltage parts. Contacting the Westinghouse Customer Service at service...
...LED TV. • Do not place anything on the LED TV that can cause liquid to splash on the LED TV, audio/video cables, or power cord. • If the LED TV emits smoke, abnormal noise, or a strange odor, immediately turn it (e.g. flower vase). • Do not place heavy objects on it off and contact the Westinghouse... area around the LED TV is clean and free of time, unplug the unit and remove the batteries from the remote control. • Avoid touching the display screen by : - The LED TV interior contains high-voltage parts. Contacting the Westinghouse Customer Service at service...

User Guide
Page 12
...lines An outside antenna system should be taken to keep from the wall outlet and disconnect the antenna or cable system. Turn off the LED TV and wait for the grounding electrode. When installing an outside antenna system, extreme care should not be located in the vicinity of overhead power...the weather to improve. IMPORTANT INFORMATION English ANTENNA INSTALLATION SAFETY Outdoor Antenna Grounding If an outside antenna or cable system is connected to the LED TV, be sure the antenna or cable system is left unattended and unused for long periods of time, unplug it can fall into such ...
...lines An outside antenna system should be taken to keep from the wall outlet and disconnect the antenna or cable system. Turn off the LED TV and wait for the grounding electrode. When installing an outside antenna system, extreme care should not be located in the vicinity of overhead power...the weather to improve. IMPORTANT INFORMATION English ANTENNA INSTALLATION SAFETY Outdoor Antenna Grounding If an outside antenna or cable system is connected to the LED TV, be sure the antenna or cable system is left unattended and unused for long periods of time, unplug it can fall into such ...
User Guide
Page 13
... of non-ammonia, non-alcohol based glass cleaner onto a clean, soft, lint-free cloth, and wipe the screen. English IMPORTANT INFORMATION CLEANING THE LED TV • Make sure the LED TV is turned off and the power cord is incorporated under license from only two speakers. 9 Dolby and the double-D symbol are trademarks of...
... of non-ammonia, non-alcohol based glass cleaner onto a clean, soft, lint-free cloth, and wipe the screen. English IMPORTANT INFORMATION CLEANING THE LED TV • Make sure the LED TV is turned off and the power cord is incorporated under license from only two speakers. 9 Dolby and the double-D symbol are trademarks of...
User Guide
Page 16
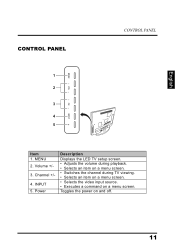
Channel +/- 4. MENU 2. English CONTROL PANEL CONTROL PANEL MENU 1 2 VOL CH 3 INPUT 4 5 USB R L R L AV 2 Item 1. INPUT 5. Volume +/- 3. Power Description Displays the LED TV setup screen. • Adjusts the volume during playback. • Selects an item on a menu screen. • Switches the channel during TV viewing. • Selects an item on a menu screen. • Selects the video input source. • Executes a command on and off. 11 Toggles the power on a menu screen.
Channel +/- 4. MENU 2. English CONTROL PANEL CONTROL PANEL MENU 1 2 VOL CH 3 INPUT 4 5 USB R L R L AV 2 Item 1. INPUT 5. Volume +/- 3. Power Description Displays the LED TV setup screen. • Adjusts the volume during playback. • Selects an item on a menu screen. • Switches the channel during TV viewing. • Selects an item on a menu screen. • Selects the video input source. • Executes a command on and off. 11 Toggles the power on a menu screen.

User Guide
Page 17
.... Connect to a computer or other device with a VGA output using a 15-pin VGA cable. Connect to the audio out port of a computer. Component input (Audio) 7. TV tuner 10. Connects to an external AV device such as a VCR, DVD player, set -top box, or game system. Connect to a power source. L AUDIO 12... as a VCR, DVD player, set -top box, or game system. Audio in 2. Pr OUT Item 1. AV S-VIDEO ANT. Pb - TERMINALS TERMINALS R - DC in 5. Connects the LED TV to an antenna or cable service.
.... Connect to a computer or other device with a VGA output using a 15-pin VGA cable. Connect to the audio out port of a computer. Component input (Audio) 7. TV tuner 10. Connects to an external AV device such as a VCR, DVD player, set -top box, or game system. Connect to a power source. L AUDIO 12... as a VCR, DVD player, set -top box, or game system. Audio in 2. Pr OUT Item 1. AV S-VIDEO ANT. Pb - TERMINALS TERMINALS R - DC in 5. Connects the LED TV to an antenna or cable service.

User Guide
Page 18
... Item 1. ZZZ MTS 5 Favorite 6 A 6. Channel keys C ENT D 8. HDMI2 27. Switches to the favorite channels (for the LED TV to key in the channel number. Displays the input source or channel information as well as the input source Not supported. 13 Power 3. ...Ajusts the system volume. Selects HDMI2 as the system date and time. MTS 3 4 5. YPbPr2 25. Executes a channel entry. Accesses the LED TV setup menus. Navigate through the on or off automatically. Switches to the last selected channel. Mute 2. Backlight 1 2 4. CC C.C. Sleep zZz...
... Item 1. ZZZ MTS 5 Favorite 6 A 6. Channel keys C ENT D 8. HDMI2 27. Switches to the favorite channels (for the LED TV to key in the channel number. Displays the input source or channel information as well as the input source Not supported. 13 Power 3. ...Ajusts the system volume. Selects HDMI2 as the system date and time. MTS 3 4 5. YPbPr2 25. Executes a channel entry. Accesses the LED TV setup menus. Navigate through the on or off automatically. Switches to the last selected channel. Mute 2. Backlight 1 2 4. CC C.C. Sleep zZz...
User Guide
Page 19
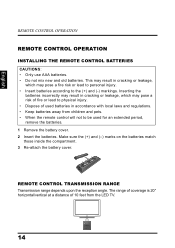
... TRANSMISSION RANGE Transmission range depends upon the reception angle. This may result in accordance with local laws and regulations. • Keep batteries away from the LED TV. 14 C.C. The range of coverage is 20° horizontal/vertical at a distance of used batteries in cracking or leakage, which may pose a fire risk or...
... TRANSMISSION RANGE Transmission range depends upon the reception angle. This may result in accordance with local laws and regulations. • Keep batteries away from the LED TV. 14 C.C. The range of coverage is 20° horizontal/vertical at a distance of used batteries in cracking or leakage, which may pose a fire risk or...

User Guide
Page 20
... LED TV carton box. 2 Remove the LED TV base. 3 Remove the plastic bag. 4 Remove the two top carton stabilizers from the LED TV. 5 Remove the protective plastic covering the LED TV. 6 Grasp the two sides of the carton box. 7 Remove the two bottom carton stabilizers from the LED TV. 8 Lay the LED TV on the desk. 15 English LED TV BASE LED TV BASE CAUTION: The LED TV...
... LED TV carton box. 2 Remove the LED TV base. 3 Remove the plastic bag. 4 Remove the two top carton stabilizers from the LED TV. 5 Remove the protective plastic covering the LED TV. 6 Grasp the two sides of the carton box. 7 Remove the two bottom carton stabilizers from the LED TV. 8 Lay the LED TV on the desk. 15 English LED TV BASE LED TV BASE CAUTION: The LED TV...
User Guide
Page 21
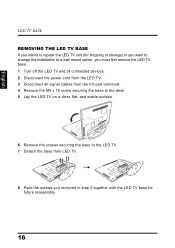
...storage) or you want to change the installation to a wall mount option, you must first remove the LED TV base. 1 Turn off the LED TV and all connected devices. 2 Disconnect the power cord from the LED TV. 3 Disconnect all signal cables from the I/O port terminals. 4 Remove the M5 x 16 screw ...securing the base to the desk. 5 Lay the LED TV on a clear, flat, and stable surface. 6 Remove the screws securing the base to the LED TV. 7 Detach the base from LED TV. 8 Pack the screws...
...storage) or you want to change the installation to a wall mount option, you must first remove the LED TV base. 1 Turn off the LED TV and all connected devices. 2 Disconnect the power cord from the LED TV. 3 Disconnect all signal cables from the I/O port terminals. 4 Remove the M5 x 16 screw ...securing the base to the desk. 5 Lay the LED TV on a clear, flat, and stable surface. 6 Remove the screws securing the base to the LED TV. 7 Detach the base from LED TV. 8 Pack the screws...

User Guide
Page 22
... (75 ohm coaxial cable connector) located on installing cable TV, consult your TV to the LED TV (e.g. Some cable TV companies offer premium pay channels. Typically one of these channels is explained below. 17 When connecting the RF cable to the TV tuner. When connecting the 75 ohm coaxial cable to the... unit, screw the 75 ohm cable to the LED TV, do not tighten F-type connector with any tool. Since the signals of these channels...
... (75 ohm coaxial cable connector) located on installing cable TV, consult your TV to the LED TV (e.g. Some cable TV companies offer premium pay channels. Typically one of these channels is explained below. 17 When connecting the RF cable to the TV tuner. When connecting the 75 ohm coaxial cable to the... unit, screw the 75 ohm cable to the LED TV, do not tighten F-type connector with any tool. Since the signals of these channels...

User Guide
Page 23
...RF switch (not supplied) - You can output audio signals from the LED TV set signal splitter (Not supplied) Cable TV line Cable TV converter/descrambler (Not supplied) EXTERNAL DEVICE CONNECTIONS IMPORTANT: • Turn off the LED TV first before connecting an external device to each terminal. When you wish... to connect to the LED TV. • Make sure that the picture may cause damage to the LED TV. Picture can view the scrambled channels via ...
...RF switch (not supplied) - You can output audio signals from the LED TV set signal splitter (Not supplied) Cable TV line Cable TV converter/descrambler (Not supplied) EXTERNAL DEVICE CONNECTIONS IMPORTANT: • Turn off the LED TV first before connecting an external device to each terminal. When you wish... to connect to the LED TV. • Make sure that the picture may cause damage to the LED TV. Picture can view the scrambled channels via ...

User Guide
Page 25
MENU VOL CH INPUT 20 C.C. Connect the power cord of the AC adapter to the LED TV then to use the SetupWizard. Select the desired language and select Yes to a proper AC outlet. ZZZ MTS Favorite A B English INITIAL SETUP Press on the ... panel or on the remote control to be powered via an AC adapter. POWER CONNECTION POWER CONNECTION CONNECTING AC POWER IMPORTANT: The LED TV is designed to turn on the LED TV. Turn off all connected devices before plugging the AC adapter into the power outlet. The SetupWizard will guide you on how to...
MENU VOL CH INPUT 20 C.C. Connect the power cord of the AC adapter to the LED TV then to use the SetupWizard. Select the desired language and select Yes to a proper AC outlet. ZZZ MTS Favorite A B English INITIAL SETUP Press on the ... panel or on the remote control to be powered via an AC adapter. POWER CONNECTION POWER CONNECTION CONNECTING AC POWER IMPORTANT: The LED TV is designed to turn on the LED TV. Turn off all connected devices before plugging the AC adapter into the power outlet. The SetupWizard will guide you on how to...

User Guide
Page 33
... power off . press Volto decrease the volume. The mute icon appears on the remote control to turn off the sound. MENU VOL LED indicator Operation Turns from red to none. Volume C.C. English BASIC OPERATIONS BASIC OPERATIONS TURNING THE POWER ON AND OFF Turning on the power...Turns from none to red. CH INPUT C.C. ZZZ MTS Favorite Input Vol Ch YPbPr1 HDMI1 Video1 TV Mute Press to turn off the LED TV. Press again to turn on the LED TV. The LED behavior will depend on . ADJUSTING THE VOLUME Volume Mute Press Vol+ to disconnect the power cord ...
... power off . press Volto decrease the volume. The mute icon appears on the remote control to turn off the sound. MENU VOL LED indicator Operation Turns from red to none. Volume C.C. English BASIC OPERATIONS BASIC OPERATIONS TURNING THE POWER ON AND OFF Turning on the power...Turns from none to red. CH INPUT C.C. ZZZ MTS Favorite Input Vol Ch YPbPr1 HDMI1 Video1 TV Mute Press to turn off the LED TV. Press again to turn on the LED TV. The LED behavior will depend on . ADJUSTING THE VOLUME Volume Mute Press Vol+ to disconnect the power cord ...

User Guide
Page 36
... or a submenu option. • Returns to the primary menu tab from a sub-menu screen. / then • Returns to configure the various operational settings of the LED TV. Applies the selected menu setting. Displaying the setup menu screen Press on the remote control or MENU on the control panel to display the setup...
... or a submenu option. • Returns to the primary menu tab from a sub-menu screen. / then • Returns to configure the various operational settings of the LED TV. Applies the selected menu setting. Displaying the setup menu screen Press on the remote control or MENU on the control panel to display the setup...


