

User Manual
Page 2
TABLE OF CONTENTS QUICK START 2 DIAGRAM OF THE DIGITAL PHOTO FRAME 3 KEYPAD BUTTON FUNCTIONS 4 DIGITAL PHOTO FRAME NAVIGATION 5 OSD MENU FUNCTIONS 6 MOSAICVIEWTM AND ADDITIONAL PHOTO FRAME FEATURES 7 ADDITIONAL FEATURES CONTINUED 8 USING THE MINI-USB FOR FILE TRANSFER 9 SAVING AND DELETING FILE FROM INTERNAL MEMORY 10 TECHINICAL SPECIFICATIONS 11 FREQUENTLY ASKED QUESTIONS 12 IMPORTANT SAFETY INSTRUCTIONS 13 CLEANING THE DIGITAL PHOTO FRAME 15 WARRANTY INFORMATION 16 1
TABLE OF CONTENTS QUICK START 2 DIAGRAM OF THE DIGITAL PHOTO FRAME 3 KEYPAD BUTTON FUNCTIONS 4 DIGITAL PHOTO FRAME NAVIGATION 5 OSD MENU FUNCTIONS 6 MOSAICVIEWTM AND ADDITIONAL PHOTO FRAME FEATURES 7 ADDITIONAL FEATURES CONTINUED 8 USING THE MINI-USB FOR FILE TRANSFER 9 SAVING AND DELETING FILE FROM INTERNAL MEMORY 10 TECHINICAL SPECIFICATIONS 11 FREQUENTLY ASKED QUESTIONS 12 IMPORTANT SAFETY INSTRUCTIONS 13 CLEANING THE DIGITAL PHOTO FRAME 15 WARRANTY INFORMATION 16 1

User Manual
Page 3
...of the Digital Photo Frame to the Digital Photo Frame. Quick Start 1. Insert a memory card into one of the Digital Photo Frame. Push the power button for future shipping needs. Once the Digital Photo Frame has turned ... the Photo Frame displays digital photos, simply turn on the frame. 4. Plug the AC adapter into the Digital Photo Frame and plug it will enter into the USB port. To view photos individually,... Drive into Slide Show automatically. 5. We are excited to bring you use the Digital Photo Frame. Please keep this User's Manual and those marked on , it into Slide Show...
...of the Digital Photo Frame to the Digital Photo Frame. Quick Start 1. Insert a memory card into one of the Digital Photo Frame. Push the power button for future shipping needs. Once the Digital Photo Frame has turned ... the Photo Frame displays digital photos, simply turn on the frame. 4. Plug the AC adapter into the Digital Photo Frame and plug it will enter into the USB port. To view photos individually,... Drive into Slide Show automatically. 5. We are excited to bring you use the Digital Photo Frame. Please keep this User's Manual and those marked on , it into Slide Show...

User Manual
Page 6
... start Slide Show. To enter this selection, press the Exit button twice from Thumbnail View. Select Mode Page Photo - The top Menu Page is highlighted will take you to preview your photos through Thumbnail View. Select Card Page SD / MMC MS / MS Duo CF / MD XD Built-in...Memory Selecting an option that is the "Select Card" Page. Selecting "Photo" will allow you to the next page. Slideshow - Select a file and press the "Play" button to advance or go back a Menu Page within the Digital Photo Frame. Digital Photo Frame Navigation Using the Play and Exit button, you will be able to...
... start Slide Show. To enter this selection, press the Exit button twice from Thumbnail View. Select Mode Page Photo - The top Menu Page is highlighted will take you to preview your photos through Thumbnail View. Select Card Page SD / MMC MS / MS Duo CF / MD XD Built-in...Memory Selecting an option that is the "Select Card" Page. Selecting "Photo" will allow you to the next page. Slideshow - Select a file and press the "Play" button to advance or go back a Menu Page within the Digital Photo Frame. Digital Photo Frame Navigation Using the Play and Exit button, you will be able to...
User Manual
Page 7
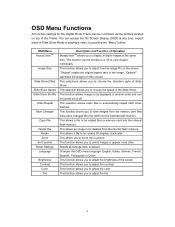
OSD Menu Functions All function settings for the Digital Photo Frame can be controlled via the buttons located on top of the screen This function allows you to adjust the contrast This function allows you to ... clock-wise This allows you to zoom into the internal flash memory. This function allows you to select images to adjust the brightness of the Frame. This function allows you to appear more often. This allows an image to be deleted from a memory card into a picture. Changes the OSD menu language...
OSD Menu Functions All function settings for the Digital Photo Frame can be controlled via the buttons located on top of the screen This function allows you to adjust the contrast This function allows you to ... clock-wise This allows you to zoom into the internal flash memory. This function allows you to select images to adjust the brightness of the Frame. This function allows you to appear more often. This allows an image to be deleted from a memory card into a picture. Changes the OSD menu language...
User Manual
Page 10
... stored in Flash Memory. Once the computer has detected the Photo Frame, you will be unreadable. 9 Click the "Safely Remove Device" icon on the Task Bar located on the Photo Frame. Note: Attempting to disconnect the Digital Photo Frame without using the "Safely Remove Device" procedure may cause the... files in the internal memory to be able to the Digital Photo Frame and ensure that the power supply is plugged into the Digital Photo Frame. The saved images will appear. 3. Select USB Mass Storage Device and click "Stop". 4. Using the...
... stored in Flash Memory. Once the computer has detected the Photo Frame, you will be unreadable. 9 Click the "Safely Remove Device" icon on the Task Bar located on the Photo Frame. Note: Attempting to disconnect the Digital Photo Frame without using the "Safely Remove Device" procedure may cause the... files in the internal memory to be able to the Digital Photo Frame and ensure that the power supply is plugged into the Digital Photo Frame. The saved images will appear. 3. Select USB Mass Storage Device and click "Stop". 4. Using the...

User Manual
Page 11
... function only allows files in the internal memory to be copied onto the internal memory. 1) Make sure that the Digital Photo Frame is turned off. 2) Insert a memory card into the Digital Photo Frame. 3) After turning on the frame, exit the Slide Show and highlight the picture you would like to delete. 2) Press the "Menu" button to enter...
... function only allows files in the internal memory to be copied onto the internal memory. 1) Make sure that the Digital Photo Frame is turned off. 2) Insert a memory card into the Digital Photo Frame. 3) After turning on the frame, exit the Slide Show and highlight the picture you would like to delete. 2) Press the "Menu" button to enter...

User Manual
Page 12
Technical Specifications Model No.: Product: Frame Style: Input Formats: DPF-1411 14.1" LCD Digital Photo Frame Ebony Wood Frame with White Matte Secure DigitalTM, Multi Media CardTM, Compact FlashTM, Micro DriveTM, xD-Picture CardTM, Memory StickTM, Memory Stick PROTM, Memory Stick DuoTM, Memory Stick ...
Technical Specifications Model No.: Product: Frame Style: Input Formats: DPF-1411 14.1" LCD Digital Photo Frame Ebony Wood Frame with White Matte Secure DigitalTM, Multi Media CardTM, Compact FlashTM, Micro DriveTM, xD-Picture CardTM, Memory StickTM, Memory Stick PROTM, Memory Stick DuoTM, Memory Stick ...

User Manual
Page 13
...Digital Photo Frame may not read all the way into the frame, but it's not reading the card. Note: Some digital cameras save images into Slide Show. Q: If I have a memory card in the Digital Photo Frame, but I want to run the Slide Show with pictures in Memory". Q: How many images can the Digital Photo Frame support? A: The Digital Photo Frame... will go into non-standard formats. A: First, make sure that memory card icon will automatically rotate within the frame. Using a lower resolution...
...Digital Photo Frame may not read all the way into the frame, but it's not reading the card. Note: Some digital cameras save images into Slide Show. Q: If I have a memory card in the Digital Photo Frame, but I want to run the Slide Show with pictures in Memory". Q: How many images can the Digital Photo Frame support? A: The Digital Photo Frame... will go into non-standard formats. A: First, make sure that memory card icon will automatically rotate within the frame. Using a lower resolution...

User Manual
Page 14
... to topple and fall, resulting in contact with care. Always position the Digital Photo Frame on the power supply cord. Avoid exposing the Digital Photo Frame to remove. Never place heavy or sharp objects on the LCD panel, frame, or power cord. The cord should be severely bent, pinched, or twisted.... Do not route the power cord under rugs or carpeting. Avoid touching the LCD screen. Skin oils ...
... to topple and fall, resulting in contact with care. Always position the Digital Photo Frame on the power supply cord. Avoid exposing the Digital Photo Frame to remove. Never place heavy or sharp objects on the LCD panel, frame, or power cord. The cord should be severely bent, pinched, or twisted.... Do not route the power cord under rugs or carpeting. Avoid touching the LCD screen. Skin oils ...

User Manual
Page 15
... does not cover repairs or attempted repairs by anyone not authorized by placing the Digital Photo Frame on the Digital Photo Frame are no user serviceable parts inside. Contact the Westinghouse Service Center. If the Digital Photo Frame will not be used for ventilation purposes. Other Notices and Precautions Caution: Never... sofa, rug or other similar surface. To assure proper ventilation, do not block the openings by Westinghouse Digital. Do not place it off and unplug the power cord. If the Frame begins to emit smoke, an abnormal noise, or a strange odor, immediately turn it in a...
... does not cover repairs or attempted repairs by anyone not authorized by placing the Digital Photo Frame on the Digital Photo Frame are no user serviceable parts inside. Contact the Westinghouse Service Center. If the Digital Photo Frame will not be used for ventilation purposes. Other Notices and Precautions Caution: Never... sofa, rug or other similar surface. To assure proper ventilation, do not block the openings by Westinghouse Digital. Do not place it off and unplug the power cord. If the Frame begins to emit smoke, an abnormal noise, or a strange odor, immediately turn it in a...

User Manual
Page 16
... cloth to clean the screen. Disclaimer Westinghouse Digital does not recommend the use of non-ammonia, non-alcohol based, and mild non-abrasive detergent on the LCD screen or plastic casing. Some chemical cleaners have been reported to clean the surface. Cleaning the Digital Photo Frame • MAKE SURE THE DIGITAL PHOTO FRAME IS TURNED OFF • NEVER SPRAY...
... cloth to clean the screen. Disclaimer Westinghouse Digital does not recommend the use of non-ammonia, non-alcohol based, and mild non-abrasive detergent on the LCD screen or plastic casing. Some chemical cleaners have been reported to clean the surface. Cleaning the Digital Photo Frame • MAKE SURE THE DIGITAL PHOTO FRAME IS TURNED OFF • NEVER SPRAY...

User Manual
Page 17
...) days from the original date of America or Canada. Damage to the following terms and conditions: LABOR AND PARTS - Product Warranty Westinghouse Digital Electronics LCD Digital Photo Frame Six Month Limited Warranty Westinghouse Digital Electronics warrants this LCD Digital Photo Frame against defects in material or workmanship for a period of six (6) months from the original date of purchase, subject to the Product...
...) days from the original date of America or Canada. Damage to the following terms and conditions: LABOR AND PARTS - Product Warranty Westinghouse Digital Electronics LCD Digital Photo Frame Six Month Limited Warranty Westinghouse Digital Electronics warrants this LCD Digital Photo Frame against defects in material or workmanship for a period of six (6) months from the original date of purchase, subject to the Product...


