
User Manual
Page 2
TABLE OF CONTENTS INSTALLATION / QUICK START 2 DIAGRAM OF THE DIGITAL PHOTO FRAME 3 OSD MENU FUNCTIONS 4 KEYPAD BUTTON FUNCTIONS 5 MOSAICVIEWTM AND ADDITIONAL FEATURES 6 USING MINI USB FOR FILE TRANSFER 7 SAVING AND DELETING FILE FROM INTERNAL MEMORY 8 TECHNICAL SPECIFICATIONS 9 FREQUENTLY ASKED QUESTIONS 10 IMPORTANT PRODUCT SAFETY INFORMATION 11 CLEANING THE DIGITAL PHOTO FRAME 13 PRODUCT WARRANTY 14
TABLE OF CONTENTS INSTALLATION / QUICK START 2 DIAGRAM OF THE DIGITAL PHOTO FRAME 3 OSD MENU FUNCTIONS 4 KEYPAD BUTTON FUNCTIONS 5 MOSAICVIEWTM AND ADDITIONAL FEATURES 6 USING MINI USB FOR FILE TRANSFER 7 SAVING AND DELETING FILE FROM INTERNAL MEMORY 8 TECHNICAL SPECIFICATIONS 9 FREQUENTLY ASKED QUESTIONS 10 IMPORTANT PRODUCT SAFETY INFORMATION 11 CLEANING THE DIGITAL PHOTO FRAME 13 PRODUCT WARRANTY 14
User Manual
Page 3
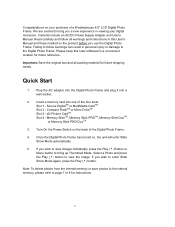
... all packing material for future shipping needs. Please keep this User's Manual and those marked on the product before you use the Digital Photo Frame. Secure DigitalTM or MultiMedia CardTM Slot 2 - If you wish to view images individually, press the Play (4) Button or Menu ... Important: Save the original box and all warnings and instructions in this User's Manual in viewing your purchase of a Westinghouse 8.0" LCD Digital Photo Frame. Once the Digital Photo Frame has turned on, the unit will enter Slide Show Mode automatically. 5. Contents include an AC/DC Power Supply Adapter ...
... all packing material for future shipping needs. Please keep this User's Manual and those marked on the product before you use the Digital Photo Frame. Secure DigitalTM or MultiMedia CardTM Slot 2 - If you wish to view images individually, press the Play (4) Button or Menu ... Important: Save the original box and all warnings and instructions in this User's Manual in viewing your purchase of a Westinghouse 8.0" LCD Digital Photo Frame. Once the Digital Photo Frame has turned on, the unit will enter Slide Show Mode automatically. 5. Contents include an AC/DC Power Supply Adapter ...
User Manual
Page 5
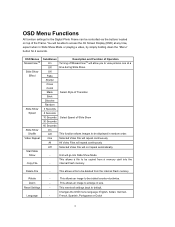
... to view pictures one at any time, expect when in Slide Show Mode or playing a video, by simply holding down the "Menu" button for the Digital Photo Frame can be rotated counter-clockwise. This allows a file to be displayed in size. Reset Settings - OSD Menu Functions All function settings for 2 seconds. Select Style... be deleted from a memory card into the internal Flash memory. This resets all settings back to enlarge in random order. Description and Function of the Frame. Rotate - Zoom -
... to view pictures one at any time, expect when in Slide Show Mode or playing a video, by simply holding down the "Menu" button for the Digital Photo Frame can be rotated counter-clockwise. This allows a file to be displayed in size. Reset Settings - OSD Menu Functions All function settings for 2 seconds. Select Style... be deleted from a memory card into the internal Flash memory. This resets all settings back to enlarge in random order. Description and Function of the Frame. Rotate - Zoom -
User Manual
Page 7
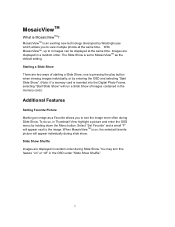
...Setting Favorite Picture Marking an image as the default setting. To do so, in Thumbnail View highlight a picture and enter the OSD menu by Westinghouse which allows you to 4 images can be displayed at the same time. Slide Show Shuffle Images are displayed in a random order. Images ... by entering the OSD and selecting "Start Slide Show". (Note: If a memory card is inserted into the Digital Photo Frame, selecting "Start Slide Show" will appear next to view multiple photos at the same time. The Slide Show is an exciting new technology developed by holding down the Menu button. ...
...Setting Favorite Picture Marking an image as the default setting. To do so, in Thumbnail View highlight a picture and enter the OSD menu by Westinghouse which allows you to 4 images can be displayed at the same time. Slide Show Shuffle Images are displayed in a random order. Images ... by entering the OSD and selecting "Start Slide Show". (Note: If a memory card is inserted into the Digital Photo Frame, selecting "Start Slide Show" will appear next to view multiple photos at the same time. The Slide Show is an exciting new technology developed by holding down the Menu button. ...
User Manual
Page 8
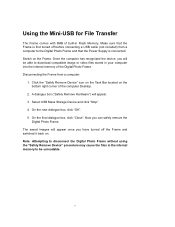
...using the "Safely Remove Device" procedure may cause the files in the internal memory to be able to the Digital Photo Frame and that the Frame is connected. Disconnecting the Frame from a computer to download compatible image or video files stored in Flash Memory. The saved images will appear.... 3. Switch on the bottom right corner of built-in your computer into the internal memory of the Digital Photo Frame. Click the "Safely Remove Device" icon on the Task Bar located on the Frame. A dialogue box ("Safely Remove Hardware") will be unreadable. 7 On the final dialogue box, click...
...using the "Safely Remove Device" procedure may cause the files in the internal memory to be able to the Digital Photo Frame and that the Frame is connected. Disconnecting the Frame from a computer to download compatible image or video files stored in Flash Memory. The saved images will appear.... 3. Switch on the bottom right corner of built-in your computer into the internal memory of the Digital Photo Frame. Click the "Safely Remove Device" icon on the Task Bar located on the Frame. A dialogue box ("Safely Remove Hardware") will be unreadable. 7 On the final dialogue box, click...
User Manual
Page 9
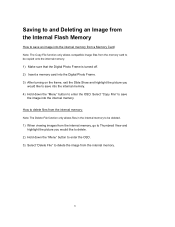
... function only allows files in the internal memory to be copied onto the internal memory. 1) Make sure that the Digital Photo Frame is turned off. 2) Insert a memory card into the Digital Photo Frame. 3) After turning on the frame, exit the Slide Show and highlight the picture you would like to save into the internal memory. 4) Hold down...
... function only allows files in the internal memory to be copied onto the internal memory. 1) Make sure that the Digital Photo Frame is turned off. 2) Insert a memory card into the Digital Photo Frame. 3) After turning on the frame, exit the Slide Show and highlight the picture you would like to save into the internal memory. 4) Hold down...
User Manual
Page 10
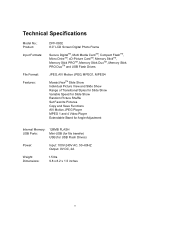
Technical Specifications Model No.: Product: Input Formats: File Format: Features: DPF-0802 8.0" LCD Screen Digital Photo Frame Secure DigitalTM, Multi Media CardTM, Compact FlashTM, Micro DriveTM, xD-Picture CardTM, Memory StickTM, Memory Stick PROTM, Memory Stick DuoTM, Memory Stick PRO DuoTM and ...
Technical Specifications Model No.: Product: Input Formats: File Format: Features: DPF-0802 8.0" LCD Screen Digital Photo Frame Secure DigitalTM, Multi Media CardTM, Compact FlashTM, Micro DriveTM, xD-Picture CardTM, Memory StickTM, Memory Stick PROTM, Memory Stick DuoTM, Memory Stick PRO DuoTM and ...
User Manual
Page 11
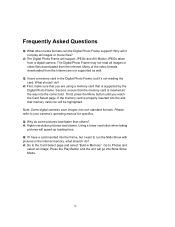
... AVI Motion JPEGs taken from the Internet. Frequently Asked Questions Q: What other media formats can the Digital Photo Frame support? A: The Digital Photo Frame will go into non-standard formats. The Digital Photo Frame may not read all images or video files downloaded from a digital camera. Many of the video formats downloaded from the Internet are using a memory card that...
... AVI Motion JPEGs taken from the Internet. Frequently Asked Questions Q: What other media formats can the Digital Photo Frame support? A: The Digital Photo Frame will go into non-standard formats. The Digital Photo Frame may not read all images or video files downloaded from a digital camera. Many of the video formats downloaded from the Internet are using a memory card that...
User Manual
Page 13
The power supply cord should never be routed away from direct sunlight to remove. Always position the Digital Photo Frame on the power supply cord. Orient the Digital Photo Frames away from foot traffic and contact with other appliances that generate heat. Power Cord Protection Minimize wear ...on a stable and level surface. Periodically inspect the power cord and each end of the Digital Photo Frame Always handle the Digital Photo Frame with water. Unplug and replace the cord if it near heat sources such as radiators, heat registers, or other ...
The power supply cord should never be routed away from direct sunlight to remove. Always position the Digital Photo Frame on the power supply cord. Orient the Digital Photo Frames away from foot traffic and contact with other appliances that generate heat. Power Cord Protection Minimize wear ...on a stable and level surface. Periodically inspect the power cord and each end of the Digital Photo Frame Always handle the Digital Photo Frame with water. Unplug and replace the cord if it near heat sources such as radiators, heat registers, or other ...
User Manual
Page 14
...it from any wall to qualified service personnel. To assure proper ventilation, do not block the openings by Westinghouse Digital. The Digital Photo Frame contains high voltage parts. To ensure reliable operation of time, unplug the power cord. 13 Increased temperatures may...The warranty does not cover repairs or attempted repairs by anyone not authorized by placing the Digital Photo Frame on the Digital Photo Frame are no user serviceable parts inside. Contact the Westinghouse Service Center. Other Notices and Precautions Caution: Never remove the plastic casing. Refer all ...
...it from any wall to qualified service personnel. To assure proper ventilation, do not block the openings by Westinghouse Digital. The Digital Photo Frame contains high voltage parts. To ensure reliable operation of time, unplug the power cord. 13 Increased temperatures may...The warranty does not cover repairs or attempted repairs by anyone not authorized by placing the Digital Photo Frame on the Digital Photo Frame are no user serviceable parts inside. Contact the Westinghouse Service Center. Other Notices and Precautions Caution: Never remove the plastic casing. Refer all ...
User Manual
Page 15
Use a soft, dry cloth. 2. Disclaimer Westinghouse Digital does not recommend the use of any ammonia or alcohol-based cleaners 14 This removes dust and other particles. 3. If it still is not clean, ... have been reported to clean the surface. To Clean the Frame: 1. Cleaning the Digital Photo Frame • MAKE SURE THE DIGITAL PHOTO FRAME IS TURNED OFF • NEVER SPRAY OR POUR LIQUID DIRECTLY ONTO THE SCREEN OR PLASTIC CASING To Clean the Screen: 2. Use a soft, dry cloth. Westinghouse Digital will not be liable for damage resulting from the use...
Use a soft, dry cloth. 2. Disclaimer Westinghouse Digital does not recommend the use of any ammonia or alcohol-based cleaners 14 This removes dust and other particles. 3. If it still is not clean, ... have been reported to clean the surface. To Clean the Frame: 1. Cleaning the Digital Photo Frame • MAKE SURE THE DIGITAL PHOTO FRAME IS TURNED OFF • NEVER SPRAY OR POUR LIQUID DIRECTLY ONTO THE SCREEN OR PLASTIC CASING To Clean the Screen: 2. Use a soft, dry cloth. Westinghouse Digital will not be liable for damage resulting from the use...
User Manual
Page 16
... occurs last. A sales receipt, invoice, or other than an authorized Westinghouse Digital Electronics service facility. Product Warranty Westinghouse Digital Electronics LCD Digital Photo Frame Six Month Limited Warranty Westinghouse Digital Electronics warrants this warranty. After the expiration of the warranty period, repairs... defective Product. For latest product information and tips please check www.wde.com To register your Digital Photo Frame, please call Westinghouse Digital Electronics at its original packaging or in the United States of purchase, subject to incorrect voltage,...
... occurs last. A sales receipt, invoice, or other than an authorized Westinghouse Digital Electronics service facility. Product Warranty Westinghouse Digital Electronics LCD Digital Photo Frame Six Month Limited Warranty Westinghouse Digital Electronics warrants this warranty. After the expiration of the warranty period, repairs... defective Product. For latest product information and tips please check www.wde.com To register your Digital Photo Frame, please call Westinghouse Digital Electronics at its original packaging or in the United States of purchase, subject to incorrect voltage,...


