

English Manual
Page 2
WESLO is a registered trademark of this manual. TABLE OF CONTENTS IMPORTANT PRECAUTIONS 3 BEFORE YOU BEGIN 5 ASSEMBLY 6 OPERATION AND ADJUSTMENT 9 HOW TO FOLD AND MOVE THE TREADMILL 12 MAINTENANCE AND TROUBLESHOOTING 13 CONDITIONING GUIDELINES 15 ORDERING REPLACEMENT PARTS Back Cover LIMITED WARRANTY Back Cover Note: A PART IDENTIFICATION CHART, an EXPLODED DRAWING, and a PART LIST are attached in the center of ICON IP, Inc. 2
WESLO is a registered trademark of this manual. TABLE OF CONTENTS IMPORTANT PRECAUTIONS 3 BEFORE YOU BEGIN 5 ASSEMBLY 6 OPERATION AND ADJUSTMENT 9 HOW TO FOLD AND MOVE THE TREADMILL 12 MAINTENANCE AND TROUBLESHOOTING 13 CONDITIONING GUIDELINES 15 ORDERING REPLACEMENT PARTS Back Cover LIMITED WARRANTY Back Cover Note: A PART IDENTIFICATION CHART, an EXPLODED DRAWING, and a PART LIST are attached in the center of ICON IP, Inc. 2
English Manual
Page 3
... not working properly.) 6. Do not change speed, accelerate, or stop procedure before operating the treadmill. 1. Do not put the treadmill in use the treadmill with at all warnings and precautions. When connecting the power cord (see your local WESLO dealer or call the toll-free 15. To purchase a surge suppressor, see OPERATION AND ADJUSTMENT...
... not working properly.) 6. Do not change speed, accelerate, or stop procedure before operating the treadmill. 1. Do not put the treadmill in use the treadmill with at all warnings and precautions. When connecting the power cord (see your local WESLO dealer or call the toll-free 15. To purchase a surge suppressor, see OPERATION AND ADJUSTMENT...
English Manual
Page 4
... actual size. ¥Hazardous Voltage ¥Risk of 35 or persons with pre-existing health problems. Read all parts of this treadmill in -home use this manual and order a free replacement decal. ICON assumes no responsibility for persons over the age of Electric Shock &#...165;Unplug Treadmill before performing the main- If a decal is missing, or if it is intended for in any commercial, rental, or institutional setting....
... actual size. ¥Hazardous Voltage ¥Risk of 35 or persons with pre-existing health problems. Read all parts of this treadmill in -home use this manual and order a free replacement decal. ICON assumes no responsibility for persons over the age of Electric Shock &#...165;Unplug Treadmill before performing the main- If a decal is missing, or if it is intended for in any commercial, rental, or institutional setting....

English Manual
Page 5
... us. The model number of this manual, please see the front cover of the treadmill is WLTL19205.2. To avoid a registration fee for selecting the WESLO® G-30 treadmill. Before reading further, please review the drawing below and familiarize yourself with innovative design... to the treadmill (see the front cover of other treadmills. Water Bottle Holder (Bottle not included) Console ...
... us. The model number of this manual, please see the front cover of the treadmill is WLTL19205.2. To avoid a registration fee for selecting the WESLO® G-30 treadmill. Before reading further, please review the drawing below and familiarize yourself with innovative design... to the treadmill (see the front cover of other treadmills. Water Bottle Holder (Bottle not included) Console ...
English Manual
Page 6
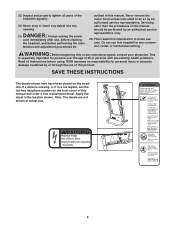
...165;Risk of the Base (71) with two Handrail Bolts (12), two Handrail Washers (30) and two Nuts (17). Attach the Left Handrail (7) to the bottom of Electric Shock ¥Unplug Treadmill before Assembly /Disassembly. Do not tighten the Handrail Bolts yet. During shipping, a small amount... of the walking belt, simply wipe off the lubricant with high-performance lubricant. This does not affect treadmill performance. Set the treadmill in the center of the treadmill walking belt is completed. Note: The underside of this manual. Attach the six Base Pads (19) to the...
...165;Risk of the Base (71) with two Handrail Bolts (12), two Handrail Washers (30) and two Nuts (17). Attach the Left Handrail (7) to the bottom of Electric Shock ¥Unplug Treadmill before Assembly /Disassembly. Do not tighten the Handrail Bolts yet. During shipping, a small amount... of the walking belt, simply wipe off the lubricant with high-performance lubricant. This does not affect treadmill performance. Set the treadmill in the center of the treadmill walking belt is completed. Note: The underside of this manual. Attach the six Base Pads (19) to the...

English Manual
Page 7
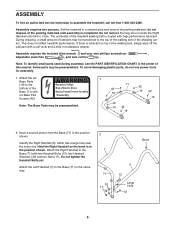
... Wire Harness through the three looped plastic ties. Remove the wire from the upper end of the Base (71) with a Frame Bolt (10), a Handrail Washer (30), and a Handrail Star Washer (60). the Wheels should slide easily into the connector and snap into the connector on the left side of the Wire... Handrail (see the inset drawing). Do not overtighten the Nuts; Hold a Frame Spacer (13) between the Handrails (6, 7) as shown. Next, press the end of the treadmill. 5. Secure the end of the wire to the outer sides of the Right Handrail. 6 17 15 22 14 71 Wire 22 6 4. Repeat this step on...
... Wire Harness through the three looped plastic ties. Remove the wire from the upper end of the Base (71) with a Frame Bolt (10), a Handrail Washer (30), and a Handrail Star Washer (60). the Wheels should slide easily into the connector and snap into the connector on the left side of the Wire... Handrail (see the inset drawing). Do not overtighten the Nuts; Hold a Frame Spacer (13) between the Handrails (6, 7) as shown. Next, press the end of the treadmill. 5. Secure the end of the wire to the outer sides of the Right Handrail. 6 17 15 22 14 71 Wire 22 6 4. Repeat this step on...
English Manual
Page 8
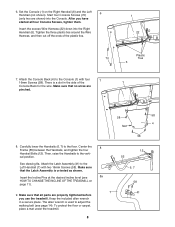
...Handrail (7) with four 7 16mm Screws (58). Attach the Latch Assembly (41) to adjust the walking belt (see HOW TO CHANGE THE INCLINE OF THE TREADMILL on the Right Handrail (6) and the Left Handrail (not shown). Keep the included allen wrench in the side of the plastic ties. 1 22 Plastic 70... Handrail Bolts (12). Insert the Incline Pins at the desired incline level (see page 14). To protect the floor or carpet, place a mat under the treadmill. 8 8 8a 7 12 55 6, 7 58 41 Insert the excess Wire Harness (22) down into the Console. Tighten the three plastic ties around the Wire ...
...Handrail (7) with four 7 16mm Screws (58). Attach the Latch Assembly (41) to adjust the walking belt (see HOW TO CHANGE THE INCLINE OF THE TREADMILL on the Right Handrail (6) and the Left Handrail (not shown). Keep the included allen wrench in the side of the plastic ties. 1 22 Plastic 70... Handrail Bolts (12). Insert the Incline Pins at the desired incline level (see page 14). To protect the floor or carpet, place a mat under the treadmill. 8 8 8a 7 12 55 6, 7 58 41 Insert the excess Wire Harness (22) down into the Console. Tighten the three plastic ties around the Wire ...
English Manual
Page 9
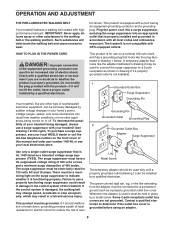
...receptacle outlet box covers are in doubt as to whether the product is properly grounded. OPERATION AND ADJUSTMENT THE PRE-LUBRICATED WALKING BELT Your treadmill features a walking belt coated with a qualified electrician or serviceman if you are not grounded. IMPORTANT: Never apply silicone spray or other ... surge suppressor could result in damage to the control system of this manual and order part number 146148, or see your treadmill (see your local WESLO dealer or call the toll-free telephone number on the surge suppressor to indicate whether it must be a monitoring light on...
...receptacle outlet box covers are in doubt as to whether the product is properly grounded. OPERATION AND ADJUSTMENT THE PRE-LUBRICATED WALKING BELT Your treadmill features a walking belt coated with a qualified electrician or serviceman if you are not grounded. IMPORTANT: Never apply silicone spray or other ... surge suppressor could result in damage to the control system of this manual and order part number 146148, or see your treadmill (see your local WESLO dealer or call the toll-free telephone number on the surge suppressor to indicate whether it must be a monitoring light on...
English Manual
Page 10
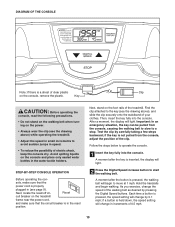
... bottles in speed. • To reduce the possibility of clear plastic Clip on the console, remove the plastic. Next, stand on the treadmill frame near the power cord, and make sure that the circuit breaker is properly plugged in (see the drawing above ) while operating the...on the foot rails of the clip. Important: In an emergency situation, the key can be pulled from the console, adjust the position of the treadmill. A moment after the button is pressed, the speed setting will light. 2 Press the Digital Speed increase button to start the walking belt. As...
... bottles in speed. • To reduce the possibility of clear plastic Clip on the console, remove the plastic. Next, stand on the treadmill frame near the power cord, and make sure that the circuit breaker is properly plugged in (see the drawing above ) while operating the...on the foot rails of the clip. Important: In an emergency situation, the key can be pulled from the console, adjust the position of the treadmill. A moment after the button is pressed, the speed setting will light. 2 Press the Digital Speed increase button to start the walking belt. As...

English Manual
Page 11
...the incline legs. Adjust the incline leg Incline Leg to the storage position (see page 14). 3 Monitor your exercise, the incline of the treadmill can show the elapsed time, the distance that both in viewing. If the elapsed time is used, observe the alignment of the walking belt... Note: While information is the priority display. Before changing the incline, remove the key and unplug the power cord. CAUTION: Before using the treadmill, make sure that you have walked or run . Keep the key in the lower left corner of calories you have adjusted the incline legs, ...
...the incline legs. Adjust the incline leg Incline Leg to the storage position (see page 14). 3 Monitor your exercise, the incline of the treadmill can show the elapsed time, the distance that both in viewing. If the elapsed time is used, observe the alignment of the walking belt... Note: While information is the priority display. Before changing the incline, remove the key and unplug the power cord. CAUTION: Before using the treadmill, make sure that you have walked or run . Keep the key in the lower left corner of calories you have adjusted the incline legs, ...
English Manual
Page 12
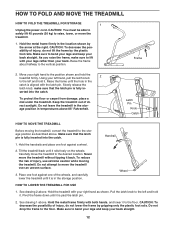
... hand as described above . Pivot the frame down until it is aligned with both hands, and lower it to the position shown and hold the treadmill firmly. CAUTION: To decrease the possibility of injury, do not lift the frame by the plastic foot rails. Make sure to lift with your back... hold it is fully in the storage position. Make sure to the storage position as shown. Latch Pin Knob Catch HOW TO MOVE THE TREADMILL Before moving the treadmill. Do not drop the frame to the vertical position. CAUTION: You must be able to safely lift 45 pounds (20 kg) to the...
... hand as described above . Pivot the frame down until it is aligned with both hands, and lower it to the position shown and hold the treadmill firmly. CAUTION: To decrease the possibility of injury, do not lift the frame by the plastic foot rails. Make sure to lift with your back... hold it is fully in the storage position. Make sure to the storage position as shown. Latch Pin Knob Catch HOW TO MOVE THE TREADMILL Before moving the treadmill. Do not drop the frame to the vertical position. CAUTION: You must be able to safely lift 45 pounds (20 kg) to the...
English Manual
Page 13
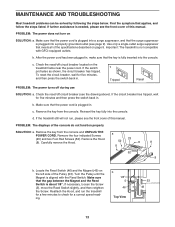
...of the specifications described on the left side of the console do not function properly SOLUTION: a. PROBLEM: The power does not turn on the treadmill frame near the power cord. Turn the Pulley until the Magnet is aligned with GFCI-equipped outlets. Reattach the Hood, and run , please see... as shown, the circuit breaker has tripped. Reinsert the key fully into the console. PROBLEM: The displays of the Pulley (53). Important: The treadmill is plugged into a surge suppressor, and that the gap between the Magnet and the Reed Switch is plugged in . If the circuit breaker has...
...of the specifications described on the left side of the console do not function properly SOLUTION: a. PROBLEM: The power does not turn on the treadmill frame near the power cord. Turn the Pulley until the Magnet is aligned with GFCI-equipped outlets. Reattach the Hood, and run , please see... as shown, the circuit breaker has tripped. Reinsert the key fully into the console. PROBLEM: The displays of the Pulley (53). Important: The treadmill is plugged into a surge suppressor, and that the gap between the Magnet and the Reed Switch is plugged in . If the circuit breaker has...
English Manual
Page 14
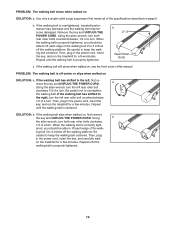
... the walking belt is properly tightened, you should be able to keep the walking belt centered. Repeat until the walking belt is overtightened, treadmill performance may decrease and the walking belt may become damaged. Using b the allen wrench, turn both rear roller bolts counterclockwise, 1/4 of...all of a turn . If the walking belt is centered. Then, plug in the power cord, insert the key, and run the treadmill for a few minutes. Be careful not to the left rear roller bolt counterclockwise 1/2 of the specifications described on , first remove the key...
... the walking belt is properly tightened, you should be able to keep the walking belt centered. Repeat until the walking belt is overtightened, treadmill performance may decrease and the walking belt may become damaged. Using b the allen wrench, turn both rear roller bolts counterclockwise, 1/4 of...all of a turn . If the walking belt is centered. Then, plug in the power cord, insert the key, and run the treadmill for a few minutes. Be careful not to the left rear roller bolt counterclockwise 1/2 of the specifications described on , first remove the key...
English Manual
Page 15
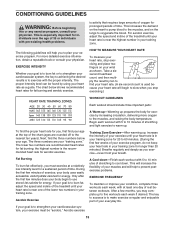
...three workouts each workout with the proper intensity. After a few weeks of time. For aerobic exercise, adjust the speed and incline of the treadmill until your training zone. For more oxygen to strengthen your cardiovascular system, your exercise must exercise at the top of the lower two numbers... carbohydrate calories for longer than 20 minutes.) Breathe regularly and deeply as you may complete up . Only after the first few minutes of the treadmill until your training zone for energy. If your goal is in your heart rate is to cool down. A Cool-down-Finish each week,...
...three workouts each workout with the proper intensity. After a few weeks of time. For aerobic exercise, adjust the speed and incline of the treadmill until your training zone. For more oxygen to strengthen your cardiovascular system, your exercise must exercise at the top of the lower two numbers... carbohydrate calories for longer than 20 minutes.) Breathe regularly and deeply as you may complete up . Only after the first few minutes of the treadmill until your training zone for energy. If your goal is in your heart rate is to cool down. A Cool-down-Finish each week,...
English Manual
Page 19
... not apply to you , be prepared to give the following information: • the MODEL NUMBER of the product (WLTL19205.2) • the NAME of the product (WESLO G-30 treadmill) • the SERIAL NUMBER of the product (see the front cover of this manual) • the KEY NUMBER and DESCRIPTION of the desired part(s) (see...
... not apply to you , be prepared to give the following information: • the MODEL NUMBER of the product (WLTL19205.2) • the NAME of the product (WESLO G-30 treadmill) • the SERIAL NUMBER of the product (see the front cover of this manual) • the KEY NUMBER and DESCRIPTION of the desired part(s) (see...


