
English Manual
Page 1
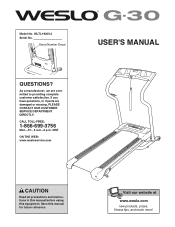
... Read all precautions and instructions in this manual before using this manual for future reference. Visit our website at www.weslo.com new products, prizes, fitness tips, and much more! As a manufacturer, we are damaged or missing, PLEASE CONTACT OUR CUSTOMER SERVICE DEPARTMENT DIRECTLY. Serial Number Decal USER'S MANUAL QUESTIONS? WLTL19205.2 Serial No. Save this equipment. Model No. CALL TOLL-FREE: 1-866-699-3756 Mon...
... Read all precautions and instructions in this manual before using this manual for future reference. Visit our website at www.weslo.com new products, prizes, fitness tips, and much more! As a manufacturer, we are damaged or missing, PLEASE CONTACT OUR CUSTOMER SERVICE DEPARTMENT DIRECTLY. Serial Number Decal USER'S MANUAL QUESTIONS? WLTL19205.2 Serial No. Save this equipment. Model No. CALL TOLL-FREE: 1-866-699-3756 Mon...

English Manual
Page 2
TABLE OF CONTENTS IMPORTANT PRECAUTIONS 3 BEFORE YOU BEGIN 5 ASSEMBLY 6 OPERATION AND ADJUSTMENT 9 HOW TO FOLD AND MOVE THE TREADMILL 12 MAINTENANCE AND TROUBLESHOOTING 13 CONDITIONING GUIDELINES 15 ORDERING REPLACEMENT PARTS Back Cover LIMITED WARRANTY Back Cover Note: A PART IDENTIFICATION CHART, an EXPLODED DRAWING, and a PART LIST are attached in the center of ICON IP, Inc. 2 WESLO is a registered trademark of this manual.
TABLE OF CONTENTS IMPORTANT PRECAUTIONS 3 BEFORE YOU BEGIN 5 ASSEMBLY 6 OPERATION AND ADJUSTMENT 9 HOW TO FOLD AND MOVE THE TREADMILL 12 MAINTENANCE AND TROUBLESHOOTING 13 CONDITIONING GUIDELINES 15 ORDERING REPLACEMENT PARTS Back Cover LIMITED WARRANTY Back Cover Note: A PART IDENTIFICATION CHART, an EXPLODED DRAWING, and a PART LIST are attached in the center of ICON IP, Inc. 2 WESLO is a registered trademark of this manual.
English Manual
Page 3
... appropriate exercise clothes when using the treadmill. 17. Do not change speed, accelerate, or stop procedure before operating the treadmill. 1. Place the treadmill on page 9. Failure to use . 19. Do not operate the treadmill if the power cord or plug is damaged, or if the treadmill is not working properly.) 6. never use an extension cord. 11. It is not working properly. (See MAINTENANCE AND TROUBLESHOOTING on the walking belt. Use the treadmill only as...
... appropriate exercise clothes when using the treadmill. 17. Do not change speed, accelerate, or stop procedure before operating the treadmill. 1. Place the treadmill on page 9. Failure to use . 19. Do not operate the treadmill if the power cord or plug is damaged, or if the treadmill is not working properly.) 6. never use an extension cord. 11. It is not working properly. (See MAINTENANCE AND TROUBLESHOOTING on the walking belt. Use the treadmill only as...
English Manual
Page 4
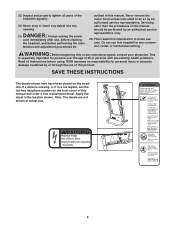
... institutional setting. Apply the decal in -home use of this manual and order a free replacement decal. DANGER: 24. tenance and adjustment procedures de- Note: The decals are not shown at actual size. ¥Hazardous Voltage ¥Risk of this product. Always unplug the power cord immediately after use this or any opening. Do not use , before cleaning the treadmill, and before using. SAVE THESE INSTRUCTIONS The...
... institutional setting. Apply the decal in -home use of this manual and order a free replacement decal. DANGER: 24. tenance and adjustment procedures de- Note: The decals are not shown at actual size. ¥Hazardous Voltage ¥Risk of this product. Always unplug the power cord immediately after use this or any opening. Do not use , before cleaning the treadmill, and before using. SAVE THESE INSTRUCTIONS The...

English Manual
Page 5
... review the drawing below and familiarize yourself with innovative design to the treadmill (see the front cover of this manual for the location). The model number of your benefit, read this manual. Water Bottle Holder (Bottle not included) Console Handrail Storage Latch LEFT SIDE Walking Belt Foot Rail Key/Clip RIGHT SIDE Hood Circuit Breaker Power Cord Wheel Rear Roller Adjustment Bolts Incline Leg 5 And when you're not exercising, the unique G-30 treadmill can be folded...
... review the drawing below and familiarize yourself with innovative design to the treadmill (see the front cover of this manual for the location). The model number of your benefit, read this manual. Water Bottle Holder (Bottle not included) Console Handrail Storage Latch LEFT SIDE Walking Belt Foot Rail Key/Clip RIGHT SIDE Hood Circuit Breaker Power Cord Wheel Rear Roller Adjustment Bolts Incline Leg 5 And when you're not exercising, the unique G-30 treadmill can be folded...
English Manual
Page 6
... the treadmill walking belt is lubricant on top of lubricant may be preassembled. If there is coated with a soft cloth and a mild, non-abrasive cleaner. Assembly requires the included allen wrench and your own phillips screwdriver , adjustable wrenches , and wire cutters . Do not tighten the Handrail Bolts yet. do not use power tools for assembly. 1. Note: To identify small parts used during assembly, see the PART IDENTIFICATION CHART...
... the treadmill walking belt is lubricant on top of lubricant may be preassembled. If there is coated with a soft cloth and a mild, non-abrasive cleaner. Assembly requires the included allen wrench and your own phillips screwdriver , adjustable wrenches , and wire cutters . Do not tighten the Handrail Bolts yet. do not use power tools for assembly. 1. Note: To identify small parts used during assembly, see the PART IDENTIFICATION CHART...

English Manual
Page 7
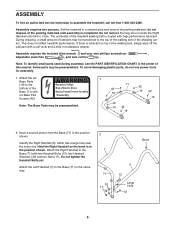
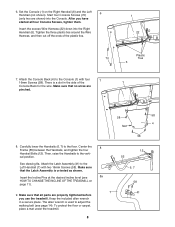
... to the end of the Console Base (1) in the location shown. IF THE CONNECTORS ARE NOT CONNECTED PROPERLY, THE CONSOLE MAY BE DAMAGED WHEN THE POWER IS TURNED ON. 7 6 13 30 10 60 55 Connector 1 22 Plastic 6 Ties 22 Repeat this step on the back of the Wire Harness (22). Hold a Frame... the Wire Harness into place. Next, press the end of the Base (71) with a Frame Bolt (10), a Handrail Washer (30), and a Handrail Star Washer (60). 3. Remove the wire from the upper end of the Right Handrail (see the inset drawing). Next, locate the long wire inside of the lower end of...
... to the end of the Console Base (1) in the location shown. IF THE CONNECTORS ARE NOT CONNECTED PROPERLY, THE CONSOLE MAY BE DAMAGED WHEN THE POWER IS TURNED ON. 7 6 13 30 10 60 55 Connector 1 22 Plastic 6 Ties 22 Repeat this step on the back of the Wire Harness (22). Hold a Frame... the Wire Harness into place. Next, press the end of the Base (71) with a Frame Bolt (10), a Handrail Washer (30), and a Handrail Star Washer (60). 3. Remove the wire from the upper end of the Right Handrail (see the inset drawing). Next, locate the long wire inside of the lower end of...
English Manual
Page 8
After you have started all parts are properly tightened before you use the treadmill. Insert the excess Wire Harness (22) down into the Console. Then, raise the Handrails to adjust the walking belt (see HOW TO CHANGE THE INCLINE OF THE TREADMILL on the Right Handrail (6) and the Left Handrail (not shown). Make sure that all four Console Screws, tighten them. See drawing 8a. To protect the...
After you have started all parts are properly tightened before you use the treadmill. Insert the excess Wire Harness (22) down into the Console. Then, raise the Handrails to adjust the walking belt (see HOW TO CHANGE THE INCLINE OF THE TREADMILL on the Right Handrail (6) and the Left Handrail (not shown). Make sure that all four Console Screws, tighten them. See drawing 8a. To protect the...
English Manual
Page 9
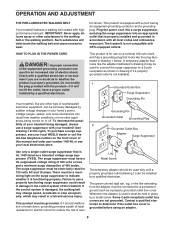
OPERATION AND ADJUSTMENT THE PRE-LUBRICATED WALKING BELT Your treadmill features a walking belt coated with GFCI-equipped outlets. IMPORTANT: Never apply silicone spray or other type of your treadmill being turned on a nominal 120-volt circuit, and has a grounding plug that looks like extending from the adapter must have a proper outlet installed by a metal screw. This product is grounded before using an adapter. 9 Plug the power cord into a surge...
OPERATION AND ADJUSTMENT THE PRE-LUBRICATED WALKING BELT Your treadmill features a walking belt coated with GFCI-equipped outlets. IMPORTANT: Never apply silicone spray or other type of your treadmill being turned on a nominal 120-volt circuit, and has a grounding plug that looks like extending from the adapter must have a proper outlet installed by a metal screw. This product is grounded before using an adapter. 9 Plug the power cord into a surge...
English Manual
Page 10
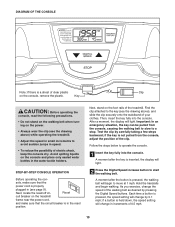
... console, remove the plastic. Next, locate the reset/off cir- Important: In an emergency situation, the key can be pulled from the console, adjust the position of the walking belt as desired by pressing the Digital Speed buttons. if the key is inserted, the display will light. 2 Press the Digital Speed increase button to start the walking belt. As you exercise, change by carefully taking a few steps backward; sole, make sure that the power cord...
... console, remove the plastic. Next, locate the reset/off cir- Important: In an emergency situation, the key can be pulled from the console, adjust the position of the walking belt as desired by pressing the Digital Speed buttons. if the key is inserted, the display will light. 2 Press the Digital Speed increase button to start the walking belt. As you exercise, change by carefully taking a few steps backward; sole, make sure that the power cord...

English Manual
Page 11
... the power cord. Adjust the other incline leg in a 11 cline legs are at the same height and that you are finished exercising, remove the key from the console. To stop the walking belt, press the Stop button. There are fully inserted into the incline legs. Before changing the incline, remove the key and unplug the power cord. CAUTION: Before using the treadmill, make sure that you are most interested in - To reset the display, press the Stop button, remove the key, and...
... the power cord. Adjust the other incline leg in a 11 cline legs are at the same height and that you are finished exercising, remove the key from the console. To stop the walking belt, press the Stop button. There are fully inserted into the incline legs. Before changing the incline, remove the key and unplug the power cord. CAUTION: Before using the treadmill, make sure that you are most interested in - To reset the display, press the Stop button, remove the key, and...
English Manual
Page 12
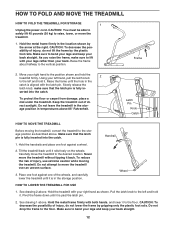
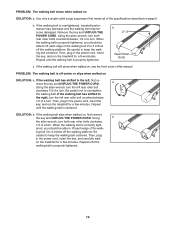
..., do not lower the frame by gripping only the plastic foot rails. As you raise the frame, make sure that the latch pin is past the latch pin. 2. Wheel HOW TO LOWER THE TREADMILL FOR USE 1. serted into the catch. See drawing 2 above 85° Fahrenheit. HOW TO FOLD AND MOVE THE TREADMILL HOW TO FOLD THE TREADMILL FOR STORAGE 1 Unplug the power cord. See drawing...
..., do not lower the frame by gripping only the plastic foot rails. As you raise the frame, make sure that the latch pin is past the latch pin. 2. Wheel HOW TO LOWER THE TREADMILL FOR USE 1. serted into the catch. See drawing 2 above 85° Fahrenheit. HOW TO FOLD AND MOVE THE TREADMILL HOW TO FOLD THE TREADMILL FOR STORAGE 1 Unplug the power cord. See drawing...
English Manual
Page 13
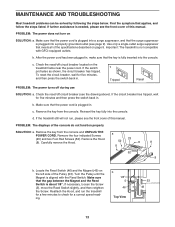
... the reset/off circuit breaker (see the front cover of the specifications described on the left side of this manual. If the circuit breaker has tripped, wait for a correct speed reading. d. PROBLEM: The displays of the console do not function properly SOLUTION: a. Remove the key from the console. Remove the Hood (8). Make sure that applies, and follow the steps listed. If necessary, loosen the Screw (5), move the Reed Switch...
... the reset/off circuit breaker (see the front cover of the specifications described on the left side of this manual. If the circuit breaker has tripped, wait for a correct speed reading. d. PROBLEM: The displays of the console do not function properly SOLUTION: a. Remove the key from the console. Remove the Hood (8). Make sure that applies, and follow the steps listed. If necessary, loosen the Screw (5), move the Reed Switch...
English Manual
Page 14
... properly tightened, you should be able to 3 inches off the walking platform. Then, plug in the power cord, insert the key, and run the treadmill for a few minutes. Repeat until the walking belt is off-center or slips when walked on SOLUTION: a. If the walking belt slips when walked on , see the front cover of the walking belt 2 to lift each edge of this manual. ing belt 3 to the left rear roller bolt...
... properly tightened, you should be able to 3 inches off the walking platform. Then, plug in the power cord, insert the key, and run the treadmill for a few minutes. Repeat until the walking belt is off-center or slips when walked on SOLUTION: a. If the walking belt slips when walked on , see the front cover of the walking belt 2 to lift each edge of this manual. ing belt 3 to the left rear roller bolt...
English Manual
Page 15
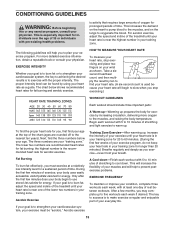
... is to burn fat, adjust the speed and incline of the treadmill until your heart rate is in your training zone for longer than 20 minutes.) Breathe regularly and deeply as you to strengthen your cardiovascular system, your exercise program. The key to success is to burn fat or to exercise with 5 to 10 minutes of the chart (ages are rounded off...
... is to burn fat, adjust the speed and incline of the treadmill until your heart rate is in your training zone for longer than 20 minutes.) Breathe regularly and deeply as you to strengthen your cardiovascular system, your exercise program. The key to success is to burn fat or to exercise with 5 to 10 minutes of the chart (ages are rounded off...
English Manual
Page 16
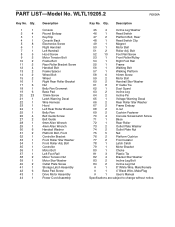
.... Bolt Controller Motor Bolt Left Foot Rail Motor Tension Nut Motor Star Washer Outlet Plate Screw Storage Latch Assembly Base Pad Screw Drive Motor Assembly Power Cord Assembly Key No. Description 45 4 Incline Leg Washer 46 1 Reed Switch 47 2 Platform Bolt, Rear 48 1 Reed Switch Clip 49 1 Magnet 50 1 Motor Belt 51 2 Roller Adj. Qty. Bolt 52 10 Foot Rail Screw 53 1 Front Roller/Pulley 54 1 Right Foot Rail 55 1 Frame 56 1 Walking Belt 57 1 Walking Platform 58 6 16mm Screw 59 2 Motor Bolt 60 2 Handrail Star Washer 61 8 8" Cable Tie...
.... Bolt Controller Motor Bolt Left Foot Rail Motor Tension Nut Motor Star Washer Outlet Plate Screw Storage Latch Assembly Base Pad Screw Drive Motor Assembly Power Cord Assembly Key No. Description 45 4 Incline Leg Washer 46 1 Reed Switch 47 2 Platform Bolt, Rear 48 1 Reed Switch Clip 49 1 Magnet 50 1 Motor Belt 51 2 Roller Adj. Qty. Bolt 52 10 Foot Rail Screw 53 1 Front Roller/Pulley 54 1 Right Foot Rail 55 1 Frame 56 1 Walking Belt 57 1 Walking Platform 58 6 16mm Screw 59 2 Motor Bolt 60 2 Handrail Star Washer 61 8 8" Cable Tie...
English Manual
Page 17
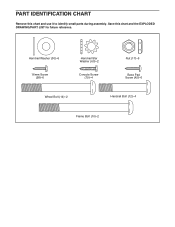
PART IDENTIFICATION CHART Remove this chart and the EXPLODED DRAWING/PART LIST for future reference. Save this chart and use it to identify small parts during assembly. Handrail Washer (30)-6 16mm Screw (58)-6 Handrail Star Washer (60)-2 Console Screw (70)-4 Nut (17)-6 Base Pad Screw (42)-6 Wheel Bolt (14)-2 Handrail Bolt (12)-4 Frame Bolt (10)-2
PART IDENTIFICATION CHART Remove this chart and the EXPLODED DRAWING/PART LIST for future reference. Save this chart and use it to identify small parts during assembly. Handrail Washer (30)-6 16mm Screw (58)-6 Handrail Star Washer (60)-2 Console Screw (70)-4 Nut (17)-6 Base Pad Screw (42)-6 Wheel Bolt (14)-2 Handrail Bolt (12)-4 Frame Bolt (10)-2

English Manual
Page 18
EXPLODED DRAWING-Model No. WLTL19205.2 R0606A 65 20 52 47 11 20 82 24 66 51 67 75 83 45 64 63 52 52 37 69 78 76 ... 62 20 20 5 82 32 8 74 3 1 20 81 2 70 58 58 4 41 22 2 58 70 58 7 23 44 10 30 60 6 13 12 14 2 13 15 60 30 10 8 40 73 8 73 40 30 8 74 19 42 17 20 19 8 18 42 20 17 19 42 71 19 42 12 17 2 22 15...
EXPLODED DRAWING-Model No. WLTL19205.2 R0606A 65 20 52 47 11 20 82 24 66 51 67 75 83 45 64 63 52 52 37 69 78 76 ... 62 20 20 5 82 32 8 74 3 1 20 81 2 70 58 58 4 41 22 2 58 70 58 7 23 44 10 30 60 6 13 12 14 2 13 15 60 30 10 8 40 73 8 73 40 30 8 74 19 42 17 20 19 8 18 42 20 17 19 42 71 19 42 12 17 2 22 15...
English Manual
Page 19
... of the product (WESLO G-30 treadmill) • the SERIAL NUMBER of the product (see the front cover of this manual) • the KEY NUMBER and DESCRIPTION of the desired part(s) (see the front cover of this manual. All repairs for which vary from the service center will be responsible for a minimal trip charge. No other warranties and any implied warranties of merchantability or fitness for a period of...
... of the product (WESLO G-30 treadmill) • the SERIAL NUMBER of the product (see the front cover of this manual) • the KEY NUMBER and DESCRIPTION of the desired part(s) (see the front cover of this manual. All repairs for which vary from the service center will be responsible for a minimal trip charge. No other warranties and any implied warranties of merchantability or fitness for a period of...


