
English Manual
Page 3
... the safety cover unless instructed to do so by persons weighing more than 1 hour. 11. Wear appropriate exercise clothing when using the treadmill; Various factors, Including the user's movement while exercising, may affect the accuracy of heart rate readings. Adjust the speed slowly to avoid... sudden Jumps in speed. 12. Position the treadmill on the treadmill. 7. The treadmill should not be used or where oxygen is intended only as described in this manual. 13. do not operate the...
... the safety cover unless instructed to do so by persons weighing more than 1 hour. 11. Wear appropriate exercise clothing when using the treadmill; Various factors, Including the user's movement while exercising, may affect the accuracy of heart rate readings. Adjust the speed slowly to avoid... sudden Jumps in speed. 12. Position the treadmill on the treadmill. 7. The treadmill should not be used or where oxygen is intended only as described in this manual. 13. do not operate the...
English Manual
Page 4
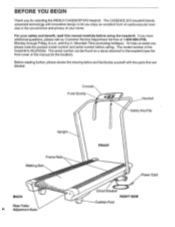
... 6 p.m. Mountain Time (excluding holidays). Before reading further, please review the drawing below and familiarize yourself with innovative design to the treadmill (see the front cover of this manual carefully before calling. Console Pulse Earclip o Handrail Safety Key/Clip Upright Frame Rails Walking Belt 0 ... form of cardiovascular exercise in the convenience and privacy of your safety and benefit, read this manual for selecting the WESLO CADENCES 970 treadmill. The CADENCE 970 treadmill blends advanced technology with the parts that are labeled. The model number of the...
... 6 p.m. Mountain Time (excluding holidays). Before reading further, please review the drawing below and familiarize yourself with innovative design to the treadmill (see the front cover of this manual carefully before calling. Console Pulse Earclip o Handrail Safety Key/Clip Upright Frame Rails Walking Belt 0 ... form of cardiovascular exercise in the convenience and privacy of your safety and benefit, read this manual for selecting the WESLO CADENCES 970 treadmill. The CADENCE 970 treadmill blends advanced technology with the parts that are labeled. The model number of the...
English Manual
Page 5
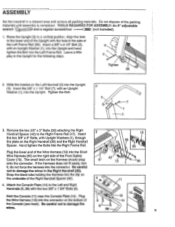
...). 4 11 --> 4. Insert 3 the two 3/8" x 3" Bolts, with an Upright Washer (1), into the Upright and hand tighten the Bolt into the Left Frame Rail. ASSEMBLY Set the treadmill in the Upright for the following steps. 1 3 1 Tighten 56 2. Hold the Console (11) near the Console Plate (14). Insert a 3/8" x 4 1/2' Bolt (2), with Upright Washers (1), through the...
...). 4 11 --> 4. Insert 3 the two 3/8" x 3" Bolts, with an Upright Washer (1), into the Upright and hand tighten the Bolt into the Left Frame Rail. ASSEMBLY Set the treadmill in the Upright for the following steps. 1 3 1 Tighten 56 2. Hold the Console (11) near the Console Plate (14). Insert a 3/8" x 4 1/2' Bolt (2), with Upright Washers (1), through the...

English Manual
Page 6
... (83) into the Wrench Clip. Tighten the Bolts and Screws used in the indicated location. Make sure that all parts are tightened before using the treadmill. . 0 78 84 83 6 5. Press the Wrench Clip onto the Right Endcap (78) in the LED DISPLAY OPERATION section on page 9. 6 Pulse Earclip Clothes Clip 7. Be...
... (83) into the Wrench Clip. Tighten the Bolts and Screws used in the indicated location. Make sure that all parts are tightened before using the treadmill. . 0 78 84 83 6 5. Press the Wrench Clip onto the Right Endcap (78) in the LED DISPLAY OPERATION section on page 9. 6 Pulse Earclip Clothes Clip 7. Be...
English Manual
Page 7
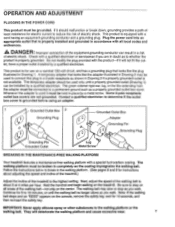
...appropriate outlet that looks like the plug illustrated in Drawing 2 may slow or stop as you walk. This product is for use on the treadmill. Be sure to 10 minutes, or until a properly grounded outlet (Drawing 1) can result in Drawing 2 if a properly grounded outlet is...Grounded Outlet Grounded Outlet Box 0 Adapter Grounding Pin 0 0 LI Grounding Plug Lug Metal Screw BREAKING IN THE MAINTENANCE-FREE WALKING PLATFORM Your treadmill features a maintenance-free walking platform with the product-if it must be used only until the walking belt no longer slows as shown in...
...appropriate outlet that looks like the plug illustrated in Drawing 2 may slow or stop as you walk. This product is for use on the treadmill. Be sure to 10 minutes, or until a properly grounded outlet (Drawing 1) can result in Drawing 2 if a properly grounded outlet is...Grounded Outlet Grounded Outlet Box 0 Adapter Grounding Pin 0 0 LI Grounding Plug Lug Metal Screw BREAKING IN THE MAINTENANCE-FREE WALKING PLATFORM Your treadmill features a maintenance-free walking platform with the product-if it must be used only until the walking belt no longer slows as shown in...
English Manual
Page 8
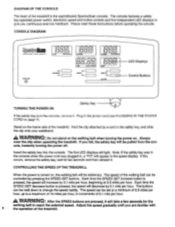
...the walking belt will be pulled from the console, instantly turning the power off. CONTROLLING THE SPEED OF THE TREADMILL When the power is turned on the frame rails of the treadmill. Please read these instructions before operating the console. Plug in the console, remove it . Insert the safety ...not stand on the walking belt when turning the power on page 7). Always wear the clip when operating the treadmill. The five LED displays will appear in increments of the treadmill is pressed, the speed will increase by a cord to change the speed rapidly. If this occurs, remove ...
...the walking belt will be pulled from the console, instantly turning the power off. CONTROLLING THE SPEED OF THE TREADMILL When the power is turned on the frame rails of the treadmill. Please read these instructions before operating the console. Plug in the console, remove it . Insert the safety ...not stand on the walking belt when turning the power on page 7). Always wear the clip when operating the treadmill. The five LED displays will appear in increments of the treadmill is pressed, the speed will increase by a cord to change the speed rapidly. If this occurs, remove ...

English Manual
Page 9
... shown in the pulse display. The walking belt can be stopped quickly, if desired, by pressing the SPEED SET buttons. CHANGING THE INCLINE OF THE TREADMILL To vary the intensity of your exercise, the incline of 99 minutes. Press the SPEED SET increase button until the walking belt begins to your... To turn the power off, remove the safety key from the console. Attach the earclip to move at a minimum of 1.5%, up to a maximum of the treadmill can be changed by 1 minute. It may be set the length of time shown will show the total time that you exercise, the time will...
... shown in the pulse display. The walking belt can be stopped quickly, if desired, by pressing the SPEED SET buttons. CHANGING THE INCLINE OF THE TREADMILL To vary the intensity of your exercise, the incline of 99 minutes. Press the SPEED SET increase button until the walking belt begins to your... To turn the power off, remove the safety key from the console. Attach the earclip to move at a minimum of 1.5%, up to a maximum of the treadmill can be changed by 1 minute. It may be set the length of time shown will show the total time that you exercise, the time will...

English Manual
Page 10
...Department. Check the circuit breaker located on the console should light. (See OPERATION AND ADJUSTMENT in this manual.) c. Various indicators on the treadmill near the power cord. The pulse earclip may affect the accuracy of five feet or less in . Various factors, Including the user's ...the display. b. Make sure that the safety key is plugged in length. Reinsert the safety key fully into the console. Rub your treadmill and follow the steps listed. Attach the clothes clip to your left ear lobe and reposition the earclip. Stand still while measuring your ...
...Department. Check the circuit breaker located on the console should light. (See OPERATION AND ADJUSTMENT in this manual.) c. Various indicators on the treadmill near the power cord. The pulse earclip may affect the accuracy of five feet or less in . Various factors, Including the user's ...the display. b. Make sure that the safety key is plugged in length. Reinsert the safety key fully into the console. Rub your treadmill and follow the steps listed. Attach the clothes clip to your left ear lobe and reposition the earclip. Stand still while measuring your ...
English Manual
Page 11
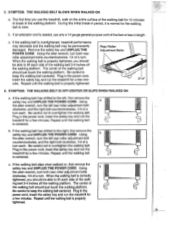
... clockwise, 1/4 of the walking belt should just touch the walking platform. Plug in the power cord, insert the safety key and run the treadmill for a few minutes. 5. Using the allen wrench, turn both rear roller adjustment bolts counterclockwise, 1/4 of the walking belt should just touch ...walking belt may be able to break in length. During this initial break-in the power cord, insert the safety key and run the treadmill for 10 minutes to lift each . Using the allen wrench, turn the left rear roller adjustment bolt counterclockwise, and the right bolt clockwise...
... clockwise, 1/4 of the walking belt should just touch the walking platform. Plug in the power cord, insert the safety key and run the treadmill for a few minutes. 5. Using the allen wrench, turn both rear roller adjustment bolts counterclockwise, 1/4 of the walking belt should just touch ...walking belt may be able to break in length. During this initial break-in the power cord, insert the safety key and run the treadmill for 10 minutes to lift each . Using the allen wrench, turn the left rear roller adjustment bolt counterclockwise, and the right bolt clockwise...
English Manual
Page 16
... APPLY TO YOU. SOME STATES DO NOT ALLOW LIMITATIONS ON HOW LONG AN IMPLIED WARRANTY LASTS. The MODEL NUMBER of the product (WESLO CADENCES 970 treadmill). 3. The NAME of the product (WL970034). 2. ACCORDINGLY, THE ABOVE LIMITATION MAY NOT APPLY TO YOU. The KEY NUMBER of ..., COSTS OF REMOVAL, INSTALLATION OR OTHER CONSEQUENTIAL DAMAGES OF WHATSOEVER NATURE. This \ arranty extends only to give the following information: 1. WESLO's obligation under normal use and service conditions, for which vary from the date of purchase. Printed in workmanship and material, under this ...
... APPLY TO YOU. SOME STATES DO NOT ALLOW LIMITATIONS ON HOW LONG AN IMPLIED WARRANTY LASTS. The MODEL NUMBER of the product (WESLO CADENCES 970 treadmill). 3. The NAME of the product (WL970034). 2. ACCORDINGLY, THE ABOVE LIMITATION MAY NOT APPLY TO YOU. The KEY NUMBER of ..., COSTS OF REMOVAL, INSTALLATION OR OTHER CONSEQUENTIAL DAMAGES OF WHATSOEVER NATURE. This \ arranty extends only to give the following information: 1. WESLO's obligation under normal use and service conditions, for which vary from the date of purchase. Printed in workmanship and material, under this ...


