

English Manual
Page 1
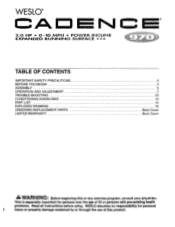
... CALL DIRECT TO OUR TOLL-FREE CUSTOMER HOT LINE. The trained technicians on our Customer Hot Line will guarantee you . Save this equipment. WESLO® CA 2.0 HP • 0-10 MPH • POWER INCLINE EXPANDED RUNNING SURFACE ••• Model No. MST ACAUTION: Read all safety precautions and instructions in this manual carefully before using this manual for future reference. o o OWNER'S MANUAL If...
... CALL DIRECT TO OUR TOLL-FREE CUSTOMER HOT LINE. The trained technicians on our Customer Hot Line will guarantee you . Save this equipment. WESLO® CA 2.0 HP • 0-10 MPH • POWER INCLINE EXPANDED RUNNING SURFACE ••• Model No. MST ACAUTION: Read all safety precautions and instructions in this manual carefully before using this manual for future reference. o o OWNER'S MANUAL If...
English Manual
Page 2
...-existing health problems. Read all instructions before using. WESLO' A, 2.0 HP • 0-10 MPH • POWER INCLINE EXPANDED RUNNING SURFACE • 4" . WESLO assumes no responsibility for persons over the age of this or any exercise program, consult your physician. o•orrosc•wr;:5,4l.v- TABLE OF CONTENTS IMPORTANT SAFETY PRECAUTIONS BEFORE YOU BEGIN ASSEMBLY OPERATION AND ADJUSTMENT TROUBLE-SHOOTING CONDITIONING GUIDELINES PART LIST EXPLODED DRAWING ORDERING REPLACEMENT PARTS LIMITED WARRANTY...
...-existing health problems. Read all instructions before using. WESLO' A, 2.0 HP • 0-10 MPH • POWER INCLINE EXPANDED RUNNING SURFACE • 4" . WESLO assumes no responsibility for persons over the age of this or any exercise program, consult your physician. o•orrosc•wr;:5,4l.v- TABLE OF CONTENTS IMPORTANT SAFETY PRECAUTIONS BEFORE YOU BEGIN ASSEMBLY OPERATION AND ADJUSTMENT TROUBLE-SHOOTING CONDITIONING GUIDELINES PART LIST EXPLODED DRAWING ORDERING REPLACEMENT PARTS LIMITED WARRANTY...
English Manual
Page 3
... treadmill is not In use the treadmill with at least 8 feet of clearance behind the treadmill. Never remove the safety cover unless instructed to do not wear loose clothing that blocks an air opening . 10. When connecting the power cord (see OPERATION AND ADJUSTMENT In this manual), plug the power cord directly into a grounded circuit capable of five feet or less In length with a three-wire conductor. 3. Athletic support...
... treadmill is not In use the treadmill with at least 8 feet of clearance behind the treadmill. Never remove the safety cover unless instructed to do not wear loose clothing that blocks an air opening . 10. When connecting the power cord (see OPERATION AND ADJUSTMENT In this manual), plug the power cord directly into a grounded circuit capable of five feet or less In length with a three-wire conductor. 3. Athletic support...
English Manual
Page 4
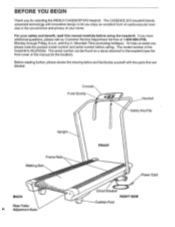
... the WESLO CADENCES 970 treadmill. Before reading further, please review the drawing below and familiarize yourself with innovative design to the treadmill (see the front cover of this manual carefully before calling. The CADENCE 970 treadmill blends advanced technology with the parts that are labeled. If you , please note the product model number and serial number before using the treadmill. Console Pulse Earclip o Handrail Safety Key/Clip Upright Frame Rails Walking Belt 0 0 BACK Rear Roller 4 Adjustment Bolts FRONT Power Cord...
... the WESLO CADENCES 970 treadmill. Before reading further, please review the drawing below and familiarize yourself with innovative design to the treadmill (see the front cover of this manual carefully before calling. The CADENCE 970 treadmill blends advanced technology with the parts that are labeled. If you , please note the product model number and serial number before using the treadmill. Console Pulse Earclip o Handrail Safety Key/Clip Upright Frame Rails Walking Belt 0 0 BACK Rear Roller 4 Adjustment Bolts FRONT Power Cord...
English Manual
Page 5
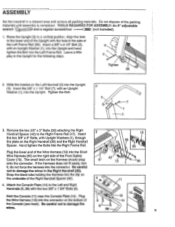
... Wire Harness (13) into the Upright 2 (3). Align the hole in the lower end of the Upright with the hole in the side of the packing materials until assembly is completed. The small latch on the bottom of the Front Safety Cover (73). Hold the Console (11) near the Console Plate (14). do not force the harness into the Upright. ASSEMBLY Set the treadmill...
... Wire Harness (13) into the Upright 2 (3). Align the hole in the lower end of the Upright with the hole in the side of the packing materials until assembly is completed. The small latch on the bottom of the Front Safety Cover (73). Hold the Console (11) near the Console Plate (14). do not force the harness into the Upright. ASSEMBLY Set the treadmill...

English Manual
Page 6
... onto the Pulse Earclip in the 7 indicated location. Be careful not to the Console Plate (14) with the four Console Screws (12). Remove the paper backing from the Wrench Clip (84). Make sure that all parts are tightened before using the treadmill. . 0 78 84 83 6 Press the Allen Wrench (83) into the Wrench Clip. 5. Attach the Console (11) to damage the wires in the...
... onto the Pulse Earclip in the 7 indicated location. Be careful not to the Console Plate (14) with the four Console Screws (12). Remove the paper backing from the Wrench Clip (84). Make sure that all parts are tightened before using the treadmill. . 0 78 84 83 6 Press the Allen Wrench (83) into the Wrench Clip. 5. Attach the Console (11) to damage the wires in the...
English Manual
Page 7
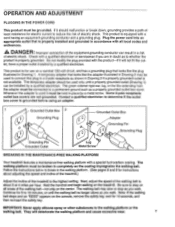
... begin walking on all local codes and ordinances. Note: If the walking belt stops and an TEEE" appears on the center. The walking belt may be connected to reduce the risk of electric shock. IMPORTANT: Never apply silicone spray or other substances to about adjusting the speed and incline of the treadmill.) Adjust the incline of the walking belt-not only on the console, remove the safety key, wait...
... begin walking on all local codes and ordinances. Note: If the walking belt stops and an TEEE" appears on the center. The walking belt may be connected to reduce the risk of electric shock. IMPORTANT: Never apply silicone spray or other substances to about adjusting the speed and incline of the treadmill.) Adjust the incline of the walking belt-not only on the console, remove the safety key, wait...
English Manual
Page 8
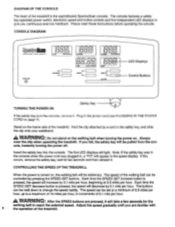
... console features a safety key-operated power switch, electronic speed and incline controls and five independent LED displays to reach the selected speed. Plug in the speed display. If you continuous exercise feedback. Insert the safety key into the console. If this occurs, remove the safety key, wait for the walking belt to give you fall, the safety key will decrease by pressing the SPEED SET buttons. Please read these instructions before operating the console. Stand on . CONSOLE DIAGRAM...
... console features a safety key-operated power switch, electronic speed and incline controls and five independent LED displays to reach the selected speed. Plug in the speed display. If you continuous exercise feedback. Insert the safety key into the console. If this occurs, remove the safety key, wait for the walking belt to give you fall, the safety key will decrease by pressing the SPEED SET buttons. Please read these instructions before operating the console. Stand on . CONSOLE DIAGRAM...

English Manual
Page 9
...%. DISTANCE DISPLAY The distance display will be changed by pressing the SPEED SET buttons. Press the TIME SET buttons to set . Each time one of the buttons is pressed, the length of time shown will slow to stand still while measuring your pulse will show the total distance you have walked or run for the treadmill to a stop the walking belt, hold down the SPEED decrease button. TURNING THE POWER OFF To turn the power off, remove the safety key...
...%. DISTANCE DISPLAY The distance display will be changed by pressing the SPEED SET buttons. Press the TIME SET buttons to set . Each time one of the buttons is pressed, the length of time shown will slow to stand still while measuring your pulse will show the total distance you have walked or run for the treadmill to a stop the walking belt, hold down the SPEED decrease button. TURNING THE POWER OFF To turn the power off, remove the safety key...

English Manual
Page 10
... been plugged in this manual.) If an extension cord is fully inserted into the console. Remove the safety key from the console. Ak WARNING: The pulse earclip Is not a medical device. Wipe the two clear circles using a cotton swab saturated with denatured alcohol. If the switch protrudes as an exercise aid In determining heart rate trends In general. 4. c. SYMPTOM: THE POWER TURNS OFF DURING USE Tripped Reset a. Attach...
... been plugged in this manual.) If an extension cord is fully inserted into the console. Remove the safety key from the console. Ak WARNING: The pulse earclip Is not a medical device. Wipe the two clear circles using a cotton swab saturated with denatured alcohol. If the switch protrudes as an exercise aid In determining heart rate trends In general. 4. c. SYMPTOM: THE POWER TURNS OFF DURING USE Tripped Reset a. Attach...
English Manual
Page 11
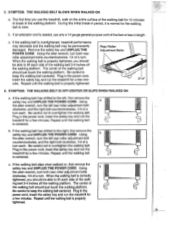
.... b. Using the allen wrench, turn . c. If an extension cord is needed, use the treadmill, walk on , first remove the safety key and UNPLUG THE POWER CORD. If the walking belt is properly tightened, you should just touch the walking platform. When the walking belt is overtightened, treadmill performance may decrease and the walking belt may be able to overtighten the walking belt. Plug in the power cord, insert the safety key and run the treadmill for the walking belt...
.... b. Using the allen wrench, turn . c. If an extension cord is needed, use the treadmill, walk on , first remove the safety key and UNPLUG THE POWER CORD. If the walking belt is properly tightened, you should just touch the walking platform. When the walking belt is overtightened, treadmill performance may decrease and the walking belt may be able to overtighten the walking belt. Plug in the power cord, insert the safety key and run the treadmill for the walking belt...
English Manual
Page 12
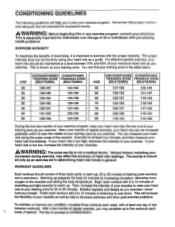
... a guide. You can measure your heart rate using your training zone as you exercise. The earcllp is important to exercise with 5 to 10 minutes of stretching and light exercise to warm up to five workouts each ...training zone. AWARNING: Before beginning this or any exercise program, consult your heart rate Immediately. This is near the low end of three basic parts: a warm-up prepares the body for exercise by using the pulse mode of the console. For effective aerobic exercise, your heart rate should consist of your heart rate as an exercise aid in determining heart rate...
... a guide. You can measure your heart rate using your training zone as you exercise. The earcllp is important to exercise with 5 to 10 minutes of stretching and light exercise to warm up to five workouts each ...training zone. AWARNING: Before beginning this or any exercise program, consult your heart rate Immediately. This is near the low end of three basic parts: a warm-up prepares the body for exercise by using the pulse mode of the console. For effective aerobic exercise, your heart rate should consist of your heart rate as an exercise aid in determining heart rate...
English Manual
Page 13
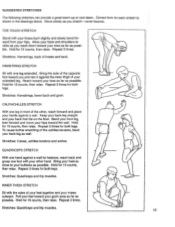
...times for each stretch is shown in front of knees and back. Keep your back leg straight and your buttocks as possible. Stretches: Quadriceps and hip muscles. 13 Stretches: Hamstrings, lower back and groin. INNER THIGH STRETCH Sit with your knees bent slightly and slowly bend... and move your hips toward your hips. Hold for 15 counts, then relax. Stretches: Quadriceps and hip muscles. Repeat 3 times for 15 counts, then relax. Pull your knees outward. Correct form for both legs. Stretches: Hamstrings, back of the other hand. Hold for both legs. To...
...times for each stretch is shown in front of knees and back. Keep your back leg straight and your buttocks as possible. Stretches: Quadriceps and hip muscles. 13 Stretches: Hamstrings, lower back and groin. INNER THIGH STRETCH Sit with your knees bent slightly and slowly bend... and move your hips toward your hips. Hold for 15 counts, then relax. Stretches: Quadriceps and hip muscles. Repeat 3 times for 15 counts, then relax. Pull your knees outward. Correct form for both legs. Stretches: Hamstrings, back of the other hand. Hold for both legs. To...
English Manual
Page 14
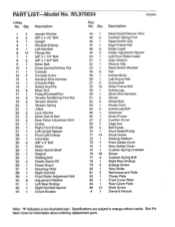
... Adjustment Spacer Left Front Roller Insert Allen Wrench Wrench Clip Reed Switch Bracket Nut Incline Motor Left Frame Rail Incline Bolt Motor Frame Bolt Incline Leg Short Wire Harness Wheel Wheel Bolt Power Cord Incline Leg Bolt Grommet Motor Frame Cushion Cover Cage Nut Belt Guide Front Roller/Pulley Small Screw Walking Platform Front Safety Cover Rear Safety Cover Cushion Spring Crossbar Screw Cushion Spring Bolt Right Rear Endcap Endcap Screw Rear Roller Reinforcement Plate Choke Plate Front Cover Plate Rear Cover Plate Deck Screw Owner's Manual Note: "#" indicates a non-illustrated part...
... Adjustment Spacer Left Front Roller Insert Allen Wrench Wrench Clip Reed Switch Bracket Nut Incline Motor Left Frame Rail Incline Bolt Motor Frame Bolt Incline Leg Short Wire Harness Wheel Wheel Bolt Power Cord Incline Leg Bolt Grommet Motor Frame Cushion Cover Cage Nut Belt Guide Front Roller/Pulley Small Screw Walking Platform Front Safety Cover Rear Safety Cover Cushion Spring Crossbar Screw Cushion Spring Bolt Right Rear Endcap Endcap Screw Rear Roller Reinforcement Plate Choke Plate Front Cover Plate Rear Cover Plate Deck Screw Owner's Manual Note: "#" indicates a non-illustrated part...
English Manual
Page 16
ORDERING REPLACEMENT PARTS To order replacement parts, call our Customer Service Department toll-free at one of this manual. The NAME of this product to replacing or repairing, at WESLO's option, the product at one of its authorized service c nters. The KEY NUMBER of the part(s) from page 14 of the product (WESLO CADENCES 970 treadmill). 3. SOME STATES DO NOT ALLOW LIMITATIONS ON HOW LONG AN IMPLIED WARRANTY LASTS. WESLO INC., 1500...
ORDERING REPLACEMENT PARTS To order replacement parts, call our Customer Service Department toll-free at one of this manual. The NAME of this product to replacing or repairing, at WESLO's option, the product at one of its authorized service c nters. The KEY NUMBER of the part(s) from page 14 of the product (WESLO CADENCES 970 treadmill). 3. SOME STATES DO NOT ALLOW LIMITATIONS ON HOW LONG AN IMPLIED WARRANTY LASTS. WESLO INC., 1500...


