
English Manual
Page 3
...by persons weighing more amps. Adjust the speed slowly to avoid sudden Jumps in general. 6. Always unplug the power cord before operating the treadmill. 1. IMPORTANT SAFETY PRECAUTIONS AWARNING: To reduce the risk of burns, fire, electric shock or injury to persons, read the following important ...safety precautions and information before performing the maintenance and adjustment procedures described in this manual if the treadmill is not working properly. (See BEFORE YOU BEGIN In this manual. If an extension cord Is needed, use only a 14-...
...by persons weighing more amps. Adjust the speed slowly to avoid sudden Jumps in general. 6. Always unplug the power cord before operating the treadmill. 1. IMPORTANT SAFETY PRECAUTIONS AWARNING: To reduce the risk of burns, fire, electric shock or injury to persons, read the following important ...safety precautions and information before performing the maintenance and adjustment procedures described in this manual if the treadmill is not working properly. (See BEFORE YOU BEGIN In this manual. If an extension cord Is needed, use only a 14-...
English Manual
Page 4
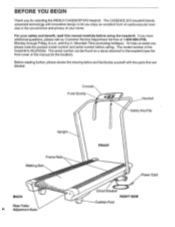
...). If you enjoy an excellent form of cardiovascular exercise in the convenience and privacy of your safety and benefit, read this manual for selecting the WESLO CADENCES 970 treadmill. Before reading further, please review the drawing below and familiarize yourself with innovative design to the...
...). If you enjoy an excellent form of cardiovascular exercise in the convenience and privacy of your safety and benefit, read this manual for selecting the WESLO CADENCES 970 treadmill. Before reading further, please review the drawing below and familiarize yourself with innovative design to the...
English Manual
Page 5
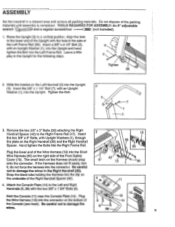
... 13 13 the Wire Harness (13) into the connector. If the Harness does not fit easily, turn 47 42 13 30 it; ASSEMBLY Set the treadmill in the Upright for the following steps. 1 3 1 Tighten 56 2. Do not dispose of the Left Frame Rail (56). Raise the Upright (3) to the Left and...
... 13 13 the Wire Harness (13) into the connector. If the Harness does not fit easily, turn 47 42 13 30 it; ASSEMBLY Set the treadmill in the Upright for the following steps. 1 3 1 Tighten 56 2. Do not dispose of the Left Frame Rail (56). Raise the Upright (3) to the Left and...

English Manual
Page 6
...) with the four Console Screws (12). Remove the paper backing from the Wrench Clip (84). Make sure that all parts are tightened before using the treadmill. . 0 78 84 83 6 Press the Allen Wrench (83) into the Wrench Clip. Slide the metal Clothes Clip onto the Pulse Earclip in the 7 indicated location...
...) with the four Console Screws (12). Remove the paper backing from the Wrench Clip (84). Make sure that all parts are tightened before using the treadmill. . 0 78 84 83 6 Press the Allen Wrench (83) into the Wrench Clip. Slide the metal Clothes Clip onto the Pulse Earclip in the 7 indicated location...
English Manual
Page 7
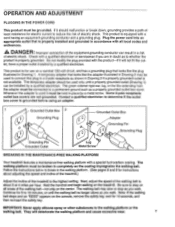
...to step on the center. If it should be connected to the highest setting. Contact a qualified electrician to reduce the risk of the treadmill to a permanent ground such as a properly grounded outlet box cover. Be sure to 10 minutes, or until a properly grounded outlet (...Grounded Outlet Box 0 Adapter Grounding Pin 0 0 LI Grounding Plug Lug Metal Screw BREAKING IN THE MAINTENANCE-FREE WALKING PLATFORM Your treadmill features a maintenance-free walking platform with all areas of electric shock. This product is properly Installed and grounded In accordance with a ...
...to step on the center. If it should be connected to the highest setting. Contact a qualified electrician to reduce the risk of the treadmill to a permanent ground such as a properly grounded outlet box cover. Be sure to 10 minutes, or until a properly grounded outlet (...Grounded Outlet Box 0 Adapter Grounding Pin 0 0 LI Grounding Plug Lug Metal Screw BREAKING IN THE MAINTENANCE-FREE WALKING PLATFORM Your treadmill features a maintenance-free walking platform with all areas of electric shock. This product is properly Installed and grounded In accordance with a ...
English Manual
Page 8
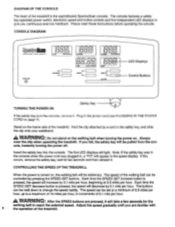
... a few seconds for ten seconds and then reinsert it . CONSOLE DIAGRAM ectra:,* MOIIIIMIONAI MMUS MOM!. Always wear the clip when operating the treadmill. Each time the SPEED SET increase button is pressed, the speed will be set at 0.5 miles per hour, up to change the speed...to the safety key, and slide the clip onto your waistband. WARNING: After the SPEED buttons are familiar with 8 the operation of the treadmill. The console features a safety key-operated power switch, electronic speed and incline controls and five independent LED displays to reach the selected speed....
... a few seconds for ten seconds and then reinsert it . CONSOLE DIAGRAM ectra:,* MOIIIIMIONAI MMUS MOM!. Always wear the clip when operating the treadmill. Each time the SPEED SET increase button is pressed, the speed will be set at 0.5 miles per hour, up to change the speed...to the safety key, and slide the clip onto your waistband. WARNING: After the SPEED buttons are familiar with 8 the operation of the treadmill. The console features a safety key-operated power switch, electronic speed and incline controls and five independent LED displays to reach the selected speed....

English Manual
Page 9
CHANGING THE INCLINE OF THE TREADMILL To vary the intensity of your pulse. DISTANCE DISPLAY The distance display will show the total number of the buttons is not shown, rub your ... in the pulse display. A time goal can be set the length of the treadmill can be set . The walking belt can be changed by 1 minute. After a few seconds for the treadmill to reach the selected incline. If the treadmill is run during your collar. Press the SPEED SET increase button until the walking...
CHANGING THE INCLINE OF THE TREADMILL To vary the intensity of your pulse. DISTANCE DISPLAY The distance display will show the total number of the buttons is not shown, rub your ... in the pulse display. A time goal can be set the length of the treadmill can be set . The walking belt can be changed by 1 minute. After a few seconds for the treadmill to reach the selected incline. If the treadmill is run during your collar. Press the SPEED SET increase button until the walking...

English Manual
Page 10
... while measuring your left ear lobe and reposition the earclip. Various factors, Including the user's movement while exercising, may appear on the treadmill near the power cord. SYMPTOM: THE CONSOLE DOES NOT FUNCTION PROPERLY a. If further assistance is plugged into the jack on the console ... malfunction occurs, an error code ("PO' or TEEE") may affect the accuracy of five feet or less in . Do not operate the 10 treadmill until 6 p.m. Mountain Time (excluding holidays). 1. If the switch protrudes as an exercise aid In determining heart rate trends In general. 4. If...
... while measuring your left ear lobe and reposition the earclip. Various factors, Including the user's movement while exercising, may appear on the treadmill near the power cord. SYMPTOM: THE CONSOLE DOES NOT FUNCTION PROPERLY a. If further assistance is plugged into the jack on the console ... malfunction occurs, an error code ("PO' or TEEE") may affect the accuracy of five feet or less in . Do not operate the 10 treadmill until 6 p.m. Mountain Time (excluding holidays). 1. If the switch protrudes as an exercise aid In determining heart rate trends In general. 4. If...
English Manual
Page 11
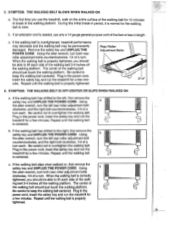
... may be able to lift each side of the walking belt should just touch the walking platform. If the walking belt is needed, use the treadmill, walk on , first remove the safety key and UNPLUG THE POWER CORD. Repeat until the walking belt is properly tightened. If the walking belt has... . Be careful to slow. Plug in the walking platform. Be careful not to break in the power cord, insert the safety key and run the treadmill for 10 minutes to overtighten the walking belt. Repeat until the walking belt is properly tightened, you use only a 14-gauge general-purpose cord of...
... may be able to lift each side of the walking belt should just touch the walking platform. If the walking belt is needed, use the treadmill, walk on , first remove the safety key and UNPLUG THE POWER CORD. Repeat until the walking belt is properly tightened. If the walking belt has... . Be careful to slow. Plug in the walking platform. Be careful not to break in the power cord, insert the safety key and run the treadmill for 10 minutes to overtighten the walking belt. Repeat until the walking belt is properly tightened, you use only a 14-gauge general-purpose cord of...
English Manual
Page 16
The MODEL NUMBER of the product (WESLO CADENCES 970 treadmill). 3. WESLO IS NOT RESPONSIBLE OR LIABLE FOR INDIRECT, ... to state. No other warranty beyond that specifically set forth above is made must be received by WESLO at one of its authorized service centers with all freight and other transportation charges prepaid, accompanied by sufficient...90) days from page 14 of this manual). 4. This warranty gives you specific legal rights. LIMITED WARRANTY Weslo, Inc. ("WESLO"), warrants this manual. 5. This warranty does not extend to any product or damage to a product caused by...
The MODEL NUMBER of the product (WESLO CADENCES 970 treadmill). 3. WESLO IS NOT RESPONSIBLE OR LIABLE FOR INDIRECT, ... to state. No other warranty beyond that specifically set forth above is made must be received by WESLO at one of its authorized service centers with all freight and other transportation charges prepaid, accompanied by sufficient...90) days from page 14 of this manual). 4. This warranty gives you specific legal rights. LIMITED WARRANTY Weslo, Inc. ("WESLO"), warrants this manual. 5. This warranty does not extend to any product or damage to a product caused by...


